CentOS 7 corosync高可用集羣的實現
===============================================================================
概述:
===============================================================================
crm命令詳解
★configure命令:
☉定義資源屬性相關的命令
property 全局屬性
rsc_defaults 資源的默認元數據屬性
op_defaults 操作的默認屬性
☉資源相關的命令
primitive 定義一個資源
monitor 資源監控
group 定義組資源
clone
ms/master (master-slave)
☉有三種類型的約束:
location 位置約束
colocation 排列約束
order 順序約束
☉設置集羣的全局屬性:property
☉定義一個primitive資源的方法:
primitive <rsc> {[<class>:[<provider>:]]<type>} [params attr_list] [op op_type [<attribute>=<value>...] ...]
op_type :: start | stop | monitor
start和stop需指明超時時間,monitor需指明時間間隔
☉定義一個組資源的方法:
group <name> <rsc> [<rsc>...]
<rsc>:資源的ID,字符串;
[<class>:[<provider>:]]<type>
☉定義資源監控:
方法一:
monitor <rsc>[:<role>] <interval>[:<timeout>]
方法二:
primitive <rsc> {[<class>:[<provider>:]]<type>} [params attr_list] [op monitor interval=# timeout=#]
★ra:資源代理
☉Commands:
☉常用命令:
classes:類別列表
list CLASSES [PROVIDER]:列出指定類型(及提供者)之下的所有可用RA;
info [<class>:[<provider>]:]]<type>:顯示指定的RA的詳細文檔;
★node 節點管理常用命令
standby:Put node into standby 設置節點爲待機狀態
online:Set node online 設置節點爲在線
delete:Delete node
★resourse 資源管理常用命令
cleanup :Cleanup resource status 清除資源狀況
migrate :Migrate a resource to another node 把資源遷往另一個節點
start :Start a resource
status :Show status of resources
stop :Stop a resource
★資源約束關係的定義:
===============================================================================
實驗:CentOS 7高可用Web集羣服務
===============================================================================
實驗環境描述:
兩臺CentOS 7.2 X86_64 的虛擬主機,模擬兩節點集羣;
ip部署:node1:10.1.252.153 ;node2:10.1.252.161 ;資源ip:10.1.252.73
安裝前配置
1)主機名解析(/etc/hosts),解析的結果必須要和本地使用的主機名保持一致
2)時間同步:
corosync安裝配置過程如下:
1.各節點安裝相關的程序包,corosync/pacemaker
# 只需安裝pacemaker即可,因爲會把依賴的corosync程序包一併安裝上
[root@node1 ~]# yum install pacemaker -y

Dependencies Resolved # 以來的程序包如下:

=======================================================================================================================================================================
 Package                                           Arch                              Version                                    Repository                        Size
=======================================================================================================================================================================
Installing:
 pacemaker                                         x86_64                            1.1.13-10.el7                              CDROM                            462 k
Installing for dependencies:
 corosync                                          x86_64                            2.3.4-7.el7                                CDROM                            210 k
 corosynclib                                       x86_64                            2.3.4-7.el7                                CDROM                            124 k
 libqb                                             x86_64                            0.17.1-2.el7                               CDROM                             91 k
 pacemaker-cli                                     x86_64                            1.1.13-10.el7                              CDROM                            253 k
 pacemaker-cluster-libs                            x86_64                            1.1.13-10.el7                              CDROM                             92 k
 pacemaker-libs                                    x86_64                            1.1.13-10.el7                              CDROM                            519 k
 resource-agents                                   x86_64                            3.9.5-54.el7                               CDROM                            339 k

Transaction Summary
=======================================================================================================================================================================
Install  1 Package (+7 Dependent packages)
2.編輯corosync配置文件/etc/corosync/corosync.conf
[root@node1 ~]# cd /etc/corosync
[root@node1 corosync]# ls
corosync.conf.example  corosync.conf.example.udpu  corosync.xml.example  uidgid.d
[root@node1 corosync]# cp corosync.conf.example corosync.conf  # 把配置文件示例複製一下

totem {
      version: 2
      crypto_cipher: aes256
      crypto_hash: sha1
      interface {              # 如果有多塊網卡可以配置多個interface
	  ringnumber: 0              #第一個必須爲0
	  bindnetaddr: 10.1.252.153      #綁定的ip地址
	  mcastaddr: 239.255.100.1   #多播地址,必要使用默認的249
	  mcastport: 5405            #默認值即可
	  ttl: 1                     #必須爲1
      }
}

logging {
      fileline: off
      to_stderr: no                            #要不要發給錯誤輸出
      to_logfile: yes                          #要不要發給日誌文件
      logfile: /var/log/cluster/corosync.log   #指明日誌文件
      to_syslog: no
      debug: off                               #是否記錄debug級別的信息,通常在調試的時候啓用
      timestamp: on                            #是否開啓時間戳
      logger_subsys {
	   subsys: QUORUM                      #要不要記錄子系統quorum的日誌信息
	   debug: off
      }
}

quorum {
      provider: corosync_votequorum            #指明使用哪一種算法來完成投票選舉
}

nodelist {                                     #節點列表
      node {
	 ring0_addr: node1.taotao.com
	 nodeid: 1
      }
      node {
	 ring0_addr: node2.taotao.com
	 nodeid: 2
      }
}
3.生成生成authkey:
[root@node1 corosync]# corosync-keygen
Corosync Cluster Engine Authentication key generator.
Gathering 1024 bits for key from /dev/random.
Press keys on your keyboard to generate entropy.
Press keys on your keyboard to generate entropy (bits = 888).
Press keys on your keyboard to generate entropy (bits = 936).
Press keys on your keyboard to generate entropy (bits = 984).
Writing corosync key to /etc/corosync/authkey.

[root@node1 corosync]# ll
total 20
-r-------- 1 root root  128 Dec  7 16:07 authkey
-rw-r--r-- 1 root root 2881 Dec  7 15:30 corosync.conf
-rw-r--r-- 1 root root 2881 Nov 21  2015 corosync.conf.example
-rw-r--r-- 1 root root  767 Nov 21  2015 corosync.conf.example.udpu
-rw-r--r-- 1 root root 3278 Nov 21  2015 corosync.xml.example
drwxr-xr-x 2 root root    6 Nov 21  2015 uidgid.d
4.將node1的配置文件和認證authkey文件遠程複製給節點node2主機一份:
[root@node1 corosync]# scp -p corosync.conf authkey node2:/etc/corosync/
corosync.conf                               100% 3031     3.0KB/s   00:00
authkey                                     100%  128     0.1KB/s   00:00

# 在node2節點上驗證文件
[root@node2 ~]# cd /etc/corosync/
[root@node2 corosync]# ll
total 20
-r-------- 1 root root  128 Dec  7 16:07 authkey
-rw-r--r-- 1 root root 3031 Dec  7 16:41 corosync.conf
-rw-r--r-- 1 root root 2881 Nov 21  2015 corosync.conf.example
-rw-r--r-- 1 root root  767 Nov 21  2015 corosync.conf.example.udpu
-rw-r--r-- 1 root root 3278 Nov 21  2015 corosync.xml.example
drwxr-xr-x 2 root root    6 Nov 21  2015 uidgid.d
5.啓動node1和node2兩節點的corosync服務,查看監聽的端口
[root@node1 corosync]# systemctl start corosync.service
[root@node1 corosync]# ss -tunl
Netid State      Recv-Q Send-Q   Local Address:Port                  Peer Address:Port
udp   UNCONN     0      0                    *:68                               *:*
udp   UNCONN     0      0         10.1.252.153:5404                             *:*
udp   UNCONN     0      0         10.1.252.153:5405                             *:*
udp   UNCONN     0      0        239.255.100.1:5405                             *:*
udp   UNCONN     0      0            127.0.0.1:323                              *:*
udp   UNCONN     0      0                    *:43497                            *:*
udp   UNCONN     0      0                    *:514                              *:*
udp   UNCONN     0      0                   :::30879                           :::*
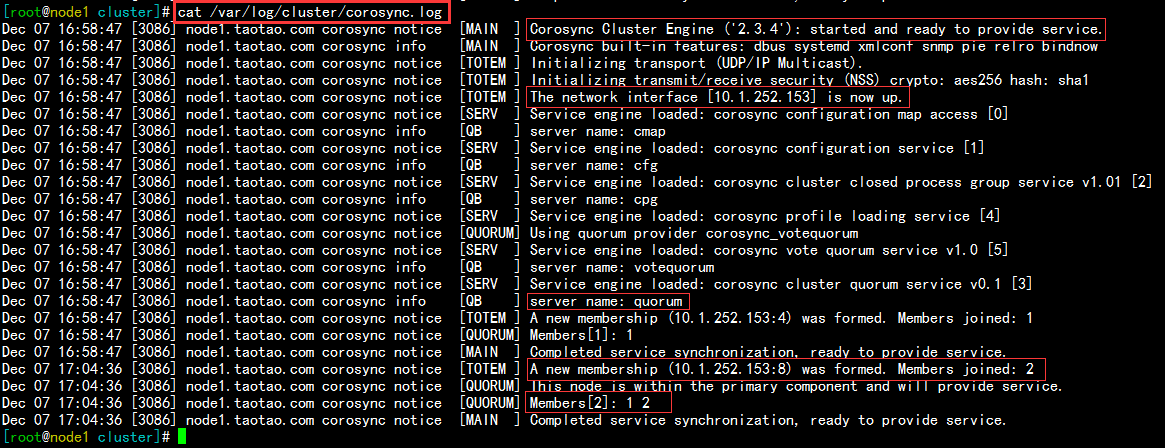
查看node1 corosync的日誌文件,正常啓動,如下:
查看node2 corosync的日誌文件,正常啓動,如下:
6.檢測集羣工作是否正常
[root@node1 cluster]# corosync-cfgtool -s
Printing ring status.
Local node ID 1
RING ID 0
	id	= 10.1.252.153
	status	= ring 0 active with no faults   # 沒有錯誤

[root@node2 corosync]# corosync-cfgtool -s
Printing ring status.
Local node ID 2
RING ID 0
	id	= 10.1.252.161
	status	= ring 0 active with no faults

[root@node1 cluster]# corosync-cmapctl |grep member
runtime.totem.pg.mrp.srp.members.1.config_version (u64) = 0
runtime.totem.pg.mrp.srp.members.1.ip (str) = r(0) ip(10.1.252.153)
runtime.totem.pg.mrp.srp.members.1.join_count (u32) = 1
runtime.totem.pg.mrp.srp.members.1.status (str) = joined
runtime.totem.pg.mrp.srp.members.2.config_version (u64) = 0
runtime.totem.pg.mrp.srp.members.2.ip (str) = r(0) ip(10.1.252.161)
runtime.totem.pg.mrp.srp.members.2.join_count (u32) = 1
runtime.totem.pg.mrp.srp.members.2.status (str) = joined
如上,就是corosync集羣的配置過程,接下來我們啓用pacemaker
pacemaker資源定義操作如下:
1.在兩個節點分別啓動pacemaker,查看其狀態
[root@node1 cluster]# systemctl start pacemaker.service  # 啓動服務

[root@node1 cluster]# systemctl status pacemaker.service  # 查看其狀態
● pacemaker.service - Pacemaker High Availability Cluster Manager
   Loaded: loaded (/usr/lib/systemd/system/pacemaker.service; disabled; vendor preset: disabled)
   Active: active (running) since Wed 2016-12-07 17:53:38 CST; 50s ago
 Main PID: 3311 (pacemakerd)
   CGroup: /system.slice/pacemaker.service   # 啓動的相關服務
           ├─3311 /usr/sbin/pacemakerd -f
           ├─3312 /usr/libexec/pacemaker/cib
           ├─3313 /usr/libexec/pacemaker/stonithd
           ├─3314 /usr/libexec/pacemaker/lrmd
           ├─3315 /usr/libexec/pacemaker/attrd
           ├─3316 /usr/libexec/pacemaker/pengine
           └─3317 /usr/libexec/pacemaker/crmd
2.使用crm_mon命令監控查看服務是否正常,可以看到當前DC爲node1,正常;
3.配置crmsh接口
1)下載crmsh以及依賴的rpm包,然後安裝
# 這是我下載的crmsh的rpm包,以及依賴到的程序文件
[root@node1 crmsh]# ll
total 668
-rw-r--r-- 1 root root 608836 Oct 16  2015 crmsh-2.1.4-1.1.x86_64.rpm
-rw-r--r-- 1 root root  27080 Oct 16  2015 pssh-2.3.1-4.2.x86_64.rpm
-rw-r--r-- 1 root root  42980 Oct 16  2015 python-pssh-2.3.1-4.2.x86_64.rpm

# 配置好yum倉庫,直接在本地安裝程序包即可
[root@node1 crmsh]# yum install -y ./*
2)運行crm命令,進入交互命令方式
3)在configure中關閉stonith
crm(live)# configure
crm(live)configure# help
crm(live)configure# property  # Tab鍵可補全
batch-limit=                   maintenance-mode=              placement-strategy=
cluster-delay=                 migration-limit=               remove-after-stop=
cluster-recheck-interval=      no-quorum-policy=              shutdown-escalation=
crmd-transition-delay=         node-action-limit=             start-failure-is-fatal=
dc-deadtime=                   node-health-green=             startup-fencing=
default-action-timeout=        node-health-red=               stonith-action=
default-resource-stickiness=   node-health-strategy=          stonith-enabled=
election-timeout=              node-health-yellow=            stonith-timeout=
enable-acl=                    notification-agent=            stonith-watchdog-timeout=
enable-startup-probes=         notification-recipient=        stop-all-resources=
have-watchdog=                 pe-error-series-max=           stop-orphan-actions=
is-managed-default=            pe-input-series-max=           stop-orphan-resources=
load-threshold=                pe-warn-series-max=            symmetric-cluster=
crm(live)configure# property stonith-enabled=
stonith-enabled (boolean, [true]):
    Failed nodes are STONITH'd

crm(live)configure# property stonith-enabled=false  # 設置stonith爲false
 crm(live)configure# show  # 再次查看發現多了一行 stonith-enabled=false
node 1: node1.taotao.com \
	attributes standby=off
node 2: node2.taotao.com
property cib-bootstrap-options: \
	have-watchdog=false \
	dc-version=1.1.13-10.el7-44eb2dd \
	cluster-infrastructure=corosync \
	stonith-enabled=false
crm(live)configure# verify   # 校驗沒有報錯
crm(live)configure# commit   # 確定沒問題,提交
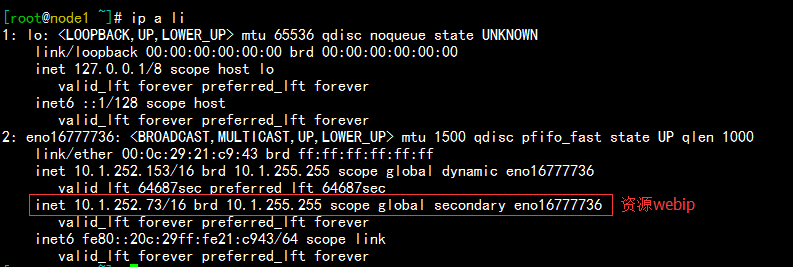
4.在configure中使用primitive定義一個webip的資源;
查看當前webip資源所在的節點,可以發現在節點node1上;
5.設置node1處於standby待機狀態,發現資源webip轉移到了節點node2上,如下:
6.現在在node1和node2兩臺主機上啓動httpd服務,並提供測試頁面,如下:
[root@node1 html]# echo "<h1>Node1</h1>" > index.html
[root@node1 html]# cat index.html
<h1>Node1</h1>

[root@node2 html]# echo "<h1>Node2</h1>" > index.html
[root@node2 html]# cat index.html
<h1>Node2</h1>

# 兩節點啓動服務,測試均可正常訪問,如下:
[root@node2 html]# curl 10.1.252.153
<h1>Node1</h1>
[root@node2 html]# curl 10.1.252.161
<h1>Node2</h1>
7.在集羣中定義httpd的資源,在CentOS 7 中要想使httpd出現在systemd的資源列表中,就要設定開機自啓enable;
[root@node1 ~]# systemctl enable httpd.service
Created symlink from /etc/systemd/system/multi-user.target.wants/httpd.service to /usr/lib/systemd/system/httpd.service.

[root@node2 html]# systemctl enable httpd.service
Created symlink from /etc/systemd/system/multi-user.target.wants/httpd.service to /usr/lib/systemd/system/httpd.service.
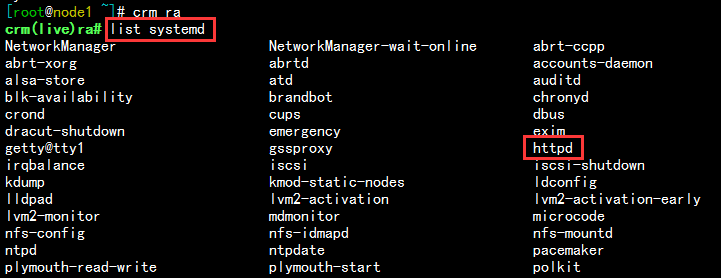
1)在資源ra中查看systemd列表可以看到httpd資源,如下:
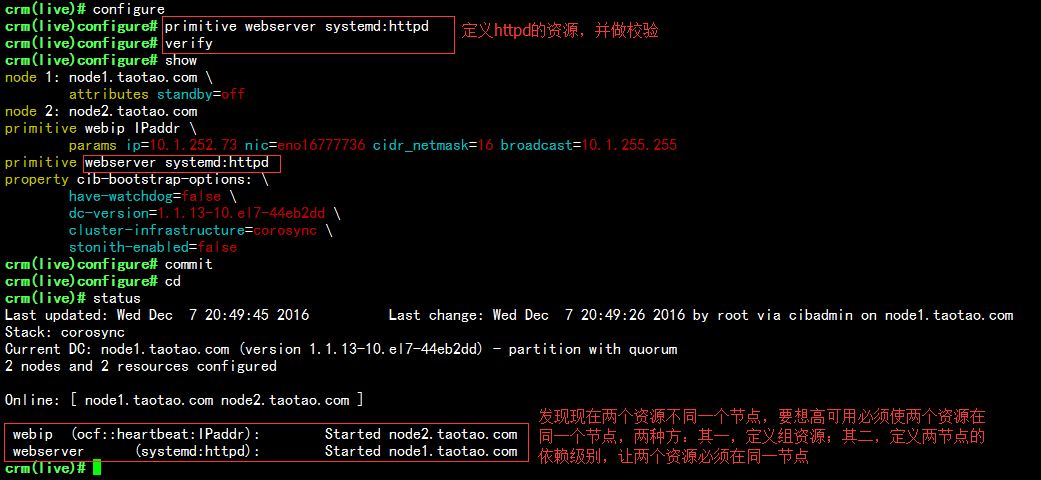
8.定義httpd的資源,並查看,發現兩個資源並不在同一節點,但是高可用服務必須要求兩個資源在同一個節點上,所以,我們要設定組資源或者資源約束;
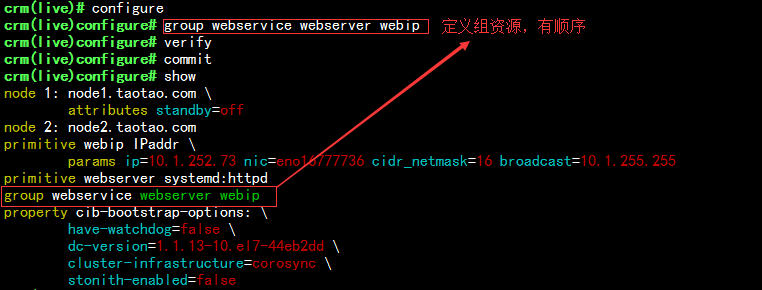
9.定義組資源webservice,使webserver和webip位於同一組中,如下:
10.查看其狀態,可以發現現在資源組webservice位於節點node1上,在瀏覽器中訪問資源ip,可以正常訪問node1的web界面,如下:
11.設置node1處於standby待機狀態,發現組資源webservice轉移到了節點node2上,再次訪問資源ip發現爲node2節點的web頁面
12.我們可以使用resource/migrate命令完成手動遷移資源到指定的節點上,現在我把node1上線,然後手動把資源遷移到node1,如下:
我們也可以使用resource下的stop,start,status命令控制服務的停止和啓動,以及狀態查看;
crm(live)# resource
crm(live)resource# stop webservice
crm(live)resource# status
 Resource Group: webservice
     webserver	(systemd:httpd):	(target-role:Stopped) Stopped
     webip	(ocf::heartbeat:IPaddr):	(target-role:Stopped) Stopped
crm(live)resource# status webservice
resource webservice is NOT running
crm(live)resource# start webservice
crm(live)resource# status webservice
resource webservice is running on: node1.taotao.com
13.如果資源在節點間轉移出現錯誤,會在狀態信息中報錯,比如,現在webservice的組資源在node1上,我在node2上啓用nginx服務,佔用node2httpd服務的80端口,然後使node1節點standby,可以發現報錯信息,如下:
現在我使node1節點上線,可以發現資源轉移到node1上,但錯誤信息依然存在,要想清除中間狀態信息,可使用resource/cleanup命令,但是一般不建議清除,因爲產生的錯誤信息有利於我們排錯,如下:
假如,用戶可上傳資源,如圖片等,所以我們還需要一個共享存儲,這裏以nfs爲例
1.準備一臺虛擬主機,當做nfs存儲服務器,如下:
[root@nfs ~]# mkdir -pv /date/web/htdocs   # 首先創建一個要共享的目錄
mkdir: 已創建目錄 "/date"
mkdir: 已創建目錄 "/date/web"
mkdir: 已創建目錄 "/date/web/htdocs"

# 在目錄中提供一個測試頁面
[root@nfs ~]# echo "<h1>Content on NAS</h1>" > /date/web/htdocs/index.html
[root@nfs ~]# cat /date/web/htdocs/index.html
<h1>Content on NAS</h1>

# 定義要共享的網絡及權限
[root@nfs ~]# vim /etc/exports
 /date/web/htdocs         10.1.0.0/16(rw)

# 因爲上傳是通過apache用戶的,所以,授權apache用戶對目錄擁有rwx權限(id映射的)
[root@nfs ~]# setfacl -m u:apache:rwx /date/web/htdocs/
[root@nfs ~]# getfacl /date/web/htdocs/
getfacl: Removing leading '/' from absolute path names
# file: date/web/htdocs/
# owner: root
# group: root
user::rwx
user:apache:rwx
group::r-x
mask::rwx
other::r-x

# 啓動服務,並設置爲開機自啓
[root@nfs ~]# systemctl start nfs-server.service
[root@nfs ~]# systemctl enable nfs-server.service
2.在node1和node2節點手動掛載nfs的共享目錄,並在瀏覽器中訪問OK,如下:
[root@node1 ~]# mount -t nfs 10.1.252.156:/date/web/htdocs /var/www/html/
3.現在我們再把文件系統定義成一個資源,由所在的節點自動掛載,定義如下:
4.重新定義組資源,使三個資源爲一組,如下:
crm(live)configure# delete webservice  # 刪除之前的組資源
INFO: resource references in location:cli-prefer-webservice updated

# 重新定義組資源,把三個資源定義爲一組
crm(live)configure# group webservice webstore webserver webip
INFO: resource references in location:cli-prefer-webservice updated

crm(live)configure# verify
crm(live)configure# commit

crm(live)configure# show  # 查看資源如下:
node 1: node1.taotao.com \
        attributes standby=off
node 2: node2.taotao.com
primitive webip IPaddr \
        params ip=10.1.252.73 nic=eno16777736 cidr_netmask=16 broadcast=10.1.255.255
primitive webserver systemd:httpd
primitive webstore Filesystem \
        params device="10.1.252.156:/date/web/htdocs/" directory="/var/www/html/" fstype=nfs \
        op start timeout=60s interval=0 \
        op stop timeout=60s interval=0
group webservice webstore webserver webip   # 組資源
location cli-prefer-webservice webservice role=Started inf: node1.taotao.com
property cib-bootstrap-options: \
        have-watchdog=false \
        dc-version=1.1.13-10.el7-44eb2dd \
        cluster-infrastructure=corosync \
        stonith-enabled=false \
        last-lrm-refresh=1481161790
查看狀態,可以發現現在資源在node1節點上,在瀏覽器中訪問OK
5.設置node1節點爲standby狀態,可以看到遷到了node2節點上,如下:
定義資源監控
現在資源位於node2上,我把node2上的httpd進程kill掉,在瀏覽器中已然不能正常訪問,但是在crm 命令中查看當前狀態,發現資源並沒有轉移,遇到這種情況,我們就需要定義資源監控,使其能夠在節點發生故障時自動重啓服務,並且在重啓無效後轉移資源。具體實現如下:
1.定義三個資源webserver、webip、webstore的監控,使其在發生故障後自動重啓服務,如果重啓無效,再完成資源遷移,如下:
# 定義三個資源的時間間隔爲30s,超時時間爲20s
crm(live)configure# monitor webserver 30s:20s
crm(live)configure# monitor webip 30s:20s
crm(live)configure# monitor webstore 30s:20s

#校驗時,報錯,提示webstore設定的超時時長小於最小值40s,所以,重新設置一下:
crm(live)configure# verify
WARNING: webstore: specified timeout 20s for monitor is smaller than the advised 40
#使用edit命令會自動vim編輯器,然後修改webstore 爲60s:40s,保存退出

#再次校驗,沒問題後提交
crm(live)configure# verify
crm(live)configure# commit
查看定義好的監控資源如下:
2.測試:
1)現在我在資源所在的node2節點上執行killall httpd命令,發現30s之後httpd又自動重啓上線了,如下:
2)現在我在node2節點上執行 killall httpd;nginx命令,殺掉httpd進程並啓用nginx進程,佔用httpd服務的80端口,查看資源是否轉移到node1節點上,發現成功轉移到節點node1上;
定義資源約束的傾向性:
1.現在我把組資源webservice對node1節點的傾向性定義爲inf(正無窮),node2對組資源不做定義,提交之後,查看狀態,發現資源馬上就轉移到了node1上了,如下:
2.如果此時,設置node1處於standby狀態,可以發現資源由node1轉移到node2上,但是,如果我設置node2對資源的傾向性爲 -inf(負無窮),則可以發現,node1處於standby狀態後,資源也不會轉移到node2節點上,如下:
注意:
如果資源對兩節點的傾向性分值一樣大,資源還是會留在當前節點,不會遷往另一個節點 ,所以,我們可以根據自己的需要定義資源的傾向性分值。
如上,就是整個corosync+pacemaker定義集羣的整個過程...


