


在 《用 rsync sersync兩個工具實現文件備份及同步 一》 中,我們說了rsync的安裝配置,使用rsync可以做同步備份等任務。如果想要實現 客戶端監視文件變化實時同步到服務器段的話,我們可以使用 sersync 工具。
注: 操作環境接《用 rsync sersync兩個工具實現文件備份及同步 一》
實驗目的:
達到將192。168.18.42 /home/tongbu 文件夾中的內容進行監控,同步到192.168.18.46 /home/tongbu 中
一、首先在服務器端(192.168.18.46)添加模塊
vi /etc/rsyncd.conf
[tongbu]
path = /home/tongbu
read only = no
#write only = yes
host allow = *
auth users = haifeng
secrets file = /etc/rsyncd.scrt
二、在客戶端安裝 sersync 工具
1.下載安裝包
wget http://sersync.googlecode.com/files/sersync2.5_64bit_binary_stable_final.tar.gz
2.解壓安裝包 進入目錄
[root@lz ~]# tar zxf sersync2.5_64bit_binary_stable_final.tar.gz
[root@lz ~]# cd GNU-Linux-x86/
[root@lz GNU-Linux-x86]# ls
confxml.xml sersync2
3.編輯 confxml.xml
<?xml version="1.0" encoding="ISO-8859-1"?>
<head version="2.5">
<host hostip="192.168.18.42" port="8008"></host> 本地主機地址
<debug start="false"/>
<fileSystem xfs="false"/>
<filter start="false">
<exclude expression="(.*)\.svn"></exclude>
<exclude expression="(.*)\.gz"></exclude>
<exclude expression="^info/*"></exclude>
<exclude expression="^static/*"></exclude>
</filter>
<inotify>
<delete start="true"/>
<createFolder start="true"/>
<createFile start="false"/>
<closeWrite start="true"/>
<moveFrom start="true"/>
<moveTo start="true"/>
<attrib start="false"/>
<modify start="false"/>
</inotify>
<sersync>
<localpath watch="/home/tongbu"> #要同步的本地路徑
<remote ip="192.168.18.46" name="tongbu"/> #服務端ip 模塊名
<!--<remote ip="192.168.8.39" name="tongbu"/>-->
<!--<remote ip="192.168.8.40" name="tongbu"/>-->
</localpath>
<rsync>
<commonParams params="-avz"/> #rsync的參數
<auth start="true" users="haifeng" passwordfile="/etc/rsyncd.scrt"/>
##爲true的時候,開啓密碼驗證
<userDefinedPort start="true" port="873"/><!-- port=873 --> #端口
<timeout start="false" time="100"/><!-- timeout=100 -->
<ssh start="false"/>
</rsync>
<failLog path="/tmp/rsync_fail_log.sh" timeToExecute="60"/><!--default every 60mins execute once-->
<crontab start="true" schedule="1"><!--600mins-->
#爲true 即多長時間監控一次 ,默認爲600分鐘,我們設置1分鐘,方便實驗
<crontabfilter start="false">
<exclude expression="*.php"></exclude>
<exclude expression="info/*"></exclude>
</crontabfilter>
</crontab>
<plugin start="false" name="command"/>
</sersync>
<plugin name="command">
<param prefix="/bin/sh" suffix="" ignoreError="true"/> <!--prefix /opt/tongbu/mmm.sh suffix-->
<filter start="false">
<include expression="(.*)\.php"/>
<include expression="(.*)\.sh"/>
</filter>
</plugin>
<plugin name="socket">
<localpath watch="/opt/tongbu">
<deshost ip="192.168.138.20" port="8009"/>
</localpath>
</plugin>
<plugin name="refreshCDN">
<localpath watch="/data0/htdocs/cms.xoyo.com/site/">
<cdninfo domainname="ccms.chinacache.com" port="80" username="xxxx" passwd="xxxx"/>
<sendurl base="http://pic.xoyo.com/cms"/>
<regexurl regex="false" match="cms.xoyo.com/site([/a-zA-Z0-9]*).xoyo.com/p_w_picpaths"/>
</localpath>
</plugin>
</head>
##設置完成後保存推出,注意密碼文件 /etc/rsyncd.scrt 權限 設置爲 600
4.啓動sersync
[root@lz GNU-Linux-x86]# ./sersync2 -r -d -o /root/GNU-Linux-x86/confxml.xml
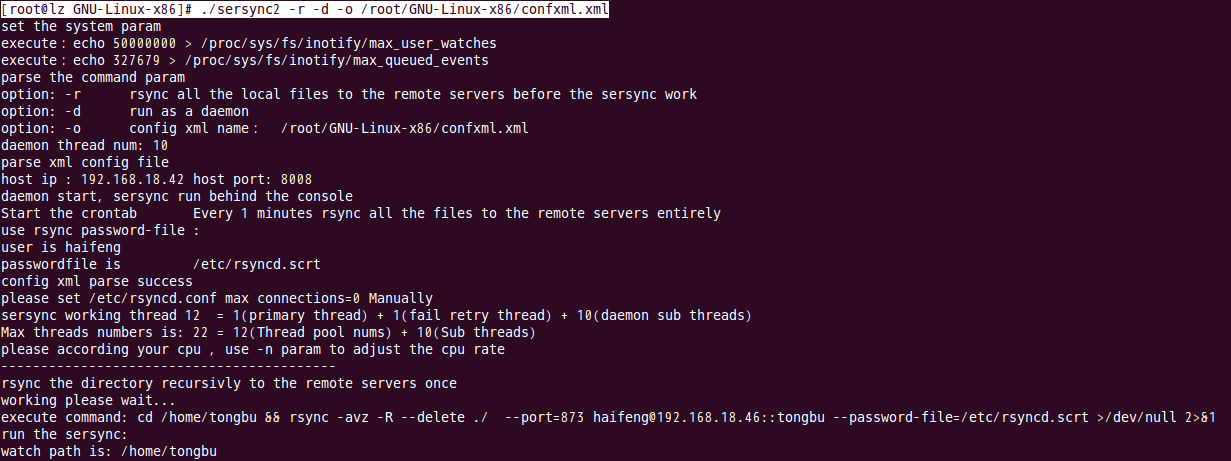
5.驗證
在客戶端/home/tongbu中寫入文件,或更改文件,服務器端可以自動同步。
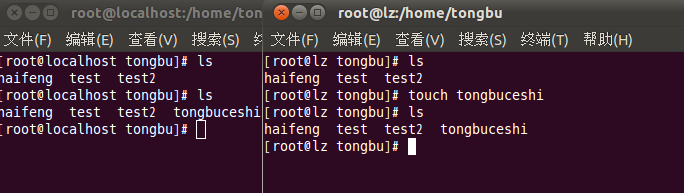
成功。 :)