


使用非Root用戶前要增加sudo 命令
卸載舊版本Docker
舊版本的 Docker 稱爲 docker 或者 docker-engine,使用以下命令卸載舊版本:
yum remove docker \
docker-client \
docker-client-latest \
docker-common \
docker-latest \
docker-latest-logrotate \
docker-logrotate \
docker-selinux \
docker-engine-selinux \
docker-engine
使用yum 安裝docker依賴包
執行以下命令安裝依賴包:
yum install -y yum-utils \ device-mapper-persistent-data \ lvm2
配置國內鏡像站
鑑於國內網絡問題,強烈建議使用國內源,官方源請在註釋中查看。
執行下面的命令添加 yum 軟件源:
阿里雲:
sudo yum-config-manager \
--add-repo \
https://mirrors.aliyun.com/docker-ce/linux/centos/docker-ce.repo
163:
yum-config-manager \
--add-repo \
https://mirrors.ustc.edu.cn/docker-ce/linux/centos/docker-ce.repo
官方源
$ sudo yum-config-manager \
--add-repo \
https://download.docker.com/linux/centos/docker-ce.repo
安裝Docker CE或者指定版本安裝
如果需要最新版本的 Docker CE 請使用以下命令:
sudo yum-config-manager --enable docker-ce-edge
sudo yum-config-manager --enable docker-ce-test
更新 yum 軟件源緩存,並安裝 docker-ce。
yum makecache fast
yum install docker-ce
安裝指定版本的Docker:
yum list docker-ce --showduplicates | sort -r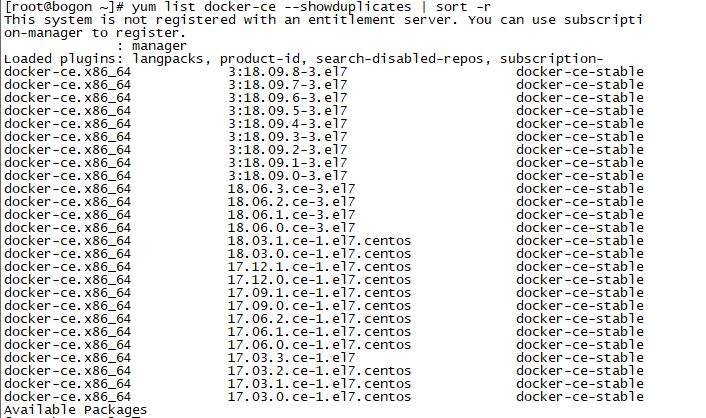
yum install docker-ce-18.06.3.ce-3.el7.centos.x86_64
注:安裝過程中的問題:

解決方法:
下載container-selinux:
wget http://mirrors.atosworldline.com/public/centos/7/extras/x86_64/Packages/container-selinux-2.68-1.el7.noarch.rpm
安裝container-selinux(使用–nodeps --force跳過依賴檢查):
rpm -ivh container-selinux-2.68-1.el7.noarch.rpm --nodeps --force
然後重新安裝Docker
啓動Docker CE
systemctl enable docker
systemctl start docker
建立Docker用戶組
默認情況下,docker 命令會使用 Unix socket 與 Docker 引擎通訊。而只有 root 用戶和 docker 組的用戶纔可以訪問 Docker 引擎的 Unix socket。出於安全考慮,一般 Linux 系統上不會直接使用 root 用戶。因此,更好地做法是將需要使用 docker 的用戶加入 docker 用戶組。
建立 docker 組:
groupadd docker
將當前用戶加入 docker 組:
usermod -aG docker $USER
退出當前終端並重新登錄,進行如下測試。
測試docker是否正確安裝
docker run hello-world
Unable to find image 'hello-world:latest' locally
latest: Pulling from library/hello-world
d1725b59e92d: Pull complete
Digest: sha256:0add3ace90ecb4adbf7777e9aacf18357296e799f81cabc9fde470971e499788
Status: Downloaded newer image for hello-world:latest
Hello from Docker!
This message shows that your installation appears to be working correctly.
To generate this message, Docker took the following steps:
- The Docker client contacted the Docker daemon.
- The Docker daemon pulled the "hello-world" image from the Docker Hub.
(amd64) - The Docker daemon created a new container from that image which runs the
executable that produces the output you are currently reading. - The Docker daemon streamed that output to the Docker client, which sent it
to your terminal.
To try something more ambitious, you can run an Ubuntu container with:
$ docker run -it ubuntu bash
Share images, automate workflows, and more with a free Docker ID:
https://hub.docker.com/
For more examples and ideas, visit:
https://docs.docker.com/get-started/
鏡像加速
如果在使用過程中發現拉取 Docker 鏡像十分緩慢,可以配置 Docker 國內鏡像加速。
添加內核參數
如果在 CentOS 使用 Docker CE 看到下面的這些警告信息:
WARNING: bridge-nf-call-iptables is disabled
WARNING: bridge-nf-call-ip6tables is disabled
請添加內核配置參數以啓用這些功能。
tee -a /etc/sysctl.conf <<-EOF
net.bridge.bridge-nf-call-ip6tables = 1
net.bridge.bridge-nf-call-iptables = 1
EOF
然後重新加載 sysctl.conf 即可
sysctl -p
導入導出命令介紹
涉及的命令有export、import、save、load
Save 命令 :
docker save [options] images [images...]
示例 :
docker save -o nginx.tar nginx:latest
或
docker save > nginx.tar nginx:latest
其中-o和>表示輸出到文件,nginx.tar爲目標文件,nginx:latest是源鏡像名(name:tag)
Load 命令 :
docker load [options]
示例
docker load -i nginx.tar
或
docker load < nginx.tar
其中-i和<表示從文件輸入。會成功導入鏡像及相關元數據,包括tag信息
Export 命令 :
docker export [options] container
示例
docker export -o nginx-test.tar nginx-test
其中-o表示輸出到文件,nginx-test.tar爲目標文件,nginx-test是源容器名(name)
import命令:
docker import [options] file|URL|- [REPOSITORY[:TAG]]
示例
docker import nginx-test.tar nginx:imp
或
cat nginx-test.tar | docker import - nginx:imp
區別
export命令導出的tar文件略小於save命令導出的
export命令是從容器(container)中導出tar文件,而save命令則是從鏡像(images)中導出
基於第二點,export導出的文件再import回去時,無法保留鏡像所有歷史(即每一層layer信息,不熟悉的可以去看Dockerfile),不能進行回滾操作;而save是依據鏡像來的,所以導入時可以完整保留下每一層layer信息。如下圖所示,nginx:latest是save導出load導入的,nginx:imp是export導出import導入的。
建議:
可以依據具體使用場景來選擇命令
若是隻想備份images,使用save、load即可
若是在啓動容器後,容器內容有變化,需要備份,則使用export、import
Docker中如何刪除image(鏡像)
docker中刪除images的命令是docker rmi,但有時候執行此命令並不能刪除images;(確認刪除竟像時鏡像沒有在容器中運行,爲停止狀態)
docker images 查看鏡像

docker rmi IMAGE ID
docker images 重新查看鏡像列表
發現image並沒有被刪除,只是他的tag被刪除了,再次執行docker rmi IMAGE_ID只會報錯
docker rmi 53912975086f
Error: image_delete: Conflict, 53912975086f wasn't deleted
2019/07/20 16:16:27 Error: failed to remove one or more images
查看docker的幫助會發現有兩個與刪除有關的命令rm和rmi
rm Remove one or more containers
rmi Remove one or more images
這裏有兩個不同的單詞,images和container。其中images很好理解,跟平常使用的虛擬機的鏡像一個意思,相當於一個模版,而container則是images運行時的的狀態。docker對於運行過的image都保留一個狀態(container),可以使用命令docker ps來查看正在運行的container,對於已經退出的container,則可以使用docker ps -a來查看。 如果你退出了一個container而忘記保存其中的數據,你可以使用docker ps -a來找到對應的運行過的container使用docker commit命令將其保存爲image然後運行。
回到之前的問題,由於image被某個container引用(拿來運行),如果不將這個引用的container銷燬(刪除),那image肯定是不能被刪除。
所以想要刪除運行過的images必須首先刪除它的container。繼續來看剛纔的例子,
執行命令 docker ps -a
可以看出53912975086f的image被cc6b344ed27f的container使用着,所以必須首先刪除該container
docker rm cc6b344ed27f
Error: container_delete: Impossible to remove a running container, please stop it first
2019/07/20 16:36:44 Error: failed to remove one or more containers
現錯誤,這是因爲該container正在運行中(運行docker ps查看),先將其關閉
docker stop cc6b344ed27f
docker rm cc6b344ed27f
docker rmi 53912975086f
docker images

可以看出,image已經被刪除。