


在 Ubuntu18.04 安裝 LEMP 棧,構建本地網站
0x00 背景
1. 目的
基於 LEMP 棧 搭建本地 web 服務器,實現一個能在本地網絡中訪問的網頁,網頁中實現對數據庫的簡單操作。
學習目標:
- 理解 web 服務器的運行,學會手動搭建一個 web 服務器
- 學習簡單的 HTML 和 PHP 知識,並編寫網站前端和服務器端的代碼
- 學習 MySQL 數據庫的基本知識,完成數據庫的基本操作,實現 PHP 和 MySQL 的連接
- 學習如何加固 LEMP 棧
2. LEMP 棧簡介
LEMP 指代 Linux、Nginx、MySQL、PHP,是一個實現 web 服務器的棧,之所以簡寫爲 LEMP 而不是 LNMP,因爲Nginx 的讀音同 Engine X,因此簡寫選的是 E 而不是 N,此外 LEMP 是實際可拼讀的英文,而 LNMP 只能逐個字母發音(當然也有 LNMP 的簡寫,但個人比較支持 LEMP)。常見的搭建 web 服務器的組合還有 LAMP,它是 LEMP 的前輩, LAMP 中用的 web 服務器軟件 爲 Apache。
0x01 實現
1. 環境搭建過程
目標環境
linux+nginx+php- fpm+mysql
1.1 安裝 Linux 系統
Linux 系統使用 Ubuntu-18.04 版本,使用 VMware Workstation 安裝其鏡像,Ubuntu 鏡像在其官網上下載。

sudo apt-get update & sudo apt-get upgrade
1.2 安裝 Nginx
在 Ubuntu 中安裝 Nginx,只需要在終端輸入以下命令即可:
sudo apt-get install nginx
在瀏覽器中瀏覽 nginx 默認網頁,http://主機地址,說明安裝成功

1.3 安裝 Php-fpm
在終端輸入以下命令即可:
sudo apt-get intall php-fpm
查看服務是否運行:
systemctl status php7.2-fpm.service

1.4 安裝 Mysql
在終端輸入以下命令安裝 mysql 和 php 的 mysql 支持:
sudo apt-get install mysql-server mysql-client php-mysql
安裝完成後,檢查 mysql 服務器是否運行:
sudo systemctl mysql.service

2. 配置自己的網站
目標
搭建本地網站 www.jaylen.com,配置 Nginx 使其支持 php,本地網站顯示一張圖片,圖片下方有個評論界面,可以輸入評論,顯示到網頁中,評論會存到 mysql 數據庫中。
2.1 域名映射
要在本地網絡中,通過瀏覽器訪問到 www.jaylen.com,需要修改主機的 hosts 文件,在 /etc/hsots 添加一行:
your-ip-add www.jaylen.com
這樣就不需要 DNS 服務器解析該域名了(域名並沒有註冊!!!,DNS 服務器是沒有記錄的)。
2.2 配置 Nginx
首先需要配置 Nginx,使其支持 php,在 /etc/nginx/conf.d 目錄下添加自己網站服務器的配置,jaylen.com.conf ,內容如下:
 #  server configuration
 server {
     listen 80;
     listen [::]:80;
     server_name jaylen.com;
     root /var/www/jaylen.com; # 網站在主機的根目錄

     # Add index.php to the list if you are using PHP
     index index.html index.htm index.nginx-debian.html index.php;

     location / {
         # First attempt to serve request as file, then
         # as directory, then fall back to displaying a 404.
         try_files $uri $uri/ =404;
     }

     # pass PHP scripts to FastCGI server
     location ~ \.php$ {
         include snippets/fastcgi-php.conf;

         # With php-fpm (or other unix sockets):
         fastcgi_pass unix:/run/php/php7.2-fpm.sock;
     }

 }
測試配置是否成功:
sudo nginx -t
成功的話,出現如下提示信息:
nginx: the configuration file /etc/nginx/nginx.conf syntax is ok
nginx: configuration file /etc/nginx/nginx.conf test is successful
重新加載配置:
sudo nginx -s reload
2.3 創建網站主頁
首先爲網站創建一個根目錄 /var/www/jaylen.com ,用於存儲網站內容,該目錄和 Nginx 配置文件中的 root 指令的內容一致。
sudo mkdir /var/www/jaylen.com
寫個簡單的 html 頁面和 php進行測試,index.html ,
<html>
     <body>
         <head>
             <title>
                 jaylen's homepage
             </title>
         </head>
         <h1>Welcome to Jaylen's Homepage</h1>
         <p>Website is under construction, wait...</p>
     </bdoy>
 </html>
index.php
<html>
     <body>
         <head>
             <title>
                 jaylen's homepage
             </title>
         </head>
         <h1>Welcome to Jaylen's Homepage</h1>
         <p>Website is under construction, wait...</p>
         <?php
             echo phpinfo();
         ?>
     </bdoy>
 </html>
通過瀏覽器瀏覽網站 www.jaylen.com


測試完成,沒有問題。
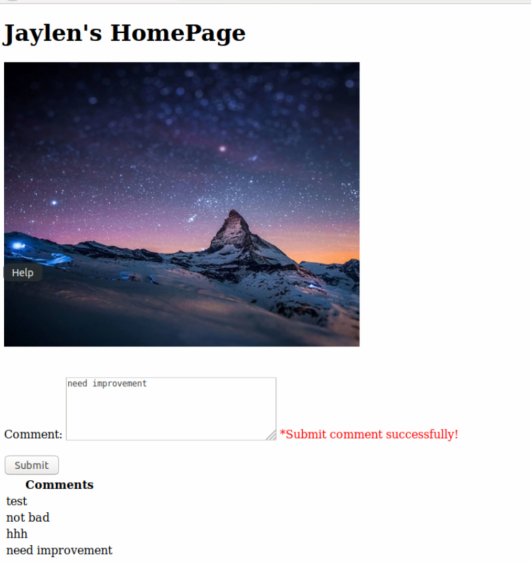
進一步完善網頁內容,使其顯示一張圖片,圖片下方帶有評論輸入框,可以提交評論,提交的評論存到主機的 mysql 數據庫中,而後顯示在評論區,最後完成的大致如下圖,簡陋的不行。
在 mysql 中創建一個新用戶,並授權 INSERT、SELECT 權限,評論內容需要存到數據庫,並讀取數據庫內容。

mysql>
CREATE USER 'user101'@'localhost'
  IDENTIFIED BY 'webdev101@Webdev102';
GRANT INSERT,SELECT
  ON *.*
  TO 'user101'@'localhost'
  WITH GRANT OPTION;
刷新授權表,退出,
mysql> FLUSH PRIVILEGE;
mysql> quit;
以新創建的用戶重新登陸
mysql -u user101 -p
創建一個數據庫
mysql> create database webdb101
切換到該數據庫
mysql> use webdb101
創建一個表格,用於存放評論內容
mysql> CREATE TABLE comments (
id INT(6) UNSIGNED AUTO_INCREMENT PRIMARY KEY,
comment VARCHAR(200) NOT NULL
);
插入一條數據
mysql> INSERT INTO comments(comment) VALUES ('test');
最終的 index.php 文件內容如下:
<!DOCTYPE HTML>
 <html>
 <head>
 <style>
 .error {color: #FF0000;}
 img {
     width: 30%;
     height: auto;
 }
 td {
     border: 1px solid black;
 }
 </style>
 </head>
 <body>

 <?php
 // define variables and set to empty values

 include('connect-mysql.php');

 $comment = "";
 $commentErr = "";

 if ($_SERVER["REQUEST_METHOD"] == "POST") {
   if (empty($_POST["comment"])) {
     $commentErr = "You must write someting...";
   } else {
     $comment = test_input($_POST["comment"]);
     $sql = "INSERT INTO comments (comment) VALUES ('".$comment."')";
     if (mysqli_query($dbcon, $sql)) {
         $commentErr = "Submit comment successfully!";
     }
     else {
         $commentErr = "Error:" . $sql . "<br>" . mysqli_error($dbcon);
     }
   }
 }

 function test_input($data) {
   $data = trim($data);
   $data = stripslashes($data);
   $data = htmlspecialchars($data);
   return $data;
 }
 ?>

 <h1>Jaylen's HomePage</h1>
 <img src='image/homepage.jpeg' alt='homepage icon'>
 <form method="post" action="<?php echo htmlspecialchars($_SERVER["PHP_SELF"]);?>">
   <hr>
   <p>Wirte your comment here!</p>
   <textarea name="comment" rows="5" cols="80"><?php echo $comment;?></textarea>
   <span class='error'>*<?php echo $commentErr; ?></span>
   <br></br>
   <input type="submit" name="submit" value="Submit">
   <hr>
 </form>
 <?php
 $sqlget = "SELECT * FROM comments";
 $sqldata = mysqli_query($dbcon, $sqlget) or die("Fail to connect to database!" .  mysqli_error($dbcon));

 echo "<table>";
 echo "<tr><th>Comments</th></tr>";

 while($row = mysqli_fetch_array($sqldata, MYSQLI_ASSOC)) {
     echo "<tr><td>";
     echo $row['comment'];
     echo "</td></tr>";
 }

 echo "</table>";
 ?>
 </body>
 </html>
連接數據庫的操作,單獨放到 connec-mysql.php 文件中。
在網頁中測試下提交評論,
[外鏈圖片轉存失敗(img-4GV7Mzuw-1565152977001)(https://cdn.jsdelivr.net/gh/BingSlient/WebSecurityLearning/WebSecurityBasics/images/1564841954745.png)]
2.4 問題
記錄搭建自己本地網絡過程中遇到的問題。
-
配置 Nginx 使其支持 php 時,訪問 http://localhsot/index.php,出現
502 Bad Gateway錯誤,查看 Nginx 錯誤日誌/var/log/nginx/error.log,找到錯誤記錄如下:2019/08/02 03:11:53 [crit] 4293#4293: *50 connect() to unix:/var/run/php/php7.0-fpm.sock failed (2: No such file or directory) while connecting to upstream, client: 192.168.47.129, server: _, request: "GET /index.php HTTP/1.1", upstream: "fastcgi://unix:/var/run/php/php7.0-fpm.sock:", host: "192.168.47.129"原因是找不到
unix:/var/run/php/php7.0-fpm.sock文件,而我安裝的版本是 7.2 的,因此應該是配置錯誤了,在系統中查找php7.0-fpm.sock發現實際路徑爲/run/php/php7.0-fpm.sock修改/etc/nginx/sites-avalable/default文件如下:# pass PHP scripts to FastCGI server location ~ \.php$ { include snippets/fastcgi-php.conf; # With php-fpm (or other unix sockets): fastcgi_pass unix:/run/php/php7.2-fpm.sock; # With php-cgi (or other tcp sockets): #fastcgi_pass 127.0.0.1:9000; } -
在
index.php文件中對數據庫進行插入操作時,提示錯誤:Unknown column '' in 'field list'原因時插入的數據是
VARCHAR類型,需要額外添加雙引號,我原來的 sql 語句如下:$sql = "INSERT INTO comments (comment) VALUES ($comment)";這樣實際導致
$comment變量展開後是一個標識符,而不是字符串,需要在外面添加額外的雙引號,具體處理如下,注意在單引號中$不會被識別成特殊字符,因此不會展開變量,而雙引號中不能直接包含雙引號,所以就成了下面的結果。$sql = "INSERT INTO comments (comment) VALUES ('".$comment."')";
3.本地服務器加固
3.1 加固 Linux 系統
時刻保持系統和軟件爲最新版本
在 Ubuntu 中檢查系統需要更新的軟件包,使用如下命令,apt-get -s 命令用於模擬後面命令的操作,但實際不會改變系統的狀態,所以 apt-get -s upgrade 只會模擬軟件更新的過程,你會看到被更新的軟件的信息,但實際並沒有更新到系統上 :
sudo apt-get update && sudo apt-get -s upgrade
然後根據需要更新你想要更新的軟件。如果你想更新所有軟件,使用如下命令:
sudo apt-get update && sudo apt-get upgrade
加固遠程登陸
在使用和管理服務器時,往往我們需要遠程登陸服務器,這就需要我們保證遠程登陸過程的安全性。以下步驟一定程度提高了遠程登陸的安全性。
- 強制使用高強度用戶密碼(數字、字母、字符的組合且長度14位以上)
- 更改 SSH 默認的端口(22)爲隨機端口
- 禁止 root 身份的遠程登陸
- 使用公鑰認證機制進行遠程登陸
- 使用 Linux 標準用戶而不是 root 用戶執行上述操作,並且該用戶的權限可提升成 root 權限
現以 Ubuntu 系統爲例,完成上述操作:
強制使用高強度用戶密碼
要強制用戶使用高強度密碼,需要安裝額外的模塊 libpam-cracklib
sudo apt-get install libpam-cracklib
在 Ubuntu 中,密碼策略(規定密碼的長度,字符等)定義在 /etc/pam.d/common-password 文件中,如果要規定,密碼長度爲 14,包含大小寫字符數字和字符,在文件中,在 pam_unix.so的前一行,添加:
password required pam_cracklib.so try_first_pass retry=3 minlen=14 lcredit=-1 ucredit=-1 dcredit=-1 ocredit=-1 difok=2 reject_username
上述配置的選項的描述如下,詳情參考 libpam-cracklib 文檔:
| 選項 | 描述 |
|---|---|
| retry=N | 設置密碼時的,最大重試次數 |
| minlen=N | 新密碼的最小長度 |
| lcredit=N | 最少小寫字母數,小於0,正常計算 minlen,大於0,計算 minlen 額外加 1 |
| ucredt=N | 最少大寫字母數,小於0,正常計算 minlen,大於0,計算 minlen 額外加 1 |
| dcredit=N | 最少數字的數,小於0,正常計算 minlen,大於0,計算 minlen 額外加 1 |
| ocredit=N | 最少其它字符數,小於0,正常計算 minlen,大於0,計算 minlen 額外加 1 |
| difok=N | 和舊密碼不同的字符數 |
| reject_username | 禁止用戶名作爲密碼 |
總之規定各種字符類型的個數,要使用負數,其絕對值表示該類型字符至少有多少個。
更改 SSH 默認的端口(22)爲隨機端口
禁止 root 身份的遠程登陸
修改 ssh-server 的配置文件:
sudo vim /etc/ssh/sshd_config
找到 # Port 22 更改爲:
Port 2019
找到 #PermitRootLogin,更改爲:
PermitRootLogin no
遠程登陸則需要指定該端口執行登陸,而且無法使用 root 用戶登陸
sss username@ip-addr -p 2019
使用公鑰認證機制進行遠程登陸
SSH 登陸 提供公鑰認證機制的登陸,即不需要密碼的登陸方式,但是需要客戶端生成公鑰和私鑰,並將公鑰發送給服務端,服務端將公鑰添加到相應用戶的配置文件中。
首先客戶端需要生成,密鑰對:
ssh-keygen -t rsa -b 4096
使用默認文件名,一路 Enter 最後,生成的密鑰對文件在 ~/.ssh/ 目錄下,其中 id_rsa 爲私鑰,id_rsa.pub 爲公鑰。
接着使用將公鑰文件上傳到服務器:
ssh-copy-id username@ip-addr -p portnum
該命令會把公鑰文件的內容,寫入到 /home/username/ssh/authorized_keys 文件中,所以也可以手動添加內容。如此一來就可以 username 的身份,不使用密碼登陸服務器了。
ssh -p 2019 username@ip-addr
3.2 加固 Nginx
防止信息泄露
Nginx 默認開啓 Server Token(顯示版本號),這樣使得 Nginx 的版本號很容易被獲取,如下圖爲連接域名不存在資源時的返回頁面,可以看到 Nginx 的版本號
在 /etc/nginx/nginx.conf 中 http 塊中添加(去掉註釋即可):

server_tokens off
關閉後,訪問域名下不存在的資源,返回頁面中沒有了 Nginx 的版本號 信息。

增加訪問控制策略
Nginx 可以使用 allow 和 deny 指令在配置文件中允許或禁止特定 IP 的訪問, 編輯 Niginx 配置文件 /etc/nginx/conf.d/jaylen.com.conf,只允許 192.168.47.129 192.168.47.130 訪問 網站 www.jaylen.com
 #  server configuration
 server {
     listen 80;
     listen [::]:80;

     # IPs access control
     allow 192.168.47.129;
     allow 192.168.47.130;
     deny all;

     root /var/www/jaylen.com;
使用 TLS 加固 Nginx
TLS 可以加密客戶端和服務端通信的數據,降低信息泄露的風險。對於本地網站可以使用 SSL 自籤 證書 實現 HTTPS 連接。當然在公網中使用的網站,通常會使用 CA 認證的證書,要免費使用 SSL 證書,可參考:
How to Install Nginx with Let’s encrypt and get A+ from SSLLabs Test
要在 Nginx 配置自簽證書,首先在配置目錄下建一個文件夾,進到文件夾中:
sudo mkdir /etc/nginx/ssl/
cd /etc/nginx/ssl
生成密鑰:
sudo openssl genrsa -aes256 -out nginx.key 1024
接着生成 CSR:
sudo openssl req -new -key nginx.key -out nginx.csr
Enter pass phrase for nginx.key:
Can't load /home/jaylen/.rnd into RNG
140067713049024:error:2406F079:random number generator:RAND_load_file:Cannot open file:../crypto/rand/randfile.c:88:Filename=/home/jaylen/.rnd
You are about to be asked to enter information that will be incorporated
into your certificate request.
What you are about to enter is what is called a Distinguished Name or a DN.
There are quite a few fields but you can leave some blank
For some fields there will be a default value,
If you enter '.', the field will be left blank.
-----
Country Name (2 letter code) [AU]:CN
State or Province Name (full name) [Some-State]:Guangdong
Locality Name (eg, city) []:Guangzhou
Organization Name (eg, company) [Internet Widgits Pty Ltd]:IT
Organizational Unit Name (eg, section) []:IT
Common Name (e.g. server FQDN or YOUR name) []:www.jaylen.com
Email Address []:[email protected]

Please enter the following 'extra' attributes
to be sent with your certificate request
A challenge password []:admin
An optional company name []:IT
最後,簽發證書:
sudo openssl x509 -req -days 365 -in nginx.csr -signkey nginx.key -out nginx.crt
成功簽發:
ignkey nginx.key -out nginx.crt
Signature ok
subject=C = CN, ST = Guangdong, L = Guangzhou, O = IT, OU = IT, CN = www.jaylen.com, emailAddress = [email protected]
Getting Private key
Enter pass phrase for nginx.key:
接着在 /etc/nginx/conf.d/jaylen.com.conf 中修改:
 server {
     listen 443 ssl;
     ssl_certificate /etc/nginx/ssl/nginx.crt;
     ssl_certificate_key /etc/nginx/ssl/nginx.key;
     ssl_protocols       TLSv1 TLSv1.1 TLSv1.2;
重新加載 Nginx 配置:
sudo nginx -s reload
提示輸入之前步驟設置的密碼,輸入即可。
其它 加固措施,可仔細閱讀:
Top 25 Nginx Web Server Best Security Practices
Nginx Web Server Security and Hardening Guide
3.3 加固 mysql
運行 mysql_secure_installation 工具(安裝 mysql 後自帶的 shell 腳本),進行 mysql 的安全檢查,
根據提示,設置密碼爲最高級別,併爲 root 用戶設置密碼,最後同意以下選項:
- Remove anonymous users? – 刪除匿名用戶
- Disallow root login remotely? – 禁止遠程使用 root 用戶登陸
- Remove test database and access to it? – 刪除測試數據庫和其訪問權限
- Reload privilege tables now? – 重載授權表
3.4 加固 PHP
修改 php.ini 文件
當文件不存在時停止 PHP 處理
Nginx 對於 PHP 支持的配置文件中常常會使用如下形式的配置,該配置使得 PHP 解釋器接受所有以 .php結尾的 URI,這樣一來就會存在很大的風險,存在任意代碼執行漏洞,具體解釋見參考資料 [6]。
修改 /etc/php/7.2/fpm/php.ini文件(不同系統該文件位置略有不同),設置cgi.fix_pathinfo=0,可以禁止 PHP 解釋器查找文件系統中不存在的文件,使用sed 命令完成文件內容的修改:
sudo sed -i 's/;cgi.fix_pathinfo=1/cgi.fix_pathinfo=0/g' /etc/php/7.2/fpm/php.ini
禁用危險的 PHP 函數
在 php.ini 中添加:
disable_functions =exec,eval,phpinfo,passthru,shell_exec,system,proc_open,popen,curl_exec,curl_multi_exec,parse_ini_file,show_source
限制文件上傳功能
如果網站不需要文件上傳功能,應該禁用。
file_uploads=Off
如果需要上傳功能,則設置文件的大小,根據實際情況設置,如頭像圖片上傳1M足矣。
file_uploads=On
upload_max_filesize=1M
設置 POST 方法傳輸數據的大小
POST 方法是當客戶端需要向服務器發送數據時使用的,該方法可被用於對服務器進行 DoS 攻擊等,所以需要將其能傳輸的數據大小設置成合理的數值,如果網站不需要上傳文件等數據量大的操作,4KB也應該足夠了。
post_max_size=1K
防止 PHP 信息泄露
expose_php = Off
限制 PHP 腳本的最長執行時間
# set in seconds
max_execution_time = 30 #最長執行時間 30 s
max_input_time = 30		#腳本解析輸入最長時間30s
memory_limit = 40M 		#腳本最大使用內存40M
這樣可以有效防止大規模的 DOS 攻擊。
禁用未使用的 PHP 模塊
查看已安裝的 PHP 模塊:
php -m
根據實際情況,禁用不使用模塊,註釋掉 php.ini相應的配置行。
0x02 參考資料
[1] Install a LEMP Stack on Ubuntu 18.04
[2] Serve PHP with PHP-FPM and NGINX
[3] Nginx vs Apache
[4] Setting up an Nginx Reverse Proxy
[5] Getting Started with NGINX
[6] Passing Uncontrolled Requests to PHP
[7] Unknown column '' in 'field list'解決方案
[10] Use Public Key Authentication with SSH
[11] Top 25 Nginx Web Server Best Security Practices
[12] Nginx Web Server Security and Hardening Guide