


最近學習ThingsBoard,其中大量使用了Actor設計模式,再這裏做個Actor模式理解與使用的筆記
Actor模式是一種併發模型,與另一種模型共享內存完全相反,Actor模型share nothing。所有的線程(或進程)通過消息傳遞的方式進行合作,這些線程(或進程)稱爲Actor。
共享內存更適合單機多核的併發編程,而且共享帶來的問題很多,編程也困難。隨着多核時代和分佈式系統的到來,共享模型已經不太適合併發編程,因此幾十年前就已經出現的Actor模型又重新受到了人們的重視。
多線程編程-共享內存
到了多核時代,有多個工人,這些工人共同使用一個倉庫和車間,幹什麼都要排隊。比如我要從一塊鋼料切出一塊來用,我得等別人先用完。有個扳手,另一個人在用,我得等他用完。兩個人都要用一個切割機從一塊鋼材切一塊鋼鐵下來用,但是一個人拿到了鋼材,一個人拿到了切割機,他們互相都不退讓,結果誰都幹不了活。
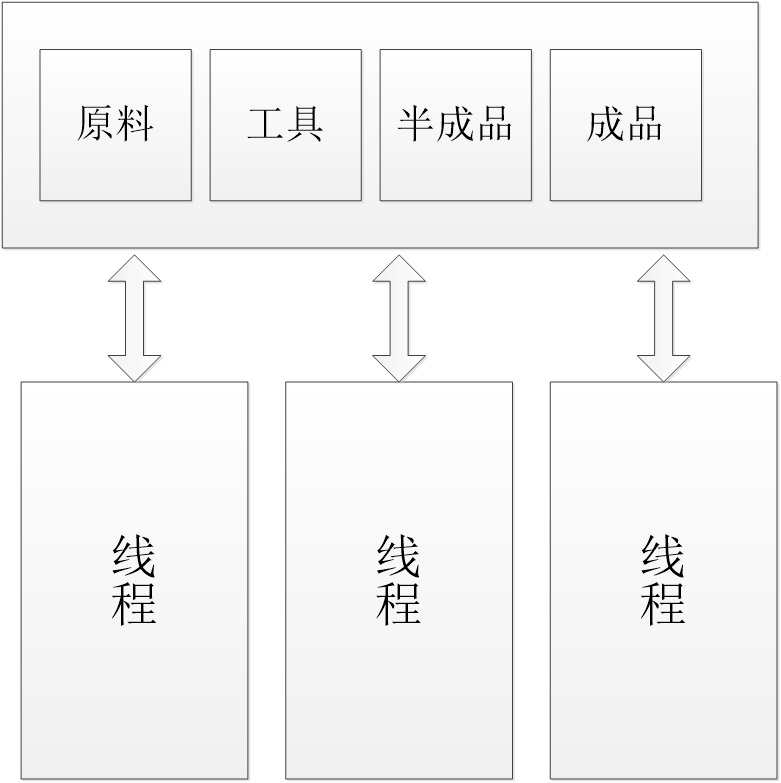
多線程/分佈式編程-Actor模型
到了分佈式系統時代,工廠已經用流水線了,每個人都有明確分工,這就是Actor模式。每個線程都是一個Actor,這些Actor不共享任何內存,所有的數據都是通過消息傳遞的方式進行的。
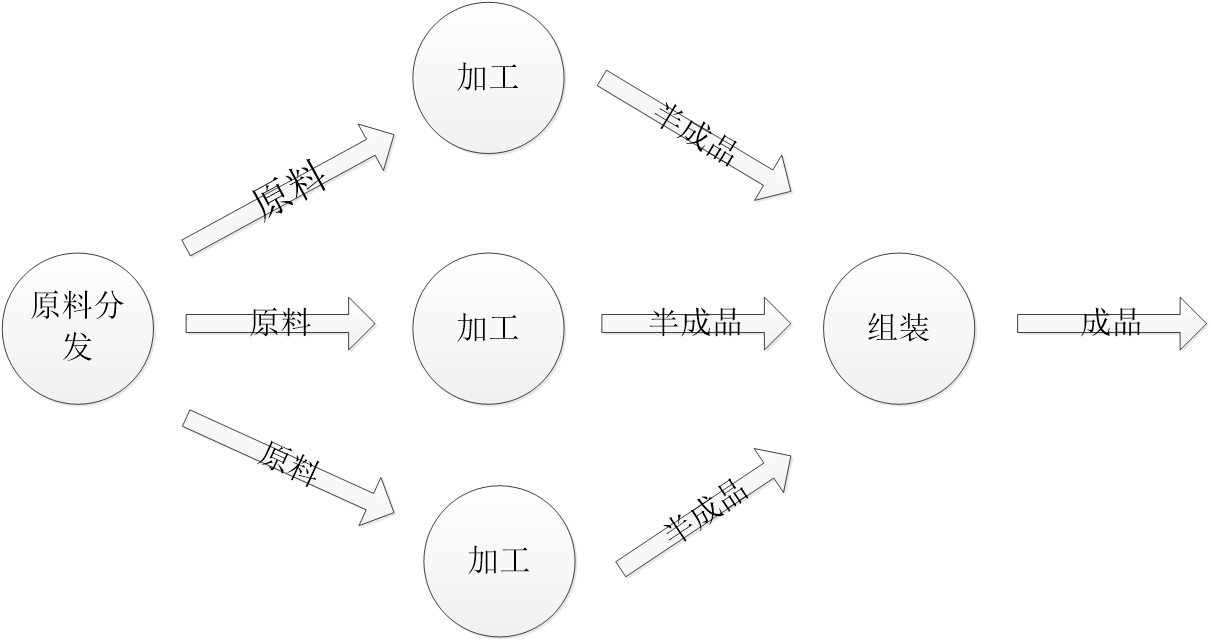
如果用Actor模型實現統計素數個數,那麼我們需要1個actor做原料的分發,就是提供要處理的整數,然後10個actor加工,每次從分發actor那裏拿一個整數進行加工,最終把加工出來的半成品發給組裝actor,組裝actor把10個加工actor的結果彙總輸出。
Actor模式的Springboot實現
瞭解過Akka或者Actor的人應該知道,這的確是一個很不錯的框架,按照Akka官網的描述——使用Akka使得構建強有力的併發與分佈式應用將更加容易。
與springboot集成,是因爲我們想把ActorSystem、Actor等組件的創建納入SpringBoot容器中,方便管理。大家都知道,ActorSystem的創建不是依賴new方式,而是通過create方法,所以我們需要寫一個Bean來生產ActorSystem。另外Actor,它也是通過actorOf()方法創建的,所以我們也需要寫生產Actor引用的方法,Akka提供了IndirectActorProducer接口,通過實現該接口,我們就可以實現DI(依賴注入)。集成springboot之後,ActorSystem範圍內的依賴都會交給SpringBoot來管理,並且每個ActorSystem都會持有一個ApplicationContext。
下面我們開始來看看集成是怎樣實現的:
在實現之前,我們需要加入相關依賴,如下:
<?xml version="1.0" encoding="UTF-8"?>
<project xmlns="http://maven.apache.org/POM/4.0.0" xmlns:xsi="http://www.w3.org/2001/XMLSchema-instance"
	xsi:schemaLocation="http://maven.apache.org/POM/4.0.0 http://maven.apache.org/xsd/maven-4.0.0.xsd">
	<modelVersion>4.0.0</modelVersion>
	<parent>
		<groupId>org.springframework.boot</groupId>
		<artifactId>spring-boot-starter-parent</artifactId>
		<version>2.1.3.RELEASE</version>
		<relativePath/> <!-- lookup parent from repository -->
	</parent>
	<groupId>io.kunalk.spring</groupId>
	<artifactId>springakka</artifactId>
	<version>0.0.1-SNAPSHOT</version>
	<name>springakka</name>
	<description>Demo project for Spring Boot</description>

	<properties>
		<java.version>1.8</java.version>
	</properties>

	<dependencies>
		<dependency>
			<groupId>org.springframework.boot</groupId>
			<artifactId>spring-boot-starter-actuator</artifactId>
		</dependency>

		<dependency>
			<groupId>org.springframework.boot</groupId>
			<artifactId>spring-boot-starter-test</artifactId>
			<scope>test</scope>
		</dependency>

		<dependency>
			<groupId>com.typesafe.akka</groupId>
			<artifactId>akka-actor_2.11</artifactId>
			<version>2.4.3</version>
		</dependency>

		<dependency>
			<groupId>com.typesafe.akka</groupId>
			<artifactId>akka-slf4j_2.11</artifactId>
			<version>2.4.3</version>
		</dependency>
	</dependencies>

	<build>
		<plugins>
			<plugin>
				<groupId>org.springframework.boot</groupId>
				<artifactId>spring-boot-maven-plugin</artifactId>
			</plugin>
		</plugins>
	</build>

</project>
第一步,實現IndirectActorProducer,用於生產Actor,既然是交給Spring管理,肯定少不了ApplicationContext對象和bean名稱:
/**
 * 實現IndirectActorProducer,用於生產Actor
 *
 * <p/>
 * Date 2019年8月8日 下午6:44:05
 * <p/>
 * @author ieflex
 */
public class SpringActorProducer implements IndirectActorProducer {

	final private ApplicationContext applicationContext;
	final private String actorBeanName;

	public SpringActorProducer(ApplicationContext applicationContext, String actorBeanName) {
		this.applicationContext = applicationContext;
		this.actorBeanName = actorBeanName;
	}

	@Override
	public Actor produce() {
		return (Actor) applicationContext.getBean(actorBeanName);
	}

	@Override
	public Class<? extends Actor> actorClass() {
		return (Class<? extends Actor>) applicationContext.getType(actorBeanName);
	}
}
第二步,實現了DI之後,我們就需要構造Props對象,用來創建ActorRef:
/**
 * 擴展組件,ApplicationContext會在SpringBoot初始化的時候加載進來 <br/>
 * 構造Props,用於生產ActorRef
 */
@Component
public class SpringExtension implements Extension {

	private ApplicationContext applicationContext;

	public void initialize(ApplicationContext applicationContext) {
		this.applicationContext = applicationContext;
	}

	/**
	 * 該方法用來創建Props對象,依賴前面創建的SpringActorProducer,DI組件,獲取到Props對象,我們就可以創建Actor bean對象
	 *
	 * @param beanName actor bean 名稱
	 * @return props
	 */
	public Props props(String actorBeanName) {
		return Props.create(SpringActorProducer.class, applicationContext, actorBeanName);
	}
}
第三步,通過SpringExtProvider我們可以獲取到SpringExt,通過SpringExt我們可以使用Props創建ActorRef對象,那麼現在我們怎麼來初始化ActorSystem,並掃描到納入到容器的Actor呢?我們可以通過@Configuration來創建一個配置類:
/**
 * 創建ActorSystem,並將其放入到spring管理,初始化ApplicationContext
 *
 * <p/>
 * Date 2019年8月8日 下午6:50:20
 * <p/>
 *
 * @author ieflex
 */
@Configuration
class ApplicationConfiguration {

	@Autowired
	private ApplicationContext applicationContext;

	@Autowired
	private SpringExtension springExtension;

	@Bean
	public ActorSystem actorSystem() {
		ActorSystem actorSystem = ActorSystem.create("actor-system", akkaConfiguration());
		springExtension.initialize(applicationContext);
		return actorSystem;
	}

	@Bean
	public Config akkaConfiguration() {
		return ConfigFactory.load();
	}
}
下面,我們就來創建一個Actor示例,來驗證集成是否成功,如下:
/**
 * 一般情況下我們的Actor都需要繼承自UntypedActor,並實現其onReceive方法。onReceive用於接收消息,你可以在其中實現對消息的匹配並做不同的處理。
 *
 */
@Component("workerActor")
@Scope("prototype")
public class WorkerActor extends UntypedActor {

	@Autowired
	private BusinessService businessService;

	private int count = 0;

	@Override
	public void onReceive(Object message) throws Exception {
		if (message instanceof Request) {
			businessService.perform(this + " " + (++count));
		} else if (message instanceof Response) {
			getSender().tell(count, getSelf());
		} else {
			unhandled(message);
		}
	}

	public static class Request {
	}

	public static class Response {
	}
}
特別注意,使用依賴注入框架時,Actor不能配置爲單例的,否則程序會出現問題。這裏我們簡單輸出接受到的消息。
測試:
@Component
class Runner implements CommandLineRunner {

    private final Logger logger = LoggerFactory.getLogger(this.getClass());

    @Autowired
    private ActorSystem actorSystem;

    @Autowired
    private SpringExtension springExtension;

    @Override
    public void run(String[] args) throws Exception {
        try {
        	//Actor,它也是通過actorOf()方法創建
            ActorRef workerActor = actorSystem.actorOf(springExtension.props("workerActor"), "worker-actor");

            workerActor.tell(new WorkerActor.Request(), null);
            workerActor.tell(new WorkerActor.Request(), null);
            workerActor.tell(new WorkerActor.Request(), null);

            FiniteDuration duration = FiniteDuration.create(1, TimeUnit.SECONDS);
            Future<Object> awaitable = Patterns.ask(workerActor, new WorkerActor.Response(), Timeout.durationToTimeout(duration));

            logger.info("Response: " + Await.result(awaitable, duration));
        } finally {
            actorSystem.terminate();
            Await.result(actorSystem.whenTerminated(), Duration.Inf());
        }
    }
}
啓動測試結果:
08/08 18:49:19.246 INFO [main] i.k.s.s.SpringakkaApplication - Starting SpringakkaApplication on lihui with PID 61208 (D:\eclipse-workspace\workspace\springboot-akka\target\classes started by lily in D:\eclipse-workspace\workspace\springboot-akka)
08/08 18:49:19.249 INFO [main] i.k.s.s.SpringakkaApplication - No active profile set, falling back to default profiles: default
08/08 18:49:20.091 INFO [actor-system-akka.actor.default-dispatcher-4] a.e.s.Slf4jLogger - Slf4jLogger started
08/08 18:49:20.296 INFO [main] i.k.s.s.SpringakkaApplication - Started SpringakkaApplication in 1.244 seconds (JVM running for 2.218)
08/08 18:49:20.299 INFO [actor-system-akka.actor.default-dispatcher-5] i.k.s.s.s.BusinessService - Perform: io.kunalk.spring.springakka.actor.WorkerActor@70b82aef 1
08/08 18:49:20.300 INFO [actor-system-akka.actor.default-dispatcher-5] i.k.s.s.s.BusinessService - Perform: io.kunalk.spring.springakka.actor.WorkerActor@70b82aef 2
08/08 18:49:20.300 INFO [actor-system-akka.actor.default-dispatcher-5] i.k.s.s.s.BusinessService - Perform: io.kunalk.spring.springakka.actor.WorkerActor@70b82aef 3
08/08 18:49:20.300 INFO [main] i.k.s.s.Runner - Response: 3
例子地址:
https://github.com/ieflex/springboot-akka