


此博文是案例博文,關於LVS負載均衡羣集的原理及相關概述,請參考博文:Centos 7之LVS負載均衡羣集
一、案例簡介
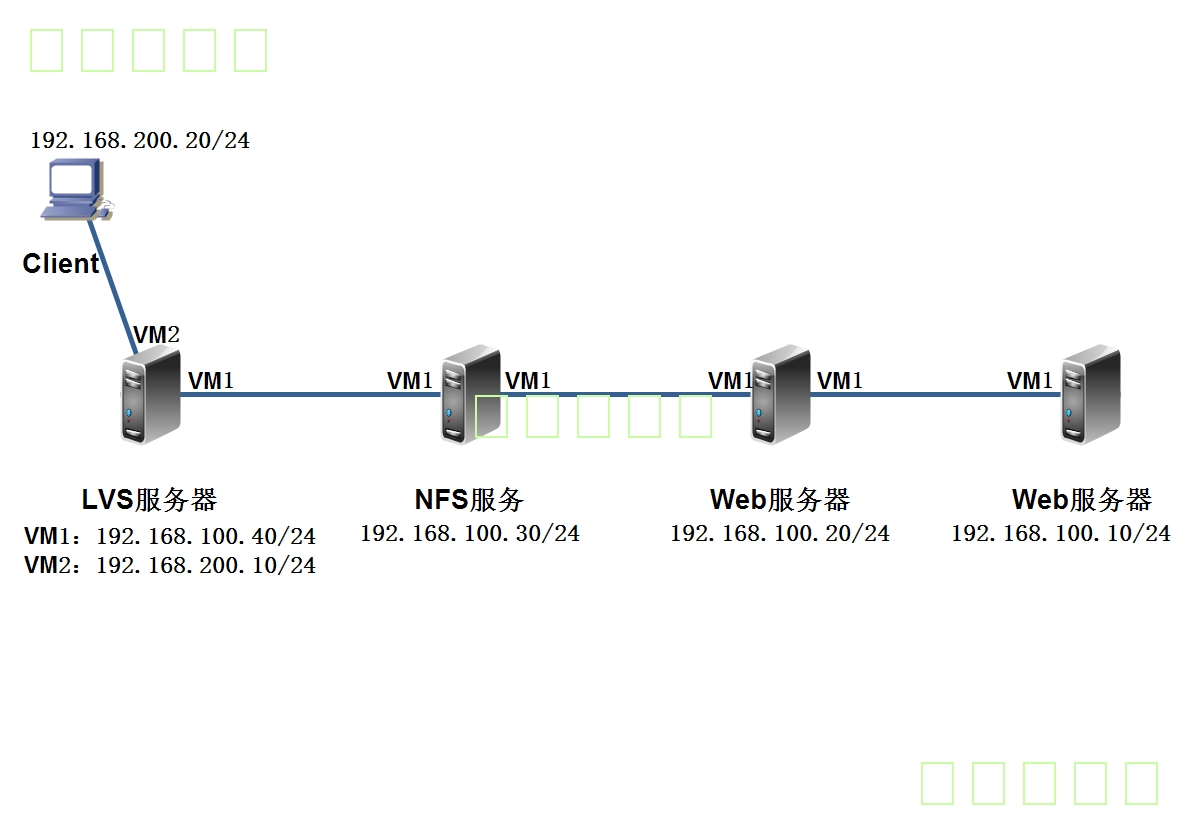
1、案例環境
2、實驗結果
使用NAT模式的羣集技術,LVS負載調度器是所有節點訪問Internet的網關服務器,其192.168.200.10作爲整個羣集的VIP地址。
使用輪詢(rr)的調度算法。
web1和web2先搭建web服務,分別準備不同的網頁文件,供客戶端訪問,以此來確定client訪問LVS服務器的192.168.200.10,可以訪問到兩臺web服務器。
- 待client測試成功後,web1和web2便可以掛載NFS服務器提供的共享目錄,以此來爲client提供相同的網頁文件。
二、開始搭建複製均衡羣集
1、部署Web1服務器:
[root@centos01 ~]# yum -y install httpd  <!--安裝httpd服務-->
[root@centos01 ~]# echo "www.benet.com" >
/var/www/html/index.html   <!--創建網站主頁測試頁-->
[root@centos01 ~]# systemctl start httpd   <!--啓動httpd服務-->
[root@centos01 ~]# systemctl enable httpd  <!--設置開機自動啓動-->
[root@centos01 ~]# vim /etc/sysconfig/network-scripts/ifcfg-ens32
      <!--編輯網卡配置文件-->
GATEWAY=192.168.100.40   <!--添加網關-->
[root@centos01 ~]# systemctl restart network<!--重啓網卡服務-->
2、部署Web2服務器:
[root@centos02 ~]# yum -y install httpd    <!--安裝httpd服務-->
[root@centos02 ~]# echo "www.accp.com" >
/var/www/html/index.html    <!--創建網站主頁測試頁-->
[root@centos02 ~]# systemctl start httpd    <!--啓動httpd服務-->
[root@centos02 ~]# systemctl enable httpd <!--設置開機自動啓動-->
[root@centos02 ~]# vim /etc/sysconfig/network-scripts/ifcfg-ens32
          <!--編輯網卡配置文件-->
GATEWAY=192.168.100.40   <!--添加網關-->
[root@centos02 ~]# systemctl restart network <!--重啓網卡服務-->
3、部署網關/LVS服務器:
[root@centos04 ~]# cp /etc/sysconfig/network-scripts/ifcfg-ens32
/etc/sysconfig/network-scripts/ifcfg-ens34
<!--複製網卡配置文件-->
[root@centos04 ~]# vim /etc/sysconfig/network-scripts/ifcfg-ens34
        <!--編輯ens34網卡配置文件-->
TYPE=Ethernet
PROXY_METHOD=none
BROWSER_ONLY=no
BOOTPROTO=static
DEFROUTE=yes
NAME=ens34      <!--修改名字-->
DEVICE=ens34   <!--修改名字-->
ONBOOT=yes
IPADDR=192.168.200.10   <!--配置IP地址-->
NATEMASK=255.255.255.0
[root@centos04 ~]# systemctl restart network <!--重啓網卡服務-->
[root@centos04 ~]# vim /etc/sysctl.conf   <!--開啓路由轉發功能-->
net.ipv4.ip_forward = 1

[root@centos04 ~]# sysctl -p   <!--驗證-->
net.ipv4.ip_forward = 1
[root@centos04 ~]# modprobe ip_vs   <!--加載ip_vs模塊-->
[root@centos04 ~]# yum -y install ipvsadm<!--安裝ipvsadm軟件包-->
[root@centos04 ~]# ipvsadm -C   <!--清空ipvsadm規則-->
[root@centos04 ~]# ipvsadm -A -t 192.168.200.10:80 -s rr
             <!--創建虛擬服務器,羣集的VIP地址爲192.168.200.10-->
[root@centos04 ~]# ipvsadm -a -t 192.168.200.10:80 -r
192.168.100.10:80 -m -w 1   <!--添加服務器節點-->
[root@centos04 ~]# ipvsadm -a -t 192.168.200.10:80 -r
192.168.100.20:80 -m -w 1   <!--添加服務器節點-->
[root@centos04 ~]# ipvsadm-save   <!--保存策略-->
-A -t centos04:http -s rr
-a -t centos04:http -r 192.168.100.10:http -m -w 1
-a -t centos04:http -r 192.168.100.20:http -m -w 1
[root@centos04 ~]# ipvsadm-save >
/etc/sysconfig/ipvsadm.bak<!--導出策略 備份策略-->
[root@centos04 ~]# cat /etc/sysconfig/ipvsadm.bak <!--查看備份的策略-->
-A -t centos04:http -s rr
-a -t centos04:http -r 192.168.100.10:http -m -w 1
-a -t centos04:http -r 192.168.100.20:http -m -w 1
4、配置客戶端
1)客戶端配置IP地址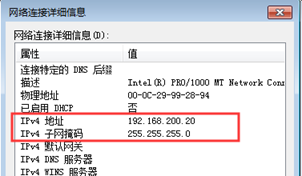
2)測試LVS負載均衡服務器是否工作正常(多次訪問192.168.200.10,可以得到兩個不同的頁面):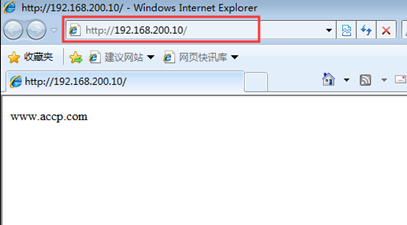

5、配置NFS共享存儲
[root@centos03 ~]# yum -y install nfs-utils rpcbind <!--安裝NFS相關軟件包-->
[root@centos03 ~]# systemctl enable nfs <!--設置爲開機自動啓動-->
[root@centos03 ~]# systemctl enable rpcbind <!--設置爲開機自動啓動-->
[root@centos03 ~]# mkdir -p /opt/wwwroot   <!--創建共享目錄-->
[root@centos03 ~]# echo "www.wangyi.com" >
/opt/wwwroot/index.html   <!--新建網站主頁,寫入內容-->
[root@centos03 ~]# vim /etc/exports   <!--設置共享目錄-->
/opt/wwwroot    192.168.100.0/24(rw,sync,no_root_squash)  <!--添加此行-->
[root@centos03 ~]# systemctl restart rpcbind  <!--重啓服務-->
[root@centos03 ~]# systemctl restart nfs   <!--重啓服務-->
[root@centos03 ~]# showmount -e   <!--查看共享的目錄-->
Export list for centos03:
/opt/wwwroot 192.168.100.0/24
1)Web服務器1掛載共享目錄
[root@centos01 ~]# yum -y install rpcbind nfs-utils<!--安裝相關軟件包-->
[root@centos01 ~]# systemctl enable rpcbind
                       <!--設置服務開機自動啓動-->
[root@centos01 ~]# systemctl start rpcbind <!--啓動服務-->
[root@centos01 ~]# showmount -e 192.168.100.30
                           <!--查詢NFS服務器共享的目錄-->
Export list for 192.168.100.30:
/opt/wwwroot 192.168.100.0/24
[root@centos01 ~]# mount 192.168.100.30:/opt/wwwroot
/var/www/html/   <!--掛載共享目錄-->
[root@centos01 ~]# df -hT /var/www/html/ <!--查看是否掛載成功-->
文件系統                    類型  容量  已用  可用 已用% 掛載點
192.168.100.30:/opt/wwwroot nfs4   76G  3.7G   73G    5% /var/www/html
[root@centos01 ~]# vim /etc/fstab   <!--設置自動掛載-->
192.168.100.30:/opt/wwwroot     /var/www/html                     nfs     defaults,_netdev 0 0
2)Web服務器2掛載共享目錄
[root@centos02 ~]# yum -y install rpcbind nfs-utils <!--安裝相關軟件包-->
[root@centos02 ~]# systemctl enable rpcbind
                                     <!--設置服務開機自動啓動-->
[root@centos02 ~]# systemctl start rpcbind    <!--啓動服務-->
[root@centos02 ~]# showmount -e 192.168.100.30
                             <!--查詢NFS服務器共享的目錄-->
Export list for 192.168.100.30:
/opt/wwwroot 192.168.100.0/24
[root@centos02 ~]# mount 192.168.100.30:/opt/wwwroot
/var/www/html/     <!--掛載共享目錄-->
[root@centos02 ~]# df -hT /var/www/html/ <!--查看是否掛載成功-->
文件系統                    類型  容量  已用  可用 已用% 掛載點
192.168.100.30:/opt/wwwroot nfs4   76G  3.7G   73G    5% /var/www/html
[root@centos02 ~]# vim /etc/fstab   <!--設置自動掛載-->
192.168.100.30:/opt/wwwroot     /var/www/html                     nfs     defaults,_netdev 0 0
6、客戶端訪問
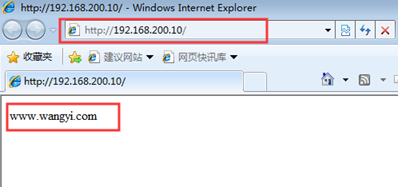
至此,不管怎樣刷新訪問,都將是看到同一個網頁。最終的LVS負載均衡效果也就實現了。
當LVS服務器重啓後,LVS規則將會丟失,這就用到了備份,需要注意的是,備份時的主機名和恢復時的主機名必須一致,並且需要注意網卡優先的問題,否則在恢復後,會發現VIP(羣集的虛擬IP)變成了LVS服務器的另一個IP地址
[root@centos04 ~]# ipvsadm -ln  <!--重啓後查看策略-->
IP Virtual Server version 1.2.1 (size=4096)
Prot LocalAddress:Port Scheduler Flags
  -> RemoteAddress:Port           Forward Weight ActiveConn InActConn

[root@centos04 ~]# ipvsadm-restore <
/etc/sysconfig/ipvsadm.bak    <!--恢復策略-->
[root@centos04 ~]# ipvsadm -ln      <!--查看策略是否恢復-->
IP Virtual Server version 1.2.1 (size=4096)
Prot LocalAddress:Port Scheduler Flags
  -> RemoteAddress:Port           Forward Weight ActiveConn InActConn
TCP  192.168.100.40:80 rr
  -> 192.168.100.10:80            Masq    1      0          0
  -> 192.168.100.20:80            Masq    1      0          0
—————— 本文至此結束,感謝閱讀 ——————