


实验环境
用两台服务器模拟6台服务器(添加网卡)
主服务器Redis1:
ens33: 192.168.52.150
ens36: 192.168.52.153
ens37: 192.168.52.154
从服务器Redis2:
ens33: 192.168.52.148
ens36: 192.168.52.155
ens37: 192.168.52.156
在两台服务器上都安装Redis
[root@localhost ~]# yum install gcc gcc-c++ make -y ##安装环境组件
[root@localhost ~]# mkdir /mnt/tools
[root@localhost ~]# mount.cifs //192.168.100.100/tools /mnt/tools/ ##挂载
Password for root@//192.168.100.100/tools:
[root@localhost ~]# cd /mnt/tools/redis/
[root@localhost redis]# ls
redis-5.0.7.tar.gz
[root@localhost redis]# tar xf redis-5.0.7.tar.gz -C /opt/ ##解压
[root@localhost redis]# cd /opt/
[root@localhost opt]# ls
redis-5.0.7 rh
[root@localhost opt]# cd redis-5.0.7/
[root@localhost redis-5.0.7]# make ##编译
[root@localhost redis-5.0.7]# make PREFIX=/usr/local/redis/ install ##安装
[root@localhost redis-5.0.7]# cd utils/
[root@localhost utils]# ./install_server.sh ##执行脚本进行配置
Welcome to the redis service installer
This script will help you easily set up a running redis server
Please select the redis port for this instance: [6379] ##默认端口
Selecting default: 6379
Please select the redis config file name [/etc/redis/6379.conf] ##配置文件
Selected default - /etc/redis/6379.conf
Please select the redis log file name [/var/log/redis_6379.log] ##日志文件
Selected default - /var/log/redis_6379.log
Please select the data directory for this instance [/var/lib/redis/6379] ##数据文件
Selected default - /var/lib/redis/6379
Please select the redis executable path [] /usr/local/redis/bin/redis-server
##可执行文件路径
Selected config:
Port : 6379
Config file : /etc/redis/6379.conf
Log file : /var/log/redis_6379.log
Data dir : /var/lib/redis/6379
Executable : /usr/local/redis/bin/redis-server
Cli Executable : /usr/local/redis/bin/redis-cli
Is this ok? Then press ENTER to go on or Ctrl-C to abort.
Copied /tmp/6379.conf => /etc/init.d/redis_6379
Installing service...
Successfully added to chkconfig!
Successfully added to runlevels 345!
Starting Redis server...
Installation successful!
[root@localhost utils]# ln -s /usr/local/redis/bin/ /usr/local/bin/ ##便于系统识别
[root@localhost utils]# netstat -ntap | grep 6379
tcp 0 0 127.0.0.1:6379 0.0.0.0: LISTEN 44510/redis-server
在两台服务器上修改配置文件
[root@localhost utils]# vim /etc/redis/6379.conf
#bind 127.0.0.1 ##注释第70行的监听127地址,已监听所有地址
protected-mode no ##去掉第89行注释关闭安全保护
port 6379 ##去掉第93行注释,开启端口6379
daemonize yes ##去掉第137行注释,以独立进程启动
cluster-enabled yes ##去掉第833行注释,开启群集功能
cluster-config-file nodes-6379.conf ##去掉第841行注释,群集名称文件设置
cluster-node-timeout 15000 ##去掉第847行注释,群集超时时间设置
appendonly yes ##去掉第700行注释,开启aof持久化
[root@localhost utils]# /etc/init.d/redis_6379 restart ##重启服务
Stopping ...
Redis stopped
Starting Redis server...
[root@localhost utils]# cd /var/lib/redis/6379/
[root@localhost 6379]# ls
appendonly.aof dump.rdb nodes-6379.conf ##生成aof,rdb和节点文件
在主服务器上安装rvm,Ruby控制群集软件
[root@localhost utils]# gpg --keyserver hkp://keys.gnupg.net --recv-keys 409B6B1796C275462A1703113804BB82D39DC0E3
##导入key文件
gpg: 已创建目录‘/root/.gnupg’
gpg: 新的配置文件‘/root/.gnupg/gpg.conf’已建立
gpg: 警告:在‘/root/.gnupg/gpg.conf’里的选项于此次运行期间未被使用
gpg: 钥匙环‘/root/.gnupg/secring.gpg’已建立
gpg: 钥匙环‘/root/.gnupg/pubring.gpg’已建立
gpg: 下载密钥‘D39DC0E3’,从 hkp 服务器 keys.gnupg.net
gpg: /root/.gnupg/trustdb.gpg:建立了信任度数据库
gpg: 密钥 D39DC0E3:公钥“Michal Papis (RVM signing) <[email protected]>”已导入
gpg: 没有找到任何绝对信任的密钥
gpg: 合计被处理的数量:1
gpg: 已导入:1 (RSA: 1)
[root@localhost utils]# curl -sSL https://get.rvm.io | bash -s stable ##安装rvm
........................//省略过程
[root@localhost utils]# source /etc/profile.d/rvm.sh ##执行环境变量
[root@localhost utils]# rvm list known ##列出ruby可以安装的版本
[root@localhost utils]# rvm install 2.4.1 ##安装2.4.1 版本
[root@localhost utils]# rvm use 2.4.1 ##使用rubyruby2.4.1 版本
Using /usr/local/rvm/gems/ruby-2.4.1
[root@localhost utils]# ruby -v ##查看当前ruby2.4.1 版本
ruby 2.4.1p111 (2017-03-22 revision 58053) [x86_64-linux]
[root@localhost utils]# gem install redis #再次安装Redis
Fetching redis-4.1.3.gem
Successfully installed redis-4.1.3
Parsing documentation for redis-4.1.3
Installing ri documentation for redis-4.1.3
Done installing documentation for redis after 1 seconds
1 gem installed
[root@localhost utils]#
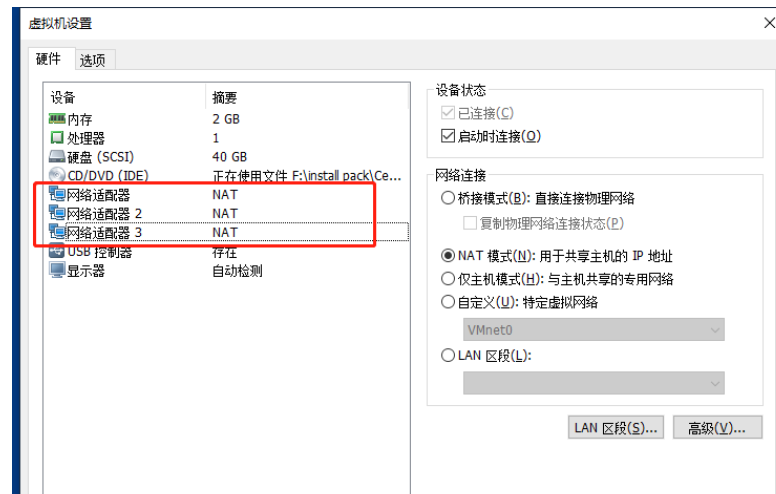
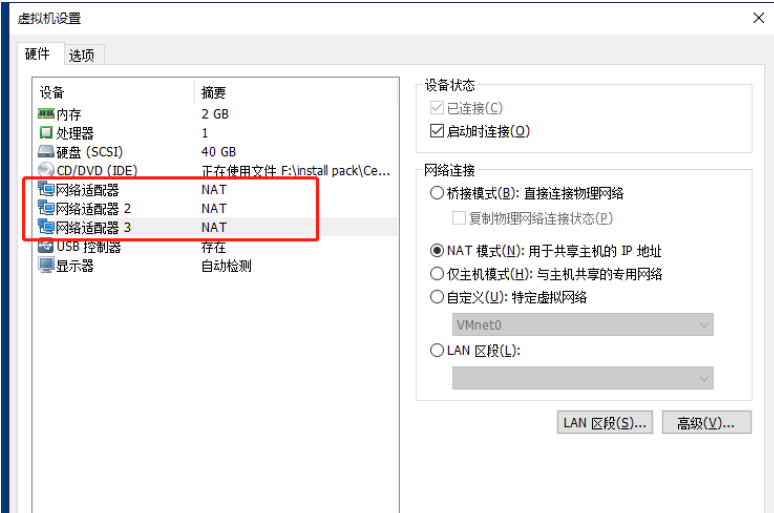
在主服务器上添加两块网卡
[root@localhost utils]# service network restart ##重启网卡
[root@localhost utils]# systemctl stop firewalld.service ##关闭防火墙
[root@localhost utils]# setenforce 0
[root@localhost utils]# ifconfig
ens33: flags=4163<UP,BROADCAST,RUNNING,MULTICAST> mtu 1500
inet 192.168.52.150 netmask 255.255.255.0 broadcast 192.168.52.255
inet6 fe80::5134:22f5:842b:5201 prefixlen 64 scopeid 0x20<link>
ether 00:0c:29:0d:f1:75 txqueuelen 1000 (Ethernet)
RX packets 91575 bytes 119014065 (113.5 MiB)
RX errors 0 dropped 0 overruns 0 frame 0
TX packets 28442 bytes 2443621 (2.3 MiB)
TX errors 0 dropped 0 overruns 0 carrier 0 collisions 0ens36: flags=4163<UP,BROADCAST,RUNNING,MULTICAST> mtu 1500
inet 192.168.52.153 netmask 255.255.255.0 broadcast 192.168.52.255
inet6 fe80::84f1:53d8:a97a:d450 prefixlen 64 scopeid 0x20<link>
ether 00:0c:29:0d:f1:89 txqueuelen 1000 (Ethernet)
RX packets 128 bytes 18873 (18.4 KiB)
RX errors 0 dropped 0 overruns 0 frame 0
TX packets 42 bytes 6253 (6.1 KiB)
TX errors 0 dropped 0 overruns 0 carrier 0 collisions 0ens37: flags=4163<UP,BROADCAST,RUNNING,MULTICAST> mtu 1500
inet 192.168.52.154 netmask 255.255.255.0 broadcast 192.168.52.255
inet6 fe80::74f5:2344:c59b:4fdb prefixlen 64 scopeid 0x20<link>
ether 00:0c:29:0d:f1:7f txqueuelen 1000 (Ethernet)
RX packets 107 bytes 16849 (16.4 KiB)
RX errors 0 dropped 0 overruns 0 frame 0
TX packets 29 bytes 4601 (4.4 KiB)
TX errors 0 dropped 0 overruns 0 carrier 0 collisions 0
在从服务器上也添加两块网卡
[root@slave utils]# service network restart ##重启网卡
[root@slave utils]# systemctl stop firewalld.service ##关闭防火墙
[root@slave utils]# setenforce 0
[root@localhost utils]# ifconfig
ens33: flags=4163<UP,BROADCAST,RUNNING,MULTICAST> mtu 1500
inet 192.168.52.148 netmask 255.255.255.0 broadcast 192.168.52.255
inet6 fe80::c776:9d00:618:88f2 prefixlen 64 scopeid 0x20<link>
ether 00:0c:29:37:e9:25 txqueuelen 1000 (Ethernet)
RX packets 65481 bytes 86357533 (82.3 MiB)
RX errors 0 dropped 0 overruns 0 frame 0
TX packets 21069 bytes 1892475 (1.8 MiB)
TX errors 0 dropped 0 overruns 0 carrier 0 collisions 0ens36: flags=4163<UP,BROADCAST,RUNNING,MULTICAST> mtu 1500
inet 192.168.52.155 netmask 255.255.255.0 broadcast 192.168.52.255
inet6 fe80::d3e5:cd6b:26f8:fd1f prefixlen 64 scopeid 0x20<link>
ether 00:0c:29:37:e9:39 txqueuelen 1000 (Ethernet)
RX packets 143 bytes 17342 (16.9 KiB)
RX errors 0 dropped 0 overruns 0 frame 0
TX packets 38 bytes 5940 (5.8 KiB)
TX errors 0 dropped 0 overruns 0 carrier 0 collisions 0ens37: flags=4163<UP,BROADCAST,RUNNING,MULTICAST> mtu 1500
inet 192.168.52.156 netmask 255.255.255.0 broadcast 192.168.52.255
inet6 fe80::222b:77ad:8da2:4ea6 prefixlen 64 scopeid 0x20<link>
ether 00:0c:29:37:e9:2f txqueuelen 1000 (Ethernet)
RX packets 114 bytes 14481 (14.1 KiB)
RX errors 0 dropped 0 overruns 0 frame 0
TX packets 30 bytes 4661 (4.5 KiB)
TX errors 0 dropped 0 overruns 0 carrier 0 collisions 0
在master服务器上创建集群
##6个实例分为三组,每组一主一从
[root@localhost utils]# redis-cli --cluster create 192.168.52.150:6379 192.168.52.153:6379 192.168.52.154:6379 192.168.52.148:6379 192.168.52.155:6379 192.168.52.156:6379 --cluster-replicas 1
##创建群集,每组一主一从Performing hash slots allocation on 6 nodes...
Master[0] -> Slots 0 - 5460
Master[1] -> Slots 5461 - 10922
Master[2] -> Slots 10923 - 16383
Adding replica 192.168.52.155:6379 to 192.168.52.150:6379
Adding replica 192.168.52.156:6379 to 192.168.52.153:6379
Adding replica 192.168.52.148:6379 to 192.168.52.154:6379
M: b9dfae79d92141a7bad172a344e0696f356a875f 192.168.52.150:6379
slots:[0-16383] (5461 slots) master ##128,129,135为主
M: b9dfae79d92141a7bad172a344e0696f356a875f 192.168.52.153:6379
slots:[0-16383] (5462 slots) master
M: b9dfae79d92141a7bad172a344e0696f356a875f 192.168.52.154:6379
slots:[0-16383] (5461 slots) master
S: ebc69ee01cf293b3af9930cac2dba03b4475336b 192.168.52.148:6379
replicates b9dfae79d92141a7bad172a344e0696f356a875f ##136,137,138为副本
S: ebc69ee01cf293b3af9930cac2dba03b4475336b 192.168.52.155:6379
replicates b9dfae79d92141a7bad172a344e0696f356a875f
S: ebc69ee01cf293b3af9930cac2dba03b4475336b 192.168.52.156:6379
replicates b9dfae79d92141a7bad172a344e0696f356a875f
...
Can I set the above configuration? (type 'yes' to accept): yes ##选择yes
Nodes configuration updated
Assign a different config epoch to each node
Sending CLUSTER MEET messages to join the cluster
Waiting for the cluster to joinPerforming Cluster Check (using node 192.168.52.150:6379)
M: b9dfae79d92141a7bad172a344e0696f356a875f 192.168.52.150:6379
slots:[0-16383] (16384 slots) master
1 additional replica(s)
S: ebc69ee01cf293b3af9930cac2dba03b4475336b 192.168.52.155:6379
slots: (0 slots) slave
replicates b9dfae79d92141a7bad172a344e0696f356a875f
[OK] All nodes agree about slots configuration.
Check for open slots...
Check slots coverage...
[OK] All 16384 slots covered.
[root@localhost utils]#
验证群集读写原理
[root@localhost utils]# redis-cli -h 192.168.52.150 -p 6379 ##主服务器
192.168.52.150:6379> set name zhangsan ##创建键值对
OK
192.168.52.150:6379> keys
1) "name"
192.168.52.150:6379> get name
"zhangsan"
192.168.52.150:6379> exit
[root@localhost utils]# redis-cli -h 192.168.52.148 -p 6379 ##从服务器
192.168.52.148:6379> keys ##查看从上也有
1) "name"
192.168.52.148:6379> get name
"zhangsan"
192.168.52.148:6379> exit
[root@localhost utils]#