Zabbix部署
實驗環境:
CentOS 7-2:192.168.18.147(監測端:部署安裝zabbix)
CentOS 7-3:192.168.18.128(被監測端)
監測端操作:
[root@cacti ~]# systemctl stop firewalld.service #關閉防火牆功能
[root@cacti ~]# systemctl disable firewalld.service #開機禁用防火牆功能
Removed symlink /etc/systemd/system/multi-user.target.wants/firewalld.service.
Removed symlink /etc/systemd/system/dbus-org.fedoraproject.FirewallD1.service.
[root@cacti ~]# setenforce 0 #關閉增強型安全功能
`安裝LAMP架構`
[root@cacti ~]# yum install -y \
httpd \
mariadb-server mariadb \
php \
php-mysql \
php-gd \
libjpeg* \
php-ldap \
php-odbc \
php-pear \
php-xml \
php-xmlrpc \
php-mhash
`編輯apache配置文件`
[root@cacti ~]# vim /etc/httpd/conf/httpd.conf
95 ServerName www.yun.com:80 #第95行,刪除註釋,域名自定義
164 DirectoryIndex index.html index.php #164行,添加首頁支持類類型index.php
#修改完成後按Esc退出插入模式,輸入:wq保存退出
`修改時區爲中國`
[root@cacti ~]# vim /etc/php.ini
878 date.timezone = PRC #878行,把前面模板的;號刪除,後面添加中國時區PRC
#修改完成後按Esc退出插入模式,輸入:wq保存退出
[root@cacti ~]# systemctl start httpd.service #啓動apache服務
[root@cacti ~]# systemctl start mariadb.service #啓動mariadb服務
[root@cacti ~]# netstat -ntap | egrep '(3306|80)' #使用egrep命令同時查看3306和80端口
tcp 0 0 0.0.0.0:3306 0.0.0.0:* LISTEN 4410/mysql
tcp6 0 0 :::80 :::* LISTEN 4131/httpd
`初始化數據庫配置`
[root@cacti ~]# mysql_secure_installation
NOTE: RUNNING ALL PARTS OF THIS SCRIPT IS RECOMMENDED FOR ALL MariaDB
SERVERS IN PRODUCTION USE! PLEASE READ EACH STEP CAREFULLY!
In order to log into MariaDB to secure it, we'll need the current
password for the root user. If you've just installed MariaDB, and
you haven't set the root password yet, the password will be blank,
so you should just press enter here.
Enter current password for root (enter for none): #此處直接回車
OK, successfully used password, moving on...
Setting the root password ensures that nobody can log into the MariaDB
root user without the proper authorisation.
Set root password? [Y/n] y #設置密碼
New password: #abc123
Re-enter new password: #確認輸入:abc123
Password updated successfully!
Reloading privilege tables..
... Success!
By default, a MariaDB installation has an anonymous user, allowing anyone
to log into MariaDB without having to have a user account created for
them. This is intended only for testing, and to make the installation
go a bit smoother. You should remove them before moving into a
production environment.
Remove anonymous users? [Y/n] n #是否刪除匿名用戶,選擇不刪除
... skipping.
Normally, root should only be allowed to connect from 'localhost'. This
ensures that someone cannot guess at the root password from the network.
Disallow root login remotely? [Y/n] y #是否遠程連接
... Success!
By default, MariaDB comes with a database named 'test' that anyone can
access. This is also intended only for testing, and should be removed
before moving into a production environment.
Remove test database and access to it? [Y/n] n #是否刪除測試數據庫
... skipping.
Reloading the privilege tables will ensure that all changes made so far
will take effect immediately.
Reload privilege tables now? [Y/n] y #是否重新加載
... Success!
Cleaning up...
All done! If you've completed all of the above steps, your MariaDB
installation should now be secure.
Thanks for using MariaDB!
#驗證登錄數據庫
[root@cacti ~]# mysql -u root -p
Enter password: #輸入密碼abc123
Welcome to the MariaDB monitor. Commands end with ; or \g.
Your MariaDB connection id is 8
Server version: 5.5.64-MariaDB MariaDB Server
Copyright (c) 2000, 2018, Oracle, MariaDB Corporation Ab and others.
Type 'help;' or '\h' for help. Type '\c' to clear the current input statement.
`創建zabbix數據庫,並且設置爲utf8形式,把裏面的字符串轉換爲二進制`
MariaDB [(none)]> CREATE DATABASE zabbix character set utf8 collate utf8_bin;
Query OK, 1 row affected (0.00 sec)
`提升用戶`
MariaDB [(none)]> show databases;
+--------------------+
| Database |
+--------------------+
| information_schema |
| mysql |
| performance_schema |
| test |
| zabbix |
+--------------------+
5 rows in set (0.00 sec)
#此時有zabbix數據庫,需要創建管理裏這個數據庫的用戶
MariaDB [(none)]> GRANT all privileges ON *.* TO 'zabbix'@'%' IDENTIFIED BY 'admin123';
Query OK, 0 rows affected (0.01 sec)
#把所有數據庫和所有表都交給zabbix進行管理,並且設置密碼爲admin123
MariaDB [(none)]> flush privileges; #刷新
Query OK, 0 rows affected (0.00 sec)
MariaDB [(none)]> quit #退出數據庫
Bye
`測試php基本信息`
[root@localhost ~]# cd /var/www/html/
[root@localhost html]# ls
[root@localhost html]# vim index.php
<?php
phpinfo();
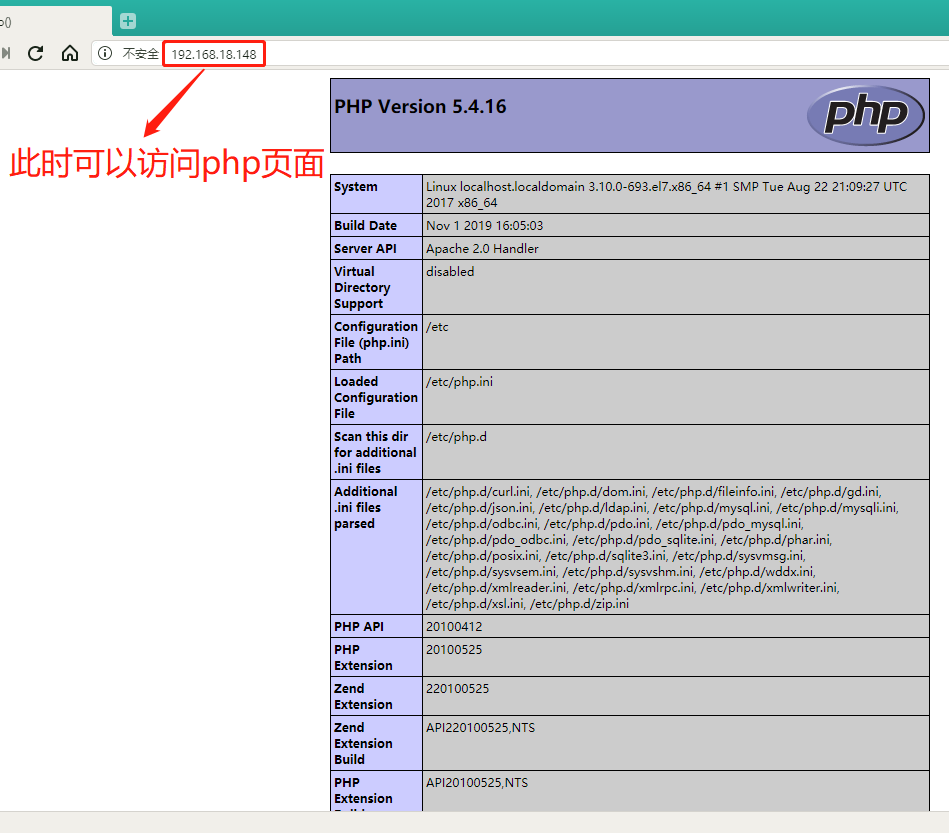
?>此時在宿主機中輸入:192.168.18.147,查看是否可以訪問php頁面:
測試是否能夠連接數據庫:
[root@localhost html]# vim index.php
#先按3dd刪除原有內容,再插入以下內容
<?php
$link=mysql_connect('192.168.18.147','zabbix','admin123');
if($link) echo "<h1>Success!!</h1>";
else echo "Fail!!";
mysql_close();
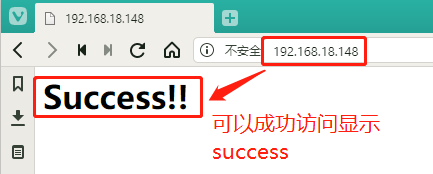
?>此時在宿主機中刷新之前的頁面:192.168.18.147,如果可以訪問mysql數據庫則返回Success提示,如果不能則返回Fail提示:
解決問題:
如果出現Fail報錯一般爲本地無法登錄得問題,可以使用以下方法解決
[root@cacti html]# mysql -u zabbix -p
Enter password:     #此時輸入admin123無法登錄數據庫,說明有用戶佔用
ERROR 1045 (28000): Access denied for user 'zabbix'@'localhost' (using password: YES)

`先使用root用戶登錄數據庫`
[root@cacti html]# mysql -u root -p
Enter password:
Welcome to the MariaDB monitor.  Commands end with ; or \g.
Your MariaDB connection id is 15
Server version: 5.5.64-MariaDB MariaDB Server

Copyright (c) 2000, 2018, Oracle, MariaDB Corporation Ab and others.

Type 'help;' or '\h' for help. Type '\c' to clear the current input statement.

MariaDB [(none)]> select user,host from mysql.user;
+--------+-----------+
| user   | host      |
+--------+-----------+
| zabbix | %         |
| root   | 127.0.0.1 |
| root   | ::1       |
|        | cacti     |
|        | localhost |
| root   | localhost |
+--------+-----------+
6 rows in set (0.00 sec)

`以下操作刪除空用戶`
MariaDB [(none)]> drop user ''@localhost;
Query OK, 0 rows affected (0.00 sec)

MariaDB [(none)]> drop user ''@cacti;
Query OK, 0 rows affected (0.00 sec)

`此時空用戶被刪除`
MariaDB [(none)]> select user,host from mysql.user;
+--------+-----------+
| user   | host      |
+--------+-----------+
| zabbix | %         |
| root   | 127.0.0.1 |
| root   | ::1       |
| root   | localhost |
+--------+-----------+
4 rows in set (0.00 sec)

MariaDB [(none)]> quit
Bye

`此時再次刷新頁面就會顯示Success!!成功登錄`
部署Zabbix Server
[root@cacti html]# yum install php-bcmath php-mbstring -y
`安裝zabbix源`
[root@cacti html]# rpm -ivh http://repo.zabbix.com/zabbix/3.5/rhel/7/x86_64/zabbix-release-3.5-1.el7.noarch.rpm
獲取http://repo.zabbix.com/zabbix/3.5/rhel/7/x86_64/zabbix-release-3.5-1.el7.noarch.rpm
警告:/var/tmp/rpm-tmp.13QGZK: 頭V4 RSA/SHA512 Signature, 密鑰 ID a14fe591: NOKEY
準備中...                          ################################# [100%]
正在升級/安裝...
   1:zabbix-release-3.5-1.el7         ################################# [100%]

`查看源`
[root@cacti html]# cd /etc/yum.repos.d/
[root@cacti yum.repos.d]# ls
CentOS-Base.repo  CentOS-Debuginfo.repo  CentOS-Media.repo    CentOS-Vault.repo
CentOS-CR.repo    CentOS-fasttrack.repo  CentOS-Sources.repo  zabbix.repo
[root@cacti yum.repos.d]# cat zabbix.repo
[zabbix]
name=Zabbix Official Repository - $basearch
baseurl=http://repo.zabbix.com/zabbix/3.5/rhel/7/$basearch/
enabled=1
gpgcheck=1
gpgkey=file:///etc/pki/rpm-gpg/RPM-GPG-KEY-ZABBIX-A14FE591

[zabbix-non-supported]
name=Zabbix Official Repository non-supported - $basearch
baseurl=http://repo.zabbix.com/non-supported/rhel/7/$basearch/
enabled=1
gpgkey=file:///etc/pki/rpm-gpg/RPM-GPG-KEY-ZABBIX
gpgcheck=1

[root@cacti yum.repos.d]# yum install zabbix-server-mysql zabbix-web-mysql -y
......此處省略多行
已安裝:
  zabbix-server-mysql.x86_64 0:4.0.0-1.1rc3.el7    zabbix-web-mysql.noarch 0:4.0.0-1.1rc3.el7

作爲依賴被安裝:
  OpenIPMI.x86_64 0:2.0.27-1.el7                   OpenIPMI-libs.x86_64 0:2.0.27-1.el7
  OpenIPMI-modalias.x86_64 0:2.0.27-1.el7          fping.x86_64 0:3.10-1.el7
  iksemel.x86_64 0:1.4-2.el7.centos                zabbix-web.noarch 0:4.0.0-1.1rc3.el7

`生成數據庫文件`
[root@cacti yum.repos.d]# zcat /usr/share/doc/zabbix-server-mysql-4.0.0/create.sql.gz | mysql -u zabbix -p  zabbix
Enter password:     #輸入密碼admin123

[root@cacti yum.repos.d]# grep -n '^'[a-Z] /etc/zabbix/zabbix_server.conf
38:LogFile=/var/log/zabbix/zabbix_server.log
49:LogFileSize=0
72:PidFile=/var/run/zabbix/zabbix_server.pid
82:SocketDir=/var/run/zabbix
101:DBName=zabbix
117:DBUser=zabbix
357:SNMPTrapperFile=/var/log/snmptrap/snmptrap.log
475:Timeout=4
518:AlertScriptsPath=/usr/lib/zabbix/alertscripts
529:ExternalScripts=/usr/lib/zabbix/externalscripts
565:LogSlowQueries=3000
#是配置文件中缺少的就是密碼,其它得系統已自動配置

[root@cacti yum.repos.d]# vim /etc/zabbix/zabbix_server.conf
125 DBPassword=admin123     #125行刪除註釋,添加密碼admin123在=號後面
#修改完成後按Esc退出插入模式,輸入:wq保存退出

`修改時區`
[root@cacti yum.repos.d]# vim /etc/httpd/conf.d/zabbix.conf
20         php_value date.timezone Asia/Shanghai        #20行刪除註釋,失去改爲Asia/Shanghai
#修改完成後按Esc退出插入模式,輸入:wq保存退出

`修正圖表中文亂碼`
[root@cacti yum.repos.d]# vim /usr/share/zabbix/include/defines.inc.php
#輸入以下內容進行全局字體替換爲kaiti
:%s /graphfont/kaiti/g
#修改完成後按Esc退出插入模式,輸入:wq保存退出

`複製STKAITI.TTF文件到字體目錄下`
[root@cacti yum.repos.d]# mkdir /aaa        #創建掛載目錄
[root@cacti yum.repos.d]# mount.cifs //192.168.0.105/rpm /aaa       #進行遠程掛載
Password for root@//192.168.0.105/rpm:
[root@cacti yum.repos.d]# cd /aaa/zabbix/
[root@cacti zabbix]# ls
php-bcmath-5.4.16-42.el7.x86_64.rpm    STKAITI.TTF
php-mbstring-5.4.16-42.el7.x86_64.rpm  zabbix.conf.php
[root@cacti zabbix]# cp STKAITI.TTF /usr/share/zabbix/fonts/

`啓動服務查看端口開啓情況`
[root@cacti zabbix]# systemctl enable zabbix-server
Created symlink from /etc/systemd/system/multi-user.target.wants/zabbix-server.service to /usr/lib/systemd/system/zabbix-server.service.
[root@cacti zabbix]# systemctl start zabbix-server
[root@cacti zabbix]# netstat -ntap | grep zabbix        #監聽端口爲10051
tcp        0      0 0.0.0.0:10051           0.0.0.0:*        LISTEN    6735/zabbix_server
tcp6       0      0 :::10051                :::*             LISTEN    6735/zabbix_server
[root@cacti zabbix]# systemctl restart httpd.service    #重啓httpd服務,用於驗證登錄zabbix
驗證:登錄操作,安裝zabbix
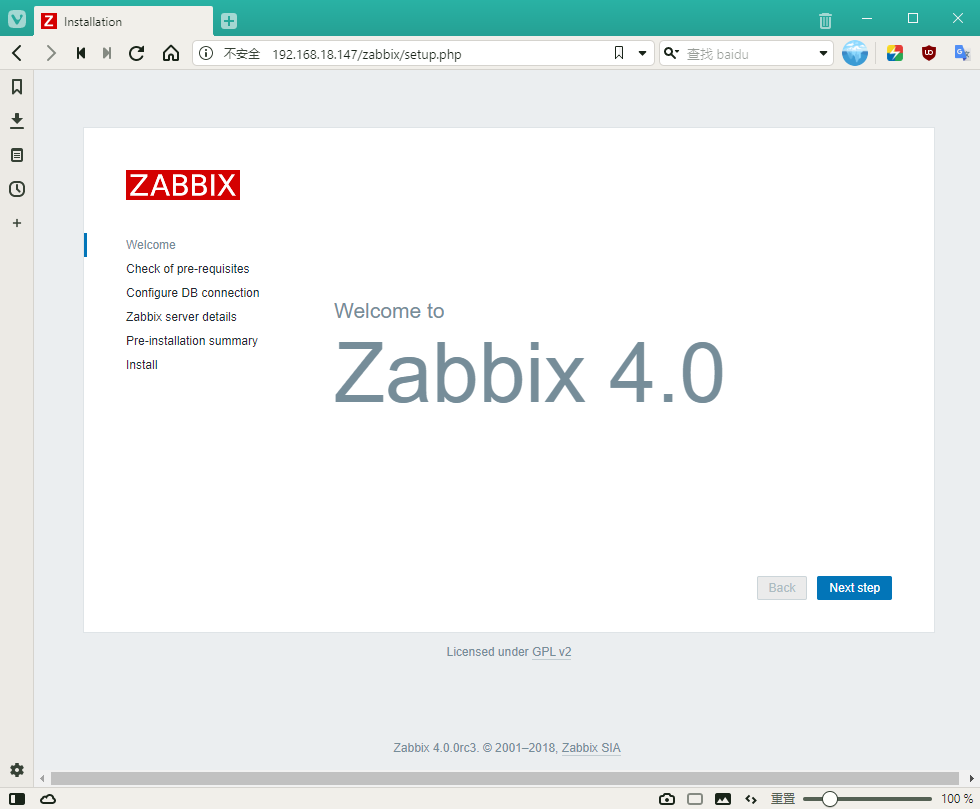
第一步:在宿主機地址欄中輸入:http://192.168.18.147/zabbix/可進入以下頁面,按Next step進入下一步
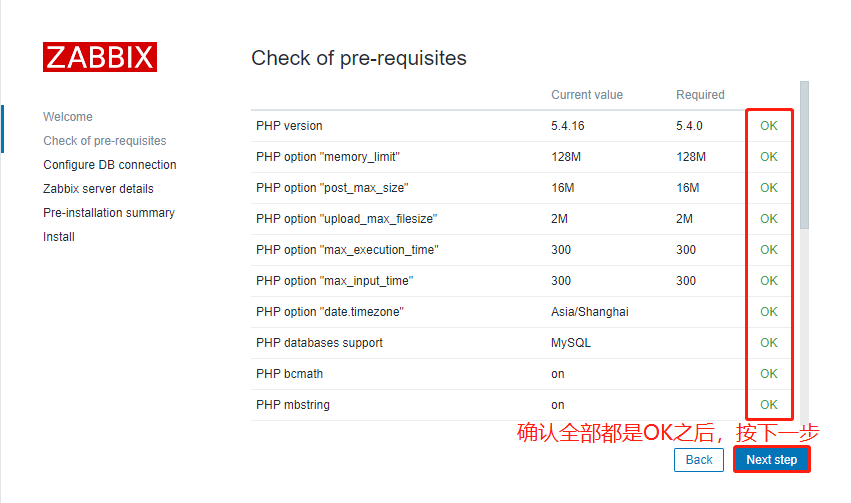
第二步:確認檢查全部爲OK之後,按Next step進入下一步
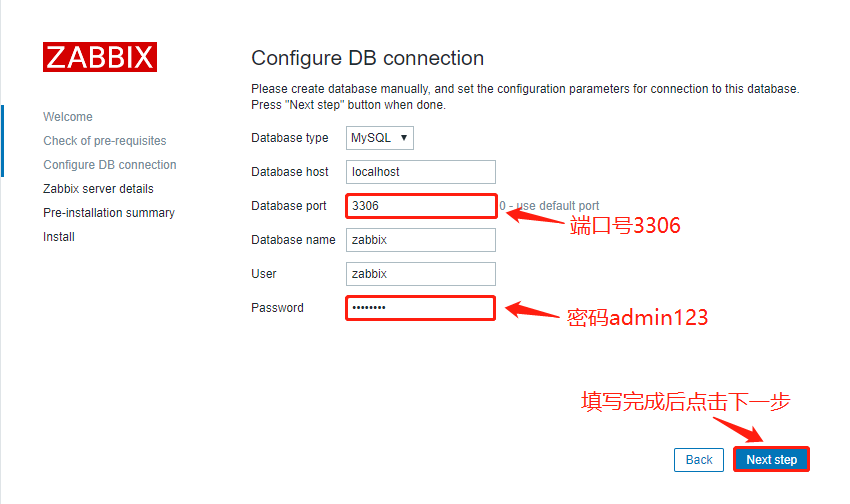
第三步:數據庫設置,輸入端口號3306,填寫密碼admin123,按Next step進入下一步
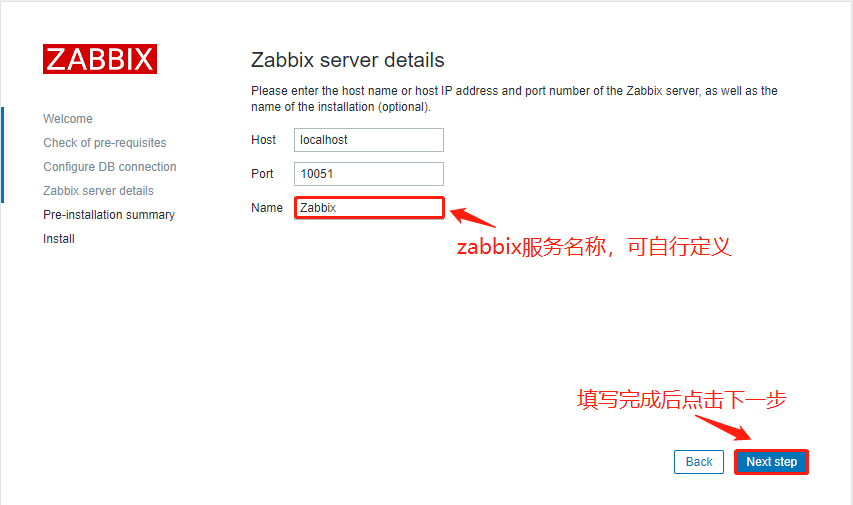
第四步:填寫zabbix服務名稱,此處填寫Zabbix(可自行定義),按Next step進入下一步
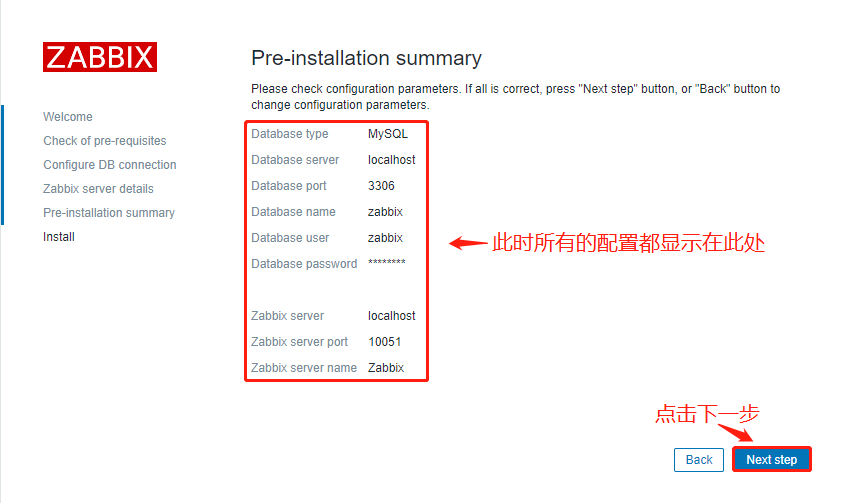
第五步:可以顯示之前所有配置的內容,直接按Next step進入下一步
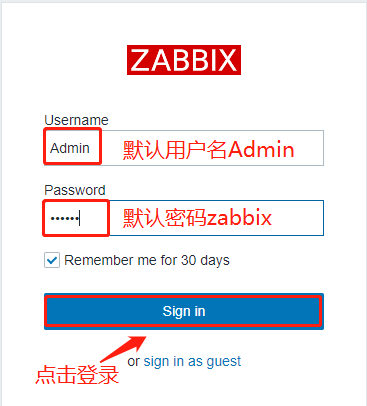
第六步:進入頁面後直接按Finish結束,進入登陸界面,輸入默認賬戶Admin,默認密碼zabbix,點擊登錄
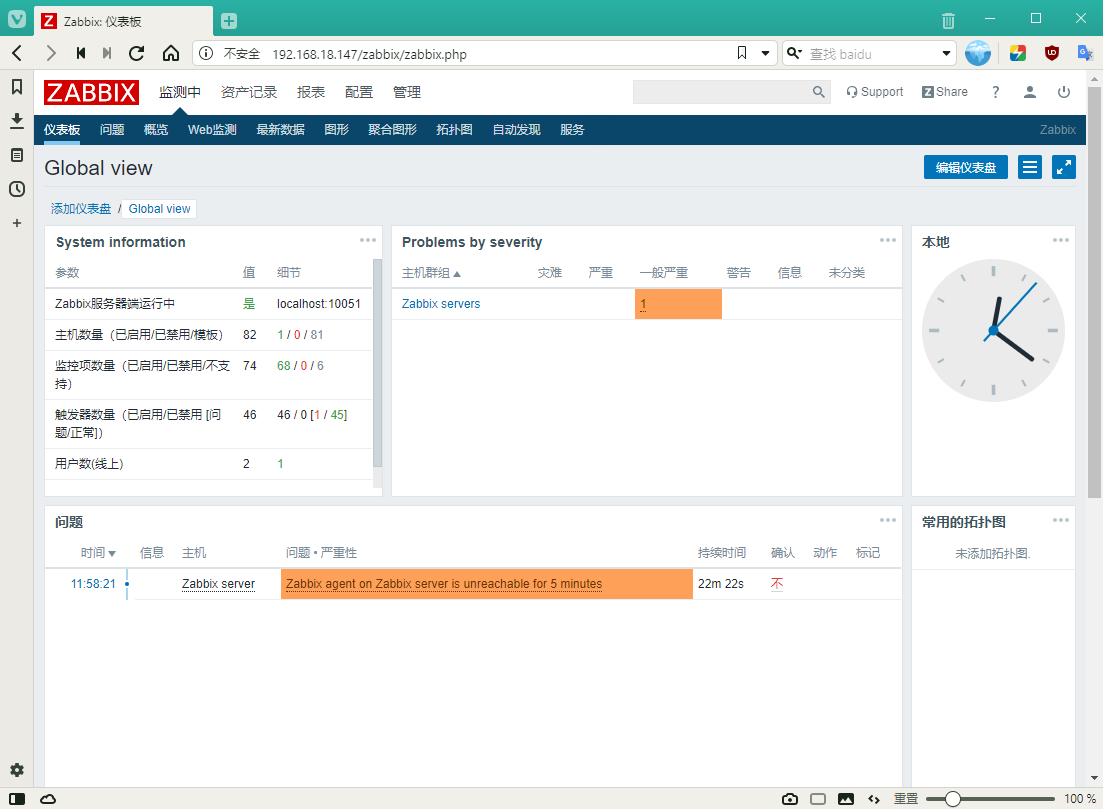
此時就可以進入到zabbix的監控界面了:
可點擊右上角人物頭像,在Language語言欄選擇Chinese(zh_CN)簡體中文,點擊Update更新
以上就是監測端的所有操作!
被監測端操作:
[root@localhost ~]# systemctl stop firewalld.service
[root@localhost ~]# systemctl disable firewalld.service
Removed symlink /etc/systemd/system/multi-user.target.wants/firewalld.service.
Removed symlink /etc/systemd/system/dbus-org.fedoraproject.FirewallD1.service.
[root@localhost ~]# setenforce 0

`安裝yum源`
[root@localhost ~]# rpm -ivh http://repo.zabbix.com/zabbix/3.5/rhel/7/x86_64/zabbix-release-3.5-1.el7.noarch.rpm
獲取http://repo.zabbix.com/zabbix/3.5/rhel/7/x86_64/zabbix-release-3.5-1.el7.noarch.rpm
警告:/var/tmp/rpm-tmp.elS5cl: 頭V4 RSA/SHA512 Signature, 密鑰 ID a14fe591: NOKEY
準備中...                          ################################# [100%]
正在升級/安裝...
   1:zabbix-release-3.5-1.el7         ################################# [100%]

[root@localhost ~]# cd /etc/yum.repos.d/
[root@localhost yum.repos.d]# ls
CentOS-Base.repo  CentOS-Debuginfo.repo  CentOS-Media.repo    CentOS-Vault.repo
CentOS-CR.repo    CentOS-fasttrack.repo  CentOS-Sources.repo  zabbix.repo
[root@localhost yum.repos.d]# yum install zabbix-agent -y

`修改配置文件`
[root@localhost yum.repos.d]# grep -n '^'[a-Z] /etc/zabbix/zabbix_agentd.conf
13:PidFile=/var/run/zabbix/zabbix_agentd.pid
32:LogFile=/var/log/zabbix/zabbix_agentd.log
43:LogFileSize=0
98:Server=127.0.0.1             #此處需要修改爲監控端IP
139:ServerActive=127.0.0.1      #此處需要修改爲監控端IP
150:Hostname=Zabbix server
268:Include=/etc/zabbix/zabbix_agentd.d/*.conf

[root@localhost yum.repos.d]# vim /etc/zabbix/zabbix_agentd.conf
98 Server=192.168.18.147            #98行,指向監控服務器IP
139 ServerActive=192.168.18.147     #139行,指向監控服務器IP
150 Hostname=zhou                   #主機名,可自行定義
#修改完成後按Esc退出插入模式,輸入:wq保存退出

`啓動服務`
[root@localhost yum.repos.d]# systemctl enable zabbix-agent.service
Created symlink from /etc/systemd/system/multi-user.target.wants/zabbix-agent.service to /usr/lib/systemd/system/zabbix-agent.service.
[root@localhost yum.repos.d]# systemctl restart zabbix-agent.service
[root@localhost yum.repos.d]# netstat -ntap | grep zabbix       #監聽端口爲10050
tcp        0      0 0.0.0.0:10050           0.0.0.0:*         LISTEN   5425/zabbix_agentd
tcp6       0      0 :::10050                :::*              LISTEN   5425/zabbix_agentd
此時不會自動識別被監控端,需要做以下操作:
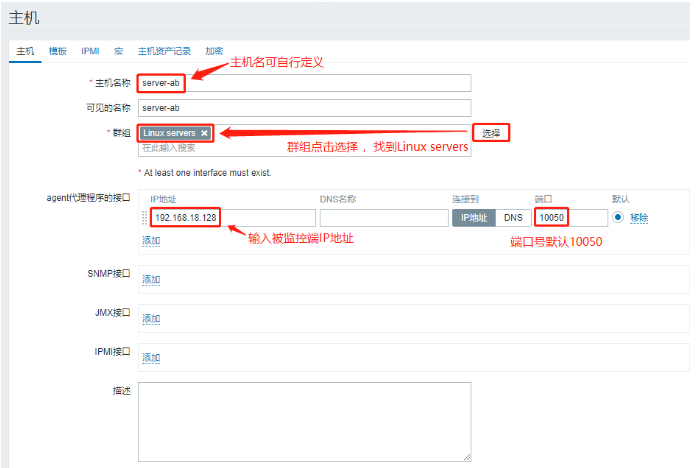
第一步:找到配置下的主機選項,點擊創建主機

第二步:在主機配置界面填入相應內容,然後點擊模板
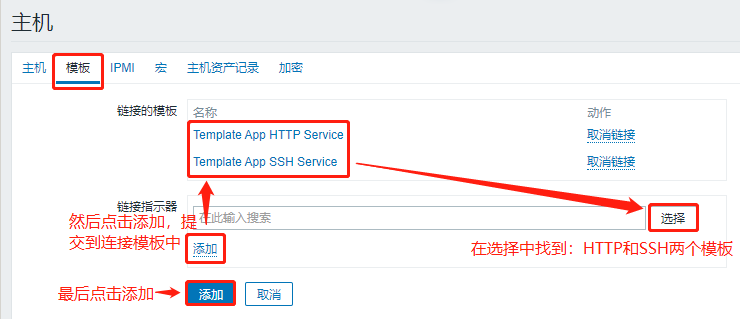
第三步:在模板中選擇HTTP和SSH的模板鏈接,點擊提示器中的添加,然後再點擊藍色的添加圖標
此時回到開始的界面就會顯示新添加的監控項
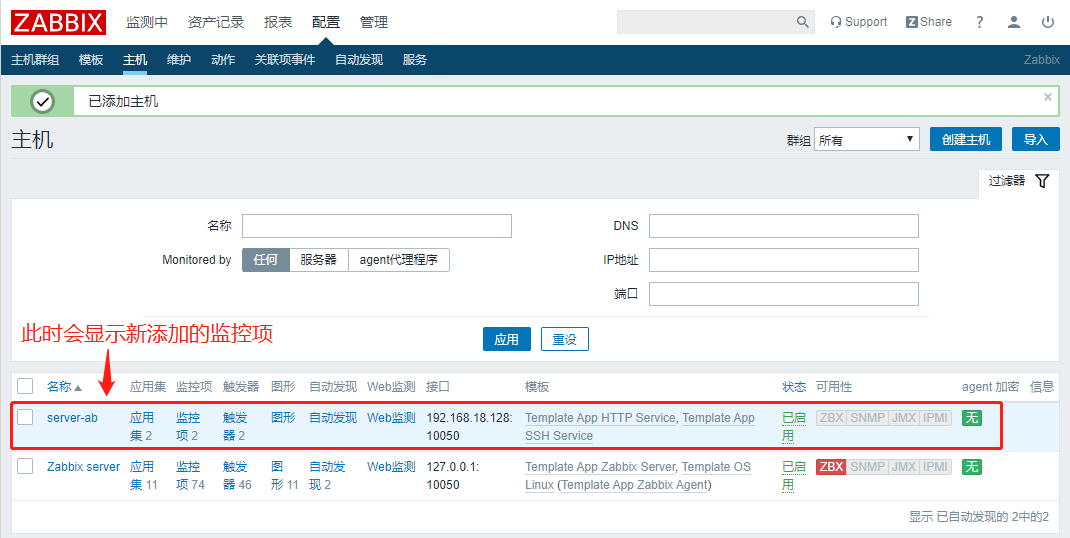
以上就實現了服務器監控被監控端,假如被監控端遇到問題,就會觸發報警,最終會以郵件形式提供(需要添加郵件發送服務)
Zabbix監測和報警機制
監控端安裝郵件報警功能的操作
[root@cacti zabbix]# yum install mailx -y
[root@cacti zabbix]# vim /etc/mail.rc
#在末行下插入以下內容
set from=郵箱地址   #例如[email protected]
set smtp=smtp.163.com
set smtp-auth-user=郵箱地址
set smtp-auth-password=郵箱密碼
set smtp-auth=login
#修改完成後按Esc退出插入模式,輸入:wq保存退出

`嘗試發送測試郵件`
[root@cacti zabbix]# echo "hello world" | mail -s "testmail" 郵箱地址
此時郵箱收到測試郵件:

編寫發郵件腳本:
[root@cacti zabbix]# cd /usr/lib/zabbix/alertscripts
[root@cacti alertscripts]# vim mail.sh
#!/bin/bash
#send mail
messages=`echo $3 | tr '\r\n' '\n'`
subject=`echo $2 | tr '\r\n' '\n'`
echo "${messages}" | mail -s "${subject}" $1 >>/tmp/mailx.log 2>&1
#修改完成後按Esc退出插入模式,輸入:wq保存退出
[root@cacti alertscripts]# mv mail.sh mailx.sh
`在tmp目錄下創建mailx的日誌文件`
[root@cacti alertscripts]# touch /tmp/mailx.log
`賦予權限`
[root@cacti alertscripts]# chown -R zabbix.zabbix /tmp/mailx.log
[root@cacti alertscripts]# chmod +x /usr/lib/zabbix/alertscripts/mailx.sh
[root@cacti alertscripts]# chown -R zabbix.zabbix /usr/lib/zabbix/
`驗證過程`
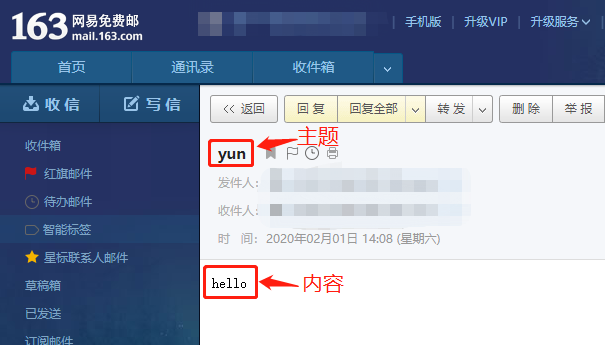
[root@cacti alertscripts]# ./mailx.sh 郵箱地址 "yun" "hello"
#其中郵箱地址爲$1,yun爲$2主題,hello爲$3內容此時執行完腳本,郵箱中就可以收到相對應的郵件了!
接下來進入Web界面進行設置:
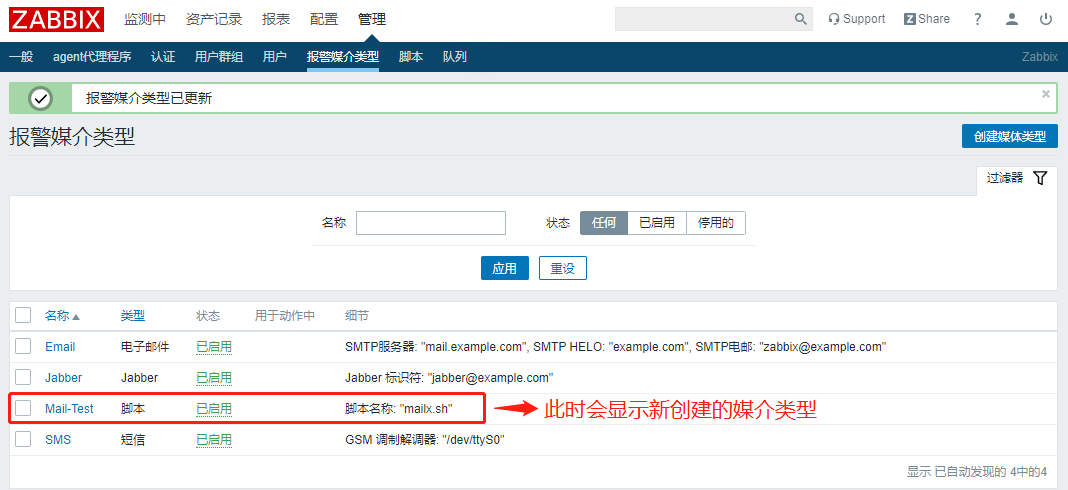
第一步:在上方選擇管理,找到其中的報警媒介類型,再點擊頁面右上角的創建媒體類型,在界面中輸入相關信息

第二步:選項中會顯示3次探測服務,如果宕掉就會觸發報警,最後點擊下方的藍色添加圖標,就可以生成新的報警類型了
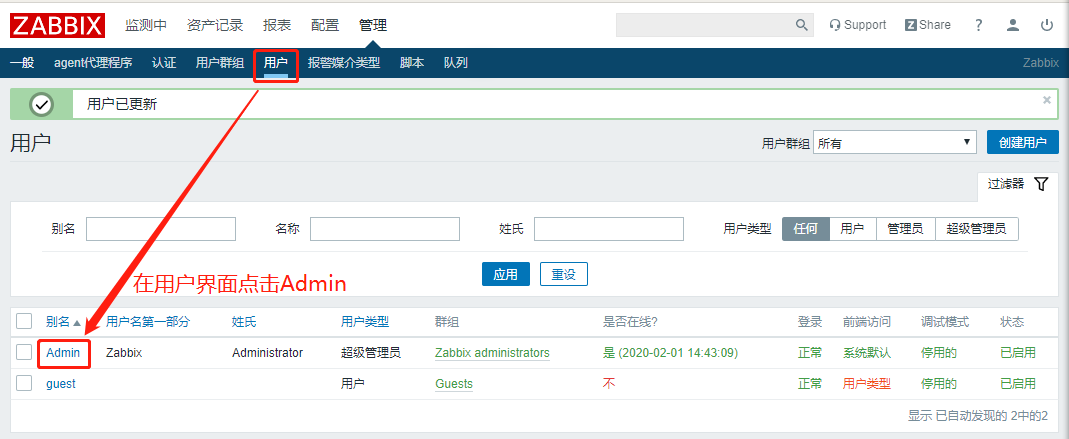
接下來我們需要指定用戶
第一步:找到配置中的用戶界面,點擊Admin用戶
第二步:在用戶的報警媒介中點擊添加,輸入相對應的媒介信息,最後點擊添加
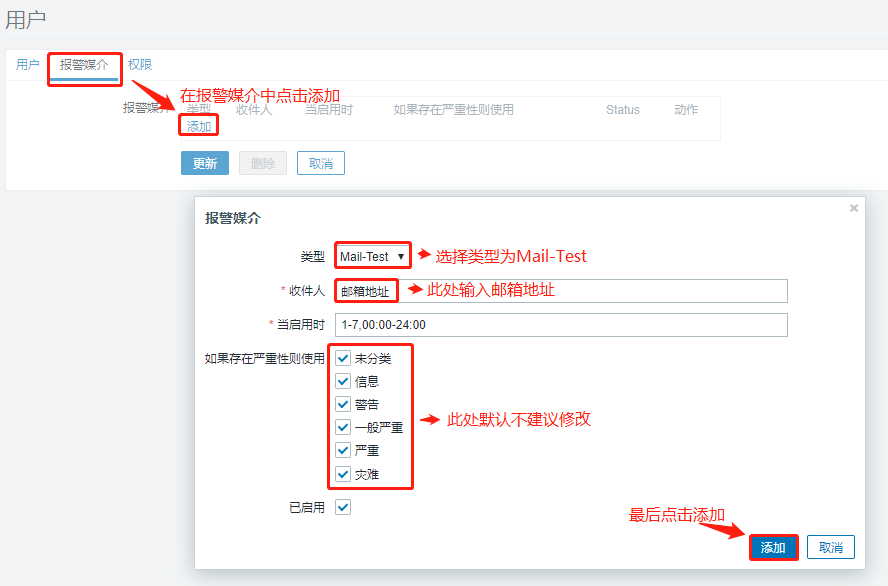
第三步:添加媒介之後一定不要忘記點擊更新

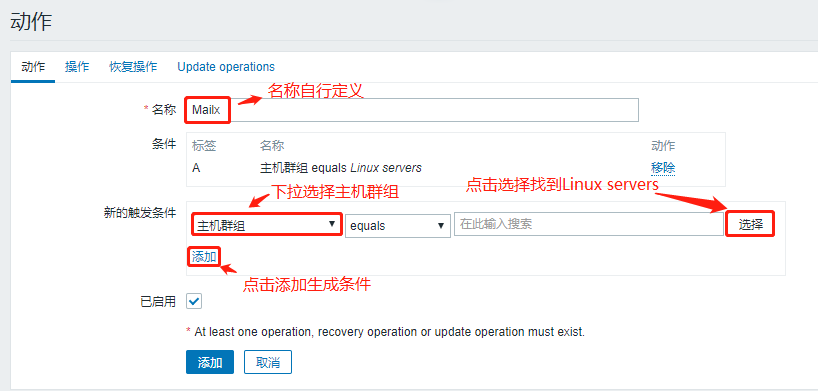
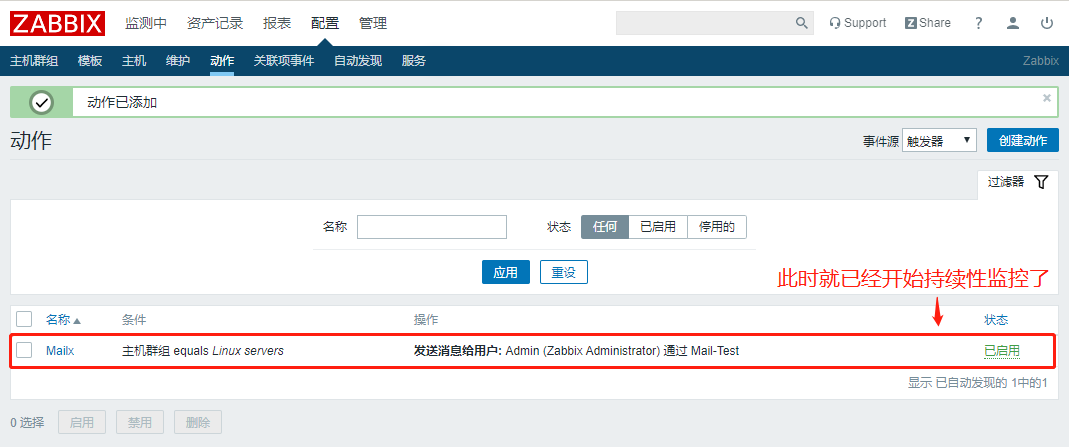
在動作中刪除原有模板,在進行重新定義,點擊右上角的創建動作
第一步:在動作界面中輸入名稱,生成新的觸發條件
第二步:在操作中做以下操作,下方點擊新的,做添加操作,最後點擊跟新
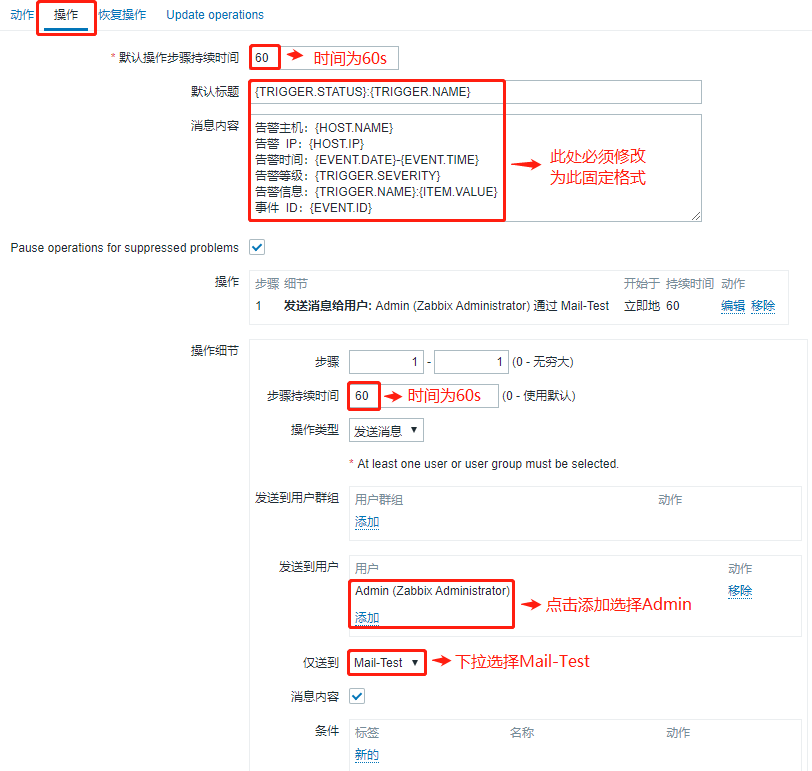
此時新的操作生成!

第三步:恢復操作中做以下填寫
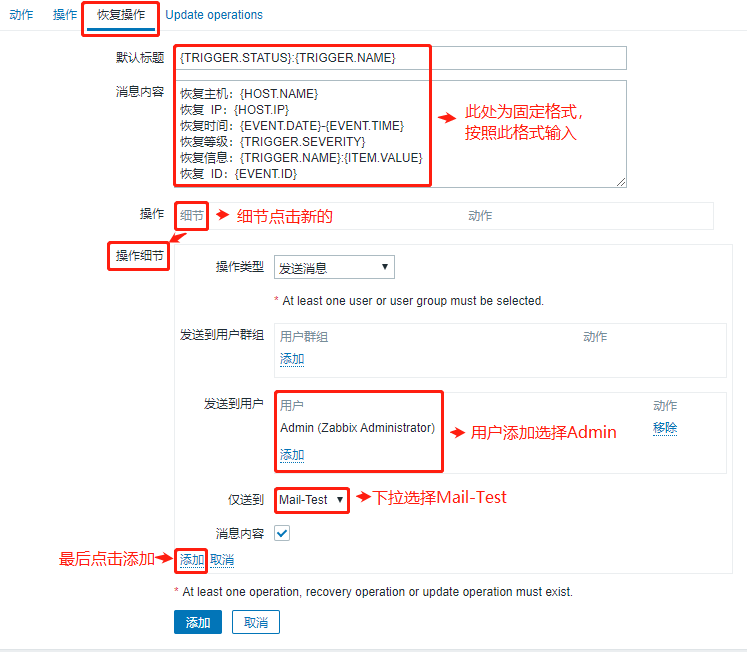
此時新的操作生成!

第四步:點擊藍色圖標添加,此時就會進行持續性的監控了
查看被監控端SSH遠程連接服務狀態
[root@localhost yum.repos.d]# systemctl status sshd
● sshd.service - OpenSSH server daemon
Loaded: loaded (/usr/lib/systemd/system/sshd.service; enabled; vendor preset: enabled)
Active: active (running) since 一 2019-11-25 11:00:11 CST; 2 months 7 days ago
#此時顯示爲running運行狀態
`停止此服務`
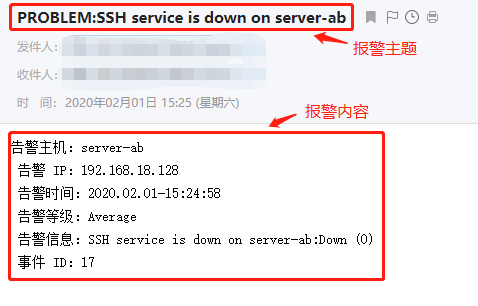
[root@localhost yum.repos.d]# systemctl stop sshd此時我們看監控界面會不會跳出提示
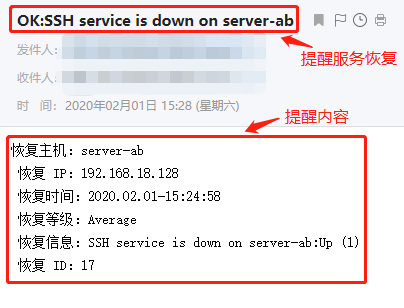
經過等待幾分鐘之後監控界面會自動跳出SSH服務down的提示,此時郵箱也會收到郵件

`啓動sshd服務`
[root@localhost yum.repos.d]# systemctl start sshd
此時幾分鐘過後會自動監測到服務成功開啓,報警已解決,同時郵箱也會收到服務恢復的郵件