


一、什麼樣的情形需要批量部署
1、操作系統的安裝
常見的有collber,red hat satelite(redhat)系統專用。
2、操作系統的配置
常見的有cfengine,puppet,chef,func。其中puppet最受歡迎
3、批量程序的部署
4、批量命令的運行查看狀態信息
二、ansible介紹
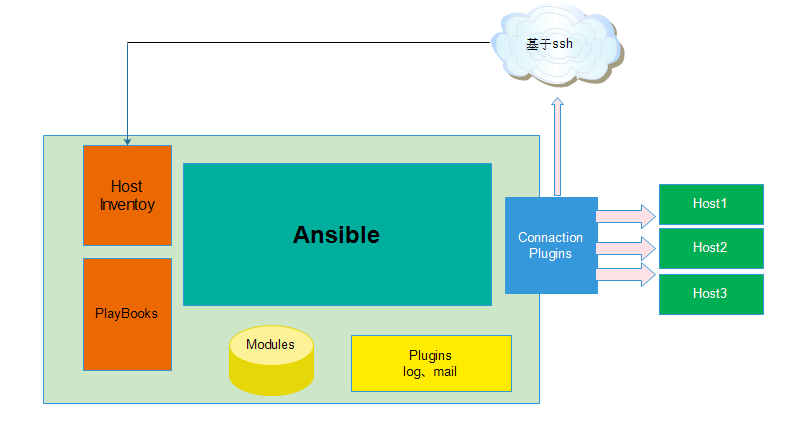
ansible的架構大致如下
ansible是新出現的運維工具是基於Python研發的糅合了衆多老牌運維工具的優點實現了批量操作系統配置、批量程序的部署、批量運行命令等功能。
運維工具常見的工作模式 1、agent模式: 基於ssl實現。代理工作在被監控端。像puppet。 2、agentless模式: 基於ssh服務實現工作在被監控端。監控端是ssh的客戶端。
ansible是工作在agentless模式下具有冪等性。ansible在控制端只需要告訴監控端的期望狀態就可以實現批量部署。
名詞解釋 冪等性不會重複執行相同的指令。例如不會重複安裝軟件 期望狀態只需要告訴被監控端的期望狀態
ansible是基於模塊工作的ansible本身沒有批量部署的能力。真正具有批量部署的是ansible所運行的模塊ansible只是提供一種框架。架構包括
連接插件connection plugins負責和被監控端實現通信。
Host Inventory:指定操作的主機,是一個配置文件裏面定義監控的主機
各種模塊核心模塊command模塊自定義模塊
藉助於插件完成記錄日誌郵件等功能
PlayBooks:劇本執行多個任務時。並非必需可以讓節點一次性運行多個任務
三、ansible的基本使用
安裝軟件yum install ansible -y # 對應的軟件在 epel 倉庫中也可自己手動編譯 #源碼地址 https://pypi.python.org/packages/source/a/ansible/ansible-1.5.tar.gz
2、定義Host Inventory # vim /etc/ansible/hosts [webhosts] 172.16.10.22 ansible_ssh_user=root ansible_ssh_pass=guoting 172.16.10.33 ansible_ssh_user=root ansible_ssh_pass=guoting 解釋 #ansible_ssh_user=root 是ssh登陸用戶 #ansible_ssh_pass=guoting 是ssh登陸密碼3、測試各個模塊 # 注意每個模塊的用法可以使用 ansible-doc MOD 來查看例如ansible-doc copy ansible命令最常用的用法 ansible <Host-partten> -m MOE -a 'MOD_ARV'所支持的模塊可以使用ansible-doc -l來查看
ansible示例
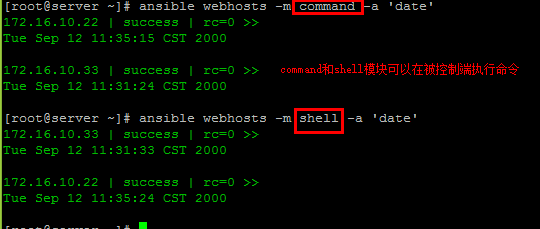
1、查看時間信息。command、shell模塊
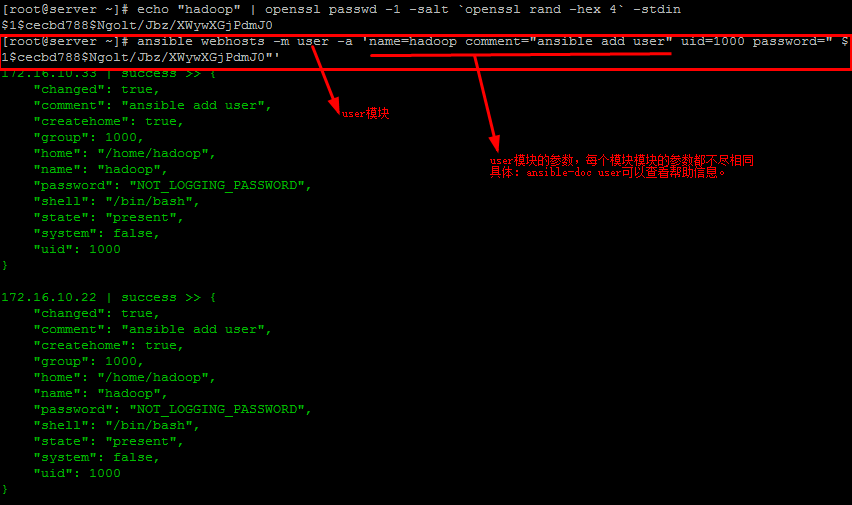
2、在控制端添加添加用戶。user模塊
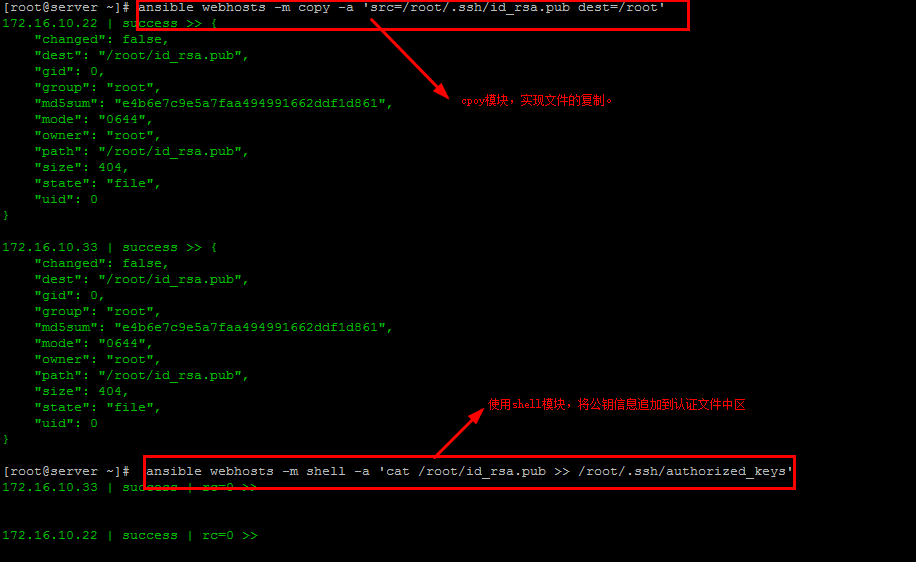
3、實現ssh祕鑰認證。shell、copy模塊
此時就可以實現基於ssh祕鑰通信了此時/etc/ansible/hosts可以修改如下
###### /etc/ansible/hosts [webhosts] 172.16.10.22 172.16.10.33
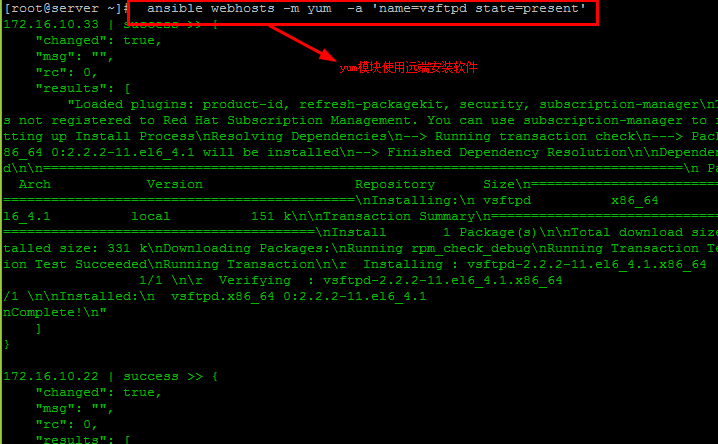
4、安裝軟件和啓動服務。yum、service模塊
5、支持管道的命令。raw模塊,類似於shell模塊
四、YAML語言介紹
1、YAML簡介
YAML是一個可讀性高的用來表達資料序列的格式。YAML參考了其他多種語言包括XML、C語言、Python、Perl以及電子郵件格式RFC2822等。Clark Evans在2001年在首次發表了這種語言另外Ingy dtNet與Oren Ben-Kiki也是這語言的共同設計者。 YAML Ain't Markup Language即YAML不是XML。不過在開發的這種語言時YAML的意思其實是"Yet Another Markup Language"仍是一種標記語言。其特性 YAML的可讀性好 YAML和腳本語言的交互性好 YAML使用實現語言的數據類型 YAML有一個一致的信息模型 YAML易於實現 YAML可以基於流來處理 YAML表達能力強擴展性好 更多的內容及規範參見http://www.yaml.org。 ##########################YAML語法 YAML的語法和其他高階語言類似並且可以簡單表達清單、散列表、標量等數據結構。其結構Structure通過空格來展示序列Sequence裏的項用"-"來代表 Map裏的鍵值對用":"分隔。YAML文件擴展名通常爲.yaml或者.yml。下面是一個示例。 name: John Smith age: 41gender: Male spouse: name: Jane Smith age: 37 gender: Female children: - name: Jimmy Smith age: 17 gender: Male - name: Jenny Smith age 13 gender: Female YAML 2 個重要的結構組成部分list和directory ################################# list 列表的所有元素均使用“-”打頭例如 # A list of tasty fruits - Apple - Orange - Strawberry - Mango ##############################dictionary 字典通過key與valuef進行標識例如 --- # An employee record name: Example Developer job: Developer skill: Elite 也可以將key:value放置於{}中進行表示例如 --- # An employee record {name: Example Developer, job: Developer, skill: Elite} 多個映射關係組成一個字典一個列表可以包含多個字典。2、ymal中的變量
################################## 變量命名 變量名僅能由字母、數字和下劃線組成且只能以字母開頭。 ################################## facts facts是由正在通信的遠程目標主機發回的信息這些信息被保存在ansible變量中。要獲取指定的遠程主機所支持的所有facts可使用如下命令進行 # ansible hostname -m setup 這個命令可以獲得被監控端主機的各種信息將這些信息得到後保存到變量中。 ################################ 自定義變量 在 yaml 中可以使用vars關鍵字來定義變量 vars: var_name: value ############################# 變量的引用 {{ var_name }} ########################### 特殊的變量迭代 當有需要重複性執行的任務時可以使用迭代機制。其使用格式爲將需要迭代的內容定義爲item變量引用並通過with_items語句來指明迭代的元素列表即可。 #######################################示例 例如在被控端添加 2 個用戶 方式1一般做法 - name: add user testuser1 user: name=testuser1 state=present groups=wheel - name: add user testuser2 user: name=testuser2 state=present groups=wheel 方式2使用變量方式 - name: add several users vars: user1: testuser1 user2: testuser2 user: name={{ user1 }} state=present groups=wheel user: name={{ user2 }} state=present groups=wheel 方式3使用迭代方式 - name: add several users user: name={{ item }} state=present groups=wheel with_items: - testuser1 - testuser2 事實上with_items中可以使用元素還可爲hashes例如 - name: add several users user: name={{ item.name }} state=present groups={{ item.groups }} with_items: - { name: 'testuser1', groups: 'wheel' } - { name: 'testuser2', groups: 'root' }3、Inentory文件的格式
inventory文件遵循INI文件風格中括號中的字符爲組名。可以將同一個主機同時歸併到多個不同的組中此外當如若目標主機使用了非默認的SSH端口還可以在主機名稱之後使用冒號加端口號來標明。 [webservers] www1.magedu.com:2222 www2.magedu.com [dbservers] db1.magedu.com db2.magedu.com db3.magedu.com 如果主機名稱遵循相似的命名模式還可以使用列表的方式標識各主機例如 [webservers] www[01:50].example.com [databases] db-[a:f].example.com #################### 主機變量 可以在inventory中定義主機時爲其添加主機變量以便於在playbook中使用。例如 [webservers] www1.magedu.com http_port=80 maxRequestsPerChild=808 www2.magedu.com http_port=303 maxRequestsPerChild=909 ################### 組變量 組變量是指賦予給指定組內所有主機上的在playbook中可用的變量。例如 [webservers] www1.magedu.com www2.magedu.com [webservers:vars] ntpntp_server=ntp.magedu.com nfsnfs_server=nfs.magedu.com ################## 組嵌套 inventory中組還可以包含其它的組並且也可以向組中的主機指定變量。不過這些變量只能在ansible-playbook中使用而ansible不支持。例如 [apache] httpd1.magedu.com httpd2.magedu.com [nginx] ngx1.magedu.com ngx2.magedu.com [webservers:children] apache nginx [webservers:vars] ntpntp_server=ntp.magedu.com ######################### inventory參數 ansible基於ssh連接inventory中指定的遠程主機時還可以通過參數指定其交互方式常用的參數如下所示 ansible_ssh_host # 要連接的主機名 ansible_ssh_port # 端口號默認是22 ansible_ssh_user # ssh連接時默認使用的用戶名 ansible_ssh_pass # ssh連接時的密碼 ansible_sudo_pass # 使用sudo連接用戶是的密碼 ansible_ssh_private_key_file # 祕鑰文件如果不想使用ssh-agent管理時可以使用此選項 ansible_shell_type # shell的類型默認sh ######################################################################################### ansible的循環機制還有更多的高級功能具體請參見官方文檔http://docs.ansible.com/playbooks_loops.html。
4、playbooks
playbook是由一個或多個“play”組成的列表。play的主要功能在於將事先歸併爲一組的主機裝扮成事先通過ansible中的task定義好的角色。 從根本上來講所謂task無非是調用ansible的一個module。將多個play組織在一個playbook中即可以讓它們聯同起來按事先編排的機制同唱一臺大戲。 ###########################playbook基礎組件 1、Hosts和Users playbook中的每一個play的目的都是爲了讓某個或某些主機以某個指定的用戶身份執行任務。 hosts用於指定要執行指定任務的主機其可以是一個或多個由冒號分隔主機組。 remote_user則用於指定遠程主機上的執行任務的用戶。 不過remote_user也可用於各task中。也可以通過指定其通過sudo的方式在遠程主機上執行任務其可用於play全局或某任務。 此外甚至可以在sudo時使用sudo_user指定sudo時切換的用戶。 - hosts: webnodes remote_user: mageedu tasks: - name: test connection ping: remote_user: mageedu sudo: yes 2、任務列表和action play的主體部分是task list。task list中的各任務按次序逐個在hosts中指定的所有主機上執行即在所有主機上完成第一個任務後再開始第二個。 在運行自下而下某playbook時如果中途發生錯誤所有已執行任務都將回滾因此在更正playbook後重新執行一次即可。 task的目的是使用指定的參數執行模塊而在模塊參數中可以使用變量。模塊執行是冪等的這意味着多次執行是安全的因爲其結果均一致。 每個task都應該有其name用於playbook的執行結果輸出建議其內容儘可能清晰地描述任務執行步驟。如果未提供name則action的結果將用於輸出。 定義task的可以使用“action: module options”或“module: options”的格式推薦使用後者以實現向後兼容。 如果action一行的內容過多也中使用在行首使用幾個空白字符進行換行。 tasks: - name: make sure apache is running service: name=httpd state=running 在衆多模塊中只有command和shell模塊僅需要給定一個列表而無需使用“key=value”格式例如 tasks: - name: disable selinux command: /sbin/setenforce 0如果命令或腳本的退出碼不爲零可以使用如下方式替代 tasks: - name: run this command and ignore the result shell: /usr/bin/somecommand || /bin/true 或者使用ignore_errors來忽略錯誤信息 tasks: - name: run this command and ignore the result shell: /usr/bin/somecommand ignore_errors: True 3、handlers 用於當關注的資源發生變化時採取一定的操作。 “notify”這個action可用於在每個play的最後被觸發這樣可以避免多次有改變發生時每次都執行指定的操作取而代之僅在所有的變化發生完成後一次性地執行指定操作。在notify中列出的操作稱爲handler也即notify中調用handler中定義的操作。 - name: template configuration file template: src=template.j2 dest=/etc/foo.conf notify: - restart memcached - restart apache handler是task列表這些task與前述的task並沒有本質上的不同。 handlers: - name: restart memcached service: name=memcached state=restarted - name: restart apache service: name=apache state=restarted
5、tags
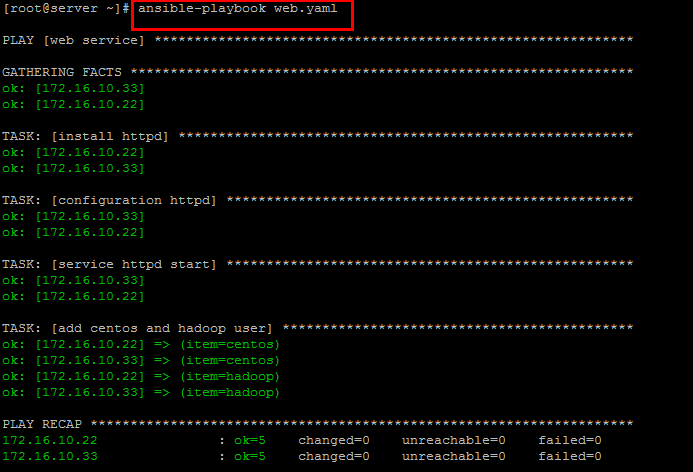
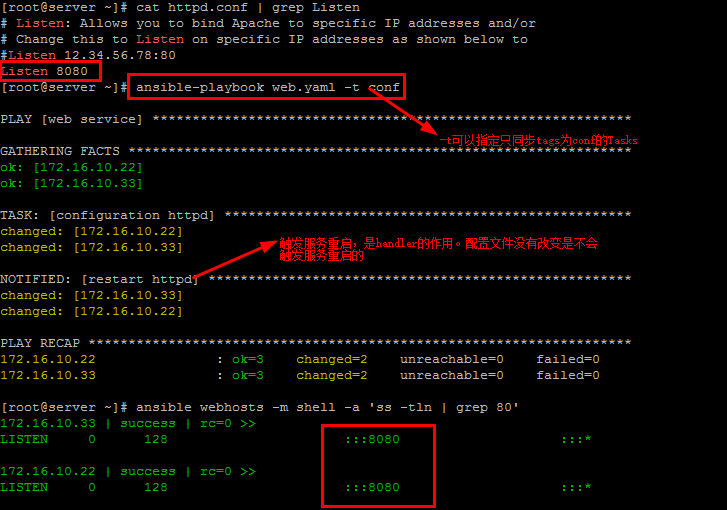
tags用於讓用戶選擇運行或路過playbook中的部分代碼。ansible具有冪等性因此會自動跳過沒有變化的部分即便如此有些代碼爲測試其確實沒有發生變化的時間依然會非常地長。此時如果確信其沒有變化就可以通過tags跳過此些代碼片斷。 示例基於playbooks實現web服務的部署 1、提供好Inventory文件 # /etc/ansible/hosts基於祕鑰認證 [webhosts] 172.16.10.22 172.16.10.33 2、編輯 palybooks 劇本 # vim /root/web.yaml - name: web service remote_user: root hosts: webhosts vars: packages: httpd tasks: - name: install httpd yum: name={{ packages }} state=present tags: install - name: configuration httpd copy: src=/root/httpd.conf dest=/etc/httpd/conf/httpd.conf tags: conf notify: - restart httpd - name: service httpd start service: name=httpd enabled=no state=started tags: start - name: add centos and hadoop user user: name={{ item }} state=absent tags: adduser with_items: - centos - hadoop handlers: - name: restart httpd service: name=httpd state=restarted 3、準備好配置文件 將web的配置放到指定目錄 src=/root/httpd.conf 4、開始部署 ansible-playbooks /root/web.yml結果示例
查看端口
此時如果配置文件發生變化
至此基本使用配置完成

