


http://cnfeat.com/2014/05/10/2014-05-11-how-to-build-a-blog/
摘要:這是一篇很詳盡的獨立博客搭建教程,裏面介紹了域名註冊、DNS設置、github和Hexo設置等過程,這是我寫得最長的一篇教程。我想將我搭建獨立博客的過程在一篇文章中儘可能詳細地寫出來,希望能給後來者一個明確的指引,同時用這篇教程開篇,正式開始我的第八大洲之旅。
前言
作爲一個技術小白,沒有技術基礎,看網上的教程也雲裏霧裏,看程序員的教程相當不容易,稍微有些細節描述得不清楚自己就要繞彎路去找答案(善用搜索引擎),所以,在自己的博客搭建完成之後,我決定要將我搭建博客的過程全記錄下來,以供後期和我一樣的小白參考(是的,我堅信還有很多一樣和我一樣的人),我會儘可能詳細的整理這個教程,其中的資料可能會摘錄到其他人的教程,我會在後面列出了參考資料,感謝這些作者們。
爲什麼要開博客?可以看看我的這篇《爲什麼你要寫博客?》
也可以看看這篇《我的博客時代》
以下以我的博客:www.cnfeat.com爲例,教大家如何搭建一個獨立博客。
爲什麼要搭建一個獨立博客?
獨立的纔是自己的。
小白進入門檻
- 1、非常折騰,需要耐心;
- 2、也需要一定的學習能力和鑽研精神;
- 3、懂一些網頁基礎知識,不懂也重要,參看第二和第三條;
小白白請看
2014年5月15日更新:發現一個更簡單的方法:用靜態頁面生成靜態博客 byisnowfy
按此教程操作即可。
爲什麼選擇GitHub Pages?
很多人用wordpress,你爲什麼要用github pages來搭建?
- 1、github pages有300M免費空間,資料自己管理,保存可靠;
- 2、學着用github,享受github的便利,上面有很多大牛,眼界會開闊很多;
- 3、順便看看github工作原理,最好的團隊協作流程;
- 4、github是趨勢;
- 5、你不覺得一個文科生用github很geek嗎?瞬間躋身技術界;
- 6、就算github被牆了,我可以搬到國內的gitcafe中去。

GitHub Pages是什麼?
GitHub Pages本用於介紹託管在GitHub的項目, 不過,由於他的空間免費穩定,用來做搭建一個博客再好不過了。
github Pages可以被認爲是用戶編寫的、託管在github上的靜態網頁。

購買域名
只推薦上godaddy購買,安全,而且可以使用支付寶。
教程(截止至2014年5月10日)如下
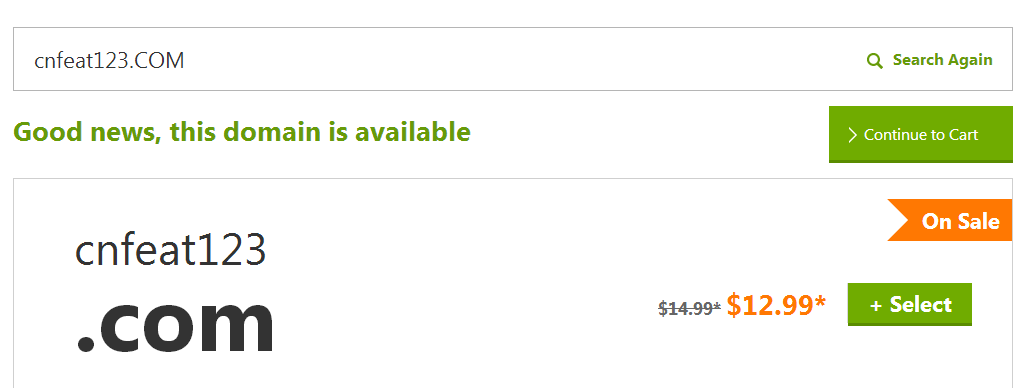
1、查你想要的域名;

2、查到適合的域名之後選擇「continue to Cart」;
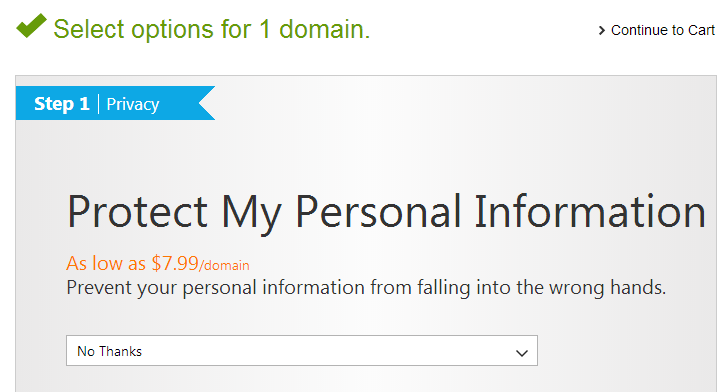
3、godaddy附加收費服務,不要管,繼續「continue to Cart」;
4、確認購買。修改購買年限,默認是兩年,可以修改成1/2/3/5/10年,隨自己喜歡。現在godaddy上com每年的默認費用是12.99美元,附加上ICANN的管理費用就是13.17美元。

如果你不是土豪,可以上網搜godaddy的優惠碼,一大堆,找一個填進這裏,填完之後,一年的費用會變成8.99美元。

說明一下:一般來講,使用網上的優惠碼第一年收費8.99美元,以後每年的收費是10.99美元,不過在網上可以搜到合適的優惠碼,可以每年的收費都是8.99美元,記得多測試自行鑑別。
如圖,我買了五年的費用就是45.85美元,隨後點擊「Proceed to Checkout」

5、結算。登錄或註冊界面,填完必要的信息之後,選擇用支付寶結算。

如果以上的教程如果不夠清晰,可以參照這一份《2013年10月新版godaddy域名註冊圖文教程》。
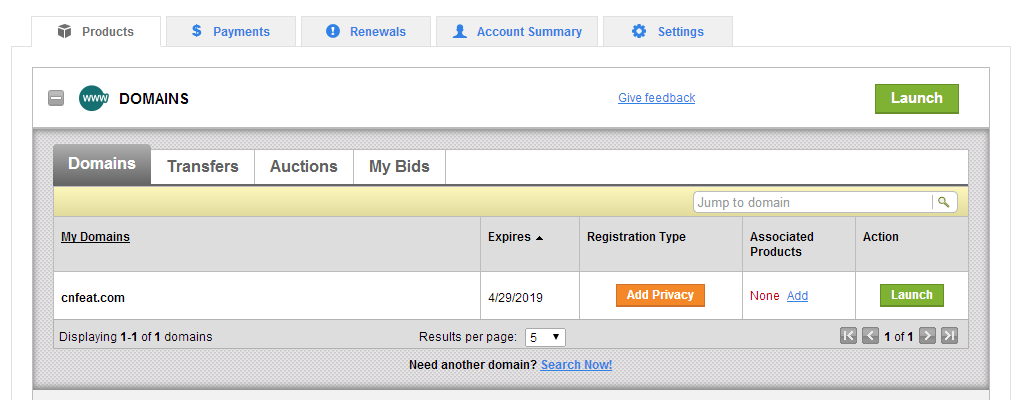
6、檢查。結算後,重新登錄,去「My Account」,域名已經顯示在你的賬戶了。
7、補充一些注意事項:
- 輸入優惠碼沒有優惠或者優惠幅度較低,請清除瀏覽器cookies再嘗試;
- 如果沒有支付寶支付選項,有可能是使用的優惠碼不支持支付寶,請重新清除瀏覽器cookies再嘗試;
- 註冊時用戶填寫信息時一定要輸入正確的郵箱名字,否則修改十分麻煩。
- 買完域名之後一定要記得去自己的郵箱查看激活郵件,否則域名激活不了。
安裝準備軟件
依次下載安裝。
怎麼打開Git?
- 1、開始菜單Git Bash。
![]()
- 2、鼠標右鍵打開Git Bash。
![]()


註冊GitHub
註冊你的username和郵箱,郵箱十分重要,GitHub上很多通知都是通過郵箱的。
註冊過程比較簡單,詳細也可以看:
一步步在GitHub上創建博客主頁 全系列 by pchou(推薦)
配置和使用Github
以下教程主要參考beiyuu的《使用Github Pages建獨立博客》寫成。
配置SSH keys
我們如何讓本地git項目與遠程的github建立聯繫呢?用SSH keys。
檢查SSH keys的設置
首先我們需要檢查你電腦上現有的ssh key:
<code>$ <span class="built_in eye-protector-processed">cd</span> ~/. ssh 檢查本機的ssh密鑰
</code>
如果提示:No such file or directory 說明你是第一次使用git。
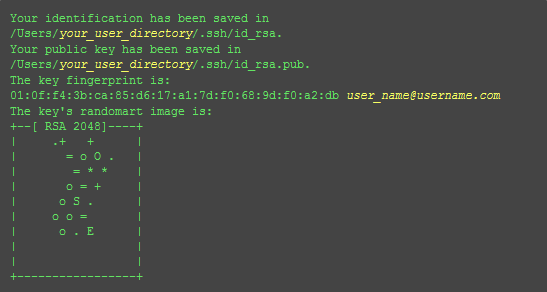
生成新的SSH Key:
<code>$ ssh<span class="attribute eye-protector-processed">-keygen</span> <span class="attribute eye-protector-processed">-t</span> rsa <span class="attribute eye-protector-processed">-C</span> <span class="string eye-protector-processed">"郵件地址@youremail.com"</span>
Generating <span class="keyword eye-protector-processed">public</span>/<span class="keyword eye-protector-processed">private</span> rsa key <span class="built_in eye-protector-processed">pair</span><span class="built_in eye-protector-processed">.</span>
Enter file <span class="keyword eye-protector-processed">in</span> which <span class="keyword eye-protector-processed">to</span> save the key (/Users/your_user_directory<span class="subst">/</span><span class="built_in eye-protector-processed">.</span>ssh/id_rsa):<span class="subst"><</span>回車就好<span class="subst">></span>
</code>
注意1: 此處的郵箱地址,你可以輸入自己的郵箱地址;注意2: 此處的「-C」的是大寫的「C」
然後系統會要你輸入密碼:
<code><span class="constant eye-protector-processed">Enter</span> passphrase (empty <span class="keyword eye-protector-processed">for</span> no passphrase)<span class="symbol">:<</span>輸入加密串>
<span class="constant eye-protector-processed">Enter</span> same passphrase <span class="symbol">again:</span><再次輸入加密串>
</code>
在回車中會提示你輸入一個密碼,這個密碼會在你提交項目時使用,如果爲空的話提交項目時則不用輸入。這個設置是防止別人往你的項目裏提交內容。
注意:輸入密碼的時候沒有*字樣的,你直接輸入就可以了。
最後看到這樣的界面,就成功設置ssh key了:
添加SSH Key到GitHub
在本機設置SSH Key之後,需要添加到GitHub上,以完成SSH鏈接的設置。
-
1、打開本地C:\Documents and Settings\Administrator.ssh\id_rsa.pub文件。此文件裏面內容爲剛纔生成人密鑰。如果看不到這個文件,你需要設置顯示隱藏文件。準確的複製這個文件的內容,才能保證設置的成功。
-
2、登陸github系統。點擊右上角的 Account Settings—->SSH Public keys —-> add another public keys
-
3、把你本地生成的密鑰複製到裏面(key文本框中), 點擊 add key 就ok了

測試
可以輸入下面的命令,看看設置是否成功,[email protected]的部分不要修改:
<code><span class="variable eye-protector-processed">$ </span>ssh -<span class="constant eye-protector-processed">T</span> git<span class="variable eye-protector-processed">@github</span>.com
</code>
如果是下面的反饋:
<code>The authenticity <span class="keyword eye-protector-processed">of</span> host <span class="comment eye-protector-processed">'github.com (207.97.227.239)' can't be established.</span>
RSA <span class="keyword eye-protector-processed">key</span> fingerprint <span class="keyword eye-protector-processed">is</span> <span class="number eye-protector-processed">16</span>:<span class="number eye-protector-processed">27</span>:ac:a5:<span class="number eye-protector-processed">76</span>:<span class="number eye-protector-processed">28</span>:<span class="number eye-protector-processed">2</span>d:<span class="number eye-protector-processed">36</span>:<span class="number eye-protector-processed">63</span>:<span class="number eye-protector-processed">1</span>b:<span class="number eye-protector-processed">56</span>:<span class="number eye-protector-processed">4</span>d:eb:df:a6:<span class="number eye-protector-processed">48.</span>
Are you sure you want <span class="keyword eye-protector-processed">to</span> <span class="keyword eye-protector-processed">continue</span> connecting (yes/no)?
</code>
不要緊張,輸入yes就好,然後會看到:
<code>Hi cnfeat! You<span class="attribute eye-protector-processed">'ve</span> successfully authenticated, but GitHub does <span class="keyword eye-protector-processed">not</span> provide shell <span class="keyword eye-protector-processed">access</span>.
</code>
設置用戶信息
現在你已經可以通過SSH鏈接到GitHub了,還有一些個人信息需要完善的。
Git會根據用戶的名字和郵箱來記錄提交。GitHub也是用這些信息來做權限的處理,輸入下面的代碼進行個人信息的設置,把名稱和郵箱替換成你自己的,名字必須是你的真名,而不是GitHub的暱稱。
<code>$ git config --<span class="keyword eye-protector-processed">global</span> user.name <span class="string eye-protector-processed">"cnfeat"</span><span class="comment eye-protector-processed">//用戶名</span>
$ git config --<span class="keyword eye-protector-processed">global</span> user.email  <span class="string eye-protector-processed">"[email protected]"</span><span class="comment eye-protector-processed">//填寫自己的郵箱</span>
</code>
SSH Key配置成功
本機已成功連接到github。
若有問題,請重新設置。常見錯誤請參考:
GitHub Help - Generating SSH Keys
GitHub Help - Error Permission denied (publickey)
使用GitHub Pages建立博客
與GitHub建立好鏈接之後,就可以方便的使用它提供的Pages服務,GitHub Pages分兩種,一種是你的GitHub用戶名建立的username.github.io這樣的用戶&組織頁(站),另一種是依附項目的pages。
想建立個人博客是用的第一種,形如cnfeat.github.io這樣的可訪問的站,每個用戶名下面只能建立一個。
github上建立倉庫
登錄後系統,在github首頁,點擊頁面右下角「New Repository」

填寫項目信息:
project name:cnfeat.github.io
description: Writing 1000 Words a Day Changed My Life
注:Github Pages的Repository名字是特定的,比如我Github賬號是cnfeat,那麼我Github Pages Repository名字就是cnfeat.github.io。

點擊「Create Repository」 完成創建。
詳細可以看這裏:一步步在GitHub上創建博客主頁(2)
用Hexo克隆主題
Hexo介紹
Hexo的作者是tommy351,根據官方介紹,Hexo是一個簡單、快速、強大的博客發佈工具,支持Markdown格式。
安裝Hexo
打開git。
<code><span class="variable eye-protector-processed">$ </span>npm install -g hexo
</code>
部署Hexo
在我的電腦中建立一個名字叫「Hexo」的文件夾,然後在此文件夾中右鍵打開Git Bash。
<code><span class="variable eye-protector-processed">$ </span>hexo init
</code>
Hexo隨後會自動在目標文件夾建立網站所需要的所有文件。
現在我們已經搭建起本地的hexo博客了,執行以下命令(在H:\hexo),然後到瀏覽器輸入localhost:4000看看。
<code><span class="variable eye-protector-processed">$ </span>hexo g
<span class="variable eye-protector-processed">$ </span>hexo s
</code>
複製cnfeat的主題
以下進入複製主題環節,如果那一步出現問題,或者修改後沒有顯示修改的結果,建議來來一個,再看看,可以解決很多問題。
<code><span class="variable eye-protector-processed">$ </span>hexo clean
<span class="variable eye-protector-processed">$ </span>hexo g
<span class="variable eye-protector-processed">$ </span>hexo s
</code>
建立了Hexo文件之後就可以複製我的主題了
<code><span class="variable eye-protector-processed">$ </span>git clone <span class="symbol">https:</span>/<span class="regexp eye-protector-processed">/github.com/cnfeat</span><span class="regexp eye-protector-processed">/cnfeat.git themes/jacman</span>
</code>
如果不行,可以複製wuchong的修改的主題,我的就是複製他的修改的。
<code><span class="variable eye-protector-processed">$ </span>git clone <span class="symbol">https:</span>/<span class="regexp eye-protector-processed">/github.com/wuchong</span><span class="regexp eye-protector-processed">/jacman.git themes/jacman</span>
</code>
或者複製yangjian的
<code><span class="variable eye-protector-processed">$ </span>git clone <span class="symbol">https:</span>/<span class="regexp eye-protector-processed">/github.com/</span><span class="constant eye-protector-processed">A</span>-limon/pacman.git themes/pacman
</code>
啓用cnfeat的主題
修改Hexo目錄下的config.yml配置文件中的theme屬性,將其設置爲jacman。同時請設置stylus屬性中的compress值爲true。
<code><span class="attribute eye-protector-processed">theme</span>: <span class="string eye-protector-processed">jacman</span>
</code>
注意:Hexo有兩個config.yml文件,一個在根目錄,一個在theme下,此時修改的是在根目錄下的。
更新主題
<code><span class="variable eye-protector-processed">$ </span>cd themes/jacman
<span class="variable eye-protector-processed">$ </span>git pull
</code>
注意:爲避免出錯,請先備份你的_config.yml 文件後再升級
本地查看調試
<code><span class="variable eye-protector-processed">$ </span>hexo g <span class="comment eye-protector-processed">#生成</span>
<span class="variable eye-protector-processed">$ </span>hexo s <span class="comment eye-protector-processed">#啓動本地服務,進行文章預覽調試</span>
</code>
或者直接作用組合命令
<code><span class="variable eye-protector-processed">$ </span>hexo d -g
</code>
瀏覽器輸入http://localhost:4000,查看搭建效果。此後的每次變更_config.yml 文件或者上傳文件都可以先用此命令調試,非常好用,尤其是當你想調試出自己想要的主題時。
將獨立域名與GitHub Pages的空間綁定
GitHub Pages的設置
方法一:在Repository的根目錄下面,新建一個名爲CNAME的文本文件,裏面寫入你要綁定的域名,比如cnfeat.com。
方法二:到我的github倉庫,點擊右下角的「Download ZIP」,下載源文件,解壓,找到CNAME文件,用記事本打開,將cnfeat.com修改成你的域名,放進Hexo\source目錄下,用hexo命令提交上去。
<code><span class="variable eye-protector-processed">$ </span>hexo d -g
</code>
DNS設置
用DNSpod,快,免費,穩定。
註冊DNSpod,添加域名,如下圖設置。

其中A的兩條記錄指向的ip地址是github Pages的提供的ip
- 192.30.252.153
- 192.30.252.154
如博客不能登錄,有可能是github更改了空間服務的ip地址,記得及時到在GitHub Pages查看最新的ip即可
www指定的記錄是你在github註冊的倉庫。
去Godaddy修改DNS地址
更改godaddy的Nameservers爲DNSpod的NameServers。

1、點擊「My Account」,管理我的域名。
2、點擊域名。
3、將godaddy的Nameservers更改成f1g1ns1.dnspod.net和f1g1ns2.dnspod.net
如有不詳看可以看DNSpod提供的官方幫助
詳細也可以看這裏:一步步在GitHub上創建博客主頁(3)
搭建完成
至此,獨立博客就算搭建完成,如需進步一完善請在參看以下文章或博客下留言。
Pacman主題介紹 by yangjian
使用hexo搭建博客 by yangjian
hexo系列教程:(二)搭建hexo博客 by zippera(推薦)
hexo系列教程:(三)hexo博客的配置、使用by zippera(推薦)
進階篇:Hexo設置
網站搭建完成後,就可以根據自己愛好來對Hexo生成的網站進行設置了,對整站的設置,只要修改項目目錄的_config.yml就可以了,這是我的設置,可供參考。
<code><span class="preprocessor eye-protector-processed"># Hexo Configuration</span>
<span class="preprocessor eye-protector-processed">## Docs: http://hexo.io/docs/configuration.html</span>
<span class="preprocessor eye-protector-processed">## Source: https://github.com/tommy351/hexo/</span>

<span class="preprocessor eye-protector-processed"># Site #整站的基本信息</span>
<span class="label">title:</span> <span class="number eye-protector-processed">1000</span> words a Day <span class="preprocessor eye-protector-processed">#網站標題</span>
<span class="label">subtitle:</span> Writing <span class="number eye-protector-processed">1000</span> Words a Day Changes My Life <span class="preprocessor eye-protector-processed">#網站副標題</span>
<span class="label">description:</span> 學習總結 思考感悟 知識管理 <span class="preprocessor eye-protector-processed">#網站描述</span>
<span class="label">author:</span>  cnFeat <span class="preprocessor eye-protector-processed">#網站作者,在下方顯示</span>
<span class="label">email:</span> cnFeat@gmail<span class="preprocessor eye-protector-processed">.com</span> <span class="preprocessor eye-protector-processed">#聯繫郵箱</span>
<span class="label">language:</span> <span class="built_in eye-protector-processed">zh</span>-CN

<span class="preprocessor eye-protector-processed"># URL</span>
<span class="preprocessor eye-protector-processed">## If your site is put in a subdirectory</span>
<span class="label">url:</span> http://www<span class="preprocessor eye-protector-processed">.cnfeat</span><span class="preprocessor eye-protector-processed">.com</span> <span class="preprocessor eye-protector-processed">#你的域名</span>
<span class="label">root:</span> /
<span class="label">permalink:</span> :year/:month/:day/:title/
<span class="label">tag_dir:</span> tags
<span class="label">archive_dir:</span> archives
<span class="label">category_dir:</span> categories
<span class="label">code_dir:</span> downloads/code

<span class="preprocessor eye-protector-processed"># Directory</span>
<span class="label">source_dir:</span> source
<span class="label">public_dir:</span> public

<span class="preprocessor eye-protector-processed"># Writing</span>
<span class="label">new_post_name:</span> :title<span class="preprocessor eye-protector-processed">.md</span> <span class="preprocessor eye-protector-processed"># File name of new posts</span>
<span class="label">default_layout:</span> post
<span class="label">auto_spacing:</span> false <span class="preprocessor eye-protector-processed"># Add spaces between asian characters and western characters</span>
<span class="label">titlecase:</span> false <span class="preprocessor eye-protector-processed"># Transform title into titlecase</span>
<span class="label">external_link:</span> true <span class="preprocessor eye-protector-processed"># Open external links in new tab</span>
<span class="label">max_open_file:</span> <span class="number eye-protector-processed">100</span>
<span class="label">multi_thread:</span> true
<span class="label">filename_case:</span> <span class="number eye-protector-processed">0</span>
<span class="label">render_drafts:</span> false
<span class="label">post_asset_folder:</span> false
<span class="label">highlight:</span>
  enable: true
  line_number: true
  tab_replace:

<span class="preprocessor eye-protector-processed"># Category & Tag</span>
<span class="label">default_category:</span> uncategorized
<span class="label">category_map:</span>
<span class="label">tag_map:</span>

<span class="preprocessor eye-protector-processed"># Archives</span>
<span class="preprocessor eye-protector-processed">## 2: Enable pagination</span>
<span class="preprocessor eye-protector-processed">## 1: Disable pagination</span>
<span class="preprocessor eye-protector-processed">## 0: Fully Disable</span>
<span class="label">archive:</span> <span class="number eye-protector-processed">2</span>
<span class="label">category:</span> <span class="number eye-protector-processed">2</span>
<span class="label">tag:</span> <span class="number eye-protector-processed">2</span>

<span class="preprocessor eye-protector-processed"># Server</span>
<span class="preprocessor eye-protector-processed">## Hexo uses Connect as a server</span>
<span class="preprocessor eye-protector-processed">## You can customize the logger format as defined in</span>
<span class="preprocessor eye-protector-processed">## http://www.senchalabs.org/connect/logger.html</span>
<span class="label">port:</span> <span class="number eye-protector-processed">4000</span>
<span class="label">server_ip:</span> <span class="number eye-protector-processed">0.0</span><span class="number eye-protector-processed">.0</span><span class="number eye-protector-processed">.0</span>
<span class="label">logger:</span> false
<span class="label">logger_format:</span>

<span class="preprocessor eye-protector-processed"># Date / Time format</span>
<span class="preprocessor eye-protector-processed">## Hexo uses Moment.js to parse and display date</span>
<span class="preprocessor eye-protector-processed">## You can customize the date format as defined in</span>
<span class="preprocessor eye-protector-processed">## http://momentjs.com/docs/#/displaying/format/</span>
<span class="label">date_format:</span> YYYY-MM-DD
<span class="label">time_format:</span> H:mm:ss

<span class="preprocessor eye-protector-processed"># Pagination</span>
<span class="preprocessor eye-protector-processed">## Set per_page to 0 to disable pagination</span>
<span class="label">per_page:</span> <span class="number eye-protector-processed">15</span> <span class="preprocessor eye-protector-processed">#每頁15篇文章</span>
<span class="label">pagination_dir:</span> page

<span class="preprocessor eye-protector-processed"># Disqus #社會化評論disqus,我使用多說,在主題中配置</span>
<span class="label">disqus_shortname:</span>

<span class="preprocessor eye-protector-processed"># Extensions</span>
<span class="preprocessor eye-protector-processed">## Plugins: https://github.com/tommy351/hexo/wiki/Plugins</span>
<span class="preprocessor eye-protector-processed">## Themes: https://github.com/tommy351/hexo/wiki/Themes</span>
<span class="label">theme:</span> jacman
<span class="label">exclude_generator:</span>
<span class="label">Plugins:</span>
- hexo-generator-feed
- hexo-generator-sitemap

<span class="preprocessor eye-protector-processed">#sitemap</span>
<span class="label">sitemap:</span>
  path: sitemap<span class="preprocessor eye-protector-processed">.xml</span>

<span class="preprocessor eye-protector-processed">#Feed Atom</span>
<span class="label">feed:</span>
  type: atom
  path: atom<span class="preprocessor eye-protector-processed">.xml</span>
  limit: <span class="number eye-protector-processed">20</span>

<span class="preprocessor eye-protector-processed"># Markdown</span>
<span class="preprocessor eye-protector-processed">## https://github.com/chjj/marked</span>
<span class="label">markdown:</span>
  gfm: true
  pedantic: false
  sanitize: false
  tables: true
  breaks: true
  smartLists: true
  smartypants: true

<span class="preprocessor eye-protector-processed"># Stylus</span>
<span class="label">stylus:</span>
  compress: false

<span class="preprocessor eye-protector-processed"># Deployment</span>
<span class="preprocessor eye-protector-processed">## Docs: http://hexo.io/docs/deployment.html</span>
<span class="label">deploy:</span>
  type: github
  repository: https://github<span class="preprocessor eye-protector-processed">.com</span>/cnfeat/cnfeat<span class="preprocessor eye-protector-processed">.github</span><span class="preprocessor eye-protector-processed">.io</span><span class="preprocessor eye-protector-processed">.git</span>
  branch: master
</code>
修改局部頁面
頁面展現的全部邏輯都在每個主題中控制,源代碼在hexo\themes\jacman\中:
<code>.
├── languages  <span class="preprocessor eye-protector-processed">#多語言</span>
|   ├── default<span class="preprocessor eye-protector-processed">.yml</span><span class="preprocessor eye-protector-processed">#默認語言</span>
|   └── <span class="built_in eye-protector-processed">zh</span>-CN<span class="preprocessor eye-protector-processed">.yml</span>  <span class="preprocessor eye-protector-processed">#中文語言</span>
├── layout <span class="preprocessor eye-protector-processed">#佈局,根目錄下的*.ejs文件是對主頁,分頁,存檔等的控制</span>
|   ├── _partial   <span class="preprocessor eye-protector-processed">#局部的佈局,此目錄下的*.ejs是對頭尾等局部的控制</span>
|   └── _widget<span class="preprocessor eye-protector-processed">#小掛件的佈局,頁面下方小掛件的控制</span>
├── source <span class="preprocessor eye-protector-processed">#源碼</span>
|   ├── css<span class="preprocessor eye-protector-processed">#css源碼 </span>
|   |   ├── _base  <span class="preprocessor eye-protector-processed">#*.styl基礎css</span>
|   |   ├── _partial   <span class="preprocessor eye-protector-processed">#*.styl局部css</span>
|   |   ├── fonts  <span class="preprocessor eye-protector-processed">#字體</span>
|   |   ├── images <span class="preprocessor eye-protector-processed">#圖片</span>
|   |   └── style<span class="preprocessor eye-protector-processed">.styl</span> <span class="preprocessor eye-protector-processed">#*.styl引入需要的css源碼</span>
|   ├── fancybox   <span class="preprocessor eye-protector-processed">#fancybox效果源碼</span>
|   └── js <span class="preprocessor eye-protector-processed">#javascript源代碼</span>
├── _config<span class="preprocessor eye-protector-processed">.yml</span><span class="preprocessor eye-protector-processed">#主題配置文件</span>
└── README<span class="preprocessor eye-protector-processed">.md</span>  <span class="preprocessor eye-protector-processed">#用GitHub的都知道</span>
</code>
發表新文章
用hexo發表新文章
<code><span class="variable eye-protector-processed">$ </span>hexo n <span class="comment eye-protector-processed">#寫文章 </span>
</code>
其中my new post爲文章標題,執行命令後,會在項目\source_posts中生成my new post.md文件,用編輯器打開編寫即可。
當然,也可以直接在\source_posts中新建一個md文件,我就是這麼做的。
寫完後,推送到服務器上,執行
<code><span class="variable eye-protector-processed">$ </span>hexo g <span class="comment eye-protector-processed">#生成</span>
<span class="variable eye-protector-processed">$ </span>hexo d <span class="comment eye-protector-processed">#部署 # 可與hexo g合併爲 hexo d -g</span>
</code>
用Hexo發表文章的Markdown語法
使用jacman或pacman主題,建議按此標準語法寫:
<code>title: postName #文章頁面上的顯示名稱,可以任意修改,不會出現在URL中
date: 2013-12-02 15:30:16 #文章生成時間,一般不改,當然也可以任意修改
categories: example #分類
tags: [tag1,tag2,tag3] #文章標籤,可空,多標籤請用格式,注意:後面有個空格
<span class="header eye-protector-processed">description: 附加一段文章摘要,字數最好在140字以內。
---</span>

以下正文
</code>
爲什麼我的博客有目錄?
我用的是Markdown語法,Markdown語法怎麼用?
請看這裏:獻給寫作者的 Markdown 新手指南
或者看這裏:Markdown
Hexo命令
常用命令:
<code>hexo <span class="keyword eye-protector-processed">new</span> <span class="string eye-protector-processed">"postName"</span> <span class="preprocessor eye-protector-processed">#新建文章</span>
hexo <span class="keyword eye-protector-processed">new</span> page <span class="string eye-protector-processed">"pageName"</span> <span class="preprocessor eye-protector-processed">#新建頁面</span>
hexo generate <span class="preprocessor eye-protector-processed">#生成靜態頁面至public目錄</span>
hexo <span class="keyword eye-protector-processed">server</span> <span class="preprocessor eye-protector-processed">#開啓預覽訪問端口(默認端口4000,'ctrl + c'關閉server)</span>
hexo deploy <span class="preprocessor eye-protector-processed">#將.deploy目錄部署到GitHub</span>
</code>
常用複合命令:
<code>hexo d -g <span class="comment eye-protector-processed">#生成加部署</span>
hexo s -g <span class="comment eye-protector-processed">#預覽加部署</span>
</code>
簡寫:
<code>hexo n == hexo <span class="keyword eye-protector-processed">new</span>
hexo g == hexo generate
hexo s == hexo <span class="keyword eye-protector-processed">server</span>
hexo d == hexo deploy
</code>
安裝插件
添加sitemap和feed插件
<code>$ npm install hexo<span class="attribute eye-protector-processed">-generator</span><span class="attribute eye-protector-processed">-sitemap</span>
$ npm install hexo<span class="attribute eye-protector-processed">-generator</span><span class="attribute eye-protector-processed">-feed</span>
</code>
修改_config.yml,增加以下內容
<code><span class="preprocessor eye-protector-processed"># Extensions</span>
<span class="label">Plugins:</span>
- hexo-generator-feed
- hexo-generator-sitemap

<span class="preprocessor eye-protector-processed">#Feed Atom</span>
<span class="label">feed:</span>
  type: atom
  path: atom<span class="preprocessor eye-protector-processed">.xml</span>
  limit: <span class="number eye-protector-processed">20</span>

<span class="preprocessor eye-protector-processed">#sitemap</span>
<span class="label">sitemap:</span>
  path: sitemap<span class="preprocessor eye-protector-processed">.xml</span>
</code>
Hexo上傳README文件
Github的版本庫通常建議同時附上README.md說明文件,但是hexo默認情況下會把所有md文件解析成html文件,所以即使你在線生成了README.md,它也會在你下一次部署時被刪去。怎麼解決呢?
在執行hexo deploy前把在本地寫好的README.md文件複製到.deploy文件夾中,再去執行hexo deploy。
404頁面
GitHub Pages有提供製作404頁面的指引:Custom 404 Pages。
直接在根目錄下創建自己的404.html或者404.md就可以。但是自定義404頁面僅對綁定頂級域名的項目才起作用,GitHub默認分配的二級域名是不起作用的,使用hexo server在本機調試也是不起作用的。
推薦使用騰訊公益404。
圖牀
推薦使用七牛(10G空間,免費),還可以使用Yupoo(100m免費空間)
參考資料:
[1]一步步在GitHub上創建博客主頁 全系列 by pchou(推薦)
[2]網站優化:一步步在GitHub上創建博客主頁(6) by pchou (推薦)
[3]搭建一個免費的,無限流量的Blog——github Pages和Jekyll入門 by 阮一峯(推薦)
[4]hexo系列教程:(二)搭建hexo博客 by zippera(推薦)
[5]hexo系列教程:(三)hexo博客的配置、使用by zippera(推薦)
[6]hexo系列教程:(四)hexo博客的優化技巧 by zippera(推薦)
[7]hexo你的博客 by ibruce(推薦)
[8]Pacman主題介紹 by yangjian(推薦)
[9]使用hexo搭建博客 by yangjian(推薦)
[10]折騰了個Pacman主題 by wuchong(推薦)
[11]hexo官方寫作教程「Writing」
[12]知乎上的教程:如何搭建個人獨立博客?
[13]在GitHub Pages設置獨立域名的官方教程:[Setting up a custom domain with GitHub Pages]
[14]使用Github Pages建獨立博客 by beiyuu
[15]git/github初級運用自如 by 蟲師
[16]hexo搭建靜態博客以及優化 by Joanna Wu
[17]使用Hexo搭建個人博客 by c4fun
[18]Github Pages與Hexo建個人博客流程 by Kesco
[19]Git push時重複輸入用戶名密碼的問題 by zippera
[20]hexo文件結構及網站優化 by kevin chen
相關鏈接
[2]godaddy域名商
[3]DNSPOD
[4]Hexo官方主頁
[5]GotGitHub:GitHub介紹(推薦)
[6]本地測試頁localhost:4000
鳴謝
Van Cheng

