


1.在NetBeans下建立項目首先在NetBeans下建立一個叫HelloWorld的示例項目。在NetBeans的項目視圖和文件視圖如圖1和圖所示。
在NetBeans的項目中一般至少包含了Source Packages,Test Packages,Libraries和Test Libraries四個目錄。其結構圖如如圖1。
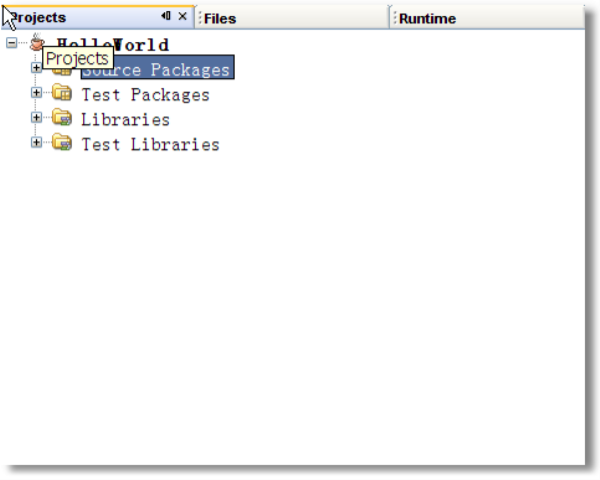
圖1 NetBeans項目結構圖
在NetBeans的文件結構至少包含nbproject, src和test三個子目錄。文件結構圖如圖2所示。在項目的文件夾下面有ant的標準構建文件build.xml,其內容如表所示。<? xml version="1.0" encoding="UTF-8" ?>
<!-- You may freely edit this file. See commented blocks below for -->
<!-- some examples of how to customize the build. -->
<!-- (If you delete it and reopen the project it will be recreated.) -->
< project name ="HelloWorld" default ="default" basedir ="." >
< description > Builds, tests, and runs the project HelloWorld. </ description >
< import file ="nbproject/build-impl.xml" />
<!--
There exist several targets which are by default empty and which can be
used for execution of your tasks. These targets are usually executed
before and after some main targets. They are:
-pre-init: called before initialization of project properties
-post-init: called after initialization of project properties
-pre-compile: called before javac compilation
-post-compile: called after javac compilation
-pre-compile-single: called before javac compilation of single file
-post-compile-single: called after javac compilation of single file
-pre-compile-test: called before javac compilation of JUnit tests
-post-compile-test: called after javac compilation of JUnit tests
-pre-compile-test-single: called before javac compilation of single JUnit test
-post-compile-test-single: called after javac compilation of single JUunit test
-pre-jar: called before JAR building
-post-jar: called after JAR building
-post-clean: called after cleaning build products
(Targets beginning with '-' are not intended to be called on their own.)
Example of inserting an obfuscator after compilation could look like this:
<target name="-post-compile">
<obfuscate>
<fileset dir="${build.classes.dir}"/>
</obfuscate>
</target>
For list of available properties check the imported
nbproject/build-impl.xml file.
Another way to customize the build is by overriding existing main targets.
The targets of interest are:
-init-macrodef-javac: defines macro for javac compilation
-init-macrodef-junit: defines macro for junit execution
-init-macrodef-debug: defines macro for class debugging
-init-macrodef-java: defines macro for class execution
-do-jar-with-manifest: JAR building (if you are using a manifest)
-do-jar-without-manifest: JAR building (if you are not using a manifest)
run: execution of project
-javadoc-build: Javadoc generation
test-report: JUnit report generation
An example of overriding the target for project execution could look like this:
<target name="run" depends="HelloWorld-impl.jar">
<exec dir="bin" executable="launcher.exe">
<arg file="${dist.jar}"/>
</exec>
</target>
Notice that the overridden target depends on the jar target and not only on
the compile target as the regular run target does. Again, for a list of available
properties which you can use, check the target you are overriding in the
nbproject/build-impl.xml file.
-->
</ project >
在列表中可以看出,有這樣的描述
 import
file="nbproject/build-impl.xml"/
import
file="nbproject/build-impl.xml"/
主要的內容實際上在nbproject/build-impl.xml裏。

圖2 NetBeans文件結構圖
那麼構建過後的class文件和jar到底放置在什麼地方。
切換到project視圖,點擊右鍵,在彈出菜單選擇“Build Project”(如圖3所示),對項目進行構建。

圖3
再切換到File視圖,將會發現多出了build和dist及其子文件夾。如圖4所示。
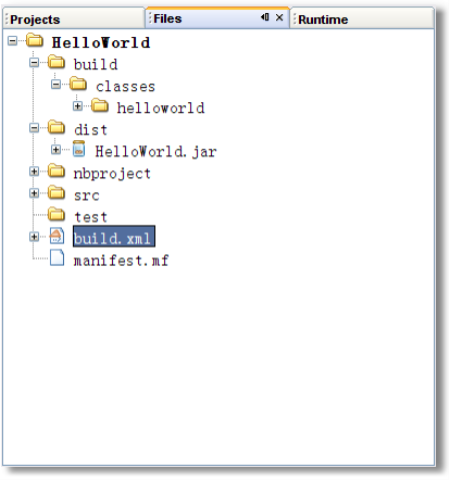
圖4
原來,NetBeans構建過後,將產生的類放置到了build文件夾的classes下面,將生成的jar包放置到了dist下面。通過搜索,build.classes.dir屬性和dist.dir是在project.properties文件裏定義的。爲了將項目引入到eclipse作準備,修改爲:
build.classes.dir=${build.dir}/dist.dir=bin自此,在HelloWorld項目在NetBeans下已經完工。
2.將HelloWorld Project 引入到Eclipse打開Eclipse,從菜單"File->New"選擇,將彈出項目嚮導。在嚮導中選擇"Java 項目"。如圖5所示。
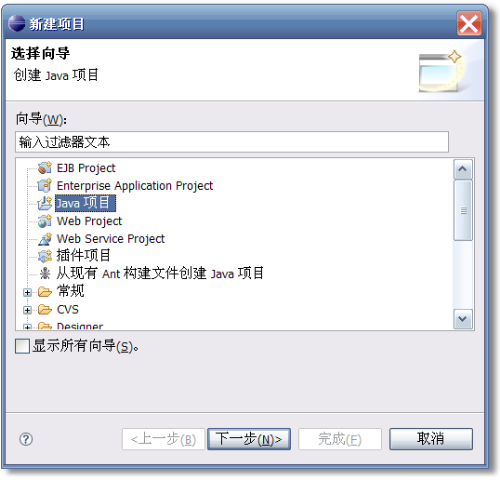
圖5
點擊下一步,在新的嚮導頁中,選擇"從現有資源創建項目"選項,然後再點擊“下一步”。如圖6所示。

圖6
這時,調整缺省輸出目錄,然後點擊“完成”按鈕。

圖7
至此,NetBeans下的項目完整地引入到了Eclipse平臺裏。像其它的Eclipse項目一樣進行操作了。