


備註:文章事例部分代碼會出現不對齊的情況,使用時,請注意格式對齊!!
第4 章 playbook和roles
4.1 ansible-playbook常用命令說明
    ansible-playbook --help
    Usage: ansible-playbook playbook.yml

    Options:
      -e EXTRA_VARS,--extra-vars=EXTRA_VARS # 設置額外的變量,格式爲key/value。-e "key=KEY",
                                            # 如果是文件方式傳入變量,則-e "@param_file"
      --flush-cache          # 清空收集到的fact信息緩存
      --force-handlers       # 即使task執行失敗,也強制執行handlers
      --list-tags            # 列出所有可獲取到的tags
      --list-tasks           # 列出所有將要被執行的tasks
      -t TAGS,--tags=TAGS    # 以tag的方式顯式匹配要執行哪些tag中的任務
      --skip-tags=SKIP_TAGS  # 以tag的方式忽略某些要執行的任務。被此處匹配的tag中的任務都不會執行
      --start-at-task=START_AT_TASK # 從此task開始執行playbook
      --step                 # one-step-at-a-time:在每一個任務執行前都進行交互式確認
      --syntax-check         # 檢查playbook語法
4.2 playbook的內容
4.2.1 hosts和remoter_user
對於playbook中的每一個play,使用hosts選項可以定義要執行這些任務的主機或主機組,還可以使用remote_user指定在遠程主機上執行任務的用戶,實際上remote_user是ssh連接到被控主機上的用戶,自然而然執行命令的身份也將是此用戶。
---   #標識
- hosts: control-node    #將要執行任務的主機,已經在hosts文件中定義好了,可是單個主機或主機組
  remote_user: root      #在目標主機上執行任務時的用戶身份
  vars:
    - pkg: httpd
  tasks:
    - name: "install httpd package."
      yum: name={{ pkg }}  state=installed
4.2.2 notify和handler
ansible每個任務的changed=true或changed=false。ansible在捕捉到changed=true時,可以觸發notify組件(如果定義了該組件),而notify是一個組件,並非一個模塊,它可以直接定義action,其主要目的是調用handler。在需要被監控的任務(tasks)中定義一個notify,只有當這個任務被執行時,纔會觸發notify對應的handlers去執行相應操作。特別需要注意:handlers下的name名稱必須要和它對應的notify名稱相同!否則不會執行!!
舉例如下:
---  #標識
- hosts: control-node
  remote_user: root
  vars:
    - pkg: httpd
  tasks:
    - name: "install httpd package."
      yum: name={{ pkg }}  state=installed
    - name: "copy httpd configure file to remote host."
      copy: src=/root/conf/httpd.conf dest=/etc/httpd/conf/httpd.conf
      notify: restart httpd
    - name: "boot httpd service."
      service: name=httpd state=started
  handlers:
    - name: restart httpd
      service: name=httpd state=restarted
在使用handlers的過程中,需要注意下面幾點
1、handlers只有在其所在的任務被執行完時,它纔會被運行;如果一個任務中定義了notify調用Handlers,但由於條件判斷等原因,該任務未被執行,則Handlers同樣不會被執行。
2、 handlers只會在Play的末尾運行一次;如果想在一個Playbook的中間運行handlers,則需要使用meta模塊來實現,例如:-meta: flush_handlers。
3、 可以直接在Handlers中使用notify選項,實現Handlers調用Handlers。
4、可以使用listen關鍵字,在一個tasks任務中一次性notify多個handler。即將多個handler分爲"一組",使用相同的"組名"即可,當notify對應的值爲"組名"時,"組"內的所有handler都會被notify。
5、如果一個Play在運行到調用handlers的語句之前失敗了,那麼這個handlers將不會被執行。但是可以使用mega模塊的--force-handlers選項來強制執行handlers,即使在handlers所在Play中途運行失敗也能執行。需要注意:--force-handlers參數主要針對即使playbook執行失敗,也要執行代碼塊成功了的handlers(即執行成功的task任務), 如果代碼塊本身執行失敗(即執行失敗的task任務),那麼它所對應的handlers應當不會被執行!
場景1:headlers在所有tasks任務被執行完時才執行:
---   #標識
- hosts: test_host
  remote_user: root
  become: yes
  become_method: sudo
  tasks:
    - name: make file task1
      file: path=/opt/task1.txt state=touch
      notify: task1
    - name: make file task2
      file: path=/opt/task2.txt state=touch
      notify: task2
  handlers:
    - name: task1
      file: path=/opt/task1.txt mode=777 owner=root group=root
    - name: task2
      file: path=/opt/task2.txt src=/opt/task2.txt dest=/opt/heihei state=link force=yes
場景2:使用meta模塊,headlers會在它所對應的task任務執行完後立即被觸發並執行,即在playbook的中間環節運行:
--- #標識
- hosts: test_host
  remote_user: root
  become: yes
  become_method: sudo
  tasks:
    - name: make file task1
      file: path=/opt/task1.txt state=touch
      notify: task1
    - meta: flush_handlers
    - name: make file task2
      file: path=/opt/task2.txt state=touch
      notify: task2
  handlers:
    - name: task1
      file: path=/opt/task1.txt mode=777 owner=root group=root
    - name: task2
      file: path=/opt/task2.txt src=/opt/task2.txt dest=/opt/heihei state=link force=yes
場景3:Handlers調用Handlers:
--- #標識
- hosts: test_host
  remote_user: root
  become: yes
  become_method: sudo
  tasks:
    - name: make file task1
      file: path=/opt/task1.txt state=touch
      notify: task1
    - name: make file task2
      file: path=/opt/task2.txt state=touch

  handlers:
    - name: task1
      file: path=/opt/task1.txt mode=777 owner=root group=root
      notify: task2
    - name: task2
      file: path=/opt/task2.txt src=/opt/task2.txt dest=/opt/heihei state=link force=yes
注意:上面執行的順序是:make file task1 > make file task2 > task1 > task2
也可以改成下面的方式:實現Handlers調用Handlers:
---  #標識
- hosts: test_host
  remote_user: root
  become: yes
  become_method: sudo
  tasks:
    - name: make file task1
      file: path=/opt/task1.txt state=touch
      notify: task1

  handlers:
    - name: task1
      file: path=/opt/task1.txt mode=777 owner=root group=root
      notify: task2
    - name: task2
      file: path=/opt/task2.txt state=touch
      notify: task3
    - name: task3
      file: path=/opt/task2.txt src=/opt/task2.txt dest=/opt/heihei state=link force=yes
注意:上面的執行順序是:make file task1 > task1 > task2 > task3
場景4:使用listen關鍵字(需要注意:listen的名稱要和notify名稱保持一致),在一個tasks任務中一次性notify多個handler:
--- #標識
- hosts: test_host
  remote_user: root
  become: yes
  become_method: sudo
  tasks:
    - name: make file task1
      file: path=/opt/task1.txt state=touch
      notify: group1_handler
  handlers:
    - name: task1
      listen: group1_handler
      file: path=/opt/task1.txt mode=777 owner=root group=root
    - name: task2
      listen: group1_handler
      file: path=/opt/task1.txt src=/opt/task1.txt dest=/opt/heihei state=link force=yes
    - name: task3
      listen: group1_handler
      shell: echo "this is test,haha...." >> /opt/task1.txt
場景5:使用--force-handlers選項來強制執行handlers(ansible-playbook XXX.yaml --force-handlers):
必須要注意的是:--force-handlers參數主要針對即使playbook執行失敗,也要執行代碼塊成功了的handlers(即執行成功的task任務), 如果代碼塊本身執行失敗(即執行失敗的task任務),那麼它所對應的handlers應當不會被執行!
---  #標識
- hosts: test_host
  remote_user: root
  become: yes
  become_method: sudo
  tasks:
    - name: make file task1
      file: path=/opt/task1.txt state=touch
      notify: task1
    - name: make file task2
      file: path=/opt/kevin/task2.txt state=touch
      notify: task2
  handlers:
    - name: task1
      file: path=/opt/task1.txt mode=777 owner=root group=root
    - name: task2
      shell: ln -s /opt/task1.txt /opt/task2.txt
4.2.3 tags任務標籤
tags可以看作是ansible的任務控制,ansible的標籤(Tags)功能可以給角色(Roles)、文件、單獨的任務,甚至整個Playbook打上標籤,然後利用這些標籤來指定要運行Playbook中的個別任務,或不執行指定的任務。如果有一個很大的playbook劇本,而只想運行playbook其中的某個或部分task任務,而不是運行playbook中所有的任務,這個時候tags是最佳選擇。
一、可以通過兩種方式根據"tags"過濾任務:
1、 在命令行上,使用或選項"--tags或 --skip-tags",後面使用空格或"="都可以。
2、在ansible配置設置中,使用和選項"TAGS_RUN或TAGS_SKIP";
3、可以使用"--list-tags"查看playbook中有哪些tags會被執行;
二、系統內置的tags有以下幾個:
always: 除非--skip-tags指定這個標籤,否則該標記爲always的task一直都會執行。"--tags always"只執行標記了always的tasks;
never: 除非--tags指定了這個標籤,否則該標記爲never的task一直都不會執行。"--tags never"執行標記了always和never的tasks;
tagged: --tags tagged表示執行所有有tags標籤的tasks任務,但不包括tags標籤是never的tasks任務;--skip-tags tagged表示所有有tags標籤的tasks任務都跳過,即不會執行。
untagged: --tags untagged表示執行所有沒有tags標籤的tasks任務和tags標籤爲always的tasks任務;--skip-tags untagged效果相反!
all:--tags all表示執行所有的tags標籤爲非never的task,包括有tags標籤和無tags標籤的tasks。
三、 tags標籤配置語法有下面三種:
語法一:
tags:
- tag_test
語法二:
tags: tag_test
語法三:
tags: ['tag_test']
官方示例如下:
[root@localhost ansible]# vim example.yml
--- #標識
- hosts: all
  remote_user: root
  gather_facts: no
  tasks:
    - yum: name={{ item }} state=installed
      with_items:
         - httpd
         - memcached
      tags:
         - packages
    - template: src=templates/src.j2 dest=/etc/foo.conf
      tags:
         - configuration
此時如果希望只run其中的某個task,則run的時候指定tags即可。可以運行多個tags,中間使用逗號隔開;也可以運行單個tags。
[root@localhost ansible]# ansible-playbook example.yml --tags "configuration,packages"
[root@localhost ansible]# ansible-playbook example.yml --tags configuration
[root@localhost ansible]# ansible-playbook example.yml --tags packages
或者
[root@localhost ansible]# ansible-playbook example.yml --tags="configuration,packages"
[root@localhost ansible]# ansible-playbook example.yml --tags=configuration
[root@localhost ansible]# ansible-playbook example.yml --tags=packages
相反,也可以使用--skip-tags跳過某個task任務。
[root@localhost ansible]# ansible-playbook example.yml --skip-tags configuration
或者
[root@localhost ansible]# ansible-playbook example.yml --skip-tags=configuration
四、內置的特殊tags的用法
[root@localhost ansible]# cat haha.yaml
--- #標識
- hosts: test_host
  remote_user: root
  gather_facts: no
  tasks:
    - name: task1
      file: path=/opt/task1.txt state=touch
      tags: make_task1
    - name: task2
      file: path=/opt/task2.txt state=touch
      tags:
         - always
    - name: task3
      file: path=/opt/task2.txt src=/opt/task2.txt dest=/opt/heihei state=link force=yes
tags: ['link_task3']執行1:如下,雖然tags指定了執行標籤爲make_task1的任務,但是由於任務2的標籤有關鍵字always,所以任務2也會被執行,這就是always的作用![root@localhost ansible]# ansible-playbook haha.yaml --tags=make_task1
五、tags標籤可以和role 結合使用
[root@localhost ansible]# cat test.yml
--- #標識
roles:
  - { role: webserver, port: 5000, tags: [ 'web', 'foo' ] }
六、tags和include結合使用
 [root@localhost ansible]# cat test.yml
--- #標識
- include: kevin.yml tags=web,foo
查看一下具體實例:再來看看一個include結合tags的示例:通過指定標籤(tags),來說明是安裝tomcat7還是tomcat8
[root@localhost ansible]# cat tomcat.yml
--- #標識
- include: install_tomcat7.yml
  tags: tomcat7
- include: install_tomcat8.yml
  tags: tomcat8
[root@localhost ansible]# cat install_tomcat7.yml
--- #標識
- name: "複製文件到遠程主機"
copy:
src={{ item.src }}
dest={{ item.dest }}
with_items:
- src: jdk-7u79-linux-x64.rpm
dest: /usr/local/src/
- src: java17.sh
dest: /etc/profile.d/
- name: "安裝jdk"
yum:
name: /usr/local/src/jdk-7u79-linux-x64.rpm
state: present
- name: "重新加載環境變量"
shell: "source /etc/profile.d/java17.sh"
- name: "複製tomcat文件到遠程服務器並解壓"
unarchive:
src=apache-tomcat-7.0.64.zip
dest=/data/
copy=yes
owner=staplesapp
group=admin
- name: "對解壓後的文件重命名"
shell: mv /data/apache-tomcat-7.0.64 /data/tomcat7
- name: "對tomcat進行相關配置"
shell: find /data/tomcat7/bin -name "*.sh" | xargs chmod +x
- name: "啓動tomcat"
shell: 'nohup /data/tomcat7/bin/startup.sh &'[root@localhost ansible]# cat install_tomcat8.yml
--- #標識
- name: "複製文件到遠程主機"
copy:
src={{ item.src }}
dest={{ item.dest }}
with_items:
- src: jdk-8u111-linux-x64.rpm
dest: /usr/local/src/
- src: java18.sh
dest: /etc/profile.d/
- name: "安裝jdk"
yum:
name: /usr/local/src/jdk-8u111-linux-x64.rpm
state: present
- name: "配置java環境變量"
shell: "source /etc/profile.d/java18.sh"
- name: "安裝tomcat"
unarchive:
src=apache-tomcat-8.0.30.tar.gz
dest=/data/
copy=yes
owner=staplesapp
group=admin
- name: "對解壓後的文件重命名"
shell: mv /data/apache-tomcat-8.0.30 /data/tomcat8
- name: "啓動tomcat"
shell: 'nohup /data/tomcat8/bin/startup.sh &'下面開始執行命令:
安裝tomcat7:
[root@localhost ansible]# ansible-playbook tomcat.yml --tags tomcat7

安裝tomcat8:
[root@localhost ansible]# ansible-playbook tomcat.yml --tags tomcat8
特別注意:
在ansible2.8版本之後將會刪除include語法,更改爲import_playbook。如果還使用include語法也可以,只不過ansible-playbook執行結果中會有告警信息:"DEPRECATION WARNING]:'include' for playbook includes. You should use 'import_playbook' instead. This feature will be removed in version 2.8. Deprecation warnings can be disabled by setting deprecation_warnings=False in ansible.cfg."。所以,最好將上面tomcat.yml文件中的include語法改成import_playbook,如下:
[root@localhost ansible]# cat tomcat.yml
--- #標識
- import_playbook: install_tomcat7.yml
  tags: tomcat7
- import_playbook: install_tomcat8.yml
  tags: tomcat8
4.2.4 include用法
如果想在playbook中重複使用任務列表,則可以使用include文件來執行此操作。 使用include的任務列表是定義系統將要實現的角色的好方法。注意事項:ansible2.8版本之後include語法變成了import_playbook。如果還是使用include,雖然不會影響執行結果,只不過在執行過程會有告警信息。
示例1:通過Include,可以在playbook中引用另一個playbook或者tasks
[root@localhost ansible]# cat install_MysqlAndPhp.yml
--- #標識
- yum:
    name: mysql
    state: present
- yum:
    name: php-fpm
    state: present

[root@localhost ansible]# cat lamp.yml
--- #標識
- hosts: test_host
  remote_user: root
  gather_facts: no
  tasks:
  - include: install_MysqlAndPhp.yml
  - yum:
      name: httpd
      state: present

[root@localhost ansible]# cat lnmp.yml
--- #標識
- hosts: test_host
  remote_user: root
  gather_facts: no
  tasks:
    - include: install_MysqlAndPhp.yml
    - yum:
        name: nginx
        state: present
示例2: 可以在handler中引用include
[root@localhost ansible]# cat test_include.yml
--- #標識
- hosts: test_host
  remote_user: root
  gather_facts: no
  tasks:
    - file:
        path: /opt/ttt
        state: touch
      notify: test include handlers

  handlers:
    - name: test include handlers
      include: include_handler.yml

[root@localhost ansible]# cat include_handler.yml
--- #標識
- - debug:
    msg: "task1 of handlers"
- debug:
    msg: "task2 of handlers"
- debug:
    msg: "task3 of handlers"
示例3: when在include中使用
[root@localhost ansible]# cat /etc/ansible/hosts
[db]
192.168.24.10
[app]
192.168.24.11

[root@localhost ansible]# cat install_client.yml
--- #標識
- hosts: '` hosts `'
  user: ansible
  sudo: yes
  sudo_user:root
  roles:
    - install_client

[root@localhost ansible]# cat roles/install_client/tasks/main.yml
--- #標識
- include: db.yml
  when: "hosts == 'db'"
- include: app.yml
  when: "hosts == 'app'"

[root@localhost ansible]# cat roles/install_client/tasks/db.yml
--- #標識
  - name: Touchdb file
    shell: touch /tmp/db.txt

[root@localhost ansible]# cat roles/install_client/tasks/app.yml
--- #標識
  - name: Touchdb file
    shell: touch /tmp/db.txt

執行命令:
[root@localhost ansible]# ansible-playbook -i hosts install_client.yml --extra-vars "hosts=db"
[root@localhost ansible]# ansible-playbook -i hosts install_client.yml --extra-vars "hosts=app"
4.2.5 role用法
角色(roles)是用於層次性,結構化地組織playbook,roles就是通過分別將變量、文件、任務、模塊及處理器放置於單獨的目錄中、並可以便捷地include他們的一種機制。
一、role的層級目錄結構
role是以特定的層級目錄結構進行組織的tasks、variables、handlers、templates、files等;
roles/
    role_name/:定義的role的名字
    file/:     用於存放copy或script等模塊調用的函數
    tasks/:     用於定義各種task,此目錄一定要有main.yml;其他文件需要main.yml包含調用
    handlers/: 用於定義各種handlers,此目錄一定要有main.yml;其他文件需要main.yml包含調用
    vars/:      用於定義variables,此目錄一定要有main.yml;其他文件需要main.yml包含調用
    templates/:存儲由template模塊調用的模板文本;
    meta/:     定義當前角色的特殊設定及其依賴關係,此目錄中至少應該有一個名爲main.yml的文件;其它的文件需要由main.yml進行"包含"調用;
    default/:  此目錄中至少應該有一個名爲main.yml的文件,用於設定默認變量;
以一個項目的role目錄結構舉例:
site.yml
webservers.yml
mariadb.yml
roles/
   common/
     files/
     templates/
     tasks/
     handlers/
     vars/
     defaults/
     meta/
   mariadb/
     files/
     templates/
     tasks/
     handlers/
     vars/
     defaults/
     meta/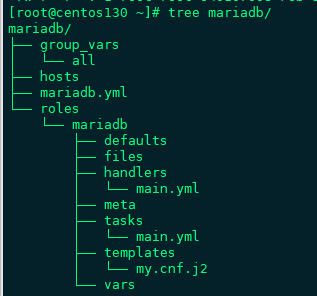
目錄解釋:
yml文件:用於定義此角色用到的各handler:在handler中使用include包含的其他的handler文件也應該位於此目錄中;
files目錄:存放由copy或script等模塊調用的文件;
templates目錄:templates模塊會自動在此目錄中尋找Jinja2模板文件;
tasks目錄:至少應該包含一個名爲main.yml的文件,其定義了此角色的任務列表;此文件可以使用include包含其他的位於此目錄中的task文件;
handlers目錄:此目錄中應當包含一個main;
vars目錄:應當包含一個main.yml文件,用於定義此角色用到的變量;
meta目錄:應當包含一個main.yml文件,用於定義此角色的特殊設定及其依賴關係;ansible 1.3及其以後的版本才支持
default目錄:爲當前角色設定默認變量時使用此目錄;應當包含一個main.yml文件;
二、 在playbook中調用role
在playbook中調用role的方式有三種,如下:
第一種:
- hosts: HOSTS
  remote_user: root
  roles:
    - ROLE_NAME1
    - ROLE_NAME2

第二種:除了字典第一個元素指明調用的role,後面是傳遞給role的變量
- hosts: HOSTS
  remote_user: root
  roles:
  - { role: ROLE_NAME1, VARIABLE1: VALUE1, ... }

第三種:when指明role調用的條件
- hosts: HOSTS
  remote_user: root
  roles:
  - { role: ROLE_NAME1, when: CONDITIONS }
三、舉例使用ansible-playbook實現如下功能配置:
1、group: 創建用戶組nginx
2、user: 創建用戶nginx
3、yum: 安裝nginx
4、template: 配置文件更新nginx.conf
5、service: 啓動nginx
[root@localhost ~]# cat /etc/ansible/ansible.cfg|grep roles_path
roles_path    = /etc/ansible/roles:/root/ansible/roles
[root@localhost ~]# mkdir ansible/roles/nginx -p
[root@localhost ~]# cd ansible/roles/nginx
[root@localhost nginx]# mkdir {tasks,templates}
[root@localhost nginx]# cd tasks

[root@localhost tasks]# vim group.yml
- name: create group nginx
    group: name=nginx gid=80

[root@localhost tasks]# vim user.yml
-name: create user nginx
    user: name=nginx uid=80 group=nginx system=yes shell=/sbin/nologin

[root@localhost tasks]# vim install.yml
- name: install package
    yum: name=nginx

[root@localhost tasks]# vim start.yml
- name: start service
    service: name=nginx state=started enabled=yes

[root@localhost tasks]# vim restart.yml
- name: restart service
    service: name=nginx state=restarted

[root@localhost tasks]# vim templ.yml
- name: copy conf
    template: src=nginx.conf.j2 dest=/etc/nginx/conf/nginx.conf

[root@localhost tasks]# vim main.yml
- include: group.yml
- include: user.yml
- include: install.yml
- include: templ.yml
- include: start.yml

[root@localhost tasks]# cd ../templates  && ls
nginx.conf.j2

[root@localhost tasks]# cd /root/ansible
[root@localhost ansible]# vim nginx_role.yml
- hosts: websrvs
  remote_user: root
  roles:
    - role: nginx

執行命令:
[root@localhost ansible]# ansible-playbook nginx_role.yml
4.2.6 playbook中的變量設置
變量的優先級
1、 extra vars變量(在命令行中使用 -e);優先級最高
2、playbook中的變量;優先級第二
3、 在inventory中定義的連接變量(比如ansible_ssh_user);優先級第三
4、 大多數的其他變量(命令行轉換,play中的變量,include的變量,role的變量等);優先級第四
5、 在inventory定義的其他變量;優先級第五
6、有系統發現的facts;優先級第六
7、 "role默認變量",這個是最默認的值,很容易喪失優先權。優先級最小。
另外:在inventory清單列表裏定義的變量:單個主機定義的變量優先級高於主機組定義的變量。ansible使用inventory定義變量的優先級順序從高到低爲:
1、 host_vars下定義變量
2、 inventory中單個主機定義變量
3、 group_vars下定義變量
4、 inventory中組定義變量
YAML陷阱
YAML語法要求如果值以{{ foo }}開頭的話,那麼就需要將整行用雙引號包起來,這是爲了確認你不是想聲明一個YAML字典。
- hosts: app_servers
  vars:
    app_path: "{{ base_path }}/data/web"
一、在playbook劇本中定義變量
在playbook中定義變量需要用到Ansible的vars模塊,可以將所有需要用到的變量統一在vars模塊下定義,定義格式需要遵循YAML語言格式:
vars:
  - var1: value1
  - var2: value2
  - var3: value3
  - ....: .....
示例如下:
[root@ss-server ansible]# cat playbook.yml
---  #標識
- hosts: kevin
  remote_user: root
  vars:
    - dir1: /root/Ansible
    - dir2: /root/Ansible/test1
    - dir3: /root/Ansible/test2
  tasks:
    - name: Create New Folder
      file: name={{ dir1 }} state=directory
    - name: Create New Folder
      file: name={{ dir2 }} state=directory
    - name: Create New Folder
      file: name={{ dir3 }} state=directory
二、通過roles角色定義變量
在Ansible的roles中定義變量,需要將變量及值的鍵值對形式寫到roles的vars目錄下的main.yml文件中,同樣適用YAML語言格式,格式如下:
 var1: value1
var2: value2
var3: value3
請注意:通過Roles定義的變量只適用於當前roles。
三、使用Facts獲取的信息
Facts通過訪問遠程系統獲取相應的信息[root@ss-server ansible]# ansible web -m setup
關閉信息收集的方法如下:
[root@ss-server ansible]# cat test.yml
--- # 標識
- hosts: web
  gather_facts: no
四、register註冊變量
變量的另一個主要用途是在運行命令時,把命令結果存儲到一個變量中,不同模塊的執行結果是不同的。register方式主要用於在task之間傳遞變量。
[root@ss-server ansible]# cat /root/register.yml
--- #標識
    - hosts: web
      tasks:
        - shell: echo hello world
          register: say_hi
        - debug: var=say_hi.stdout
        - debug: var=sya_hi['stdout']
五、藉助with_items疊加變量
迭代:當有需要重複性執行的任務時,可以使用迭代機制:
1、對迭代項的引用,固定變量名爲“item”
2、要在task中使用with_items給定要迭代的元素列表
3、列表格式:
字符串或字典
 #例如1:
 --- #標識
    - hosts: localhost
      remote_user: root
      tasks:
        - name: test #
          shell: echo "{{item}}"
          with_items:
            - haha
            - heihei
            - hehe
          register: hi_var
        - debug: var=hi_var.results[0].stdout
        - debug: var=hi_var.results[1].stdout
        - debug: var=hi_var.results[2].stdout
#例如2:yum模塊安裝多個程序包
[root@localhost mariadb]# vim tasks/main.yml
--- #標識
- name: Install MariaDB package
yum: name={{ item }} state=installed
with_items:
- mariadb-server
- mariadb
- MySQL-python
- libselinux-python
- libsemanage-python#例如3:迭代嵌套子變量(字典)
  [root@localhost ansible]# vim tasks/main.yml
--- #標識

- hosts: all
  remote_user: root
  tasks:
   - name: add some groups
     group: name={{ item }} state=present
     with_items:
      - group1
      - group2
      - group3
   - name: add some users
      user: name={{ item.name }} group={{ item.group }} state=present
      with_items:
        - { name: 'user1', group: 'group1' }
        - { name: 'user2', group: 'group2' }
        - { name: 'user3', group: 'group3' }
六、內置變量
ansible除了inventory中內置的一堆不可被引用的設置類變量,還有幾個全局都可以引用的內置變量,主要有以下幾個:
inventory_hostname、inventory_hostname_short、groups、group_names、hostvars、play_hosts、inventory_dir和ansible_version。
#獲取內置變量信息
[root@ss-server ansible]# ansible web -m debug -a 'msg="{{inventory_hostname}} & {{inventory_hostname_short}}"'
七、hostvars 變量
--- #標識
    - hosts: centos7
      tasks:
        - debug: msg="{{hostvars['192.168.8.130'].ansible_eth0.ipv4.address}}"
直接在playbook中定義變量,舉例如下:
[root@ss-server ansible]# cat testvar.yml
--- #標識
    - hosts: web
      remote_user: root
            vars_files:
              - vars.yml

            tasks:
              - name: install package
                yum: name= {{ var1 }}

             - name: create file
               file: name=/data/{{ var2 }}.log state=touch
[root@ss-server ansible]# cat vars.yml
var1: httpd
var2: vsftpd
[root@ss-server ansible]#  ansible-play -C testvar.yml
八、列表變量、循環變量、字典變量
1)ansible的變量不僅可以是單個的值,也可以爲列表,即ansible傳列表作爲變量。如下示例:
[root@ss-server ansible]# vim test.yml
--- #標識
- hosts: web
  gather_facts: no
  vars:
    - list: [1,2,3]
  tasks:
    - name: echo
      debug: msg="{{ list }}"
2)循環列表
[root@ss-server ansible]# vim test.yml
--- #標識
- hosts: test_host
  gather_facts: no
  vars:
    - list: [1,2,3]
  tasks:
    - name: this is loop
      debug: msg="{{ item }}"
      with_items: '{{list}}'
loop 關鍵字表示循環,去讀循環體裏的變量固定使用{{item}},item是個字典對象item.key=value。
需要注意:下面test.yml文件中的"loop"關鍵字 改爲 "with_items"關鍵字,效果是一樣的!
ansible的循環用法:在ansible 2.5版本之前,大多數人習慣使用"with_X"風格的關鍵字操作循環,
從ansible 2.6版本開始,官方開始推薦使用"loop"關鍵字代替"with_X"風格關鍵字。
[root@ss-server ~]# cat /etc/ansible/test.yml
--- #標識
- name: this is test
  hosts: test_host
  connection: local
  gather_facts: no
  vars:
    my_list:
      - a
      - b
      - c
      - 1

  tasks:
    - name: debug loop output
      debug:
        msg: "The {{index}} one is {{item}}"
      loop: "{{my_list}}"               # 或者使用with_items: "{{my_list}}"  或者 with_list: "{{my_list}}"
      loop_control:
        index_var: index
3)字典變量
注意:在變量中使用循環時,vars下必須要有"-",符號"-"爲循環體塊的標誌!!
[root@ss-server ansible]# vim test.yml
--- #標識
- hosts: test_host
  gather_facts: no
  vars:
    - lists:
        list1: [1,2,3]
        list2: [4,5]
  tasks:
    - name: loop
      debug: msg="{{ item }}"
      with_items: '{{lists["list1"]}}'
九、inventory
cat /etc/ansible/hosts
[web]
192.168.8.131 httpd_port=81
192.168.8.132 httpd_port=82