Flink調度

從提交來一步一步分析,本文源碼基於Apache社區 1.8-release 版本

REST提交作業流程:

1.集羣啓動後 通過 /jars/upload 向集羣提交可執行jar文件

2.通過 /jars/:jarid/run 來啓動一個job

1.構建並提交JobGraph

我們直接找到WebSubmissionExtension這個類,在StandaloneSession 集羣模式下集羣初始化DispatcherRestEndpoint的時候會從WebSubmissionExtension里加載所有的Handlers(webSubmissionHandlers)

在WebSubmissionExtension中可以找到  /jars/:jarid/run 對應的Headers是JarRunHeaders,而接受http請求的是jarRunHandler。

Flink的rest服務是基於netty實現的,在jarRunHandler接受http請求後會調用handleRequest()方法來處理請求。

在handleRequest()方法的第一行如下,會從request中構造一個JarHandlerContext對象,而jobId就是JarHandlerContext對象的一個屬性。在之後的getJobGraphAsync()傳入的第一個參數就是context

在getJobGraphAsync()方法中調用context的toJobGraph()方法獲取jobGraph

1

2

3

4

5

6

7

8

9

10

11

12

13

14

15

16

17

18

19

20

21

22

protected CompletableFuture<JarRunResponseBody> handleRequest(

            @Nonnull final HandlerRequest<JarRunRequestBody, JarRunMessageParameters> request,

            @Nonnull final DispatcherGateway gateway) throws RestHandlerException {

        final JarHandlerContext context = JarHandlerContext.fromRequest(request, jarDir, log);


...

final CompletableFuture<JobGraph> jobGraphFuture = getJobGraphAsync(context, savepointRestoreSettings, jobName, streamGraphPlan, userLibJars);

...

}


private CompletableFuture<JobGraph> getJobGraphAsync(

            JarHandlerContext context,

            final SavepointRestoreSettings savepointRestoreSettings,

            final String jobName,

            final String plan,

            final List<URL> userLibJars) {

        return CompletableFuture.supplyAsync(() -> {

            final JobGraph jobGraph = context.toJobGraph(configuration, jobName, plan, userLibJars);

            jobGraph.setSavepointRestoreSettings(savepointRestoreSettings);

            return jobGraph;

        }, executor);

    }


內部版本當前判斷streamGraphPlan是否存在來執行不同的createJobGraph方法,區別在於是否傳入jobId。

社區版調用PackagedProgramUtils的createJobGraph()方法的時候會把JarHandlerContext的jobId屬性傳過去,隨後通過steamPlan(streamGraph)的getJobGraph()方法把jobId傳進去,之後調用StreamingJobGraphGenerator.createJobGraph()方法傳入this(streamGraph)和jobId,在new jobGraph時傳入jobId和jobName。

JobGraph的構造方法判斷jobId和jobName是否爲空,如果爲空新生成一個jobId實例,jobName則使用默認值"(unnamed job)"

 JobGraph的構造方法:

1

2

3

4

5

6

7

8

9

10

11

public JobGraph(JobID jobId, String jobName) {

        this.jobID = jobId == null new JobID() : jobId;

        this.jobName = jobName == null "(unnamed job)" : jobName;


        try {

            setExecutionConfig(new ExecutionConfig());

        catch (IOException e) {

            // this should never happen, since an empty execution config is always serializable

            throw new RuntimeException("bug, empty execution config is not serializable");

        }

    }

在拿到jobGraph後進行一些後續處理然後向集羣提交job

1

2

3

4

5

CompletableFuture<Acknowledge> jobSubmissionFuture = jarUploadFuture.thenCompose(jobGraph -> {

            // we have to enable queued scheduling because slots will be allocated lazily

            jobGraph.setAllowQueuedScheduling(true);

            return gateway.submitJob(jobGraph, timeout);

        });

集羣在接受jobGraph後,有如下的代碼:

1

2

3

4

5

6

7

8

9

10

11

12

13

14

15

16

17

18

19

private CompletableFuture<Acknowledge> internalSubmitJob(JobGraph jobGraph) {

        log.info("Submitting job {} ({}).", jobGraph.getJobID(), jobGraph.getName());


        final CompletableFuture<Acknowledge> persistAndRunFuture = waitForTerminatingJobManager(jobGraph.getJobID(), jobGraph, this::persistAndRunJob)

            .thenApply(ignored -> Acknowledge.get());


        return persistAndRunFuture.handleAsync((acknowledge, throwable) -> {

            if (throwable != null) {

                cleanUpJobData(jobGraph.getJobID(), true);


                final Throwable strippedThrowable = ExceptionUtils.stripCompletionException(throwable);

                log.error("Failed to submit job {}.", jobGraph.getJobID(), strippedThrowable);

                throw new CompletionException(

                    new JobSubmissionException(jobGraph.getJobID(), "Failed to submit job.", strippedThrowable));

            else {

                return acknowledge;

            }

        }, getRpcService().getExecutor());

    }

在internalSubmitJob()方法中調用waitForTerminatingJobManager()第一個參數就是jobId,隨後在異步執行完成後判斷時候有異常,在沒有異常即提交成功的情況下,調用cleanUpJobData()清理client在提交過程中的數據,清理的標識也是jobId

接着看waitForTerminatingJobManager()方法

1

2

3

4

5

6

7

8

9

10

11

12

13

14

15

16

17

18

19

20

21

22

23

private CompletableFuture<Void> waitForTerminatingJobManager(JobID jobId, JobGraph jobGraph, FunctionWithException<JobGraph, CompletableFuture<Void>, ?> action) {

        final CompletableFuture<Void> jobManagerTerminationFuture = getJobTerminationFuture(jobId)

            .exceptionally((Throwable throwable) -> {

                throw new CompletionException(

                    new DispatcherException(

                        String.format("Termination of previous JobManager for job %s failed. Cannot submit job under the same job id.", jobId),

                        throwable)); });


        return jobManagerTerminationFuture.thenComposeAsync(

            FunctionUtils.uncheckedFunction((ignored) -> {

                jobManagerTerminationFutures.remove(jobId);

                return action.apply(jobGraph);

            }),

            getMainThreadExecutor());

    }


    CompletableFuture<Void> getJobTerminationFuture(JobID jobId) {

        if (jobManagerRunnerFutures.containsKey(jobId)) {

            return FutureUtils.completedExceptionally(new DispatcherException(String.format("Job with job id %s is still running.", jobId)));

        else {

            return jobManagerTerminationFutures.getOrDefault(jobId, CompletableFuture.completedFuture(null));

        }

    }

其中getJobTerminationFuture()來判斷當前的jobId對應的job是否已在運行中,看方法名是在wait任務終止,實際在getJobTerminationFuture(),方法中並沒有終止任務的操作,只是判斷jobManagerRunnerFutures這個map中是否存在當前jobId。

1

private final Map<JobID, CompletableFuture<JobManagerRunner>> jobManagerRunnerFutures;

jobManagerRunnerFutures看定義就可以瞭解,是持有運行中job的以jobId爲key,CompletableFuture<JobManagerRunner>爲value的映射關係。

繼續回到internalSubmitJob()方法,在waitForTerminatingJobManager()用::(jdk1.8特性)傳入了方法persistAndRunJob(),在該方法中先把jobGraph包裝成SubmittedJobGraph寫到zk中,然後調用runJob()方法,runJob()方法會先根據jobId判斷當前job是否已經提交,然後創建一個jobManagerRunner,接着把CompletableFuture<JobManagerRunner>放到名爲jobManagerRunnerFutures的Map裏,其中key就是jobId。

1

2

3

4

5

6

7

8

9

10

11

12

13

14

15

16

17

18

19

20

21

22

23

24

25

26

27

28

29

30

31

private CompletableFuture<Void> persistAndRunJob(JobGraph jobGraph) throws Exception {

          //包裝jobGraph 寫入zk

        submittedJobGraphStore.putJobGraph(new SubmittedJobGraph(jobGraph));


        final CompletableFuture<Void> runJobFuture = runJob(jobGraph);


        return runJobFuture.whenComplete(BiConsumerWithException.unchecked((Object ignored, Throwable throwable) -> {

            if (throwable != null) {

                submittedJobGraphStore.removeJobGraph(jobGraph.getJobID());

            }

        }));

    }


    private CompletableFuture<Void> runJob(JobGraph jobGraph) {              

                //判斷當前job是否已經提交

        Preconditions.checkState(!jobManagerRunnerFutures.containsKey(jobGraph.getJobID()));


        final CompletableFuture<JobManagerRunner> jobManagerRunnerFuture = createJobManagerRunner(jobGraph);


        jobManagerRunnerFutures.put(jobGraph.getJobID(), jobManagerRunnerFuture);


        return jobManagerRunnerFuture

            .thenApply(FunctionUtils.nullFn())

            .whenCompleteAsync(

                (ignored, throwable) -> {

                    if (throwable != null) {

                        jobManagerRunnerFutures.remove(jobGraph.getJobID());

                    }

                },

                getMainThreadExecutor());

    }

 繼續看createJobManagerRunner()方法,先異步的創建jobManagerRunner,然後執行startJobManagerRunner()方法,在確認jobManagerRunner後,執行start方法啓動jobManagerRunner。

在jobManagerRunner的start方法中,啓動zk選舉服務,讓自身(this)參與選舉獲得執行權,在zk確認後會回調grantLeadership()方法,jobManagerRunner實現了LeaderContender接口。

1

2

3

4

5

6

7

8

public void start() throws Exception {

        try {

            leaderElectionService.start(this);

        catch (Exception e) {

            log.error("Could not start the JobManager because the leader election service did not start.", e);

            throw new Exception("Could not start the leader election service.", e);

        }

    }


1

2

3

4

5

6

7

8

9

10

11

12

13

14

15

16

17

18

@Override

    public void grantLeadership(final UUID leaderSessionID) {

        synchronized (lock) {

            if (shutdown) {

                log.info("JobManagerRunner already shutdown.");

                return;

            }


            leadershipOperation = leadershipOperation.thenCompose(

                (ignored) -> {

                    synchronized (lock) {

                        return verifyJobSchedulingStatusAndStartJobManager(leaderSessionID);

                    }

                });


            handleException(leadershipOperation, "Could not start the job manager.");

        }

    }

 獲得執行權限後調用verifyJobSchedulingStatusAndStartJobManager()方法,先判斷job狀態,如果是DONE(finished),則已經finished,否則執行startJobMaster(),在startJobMaster()方法中先把job狀態設爲running,

把job和對應的狀態寫到zk。

如果需要實時的獲取job狀態可以用zk watch這個路徑

1

2

3

4

5

6

7

8

9

10

11

12

13

14

15

16

17

18

19

20

21

22

23

24

25

26

27

28

29

30

31

32

33

34

35

36

37

38

private CompletableFuture<Void> verifyJobSchedulingStatusAndStartJobManager(UUID leaderSessionId) {

        final CompletableFuture<JobSchedulingStatus> jobSchedulingStatusFuture = getJobSchedulingStatus();


        return jobSchedulingStatusFuture.thenCompose(

            jobSchedulingStatus -> {

                if (jobSchedulingStatus == JobSchedulingStatus.DONE) {

                    return jobAlreadyDone();

                else {

                    return startJobMaster(leaderSessionId);

                }

            });

    }


    private CompletionStage<Void> startJobMaster(UUID leaderSessionId) {

        log.info("JobManager runner for job {} ({}) was granted leadership with session id {} at {}.",

            jobGraph.getName(), jobGraph.getJobID(), leaderSessionId, getAddress());


        try {

            runningJobsRegistry.setJobRunning(jobGraph.getJobID());

        catch (IOException e) {

            return FutureUtils.completedExceptionally(

                new FlinkException(

                    String.format("Failed to set the job %s to running in the running jobs registry.", jobGraph.getJobID()),

                    e));

        }


        final CompletableFuture<Acknowledge> startFuture;

        try {

            startFuture = jobMasterService.start(new JobMasterId(leaderSessionId));

        catch (Exception e) {

            return FutureUtils.completedExceptionally(new FlinkException("Failed to start the JobMaster.", e));

        }


        final CompletableFuture<JobMasterGateway> currentLeaderGatewayFuture = leaderGatewayFuture;

        return startFuture.thenAcceptAsync(

            (Acknowledge ack) -> confirmLeaderSessionIdIfStillLeader(leaderSessionId, currentLeaderGatewayFuture),

            executor);

    }

  然後執行jobMasterService.start(),在jobMaster中 start()方法啓動RPC服務,然後startJobExecution來調度作業。

1

2

3

4

5

6

public CompletableFuture<Acknowledge> start(final JobMasterId newJobMasterId) throws Exception {

        // make sure we receive RPC and async calls

        start();


        return callAsyncWithoutFencing(() -> startJobExecution(newJobMasterId), RpcUtils.INF_TIMEOUT);

    }

  startJobExecution()方法如下:

1

2

3

4

5

6

7

8

9

10

11

12

13

14

15

16

17

18

19

20

21

22

private Acknowledge startJobExecution(JobMasterId newJobMasterId) throws Exception {


        validateRunsInMainThread();


        checkNotNull(newJobMasterId, "The new JobMasterId must not be null.");


        if (Objects.equals(getFencingToken(), newJobMasterId)) {

            log.info("Already started the job execution with JobMasterId {}.", newJobMasterId);


            return Acknowledge.get();

        }


        setNewFencingToken(newJobMasterId);


        startJobMasterServices();


        log.info("Starting execution of job {} ({}) under job master id {}.", jobGraph.getName(), jobGraph.getJobID(), newJobMasterId);


        resetAndScheduleExecutionGraph();


        return Acknowledge.get();

    }

  其中validateRunsInMainThread()使用斷言來確認調用是否發生在RPC endpoint 的主線程中,正常不會執行。然後判斷jobMasterId,並且確認當前jobMaster沒有調度過其他的job。接着到startJobMasterServices()方法,這個方法的主要作用是在調度作業之前啓動jobMaster相關的組件:

  1. 啓動心跳服務
  2. 啓動taskManager的slotPool RPC服務,確保接受當前jobMaster的調用和分配請求
  3. 啓動schedule
  4. 連接到resourceManager

在這些步驟執行完成之後,執行resetAndScheduleExecutionGraph()來開始調度executionGraph。

1

2

3

4

5

6

7

8

9

10

11

12

13

14

15

16

17

18

19

20

21

22

23

private void resetAndScheduleExecutionGraph() throws Exception {

        validateRunsInMainThread();


        final CompletableFuture<Void> executionGraphAssignedFuture;


        if (executionGraph.getState() == JobStatus.CREATED) {

            executionGraphAssignedFuture = CompletableFuture.completedFuture(null);

            executionGraph.start(getMainThreadExecutor());

        else {

            suspendAndClearExecutionGraphFields(new FlinkException("ExecutionGraph is being reset in order to be rescheduled."));

            final JobManagerJobMetricGroup newJobManagerJobMetricGroup = jobMetricGroupFactory.create(jobGraph);

            final ExecutionGraph newExecutionGraph = createAndRestoreExecutionGraph(newJobManagerJobMetricGroup);


            executionGraphAssignedFuture = executionGraph.getTerminationFuture().handle(

                (JobStatus ignored, Throwable throwable) -> {

                    newExecutionGraph.start(getMainThreadExecutor());

                    assignExecutionGraph(newExecutionGraph, newJobManagerJobMetricGroup);

                    return null;

                });

        }


        executionGraphAssignedFuture.thenRun(this::scheduleExecutionGraph);

    }

  首先判斷executionGraph的狀態是否爲create,如果不爲create會根據jobGraph創建新的executionGraph來代替當前的executionGraph,然後執行scheduleExecutionGraph(),

1

2

3

4

5

6

7

8

9

10

11

12

13

private void scheduleExecutionGraph() {

        checkState(jobStatusListener == null);

        // register self as job status change listener

        jobStatusListener = new JobManagerJobStatusListener();

        executionGraph.registerJobStatusListener(jobStatusListener);


        try {

            executionGraph.scheduleForExecution();

        }

        catch (Throwable t) {

            executionGraph.failGlobal(t);

        }

    }

  註冊想executionGraph作業狀態變更監聽器,執行executionGraph.scheduleForExecution(),先更新狀態從created到running,然後判斷調度模式,目前有兩種調度模式:

  1. LAZY_FROM_SOURCES
  2. EAGER

  Eager 調度如其名子所示,它會在作業啓動時申請資源將所有的 Task 調度起來。這種調度算法主要用來調度可能沒有終止的流作業。與之對應,Lazy From Source 則是從 Source 開始,按拓撲順序來進行調度。簡單來說,Lazy From Source 會先調度沒有上游任務的 Source 任務,當這些任務執行完成時,它會將輸出數據緩存到內存或者寫入到磁盤中。然後,對於後續的任務,當它的前驅任務全部執行完成後,Flink 就會將這些任務調度起來。這些任務會從讀取上游緩存的輸出數據進行自己的計算。這一過程繼續進行直到所有的任務完成計算。


   我們佔時可以先不考慮批程序,從流程序scheduleEager()繼續往下看,scheduleEager()方法有點長,我們先把這個方法貼出來一步一步來看。

1

2

3

4

5

6

7

8

9

10

11

12

13

14

15

16

17

18

19

20

21

22

23

24

25

26

27

28

29

30

31

32

33

34

35

36

37

38

39

40

41

42

43

44

45

46

47

48

49

50

51

52

53

54

55

56

57

58

59

60

61

62

63

64

65

66

67

68

69

70

71

72

73

74

75

76

77

78

79

80

81

82

83

84

85

86

87

88

89

90

private CompletableFuture<Void> scheduleEager(SlotProvider slotProvider, final Time timeout) {

        assertRunningInJobMasterMainThread();

        checkState(state == JobStatus.RUNNING, "job is not running currently");


        // Important: reserve all the space we need up front.

        // that way we do not have any operation that can fail between allocating the slots

        // and adding them to the list. If we had a failure in between there, that would

        // cause the slots to get lost

        final boolean queued = allowQueuedScheduling;


        // collecting all the slots may resize and fail in that operation without slots getting lost

        final ArrayList<CompletableFuture<Execution>> allAllocationFutures = new ArrayList<>(getNumberOfExecutionJobVertices());


        final Set<AllocationID> allPreviousAllocationIds =

            Collections.unmodifiableSet(computeAllPriorAllocationIdsIfRequiredByScheduling());


        // allocate the slots (obtain all their futures

        for (ExecutionJobVertex ejv : getVerticesTopologically()) {

            // these calls are not blocking, they only return futures

            Collection<CompletableFuture<Execution>> allocationFutures = ejv.allocateResourcesForAll(

                slotProvider,

                queued,

                LocationPreferenceConstraint.ALL,

                allPreviousAllocationIds,

                timeout);


            allAllocationFutures.addAll(allocationFutures);

        }


        // this future is complete once all slot futures are complete.

        // the future fails once one slot future fails.

        final ConjunctFuture<Collection<Execution>> allAllocationsFuture = FutureUtils.combineAll(allAllocationFutures);


        return allAllocationsFuture.thenAccept(

            (Collection<Execution> executionsToDeploy) -> {

                for (Execution execution : executionsToDeploy) {

                    try {

                        execution.deploy();

                    catch (Throwable t) {

                        throw new CompletionException(

                            new FlinkException(

                                String.format("Could not deploy execution %s.", execution),

                                t));

                    }

                }

            })

            // Generate a more specific failure message for the eager scheduling

            .exceptionally(

                (Throwable throwable) -> {

                    final Throwable strippedThrowable = ExceptionUtils.stripCompletionException(throwable);

                    final Throwable resultThrowable;

                    if (strippedThrowable instanceof TimeoutException) {

                        int numTotal = allAllocationsFuture.getNumFuturesTotal();

                        int numComplete = allAllocationsFuture.getNumFuturesCompleted();


                        String message = "Could not allocate all requires slots within timeout of " +

                            timeout + ". Slots required: " + numTotal + ", slots allocated: " + numComplete +

                                ", previous allocation IDs: " + allPreviousAllocationIds;


                        StringBuilder executionMessageBuilder = new StringBuilder();


                        for (int i = 0; i < allAllocationFutures.size(); i++) {

                            CompletableFuture<Execution> executionFuture = allAllocationFutures.get(i);


                            try {

                                Execution execution = executionFuture.getNow(null);

                                if (execution != null) {

                                    executionMessageBuilder.append("completed: " + execution);

                                else {

                                    executionMessageBuilder.append("incomplete: " + executionFuture);

                                }

                            catch (CompletionException completionException) {

                                executionMessageBuilder.append("completed exceptionally: " + completionException + "/" + executionFuture);

                            }


                            if (i < allAllocationFutures.size() - 1) {

                                executionMessageBuilder.append(", ");

                            }

                        }


                        message += ", execution status: " + executionMessageBuilder.toString();


                        resultThrowable = new NoResourceAvailableException(message);

                    else {

                        resultThrowable = strippedThrowable;

                    }


                    throw new CompletionException(resultThrowable);

                });

    }

  首先後驗證當前job的狀態,確認當前的job state確實爲running,否者拋出異常,job狀態先設置爲running然後纔開始調度的。接着從ExecutionJobVertex(以後簡稱ejv)開始遍歷分配slot,在ejv的allocateResourcesForAll()方法中其實又把ejv的ExecutionVertex(簡稱ev)遍歷一遍,然後取ev對應的Execution然後調用Execution的allocateAndAssignSlotForExecution()方法分配slot,具體分配算法之後單獨介紹。

  在分配完slot之後,調用execution.deploy()方法來啓動部署。

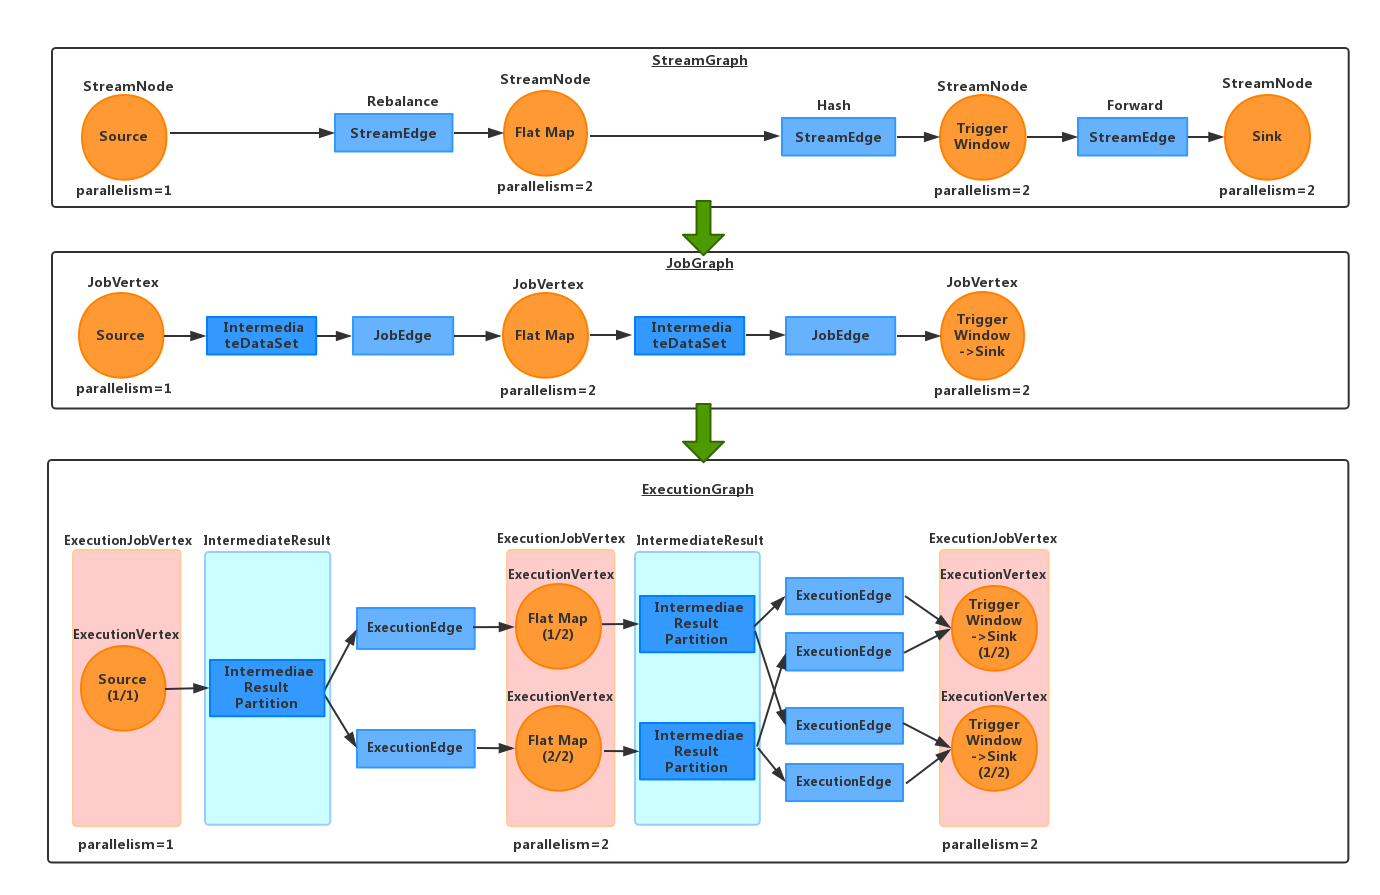
streamGraph,jobGraph,executionGraph,ExecutionJobVertex,ExecutionVertex,Execution 的關係可以參考下圖:


解析

發表評論
所有評論
還沒有人評論,想成為第一個評論的人麼? 請在上方評論欄輸入並且點擊發布.
相關文章