


https://dev.to/nburgess/creating-a-react-app-with-react-router-and-an-express-backend-33l3
In this article we will cover how to create a React application using React-Router for routing and an Express backend. We will then deploy it to Heroku. This tutorial offers a simple way to set up an API that can be quickly updated and tested while creating a React application. It may also offer help to those who are new to React. There are several ways to accomplish this goal but I have covered a very simple method that I am most familiar with. If you have a different method or if I have made any mistakes, feel free to let me know.
The source code for this application can be found here.
Technology Used:
- Express.JS
- React.JS
- React-Router
Create The Express App Backend
In order to begin setting up our app, both node.js and npm need to have been installed.
To start we will need to create a parent directory, which can be named anything you want. Here we will call ours react-express-example.
mkdir react-express-example
cd react-express-example
Initialize the project with npm:
npm init -y
Install the express package:
npm add express
Create a file named index.js and enter the following code, this will serve as a most basic express app.
const express = require('express');
const path = require('path');

const app = express();

// Serve the static files from the React app
app.use(express.static(path.join(__dirname, 'client/build')));

// An api endpoint that returns a short list of items
app.get('/api/getList', (req,res) => {
    var list = ["item1", "item2", "item3"];
    res.json(list);
    console.log('Sent list of items');
});

// Handles any requests that don't match the ones above
app.get('*', (req,res) =>{
    res.sendFile(path.join(__dirname+'/client/build/index.html'));
});

const port = process.env.PORT || 5000;
app.listen(port);

console.log('App is listening on port ' + port);
We call express() in order to create our express application, denoted by the object app. We then create a method to handle a GET request for /api/getList that will send a json response with a list of items. We will call this from our React app later.
Add a script in package.json so that the app is started once placed on the appropriate server. I normally launch my example projects on Heroku.
{
  "name": "react-express-example",
  "version": "1.0.0",
  "description": "",
  "main": "index.js",
  "scripts": {
    "start": "node index.js"
  },
  "keywords": [],
  "author": "",
  "license": "ISC",
  "dependencies": {
    "express": "^4.16.3"
  }
}
Test Our Express Server
At this point we can test our express app to make sure that everything works so far.
Run the express app with the script created above:
npm start
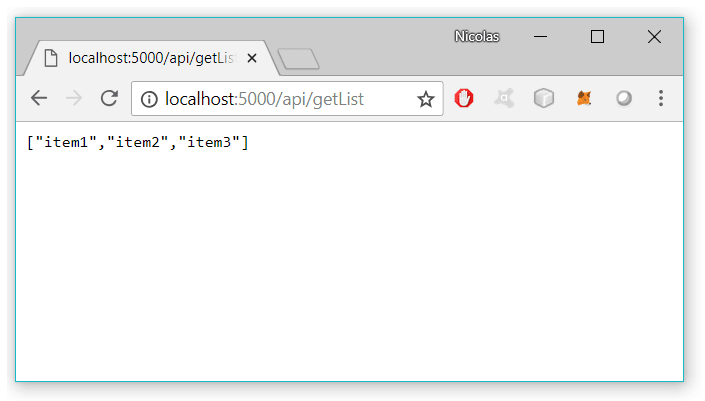
Open up http://localhost:5000/api/getList and you should see the following:
Create The React App
If you do not already have Create-React-App installed run the following line of code:
npm install -g create-react-app
The next step is to create the actual React app, which we will keep in the client folder. We will do this by running the following command within our project directory:
create-react-app client
The basic React app is now be visible at http://localhost:3000/ after running npm start from within the client folder. If you decide to name this something other than client, you will have to make changes to the Express file, as it is set to point to client/build.
In order for our React app to proxy API requests to the Express app we have created above, we will need to make a change to client/package.json. This is done by adding the line "proxy": "http://localhost:5000"
client/package.json:
{
  "name": "client",
  "version": "0.1.0",
  "private": true,
  "dependencies": {
    "react": "^16.4.1",
    "react-dom": "^16.4.1",
    "react-router-dom": "^4.3.1",
    "react-scripts": "1.1.4"
  },
  "scripts": {
    "start": "react-scripts start",
    "build": "react-scripts build",
    "test": "react-scripts test --env=jsdom",
    "eject": "react-scripts eject"
  },
  "proxy": "http://localhost:5000"
}
Adding React-Router
Here we will add React-Router to our project and create two pages, Home.js and List.js.
If you choose not to use React-Router skip to Calling Our Express App. I have had some trouble setting up a simple implementation in the past so I have included it with this tutorial.
Install the following packages for our React project:
npm install -g react-router-dom
Insert the following code into /client/src/index.js:
import React from 'react';
import { render } from 'react-dom';
import { BrowserRouter } from 'react-router-dom';

import './index.css';
import App from './App/App';

render((
    <BrowserRouter>
        <App/>
    </BrowserRouter>
), document.getElementById('root'));
Insert the following code into /client/src/App.js:
import React, { Component } from 'react';
import { Route, Switch } from 'react-router-dom';
import './App.css';
import Home from './pages/Home';
import List from './pages/List';

class App extends Component {
  render() {
    const App = () => (
      <div>
        <Switch>
          <Route exact path='/' component={Home}/>
          <Route path='/list' component={List}/>
        </Switch>
      </div>
    )
    return (
      <Switch>
        <App/>
      </Switch>
    );
  }
}

export default App;
In this segment of code we have created routes for a home page and a page to display our list. Next we will need to create these pages.
After reading an article by Alexis Mangin I began structuring my React projects similar to how describes. At this point, I recommend reorganizing the project to match the image below.

Create the file Home.js in src/App/pages and include the following code:
import React, { Component } from 'react';
import { Link } from 'react-router-dom';


class Home extends Component {
  render() {
    return (
    <div className="App">
      <h1>Project Home</h1>
      {/* Link to List.js */}
      <Link to={'./list'}>
        <button variant="raised">
            My List
        </button>
      </Link>
    </div>
    );
  }
}
export default Home;
We have created a button that will link to List.js.
Calling Our Express App
Create the file List.js in src/App/pages and include the following code:
import React, { Component } from 'react';

class List extends Component {
  // Initialize the state
  constructor(props){
    super(props);
    this.state = {
      list: []
    }
  }

  // Fetch the list on first mount
  componentDidMount() {
    this.getList();
  }

  // Retrieves the list of items from the Express app
  getList = () => {
    fetch('/api/getList')
    .then(res => res.json())
    .then(list => this.setState({ list }))
  }

  render() {
    const { list } = this.state;

    return (
      <div className="App">
        <h1>List of Items</h1>
        {/* Check to see if any items are found*/}
        {list.length ? (
          <div>
            {/* Render the list of items */}
            {list.map((item) => {
              return(
                <div>
                  {item}
                </div>
              );
            })}
          </div>
        ) : (
          <div>
            <h2>No List Items Found</h2>
          </div>
        )
      }
      </div>
    );
  }
}

export default List;
Testing Our Final App
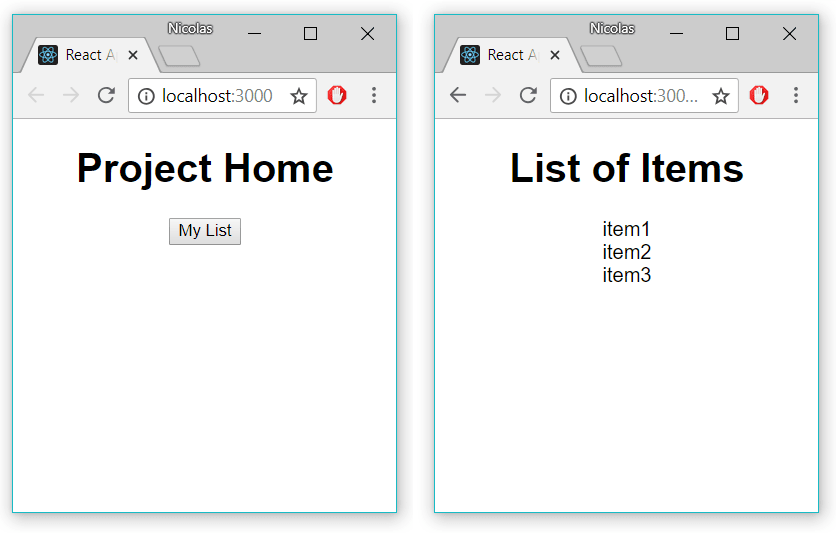
At this point the project should be up and running. To test the project run npm start from both the project's home directory and from within the client directory. After selecting My List from the homepage, we should then see the three items from our Express server.
Deploying To Heroku
Before uploading to Heroku we need to determine how to build our client code. The Express points to client/build, which we do not have before building our React app. With Heroku we can add a heroku-postbuild script so that the React app is built after we push our code, rather than having to upload compiled code.
Edit package.json in the parent directory and add the following script (not /client/package.json):
  "scripts": {
    "start": "node index.js",
    "heroku-postbuild": "cd client && npm install --only=dev && npm install && npm run build"
  }
Heroku will now enter the client directory and create the production build of the React app for us.
If you already have the Heroku tool-belt installed, deploying is as easy as running the following commands:
git init
git add .
git commit -m "Initial commit"
heroku create
git push heroku master