


k8s持久化存储
探讨:k8s中为什么要做持久化存储?
在k8s中部署的应用都是以pod容器的形式运行的,假如我们部署MySQL、Redis等数据库,需要对这些数据库产生的数据做备份。因为Pod是有生命周期的,如果pod不挂载数据卷,那pod被删除或重启后这些数据会随之消失,如果想要长久的保留这些数据就要用到pod数据持久化存储。
1、k8s持久化存储:emptyDir
查看k8s支持哪些存储
[root@k8s-master1 ~]# kubectl explain pods.spec.volumes
KIND: Pod
VERSION: v1
RESOURCE: volumes <[]Object>
DESCRIPTION:
List of volumes that can be mounted by containers belonging to the pod.
More info: https://kubernetes.io/docs/concepts/storage/volumes
Volume represents a named volume in a pod that may be accessed by any
container in the pod.
FIELDS:
awsElasticBlockStore <Object>
azureDisk <Object>
azureFile <Object>
cephfs <Object>
cinder <Object>
configMap <Object>
csi <Object>
downwardAPI <Object>
emptyDir <Object>
ephemeral <Object>
fc <Object>
flexVolume <Object>
flocker <Object>
gcePersistentDisk <Object>
gitRepo <Object>
glusterfs <Object>
hostPath <Object>
iscsi <Object>
name <string> -required-
nfs <Object>
persistentVolumeClaim <Object>
photonPersistentDisk <Object>
portworxVolume <Object>
projected <Object>
quobyte <Object>
rbd <Object>
scaleIO <Object>
secret <Object>
storageos <Object>
vsphereVolume <Object>
常用的如下:
emptyDir
hostPath
nfs
persistentVolumeClaim
glusterfs
cephfs
configMap
secret
我们想要使用存储卷,需要经历如下步骤
1、定义pod的volume,这个volume指明它要关联到哪个存储上的
2、在容器中要使用volumemounts挂载对应的存储
经过以上两步才能正确的使用存储卷
emptyDir类型的Volume是在Pod分配到Node上时被创建,Kubernetes会在Node上自动分配一个目录,因此无需指定宿主机Node上对应的目录文件。 这个目录的初始内容为空,当Pod从Node上移除时,emptyDir中的数据会被永久删除。emptyDir Volume主要用于某些应用程序无需永久保存的临时目录,多个容器的共享目录等。
创建一个pod,挂载临时目录emptyDir
Emptydir的官方网址:
https://kubernetes.io/docs/concepts/storage/volumes#emptydir
[root@k8s-master1 ~]# cat emptydir.yaml
apiVersion: v1
kind: Pod
metadata:
  name: pod-empty
spec:
  containers:
  - name: container-empty
    image: nginx
    volumeMounts:
    - mountPath: /cache
      name: cache-volume
  volumes:
  - emptyDir:
     {}
    name: cache-volume

\#更新资源清单文件
[root@k8s-master1 ~]# kubectl apply -f emptydir.yaml
pod/pod-empty created

查看本机临时目录存在的位置,可用如下方法:
\#查看pod调度到哪个节点
[root@k8s-master1 ~]# kubectl get pods -o wide | grep empty
pod-empty      1/1     Running     0       10.244.1.30   k8s-node1

\#查看pod的uid
[root@k8s-master1 ~]# kubectl get pods pod-empty -o yaml | grep uid
uid: 1e0a1665-3a9c-4b0a-b11e-dbe2e7b2b54e

\#登录到k8s-node1上
[root@k8s-node1 ~]# tree /var/lib/kubelet/pods/1e0a1665-3a9c-4b0a-b11e-dbe2e7b2b54e
/var/lib/kubelet/pods/1e0a1665-3a9c-4b0a-b11e-dbe2e7b2b54e

由上可知,临时目录在本地的/var/lib/kubelet/pods/38d60544-8591-468d-b70d-2a66df3a1cf6/volumes/kubernetes.io~empty-dir/cache-volume/下
2、k8s持久化存储:hostPath
hostPath Volume是指Pod挂载宿主机上的目录或文件。 hostPath Volume使得容器可以使用宿主机的文件系统进行存储,hostpath(宿主机路径):节点级别的存储卷,在pod被删除,这个存储卷还是存在的,不会被删除,所以只要同一个pod被调度到同一个节点上来,在pod被删除重新被调度到这个节点之后,对应的数据依然是存在的。
- 查看hostPath存储卷的用法
[root@k8s-master1 ~]# kubectl explain pods.spec.volumes.hostPath
KIND:     Pod
VERSION:  v1
RESOURCE: hostPath <Object>
DESCRIPTION:
     HostPath represents a pre-existing file or directory on the host machine
     that is directly exposed to the container. This is generally used for
     system agents or other privileged things that are allowed to see the host
     machine. Most containers will NOT need this. More info:
     https://kubernetes.io/docs/concepts/storage/volumes#hostpath
     Represents a host path mapped into a pod. Host path volumes do not support
     ownership management or SELinux relabeling.
FIELDS:
   path	<string> -required-
   type	<string>
把tomcat.tar.gz上传到k8s-node2和k8s-node1上,手动解压并导入
#创建一个pod,挂载hostPath存储卷
[root@k8s-master1 ~]# cat hostpath.yaml
apiVersion: v1
kind: Pod
metadata:
  name: test-hostpath
spec:
  containers:
  - image: nginx
    name: test-nginx
    volumeMounts:
    - mountPath: /test-nginx
      name: test-volume
  - image: tomcat:8.5-jre8-alpine
    name: test-tomcat
    volumeMounts:
    - mountPath: /test-tomcat
      name: test-volume
  volumes:
  - name: test-volume
    hostPath:
      path: /data1
      type: DirectoryOrCreate
注意:
# DirectoryOrCreate表示本地有/data1目录,就用本地的,本地没有就会在pod调度到的节点自动创建一个
#更新资源清单文件
[root@k8s-master1 ~]# kubectl apply -f hostpath.yaml
pod/test-hostpath created

\#查看pod调度到了哪个物理节点
[root@k8s-master1 volume]# kubectl get pod -owide | grep hostpath
test-hostpath               2/2     Running   0          43s     10.244.2.26   k8s-node2
\#由上面可以知道pod调度到了k8s-node2上,登录到k8s-node2机器,查看是否在这台机器创建了存储目录

[root@k8s-node1 ~]# ll /data1/
total 0
\#上面可以看到已经创建了存储目录/data1,这个/data1会作为pod的持久化存储目录

\#在k8s-node2上的/data1下创建一个目录
[root@k8s-node2 ~]# cd /data1/
[root@k8s-node2 data1]# mkdir testdir
\#测试存储卷是否可以正常使用,登录到nginx容器

[root@k8s-master1 ~]# kubectl exec -it test-hostpath -c test-nginx -- /bin/bash
root@test-hostpath:/# cd /test-nginx/
\#/test-nginx/目录存在,说明已经把宿主机目录挂载到了容器里
root@test-hostpath:/test-nginx# ls
testdir
测试存储卷是否可以正常使用,登录到tomcat容器
[root@k8s-master1 ~]# kubectl exec -it test-hostpath -c test-tomcat -- /bin/bash
root@test-hostpath:/usr/local/tomcat# cd /test-tomcat/
\#/test-tomcat/目录存在,说明已经把宿主机目录挂载到了容器里
root@test-hostpath:/test-tomcat# ls
testdir
通过上面测试可以看到,同一个pod里的test-nginx和test-tomcat这两个容器是共享存储卷的。
hostpath存储卷缺点:
单节点
pod删除之后重新创建必须调度到同一个node节点,数据才不会丢失
可以用分布式存储:
nfs,cephfs,glusterfs
3、k8s持久化存储:nfs
上节说的hostPath存储,存在单点故障,pod挂载hostPath时,只有调度到同一个节点,数据才不会丢失。那可以使用nfs作为持久化存储。
1、搭建nfs服务
以k8s的控制节点作为NFS服务端
[root@k8s-master1 ~]# yum install nfs-utils -y
#在宿主机创建NFS需要的共享目录
[root@k8s-master1 ~]# mkdir /data/volumes -pv
mkdir: created directory ‘/data’
mkdir: created directory ‘/data/volumes’
配置nfs共享服务器上的/data/volumes目录
[root@k8s-master1 ~]# systemctl start nfs
[root@k8s-master1 ~]# vim /etc/exports
/data/volumes 192.168.1.0/24(rw,no_root_squash)
no_root_squash: 用户具有根目录的完全管理访问权限
#使NFS配置生效
[root@k8s-master1 ~]# exportfs -arv
exporting 192.168.1.0/24:/data/volumes
[root@k8s-master1 ~]# service nfs start
Redirecting to /bin/systemctl start nfs.service
#设置成开机自启动
[root@k8s-master1 ~]# systemctl enable nfs && systemctl status nfs
Active: active
看到nfs是active,说明nfs正常启动了
#k8s-node2和k8s-node1上也安装nfs驱动
yum install nfs-utils -y && systemctl enable nfs
在k8s-node1上手动挂载试试:
[root@k8s-node1 ~]# mkdir /test
[root@k8s-node1 ~]# mount 192.168.1.56:/data/volumes /test/
[root@k8s-node1 ~]# df -h
192.168.1.56:/data/volumes 50G 5.2G 45G 11% /test
nfs可以被正常挂载
手动卸载:
[root@k8s-node1 ~]# umount /test
#创建Pod,挂载NFS共享出来的目录
Pod挂载nfs的官方地址:
https://kubernetes.io/zh/docs/concepts/storage/volumes/
下面编写yaml,使用nfs挂载
[root@k8s-master1 ~]# cat nfs.yaml
apiVersion: v1
kind: Pod
metadata:
 name: test-nfs-volume
spec:
 containers:
 - name: test-nfs
   image: nginx
   imagePullPolicy: IfNotPresent
   ports:
   - containerPort: 80
     protocol: TCP
   volumeMounts:
   - name: nfs-volumes
     mountPath: /usr/share/nginx/html
 volumes:
 - name: nfs-volumes
   nfs:
    path: /data/volumes
    server: 192.168.1.56
注:path: /data/volumes #nfs的共享目录
server:192.168.1.56是k8s-master1机器的ip,这个是安装nfs服务的地址
#更新资源清单文件
[root@k8s-master1 ~]# kubectl apply -f nfs.yaml
#查看pod是否创建成功
[root@k8s-master1 volumes]# kubectl get pods -o wide | grep nfs
test-nfs-volume 1/1 Running 10.244.187.108 k8s-node1
在nfs服务器上的共享目录创建一个index.html
root@k8s-master1 volumes]# pwd
/data/volumes
[root@k8s-master1 volumes]# cat index.html
Hello, World
My name is PeterXu
#请求pod,看结果
[root@k8s-master1 volumes]# curl 10.244.187.108
Hello, World
My name is PeterXu
#通过上面可以看到,在共享目录创建的index.html已经被pod挂载了
#登录到pod验证下
[root@k8s-master1 volumes]# kubectl exec -it test-nfs-volume -- /bin/bash
root@test-nfs-volume:/# cat /usr/share/nginx/html/index.html
Hello, World
My name is PeterXu
#上面说明挂载nfs存储卷成功了,nfs支持多个客户端挂载,可以创建多个pod,挂载同一个nfs服务器共享出来的目录;但是nfs如果宕机了,数据也就丢失了,所以需要使用分布式存储,常见的分布式存储有glusterfs和cephfs
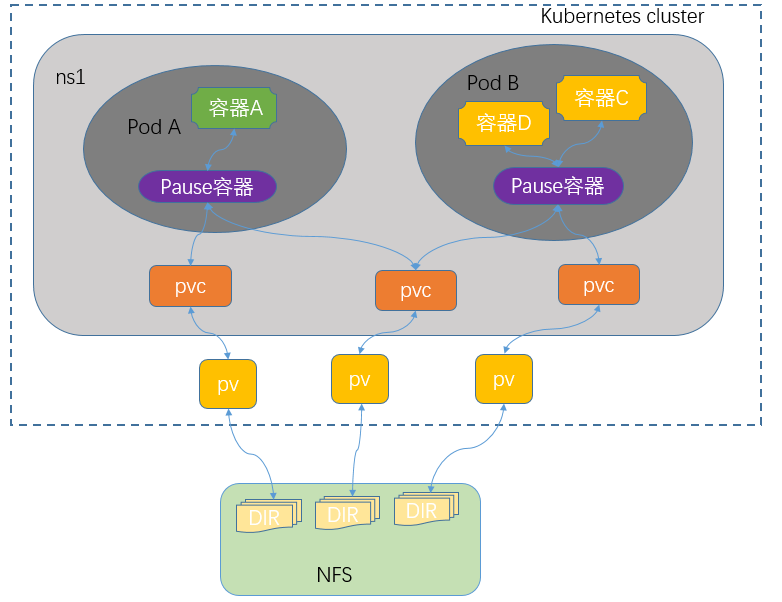
4、k8s持久化存储: PVC
参考官网:
https://kubernetes.io/docs/concepts/storage/persistent-volumes/#access-modes
4.1 k8s PV是什么?
PersistentVolume(PV)是群集中的一块存储,由管理员配置或使用存储类动态配置。 它是集群中的资源,就像pod是k8s集群资源一样。 PV是容量插件,如Volumes,其生命周期独立于使用PV的任何单个pod。
4.2 k8s PVC是什么?
PersistentVolumeClaim(PVC)是一个持久化存储卷,我们在创建pod时可以定义这个类型的存储卷。 它类似于一个pod。 Pod消耗节点资源,PVC消耗PV资源。 Pod可以请求特定级别的资源(CPU和内存)。 pvc在申请pv的时候也可以请求特定的大小和访问模式(例如,可以一次读写或多次只读)。
4.3 k8s PVC和PV工作原理
PV是群集中的资源。 PVC是对这些资源的请求。
PV和PVC之间的相互作用遵循以下生命周期:
(1)pv的供应方式
可以通过两种方式配置PV:静态或动态。
静态的:
集群管理员创建了许多PV。它们包含可供群集用户使用的实际存储的详细信息。它们存在于Kubernetes API中,可供使用。
动态的:
当管理员创建的静态PV都不匹配用户的PersistentVolumeClaim时,群集可能会尝试为PVC专门动态配置卷。此配置基于StorageClasses,PVC必须请求存储类,管理员必须创建并配置该类,以便进行动态配置。
(2)绑定
用户创建pvc并指定需要的资源和访问模式。在找到可用pv之前,pvc会保持未绑定状态
(3)使用
a)需要找一个存储服务器,把它划分成多个存储空间;
b)k8s管理员可以把这些存储空间定义成多个pv;
c)在pod中使用pvc类型的存储卷之前需要先创建pvc,通过定义需要使用的pv的大小和对应的访问模式,找到合适的pv;
d)pvc被创建之后,就可以当成存储卷来使用了,我们在定义pod时就可以使用这个pvc的存储卷
e)pvc和pv它们是一一对应的关系,pv如果被pvc绑定了,就不能被其他pvc使用了;
f)我们在创建pvc的时候,应该确保和底下的pv能绑定,如果没有合适的pv,那么pvc就会处于pending状态。
(4)回收策略
当我们创建pod时如果使用pvc做为存储卷,那么它会和pv绑定,当删除pod,pvc和pv绑定就会解除,解除之后和pvc绑定的pv卷里的数据需要怎么处理,目前,卷可以保留,回收或删除:
Retain
Recycle (不推荐使用,1.15可能被废弃了)
Delete
1、Retain
当删除pvc的时候,pv仍然存在,处于released状态,但是它不能被其他pvc绑定使用,里面的数据还是存在的,当我们下次再使用的时候,数据还是存在的,这个是默认的回收策略
Delete
删除pvc时即会从Kubernetes中移除PV,也会从相关的外部设施中删除存储资产
4.4 创建pod,使用pvc作为持久化存储卷
1、创建nfs共享目录
#在宿主机创建NFS需要的共享目录
[root@k8s-master1 ~]# mkdir /data/volume_test/v{1,2,3,4,5,6,7,8,9,10} -p
#配置nfs共享宿主机上的/data/volume_test/v1..v10目录
[root@k8s-master1 ~]# cat /etc/exports
/data/volumes 192.168.1.0/24(rw,no_root_squash)
/data/volume_test/v1 192.168.1.0/24(rw,no_root_squash)
/data/volume_test/v2 192.168.1.0/24(rw,no_root_squash)
/data/volume_test/v3 192.168.1.0/24(rw,no_root_squash)
/data/volume_test/v4 192.168.1.0/24(rw,no_root_squash)
/data/volume_test/v5 192.168.1.0/24(rw,no_root_squash)
/data/volume_test/v6 192.168.1.0/24(rw,no_root_squash)
/data/volume_test/v7 192.168.1.0/24(rw,no_root_squash)
/data/volume_test/v8 192.168.1.0/24(rw,no_root_squash)
/data/volume_test/v9 192.168.1.0/24(rw,no_root_squash)
/data/volume_test/v10 192.168.1.0/24(rw,no_root_squash)
#重新加载配置,使配置成效
[root@k8s-master1 ~]# exportfs -arv
2、如何编写pv的资源清单文件
查看定义pv需要的字段
[root@k8s-master1 ~]# kubectl explain pv
KIND:     PersistentVolume
VERSION:  v1
DESCRIPTION:
     PersistentVolume (PV) is a storage resource provisioned by an
     administrator. It is analogous to a node. More info:
     https://kubernetes.io/docs/concepts/storage/persistent-volumes
FIELDS:
   apiVersion	<string>s
   kind	<string>
   metadata	<Object>
   spec	<Object>

\#查看定义nfs类型的pv需要的字段
[root@k8s-master1 ~]# kubectl explain pv.spec.nfs
KIND:     PersistentVolume
VERSION:  v1
RESOURCE: nfs <Object>
FIELDS:
   path	<string> -required-
   readOnly	<boolean>
   server	<string> -required-
3、创建pv
参考:https://kubernetes.io/zh/docs/concepts/storage/persistent-volumes/#reclaiming
[root@k8s-master1 ~]# cat pv.yaml
apiVersion: v1
kind: PersistentVolume
metadata:
  name:  v1
spec:
  capacity:
    storage: 1Gi  #pv的存储空间容量
  accessModes: ["ReadWriteOnce"]
  nfs:
    path: /data/volume_test/v1 #把nfs的存储空间创建成pv
    server: 192.168.1.56     #nfs服务器的地址
---
apiVersion: v1
kind: PersistentVolume
metadata:
  name:  v2
spec:
  capacity:
      storage: 2Gi
  accessModes: ["ReadWriteMany"]
  nfs:
    path: /data/volume_test/v2
    server: 192.168.1.56
---
apiVersion: v1
kind: PersistentVolume
metadata:
  name:  v3
spec:
  capacity:
      storage: 3Gi
  accessModes: ["ReadOnlyMany"]
  nfs:
    path: /data/volume_test/v3
    server: 192.168.1.56
---
apiVersion: v1
kind: PersistentVolume
metadata:
  name:  v4
spec:
  capacity:
      storage: 4Gi
  accessModes: ["ReadWriteOnce","ReadWriteMany"]
  nfs:
    path: /data/volume_test/v4
    server: 192.168.1.56
---
apiVersion: v1
kind: PersistentVolume
metadata:
  name:  v5
spec:
  capacity:
      storage: 5Gi
  accessModes: ["ReadWriteOnce","ReadWriteMany"]
  nfs:
    path: /data/volume_test/v5
    server: 192.168.1.56
---
apiVersion: v1
kind: PersistentVolume
metadata:
  name:  v6
spec:
  capacity:
      storage: 6Gi
  accessModes: ["ReadWriteOnce","ReadWriteMany"]
  nfs:
    path: /data/volume_test/v6
    server: 192.168.1.56
---
apiVersion: v1
kind: PersistentVolume
metadata:
  name:  v7
spec:
  capacity:
      storage: 7Gi
  accessModes: ["ReadWriteOnce","ReadWriteMany"]
  nfs:
    path: /data/volume_test/v7
    server: 192.168.1.56
---
apiVersion: v1
kind: PersistentVolume
metadata:
  name:  v8
spec:
  capacity:
      storage: 8Gi
  accessModes: ["ReadWriteOnce","ReadWriteMany"]
  nfs:
    path: /data/volume_test/v8
    server: 192.168.1.56
---
apiVersion: v1
kind: PersistentVolume
metadata:
  name:  v9
spec:
  capacity:
      storage: 9Gi
  accessModes: ["ReadWriteOnce","ReadWriteMany"]
  nfs:
    path: /data/volume_test/v9
    server: 192.168.1.56
---
apiVersion: v1
kind: PersistentVolume
metadata:
  name:  v10
spec:
  capacity:
      storage: 10Gi
  accessModes: ["ReadWriteOnce","ReadWriteMany"]
  nfs:
    path: /data/volume_test/v10
    server: 192.168.1.56
更新资源清单文件
[root@k8s-master1 ~]# kubectl apply -f pv.yaml
persistentvolume/v1 created
persistentvolume/v2 created
persistentvolume/v3 created
persistentvolume/v4 created
persistentvolume/v5 created
persistentvolume/v6 created
persistentvolume/v7 created
persistentvolume/v8 created
persistentvolume/v9 created
persistentvolume/v10 created

#查看pv资源
[root@k8s-master1 ~]# kubectl get pv
#STATUS是Available,表示pv是可用的

4、创建pvc,和符合条件的pv绑定
[root@k8s-master1 ~]# cat pvc.yaml
apiVersion: v1
kind: PersistentVolumeClaim
metadata:
  name: my-pvc
spec:
  accessModes: ["ReadWriteMany"]
  resources:
    requests:
      storage: 2Gi

#更新资源清单文件
[root@k8s-master1 ~]# kubectl apply -f pvc.yaml
persistentvolumeclaim/my-pvc created
#查看pv和pvc
[root@k8s-master1 ~]# kubectl get pv

STATUS是Bound,表示这个pv已经被my-pvc绑定了
[root@k8s-master1 ~]# kubectl get pvc
NAME     STATUS   VOLUME   CAPACITY   ACCESS MODES
my-pvc     Bound       v2         2Gi         RWX
pvc的名字-绑定到pv-绑定的是v2这个pv-pvc可使用的容量是2G
5、创建pod,挂载pvc
[root@k8s-master1 ~]# cat pod_pvc.yaml
apiVersion: v1
kind: Pod
metadata:
  name: pod-pvc
spec:
  containers:
  - name: nginx
    image: nginx
    volumeMounts:
    - name: nginx-html
      mountPath: /usr/share/nginx/html
  volumes:
  - name: nginx-html
    persistentVolumeClaim:
      claimName: my-pvc
#更新资源清单文件
[root@k8s-master1 ~]# kubectl apply -f pod_pvc.yaml
pod/pod-pvc created
#查看pod状态
[root@k8s-master1 ~]# kubectl get pods | grep pod-pvc
pod-pvc                              1/1     Running     0          27s
#通过上面可以看到pod处于running状态,正常运行
注:使用pvc和pv的注意事项
1、我们每次创建pvc的时候,需要事先有划分好的pv,这样可能不方便,那么可以在创建pvc的时候直接动态创建一个pv这个存储类,pv事先是不存在的
2、pvc和pv绑定,如果使用默认的回收策略retain,那么删除pvc之后,pv会处于released状态,我们想要继续使用这个pv,需要手动删除pv,kubectl delete pv pv_name,删除pv,不会删除pv里的数据,当我们重新创建pvc时还会和这个最匹配的pv绑定,数据还是原来数据,不会丢失。
5、 k8s存储类:storageclass
上面介绍的PV和PVC模式都是需要先创建好PV,然后定义好PVC和pv进行一对一的Bond,但是如果PVC请求成千上万,那么就需要创建成千上万的PV,对于运维人员来说维护成本很高,Kubernetes提供一种自动创建PV的机制,叫StorageClass,它的作用就是创建PV的模板。k8s集群管理员通过创建storageclass可以动态生成一个存储卷pv供k8s pvc使用。
每个StorageClass都包含字段provisioner,parameters和reclaimPolicy。
具体来说,StorageClass会定义以下两部分:
1、PV的属性 ,比如存储的大小、类型等;
2、创建这种PV需要使用到的存储插件,比如Ceph、NFS等
有了这两部分信息,Kubernetes就能够根据用户提交的PVC,找到对应的StorageClass,然后Kubernetes就会调用 StorageClass声明的存储插件,创建出需要的PV。
查看定义的storageclass需要的字段
[root@k8s-master1 ~]# kubectl explain storageclass
KIND:     StorageClass
VERSION:  storage.k8s.io/v1
DESCRIPTION:
     StorageClass describes the parameters for a class of storage for which
     PersistentVolumes can be dynamically provisioned.
     StorageClasses are non-namespaced; the name of the storage class according
     to etcd is in ObjectMeta.Name.
FIELDS:
   allowVolumeExpansion	<boolean>
   allowedTopologies	<[]Object>
   apiVersion	<string>
   kind	<string>
   metadata	<Object>
   mountOptions	<[]string>
   parameters	<map[string]string>
   provisioner	<string> -required-
   reclaimPolicy	<string>
   volumeBindingMode	<string>

provisioner:供应商,storageclass需要有一个供应者,用来确定我们使用什么样的存储来创建pv,常见的provisioner如下

(https://kubernetes.io/zh/docs/concepts/storage/storage-classes/):
provisioner既可以由内部供应商提供,也可以由外部供应商提供,如果是外部供应商可以参考https://github.com/kubernetes-incubator/external-storage/ 下提供的方法创建。
https://github.com/kubernetes-sigs/sig-storage-lib-external-provisioner
以NFS为例,要想使用NFS,我们需要一个nfs-client的自动装载程序,称之为provisioner,这个程序会使用我们已经配置好的NFS服务器自动创建持久卷,也就是自动帮我们创建PV。
reclaimPolicy:回收策略
allowVolumeExpansion:允许卷扩展,PersistentVolume 可以配置成可扩展。将此功能设置为true时,允许用户通过编辑相应的 PVC 对象来调整卷大小。当基础存储类的allowVolumeExpansion 字段设置为 true 时,以下类型的卷支持卷扩展。
注意:此功能仅用于扩容卷,不能用于缩小卷。
5.1 安装nfs provisioner,用于配合存储类动态生成pv
把nfs-subdir-external-provisioner.tar.gz上传到k8s-node2和k8s-node1上,手动解压
[root@k8s-node2 ~]# docker load -i nfs-subdir-external-provisioner.tar.gz
[root@k8s-node1 ~]# docker load -i nfs-subdir-external-provisioner.tar.gz
1、创建运行nfs-provisioner需要的sa账号
[root@k8s-master1 nfs]# cat serviceaccount.yaml
apiVersion: v1
kind: ServiceAccount
metadata:
name: nfs-provisioner
[root@k8s-master1 nfs]# kubectl apply -f serviceaccount.yaml
serviceaccount/nfs-provisioner created
扩展:什么是sa?
sa的全称是serviceaccount。
serviceaccount是为了方便Pod里面的进程调用Kubernetes API或其他外部服务而设计的。
指定了serviceaccount之后,我们把pod创建出来了,我们在使用这个pod时,这个pod就有了我们指定的账户的权限了。
2、对sa授权
[root@k8s-master1]# kubectl create clusterrolebinding nfs-provisioner-clusterrolebinding --clusterrole=cluster-admin --serviceaccount=default:nfs-provisioner
3、安装nfs-provisioner程序
[root@k8s-master1 ~]# mkdir /data/nfs_pro -p
\#把/data/nfs_pro变成nfs共享的目录
[root@k8s-master1 ~]# cat /etc/exports
/data/volumes 192.168.1.0/24(rw,no_root_squash)
/data/volume_test/v1 192.168.1.0/24(rw,no_root_squash)
/data/volume_test/v2 192.168.1.0/24(rw,no_root_squash)
/data/volume_test/v3 192.168.1.0/24(rw,no_root_squash)
/data/volume_test/v4 192.168.1.0/24(rw,no_root_squash)
/data/volume_test/v5 192.168.1.0/24(rw,no_root_squash)
/data/volume_test/v6 192.168.1.0/24(rw,no_root_squash)
/data/volume_test/v7 192.168.1.0/24(rw,no_root_squash)
/data/volume_test/v8 192.168.1.0/24(rw,no_root_squash)
/data/volume_test/v9 192.168.1.0/24(rw,no_root_squash)
/data/volume_test/v10 192.168.1.0/24(rw,no_root_squash)
/data/nfs_pro 192.168.1.0/24(rw,no_root_squash)

[root@k8s-master1 ~]# exportfs -arv
exporting 192.168.1.0/24:/data/nfs_pro
exporting 192.168.1.0/24:/data/volume_test/v10
exporting 192.168.1.0/24:/data/volume_test/v9
exporting 192.168.1.0/24:/data/volume_test/v8
exporting 192.168.1.0/24:/data/volume_test/v7
exporting 192.168.1.0/24:/data/volume_test/v6
exporting 192.168.1.0/24:/data/volume_test/v5
exporting 192.168.1.0/24:/data/volume_test/v4
exporting 192.168.1.0/24:/data/volume_test/v3
exporting 192.168.1.0/24:/data/volume_test/v2
exporting 192.168.1.0/24:/data/volume_test/v1
exporting 192.168.1.0/24:/data/volumes

[root@k8s-master1 ~]# cat nfs-deployment.yaml
kind: Deployment
apiVersion: apps/v1
metadata:
  name: nfs-provisioner
spec:
  selector:
    matchLabels:
       app: nfs-provisioner
  replicas: 1
  strategy:
    type: Recreate
  template:
    metadata:
      labels:
        app: nfs-provisioner
    spec:
      serviceAccount: nfs-provisioner
      containers:
        - name: nfs-provisioner
          image: registry.cn-beijing.aliyuncs.com/mydlq/nfs-subdir-external-provisioner:v4.0.0
          volumeMounts:
            - name: nfs-client-root
              mountPath: /persistentvolumes
          env:
            - name: PROVISIONER_NAME
              value: example.com/nfs
            - name: NFS_SERVER
              value: 192.168.1.56
            - name: NFS_PATH
              value: /data/nfs_pro
      volumes:
        - name: nfs-client-root
          nfs:
            server: 192.168.1.56
            path: /data/nfs_pro
#更新资源清单文件
[root@k8s-master1 ~]# kubectl apply -f nfs-deployment.yaml
deployment.apps/nfs-provisioner created
#查看nfs-provisioner是否正常运行
[root@k8s-master1 nfs]# kubectl get pods | grep nfs
nfs-provisioner-7c55b8bbf7-mnndl      1/1     Running
5.2 创建storageclass,动态供给pv
[root@k8s-master1]# cat nfs-storageclass.yaml
kind: StorageClass
apiVersion: storage.k8s.io/v1
metadata:
  name: nfs
provisioner: example.com/nfs
[root@k8s-master1]# kubectl apply -f nfs-storageclass.yaml
#查看storageclass是否创建成功
[root@k8s-master1 nfs]# kubectl get storageclass
NAME       PROVISIONER           RECLAIMPOLICY   VOLUMEBINDINGMODE
nfs       example.com/nfs         Delete          Immediate
#显示内容如上,说明storageclass创建成功了

注意:provisioner处写的example.com/nfs应该跟安装nfs provisioner时候的env下的PROVISIONER_NAME的value值保持一致,如下:
env:
    - name: PROVISIONER_NAME
     value: example.com/nfs
5.3 创建pvc,通过storageclass动态生成pv
[root@k8s-master1]# cat claim.yaml
kind: PersistentVolumeClaim
apiVersion: v1
metadata:
  name: test-claim1
spec:
  accessModes:  ["ReadWriteMany"]
  resources:
    requests:
      storage: 1Gi
  storageClassName:  nfs
[root@k8s-master1]# kubectl apply -f claim.yaml
persistentvolumeclaim/test-claim1 created
#查看是否动态生成了pv,pvc是否创建成功,并和pv绑定
[root@k8s-master1 nfs]# kubectl get pvc
通过上面可以看到test-claim1的pvc已经成功创建了,绑定的pv是pvc-cbf42792-e7ee-41bc-86a1-84d59d147e09,这个pv是由storageclass调用nfs provisioner自动生成的。

步骤总结:
1、供应商:创建一个nfs provisioner
2、创建storageclass,storageclass指定刚才创建的供应商
3、创建pvc,这个pvc指定storageclass
5.4 创建pod,挂载storageclass动态生成的pvc:test-claim1
[root@k8s-master1]# cat read-pod.yaml
kind: Pod
apiVersion: v1
metadata:
  name: read-pod
spec:
  containers:
  - name: read-pod
    image: nginx
    volumeMounts:
      - name: nfs-pvc
        mountPath: /usr/share/nginx/html
  restartPolicy: "Never"
  volumes:
    - name: nfs-pvc
      persistentVolumeClaim:
        claimName: test-claim1
#更新资源清单文件
[root@k8s-master1 nfs]# kubectl apply -f read-pod.yaml
pod/read-pod created
#查看pod是否创建成功
[root@k8s-master1 nfs]# kubectl get pods | grep read
read-pod                             1/1     Running     0