


前後端的結合
前言:前後端分離趨勢越來越明顯,分離的好處在於前後端可獨立進行開發進行,前端寫前端的代碼,後端寫後端的代碼,後端提供相應的數據接口提供給前端。本文采用的是Vue+springboot的結合,做了一個登陸的demo,主要是理解前後端如何結合在一起,這裏演示的爲前後端在各自的服務器上運行,可參考前後端分離之Vue(一)Vue環境搭建,建立Vue項目
一、後端服務器的開發
後端採用的是SSM的框架結構進行改造,將前端部分交由Vue看來完成,只負責請求處理。這裏只列舉變化的部分,不變的部分springboot搭建的SSM結構即可,具體後端代碼可參看https://github.com/dgyuanjun/SpringBoot-Vue.git
1.跨域的處理
import org.springframework.context.annotation.Bean;
import org.springframework.context.annotation.Configuration;
import org.springframework.web.cors.CorsConfiguration;
import org.springframework.web.cors.UrlBasedCorsConfigurationSource;
import org.springframework.web.filter.CorsFilter;

/**
 * @author Administrator
 * @create 2018/3/12-15:17
 * @DESCRIPTION 跨域系統配置
 */
@Configuration
public class CorsConfig {
    /**
     允許任何域名使用
     允許任何頭
     允許任何方法(post、get等)
     */
    private CorsConfiguration buildConfig() {
        CorsConfiguration corsConfiguration = new CorsConfiguration();
        // // addAllowedOrigin 不能設置爲* 因爲與 allowCredential 衝突,需要設置爲具體前端開發地址
        corsConfiguration.addAllowedOrigin("http://localhost:8000");//前端的開發地址
        corsConfiguration.addAllowedHeader("*");
        corsConfiguration.addAllowedMethod("*");
        // allowCredential 需設置爲true
        corsConfiguration.setAllowCredentials(true);
        return corsConfiguration;
    }

    @Bean
    public CorsFilter corsFilter() {
        UrlBasedCorsConfigurationSource source = new UrlBasedCorsConfigurationSource();
        source.registerCorsConfiguration("/**", buildConfig());
        return new CorsFilter(source);
    }
}
2.統一API響應結果封裝
import com.alibaba.fastjson.JSON;
/**
 * @author Administrator
 * @create 2018/3/12-14:31
 * @DESCRIPTION 統一API響應結果封裝
 */
public class RestResult {
    private int code;//狀態碼

    private String message;//消息

    private Object data;//數據
    get.set方法
}
3.響應碼的枚舉
/**
 * @author Administrator
 * @create 2018/3/12-14:33
 * @DESCRIPTION 響應碼枚舉,參考HTTP狀態碼的語義
 */
public enum ResultCode {
    SUCCESS(200),//成功
    FAIL(400),//失敗
    UNAUTHORIZED(401),//未認證(簽名錯誤)
    NOT_FOUND(404),//接口不存在
    INTERNAL_SERVER_ERROR(500);//服務器內部錯誤

    private final int code;

    ResultCode(int code) {
        this.code = code;
    }

    public int code() {
        return code;
    }
}
4.接口響應信息生成
import org.springframework.stereotype.Component;

/**
 * 工廠模式
 * 接口信息生成工具
 * 。@Component 添加到Spring組件中
 * Created by bekey on 2017/12/10.
 */
@Component
public class ResultGenerator {

    private static final String SUCCESS = "success";
    //成功
    public RestResult getSuccessResult() {
        return new RestResult()
                .setCode(ResultCode.SUCCESS)
                .setMessage(SUCCESS);
    }
    //成功,附帶額外數據
    public  RestResult getSuccessResult(Object data) {
        return new RestResult()
                .setCode(ResultCode.SUCCESS)
                .setMessage(SUCCESS)
                .setData(data);
    }
    //成功,自定義消息及數據
    public  RestResult getSuccessResult(String message,Object data) {
        return new RestResult()
                .setCode(ResultCode.SUCCESS)
                .setMessage(message)
                .setData(data);
    }
    //失敗,附帶消息
    public  RestResult getFailResult(String message) {
        return new RestResult()
                .setCode(ResultCode.FAIL)
                .setMessage(message);
    }
    //失敗,自定義消息及數據
    public RestResult getFailResult(String message, Object data) {
        return new RestResult()
                .setCode(ResultCode.FAIL)
                .setMessage(message)
                .setData(data);
    }
    //自定義創建
    public RestResult getFreeResult(ResultCode code, String message, Object data) {
        return new RestResult()
                .setCode(code)
                .setMessage(message)
                .setData(data);
    }
}
具體代碼可參考:https://github.com/dgyuanjun/SpringBoot-Vue.git
二、Vue前端的開發
1.新建登陸頁面,在components裏,新建Login.vue
<template>
  <div class="login">
    {{ message }}
    <input v-model="username" placeholder="用戶名">
    <input v-model="password" placeholder="密碼">
    <button v-on:click="login">登陸 </button>
  </div>
</template>

<script>
    export default {
      name: "login",
      data() {
        return {
          message: 'Hello Vue!',
          username: '',
          password: ''
        }
      },
      http: {
        headers: {'Content-Type': 'application/x-www-form-urlencoded; charset=UTF-8'}
      },
      methods: {
        login: function () {
          var _this = this;
          console.log(_this.username+_this.password);
          _this.$http.post('http://localhost:8080/person/login', {
                username: _this.username,
                password: _this.password
          },{emulateJSON:true}
          )
            .then(function (response) {
              var errorcode = response.data.code;
              console.log(response.data.data)
              if (errorcode == "200") {
                _this.$router.push(
                  { path: '/HelloWorld',
                    query: {
                      user: response.data.data,
                    }
                  });
              } else {
                _this.$router.push({ path: '/Test' });
              }
            })
            .catch(function (error) {
              console.log(error);
            });
        }
      }

    }
</script>

<style scoped>

</style>
2.新建登陸失敗的提示頁面Fail.vue,成功的頁面可採用原有的HelloWorld.vue
<template>
  <div class="hello">
    <h2>{{ msg }}</h2>
  </div>
</template>

<script>
export default {
  name: 'HelloWorld',
  data () {
    return {
      msg: '登陸失敗'
    }
  }
}
</script>

<!-- Add "scoped" attribute to limit CSS to this component only -->
<style scoped>
h1, h2 {
  font-weight: normal;
}
ul {
  list-style-type: none;
  padding: 0;
}
li {
  display: inline-block;
  margin: 0 10px;
}
a {
  color: #42b983;
}
</style>
3.將組件添加到路由表中,在router下的index.js文件
import Vue from 'vue'
import Router from 'vue-router'
import HelloWorld from '@/components/HelloWorld'//組件的位置
import Login from '@/components/Login'
import Fail from '@/components/Fail'

Vue.use(Router)
export default new Router({
  routes: [
    {
      path: '/',//系統的首頁面url
      name: 'Login',
      component: Login//對應上文的import
    },{
      path: '/HelloWorld',
      name: 'HelloWorld',
      component: HelloWorld
    },{
      path: '/Fail',
      name: 'Fail',
      component: Fail
    }
  ]
})
4.main.js文件添加vue-resource,支持http請求,如果未安裝依賴包,先npm安裝依賴
$ npm install vue-resource// The Vue build version to load with the `import` command
// (runtime-only or standalone) has been set in webpack.base.conf with an alias.
import Vue from 'vue'
import App from './App'
import router from './router'
import VueResource from 'vue-resource'
Vue.use(VueResource);
Vue.config.productionTip = false
/* eslint-disable no-new */
new Vue({
el: '#app',
router,
components: { App },
template: '<App/>'
})三、測試效果
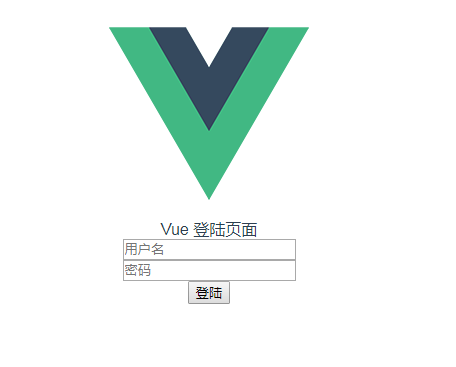
1.登陸頁面
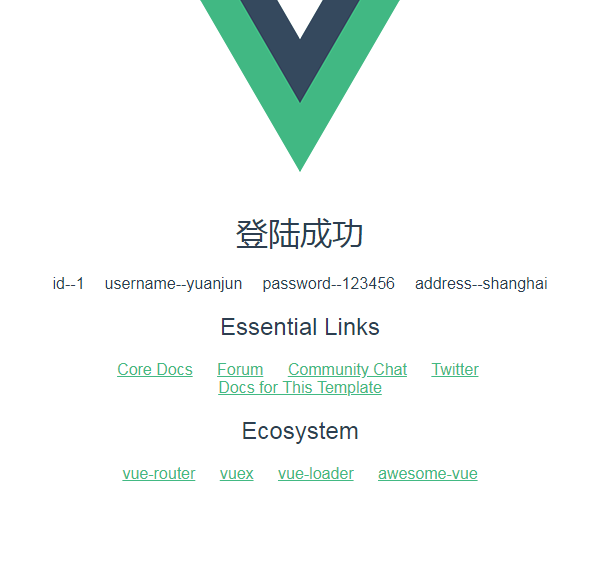
2.成功後顯示後臺數據信息
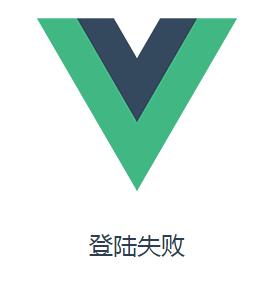
3.登陸失敗
四 源碼地址
Vue源代碼地址:https://github.com/dgyuanjun/Vue-SpringBoot.git
SpringBoot源碼地址:https://github.com/dgyuanjun/SpringBoot-Vue.git
相關鏈接
前後端分離之Vue(一)Vue環境搭建 http://blog.csdn.net/shenbug/article/details/79541218
前後端分離之Vue(三) Vue爬過的那些坑 http://blog.csdn.net/shenbug/article/details/79547171