


Docker部署nginx實現負載均衡
實驗環境:
Centos 7
Docker
Nginx
本次利用宿主機和兩個nginx容器來實現負載均衡 宿主機無任何內容 只搭載一臺nginx服務器 並由此臺服務器將請求轉發給兩個nginx容器來進行處理 那就讓我們的實驗開始吧!
一、安裝相關環境
1.安裝Docker(個人推薦配置阿里雲源 相關配置可從我博客翻閱)
2.宿主機安裝Nginx
下面我比較偷懶 直接wget Nginx rpm包
老規矩 先關防火牆和selinux
[root@cany ~]# systemctl stop firewalld.service
[root@cany ~]# setenforce 0
[root@cany ~]# yum install docker -y
[root@cany ~]# wget http://dl.Fedoraproject.org/pub/epel/epel-release-latest-7.noarch.rpm
[root@cany ~]# yum install nginx -y
用命令測試是否成功安裝 能否開啓服務
[root@cany ~]# systemctl start docker.service
[root@cany ~]# systemctl start nginx.service   Centos 7 啓動服務命令與6.x不同哦
測試web界面是否顯示?
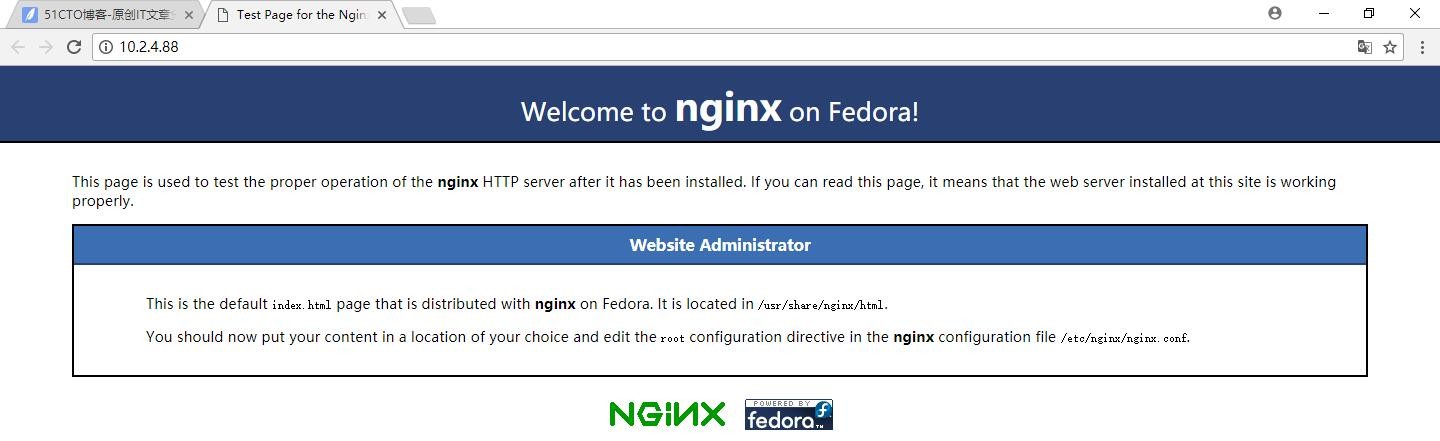
完全ok啦 沒問題!!!
下面我們來刪除掉nginx默認html 並創建一個空白index.html
[root@cany ~]# cd /usr/share/nginx/html/
[root@cany html]# rm *
rm: remove regular file ‘404.html’? y
rm: remove regular file ‘50x.html’? y
rm: remove regular file ‘index.html’? y
rm: remove regular file ‘nginx-logo.png’? y
rm: remove regular file ‘poweredby.png’? y
[root@cany html]# touch index.html
爲什麼要創建一個空白index.html呢?
答:其實我一開始也是全刪的 結果發現訪問無效 纔想起要讓nginx有響應纔會觸發nginx.conf配置 也就是纔會觸發我們配置的負載均衡 這是我個人的理解 有錯誤敬請提出
二、安裝Nginx容器
1.pull nginx鏡像
[root@cany ~]# docker pull hub.c.163.com/library/nginx:latest             下載最新Nginx鏡像
Trying to pull repository hub.c.163.com/library/nginx ...
latest: Pulling from hub.c.163.com/library/nginx
5de4b4d551f8: Pull complete
d4b36a5e9443: Pull complete
0af1f0713557: Pull complete
Digest: sha256:f84932f738583e0169f94af9b2d5201be2dbacc1578de73b09a6dfaaa07801d6
2.pull完成使用docker images命令查看
[root@cany ~]# docker images
REPOSITORY                    TAG                 IMAGE ID            CREATED             SIZE
hub.c.163.com/library/nginx   latest              46102226f2fd        9 months ago        109.4 MB
3.Docker run 創建容器
[root@cany ~]# docker run -p 8080:80 --name nginx_web1 -it hub.c.163.com/library/nginx /bin/bash 容器名:nginx_web1 映射容器8080端口到宿主機的80端口上進入nginx_web1容器的nginx目錄下 創建一個index.html
root@53cda1b9de1e:/# cd /usr/share/nginx/html/
root@53cda1b9de1e:/usr/share/nginx/html# ls
50x.html  index.html
root@53cda1b9de1e:/usr/share/nginx/html# rm *
root@53cda1b9de1e:/usr/share/nginx/html# echo hello nginx_web1 Cany > index.html
root@53cda1b9de1e:/usr/share/nginx/html# exit
下面創建多一個新的nginx容器
[root@cany ~]# docker run -p 8081:80 --name nginx_web2 -it hub.c.163.com/library/nginx /bin/bash 容器名:nginx_web2 映射容器8081端口到宿主機的80端口上進入nginx_web2容器的nginx目錄下 創建一個index.html
root@41b3eec738b5:/# cd /usr/share/nginx/html/
root@41b3eec738b5:/usr/share/nginx/html# ls
50x.html  index.html
root@41b3eec738b5:/usr/share/nginx/html# rm *
root@41b3eec738b5:/usr/share/nginx/html# echo hello nginx_web2 Cany > index.html
root@41b3eec738b5:/usr/share/nginx/html# exit
exit退出後容器不運行 先啓動兩個nginx容器再執行啓動服務命令
[root@cany ~]# docker start 41b3eec738b5
41b3eec738b5
[root@cany ~]# docker start 53cda1b9de1e
53cda1b9de1e
[root@cany ~]# docker exec -d 41b3eec738b5  service nginx start
[root@cany ~]# docker exec -d 53cda1b9de1e  service nginx start
三、配置主機host文件
宿主機ip 10.2.4.88 對應 www.abc.top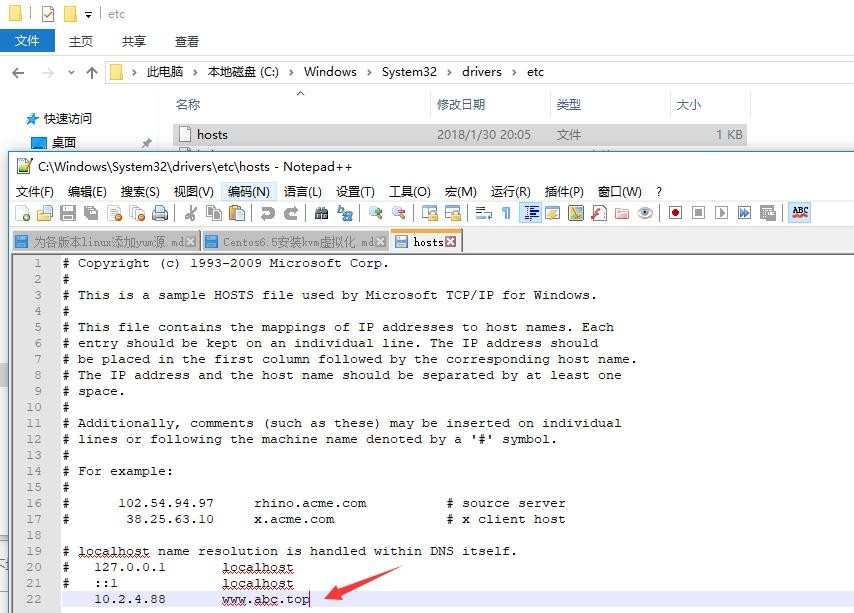
四、配置宿主機Nginx.conf文件
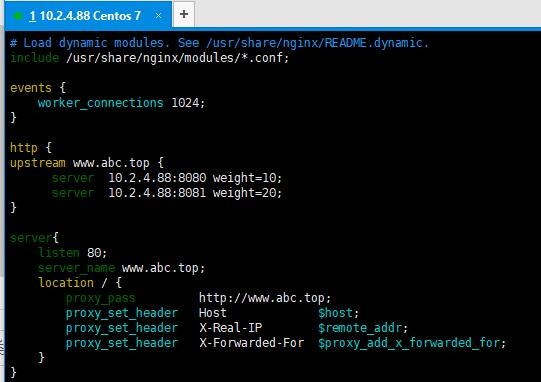
[root@cany ~]# find / -name nginx.conf      查找nginx.conf文件
/etc/nginx/nginx.conf
在http段加入以下代碼
upstream www.abc.top {
      server  10.2.4.88:8080 weight=10;
      server  10.2.4.88:8081 weight=20;
}

server{
    listen 80;
    server_name www.abc.top;
    location / {
        proxy_pass         http://www.abc.top;
        proxy_set_header   Host             $host;
        proxy_set_header   X-Real-IP        $remote_addr;
        proxy_set_header   X-Forwarded-For  $proxy_add_x_forwarded_for;
    }
}
配置如下圖
保存配置並重啓宿主機Nginx
[root@cany ~]# systemctl restart nginx.service查看Nginx容器運行狀態
五、測試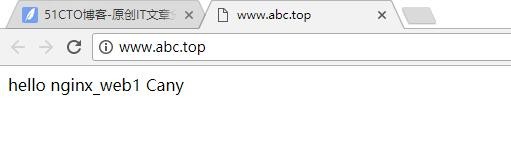
那就再刷新多幾次?
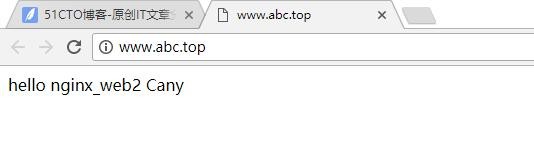
web1 web2 看出來了吧?
實驗成功!!!