


mysql 主從
MySQL主從又叫做Replication、AB複製。簡單講就是A和B兩臺機器做主從後,在A上寫數據,另外一臺B也會跟着寫數據,兩者數據實時同步。
MySQL主從是基於binlog的,主上須開啓binlog才能進行主從
binlog,其實就是一個文件,文件裏記錄了一些日誌,文件是 二進制文件,無法cat
主從過程大致有3個步驟:
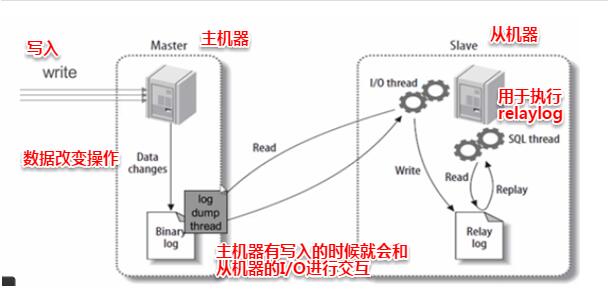
主將更改操作記錄到 binlog 裏
從將主的binlog事件(sql語句)同步到本機上並記錄在 relaylog(中繼日誌) 裏
從根據 relaylog 裏面的sql語句按順序執行
mysql主從共有三個線程
mysql 主從共有三個線程。主上有一個log dump 線程,用來和從的I/O 線程傳遞binlog;
從上有兩個線程,其中I/O 線程用來同步主的binlog並生成relaylog,另外一個sql線程用來把relaylog 裏面的sql語句落地
mysql 主從原理圖
mysql 主從應用場景
1、數據備份,主機器宕機,從機器還能隨時供服務
2、作爲一個從庫,讀的庫,減輕主庫的壓力,數據備份且可以分擔主機器被調用數據時的壓力,mysql主從,是有方向性的,寫數據,必須從主機器開始;如果不依照原理會導致數據紊亂。
準備工作
兩臺機器都安裝並啓動mysql。
配置主
編輯/etc/my.cnf配置文件
[root@localhost ~]# vim /etc/my.cnf……
server-id=131// 自定義log_bin=testlinux// 指定log前綴重啓mysql服務
[root@localhost ~]# /etc/init.d/mysqld restartShutting down MySQL.. SUCCESS!
Starting MySQL. SUCCESS!

[root@localhost ~]# ls -l /data/mysql-rw-rw----. 1 mysql mysql      120 1月  23 21:00 testlinux.000001-rw-rw----. 1 mysql mysql       19 1月  23 21:00 testlinux.index// 此時,/data/mysql目錄下會產生兩個新的文件// 之後還會生成更多以testlinux開頭的文件// 這些文件都非常重要,是實現主從的根本,沒有這些文件主從也無法完成創建一個數據庫爲實驗做準備
[root@localhost ~]# mysql -uroot -p......
MySQL > create database testlinux;
Query OK, 1 row affected (0.00 sec)// 二進制文件testlinux.000001 大小增加,它裏面記錄了數據庫的創建過程。創建一個用於同步數據的用戶
[root@localhost ~]# mysql -uroot -p
......
mysql> grant replication slave on *.* to 'repl'@'192.168.159.132' identified by '112233';
Query OK, 0 rows affected (0.01 sec)// IP爲“從”的IPmysql> flush tables with read lock;
Query OK, 0 rows affected (0.12 sec)// 鎖定數據表(目的是暫時使其不能繼續寫,保持現有狀態用於同步)mysql> show master status;
+-------------------+----------+--------------+------------------+-------------------+
| File              | Position | Binlog_Do_DB | Binlog_Ignore_DB | Executed_Gtid_Set |
+-------------------+----------+--------------+------------------+-------------------+
| testlinux.000001  |   441    |              |                  |                   |
+-------------------+----------+--------------+------------------+-------------------+1 row in set (0.00 sec)
#記住file和position(設置主從同步時會使用)
備份主庫中的所有數據庫
[root@localhost ~]# mysqldump -uroot -p112233 test > /tmp/test.sql
[root@localhost ~]# mysqldump -uroot -p112233 zrlog > /tmp/zrlog.sql
[root@localhost ~]# mysqldump -uroot -p112233 testlinux > /tmp/testlinux.sql
配置從
[root@localhost ~]# vim /etc/my.cnf……
server-id=130……

// 增加一個sever-id 和主不一樣就行

重啓mysql
[root@localhost ~]# /etc/init.d/mysqld restartShutting down MySQL.. SUCCESS!
Starting MySQL. SUCCESS!

將主中備份的數據庫發送到從中
[root@localhost ~]# scp 192.168.159.131:/tmp/*.sql /tmp/The authenticity of host '192.168.159.131 (192.168.159.131)' can't be established.
ECDSA key fingerprint is b2:66:7f:db:00:38:59:11:9e:75:75:02:fd:7a:95:d7.
Are you sure you want to continue connecting (yes/no)? yes
Warning: Permanently added '192.168.159.131' (ECDSA) to the list of known hosts.
[email protected]'s password:
testlinux.sql                                                                        100%    0     0.0KB/s   00:00    test.sql                                                                             100%    0     0.0KB/s   00:00    zrlog.sql                                                                            100%    0     0.0KB/s   00:00    創建庫
[root@localhost ~]# mysql -uroot -pEnter password:
Welcome to the MySQL monitor.
......
mysql> create database testlinux;
Query OK, 1 row affected (0.00 sec)
mysql> create database test;
Query OK, 1 row affected (0.00 sec)
mysql> create database zrlog;
Query OK, 1 row affected (0.00 sec)

恢復數據庫
[root@localhost ~]# mysql -uroot -p159820 test < /tmp/test.sql[root@localhost ~]# mysql -uroot -p159820 zrlog < /tmp/zrlog.sql[root@localhost ~]# mysql -uroot -p159820 testlinux < /tmp/testlinux.sql// 該過程要保證主從數據庫內容一致

實現主從同步
[root@localhost ~]# mysql -uroot -p.....
mysql> stop slave;
Query OK, 0 rows affected, 1 warning (0.06 sec)
mysql> change master to master_host='192.168.159.131',master_user='repl',master_password='112233',master_log_file='testlinux.000001',master_log_pos=441;
Query OK, 0 rows affected, 2 warnings (0.02 sec)
// IP爲主的IP;file、pos分別爲主的filename和position。
mysql> start slave;
Query OK, 0 rows affected (0.00 sec)

判斷主從是否配置成功
mysql> show slave status\G
......
 Slave_IO_Running: Yes
 Slave_SQL_Running: Yes
 Slave_SQL_Running_State: Slave has read all relay log; waiting for the slave I/O thread to update it
......

解鎖主庫的表(在主上操作)
[root@localhost ~]# mysql -uroot -p......
mysql> unlock tables;
Query OK, 0 rows affected (0.00 sec)
......
測試主從
主上幾個配置參數(在/etc/my.cnf中配置)
binlog-do-db= 僅同步指定的庫
binlog-ignore-db= 忽略指定的庫
從上幾個配置參數(在/etc/my.cnf中配置)
replicate_do_db= 同步指定的庫
replicate_ignore_db= 忽略指定的庫
replicate_do_table= 同步指定的表
replicate_ignore_table= 忽略指定的表
replicate_wild_do_table= 如aming.%,支持通配符
replicate_wild_ignore_table= 所有的忽略
注意: 進行從服務器的配置時儘量使用參數“replicatewild”,使匹配更精確,提升使用性能。
測試
主服務器:
mysql> show tables;
+---------------------------+
| Tables_in_adaitest |
+---------------------------+
| columns_priv |
| db |
| event |
+---------------------------+刪除表:
mysql> drop table db;
mysql> show tables;
+---------------------------+
| Tables_in_adaitest |
+---------------------------+
| columns_priv |
| event |
+---------------------------+從服務器:
主服務器刪除表之前:
mysql> show tables;
+---------------------------+
| Tables_in_adaitest |
+---------------------------+
| columns_priv |
| db |
| event |
+---------------------------+主服務器刪除表之後:
mysql> show tables;
+---------------------------+
| Tables_in_adaitest |
+---------------------------+
| columns_priv |
| event |
+---------------------------+