cacti
什麼是Cacti?
Cacti 在英文中的意思是仙人掌的意思,Cacti是一套基於PHP,MySQL,SNMP及RRDTool開發的網絡流量監測圖形分析工具。它通過snmpget來獲取數據,使用 RRDtool繪畫圖形,而且你完全可以不需要了解RRDtool複雜的參數。它提供了非常強大的數據和用戶管理功能,可以指定每一個用戶能查看樹狀結構、host以及任何一張圖,還可以與LDAP結合進行用戶驗證,同時也能自己增加模板,功能非常強大完善。Cacti 的發展是基於讓 RRDTool 使用者更方便使用該軟件,除了基本的 Snmp 流量跟系統資訊監控外,Cacti 也可外掛 Scripts 及加上 Templates 來作出各式各樣的監控圖。
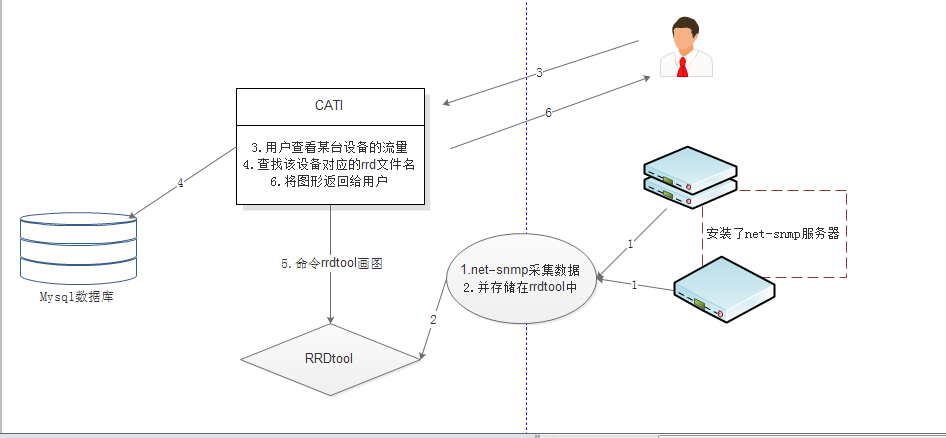
cacti是用php語言實現的一個軟件,它的主要功能是用snmp服務獲取數據,然後用rrdtool儲存和更新數據,當用戶需要查看數據的時候用rrdtool生成圖表呈現給用戶。因此,snmp和rrdtool是cacti的關鍵。Snmp關係着數據的收集,rrdtool關係着數據存儲和圖表的生成。
Mysql配合PHP程序存儲一些變量數據並對變量數據進行調用,如:主機名、主機ip、snmp團體名、端口號、模板信息等變量。
snmp抓到數據不是存儲在mysql中,而是存在rrdtool生成的rrd文件中(在cacti根目錄的rra文件夾下)。rrdtool對數據的更新和存儲就是對rrd文件的處理,rrd文件是大小固定的檔案文件(Round Robin Archive),它能夠存儲的數據筆數在創建時就已經定義。關於RRDTool的知識請參閱RRDTool教學。
什麼是SNMP?
snmp(Simple Network Management Protocal, 簡單網絡管理協議)在架構體系的監控子系統中將扮演重要角色。大體上,其基本原理是,在每一個被監控的主機或節點上 (如交換機)都運行了一個 agent,用來收集這個節點的所有相關的信息,同時監聽 snmp 的 port,也就是 UDP 161,並從這個端口接收來自監控主機的指令(查詢和設置)。
如果安裝 net-snmp,被監控主機需要安裝 net-snmp(包含了 snmpd 這個 agent),而監控端需要安裝 net-snmp-utils,若接受被監控端通過trap-communicate發來的信息的話,則需要安裝net-snmp,並啓用trap服務。如果自行編譯,需要 beecrypt(libbeecrypt)和 elf(libraryelf)的庫。
什麼是RRDtools?
RRDtool是指Round Robin Database 工具(環狀數據庫)。Round robin是一種處理定量數據、以及當前元素指針的技術。想象一個周邊標有點的圓環--這些點就是時間存儲的位置。從圓心畫一條到圓周的某個點的箭頭--這就是指針。就像我們在一個圓環上一樣,沒有起點和終點,你可以一直往下走下去。過來一段時間,所有可用的位置都會被用過,該循環過程會自動重用原來的位置。這樣,數據集不會增大,並且不需要維護。RRDtool處理RRD數據庫。它用向RRD數據庫存儲數據、從RRD數據庫中提取數據。
工作原理:
snmp關係着數據的收集,rrdtool關係數據存儲和圖表的生成,snmp抓取的數據不是存儲在數據庫中,而是存儲在rrdtool生成的rrd文件中,簡單原理圖如下:
實驗
1.搭建lamp環境
(1)配置apache
[root@cacti-server ~]# yum -y install httpd
[root@cacti-server ~]# systemctl start httpd
[root@cacti-server ~]# systemctl enable httpd
[root@cacti-server ~]# firewall-cmd --permanent --add-service=http
success
[root@cacti-server ~]# firewall-cmd --reload
success
(2)配置mariadb
[root@cacti-server ~]# yum -y install mariadb-server mysql-devel
[root@cacti-server ~]# systemctl start mariadb
[root@cacti-server ~]# mysql_secure_installation
Set root password? [Y/n]
Remove anonymous users? [Y/n] y
Disallow root login remotely? [Y/n] y
Remove test database and access to it? [Y/n] y
Reload privilege tables now? [Y/n] y
[root@cacti-server ~]# mysql -u root -p
MariaDB [(none)]> grant all privileges on *.* to test@localhost identified by 'redhat'; #創建用於測試php和mariadb連通性的用戶
Query OK, 0 rows affected (0.00 sec)
MariaDB [(none)]> flush privileges;
[root@cacti-server ~]# systemctl restart mariadb
[root@cacti-server ~]# systemctl enable mariadb
[root@cacti-server ~]# firewall-cmd --permanent --add-port=3306/tcp
success
[root@cacti-server ~]# firewall-cmd --reload
success
(3)配置php
[root@cacti-server ~]# yum -y install php php-mysql php-gd php-pear
[root@cacti-server ~]# vim /etc/php.ini
date.timezone =PRC #修改時區
[root@cacti-server ~]# vim /var/www/html/index.php #編輯測試頁面
<?php
$conn=mysql_connect('localhost','test','redhat');
if ($conn)
echo "database connect ok";
else
echo "database connect failure";
?>
<?php
phpinfo()
?>
[root@cacti-server ~]# systemctl restart httpd
(4)測試
2.安裝配置cacti
(1)下載軟件
[root@cacti-server ~]# cd /usr/local/src/
[root@cacti-server src]# wget http://www.cacti.net/downloads/cacti-0.8.8f.tar.gz
[root@cacti-server src]# tar zxvf cacti-0.8.8f.tar.gz
[root@cacti-server src]# mv cacti-0.8.8f /var/www/html/cacti
(2)創建cacti數據庫和cacti用戶,賦予權限
[root@cacti-server ~]# mysql -u root -p
MariaDB [(none)]> create database cacti default character set utf8;
MariaDB [(none)]> grant all privileges on cacti.* to cacti@localhost identified by 'redhat';
MariaDB [(none)]> flush privileges;
(3)把cacti.sql導入數據庫
[root@cacti-server cacti]# mysql -ucacti -predhat cacti < /var/www/html/cacti/cacti.sql
(4)編輯config.php和global.php
[root@cacti-server cacti]# vim /var/www/html/cacti/include/config.php|global.php
$database_type = "mysql";
$database_default = "cacti";
$database_hostname = "localhost";
$database_username = "cacti";
$database_password = "redhat";
$database_port = "3306";
$database_ssl = false;
(5)安裝rrdtool以生成圖像
[root@cacti-server src]# yum -y install rrdtool rrdtool-devel rrdtool-php rrdtool-perl
[root@cacti-server src]# yum -y install gd gd-devel php-gd #rrdtool繪製圖像需要的圖形庫
(6)安裝snmp服務
[root@cacti-server cacti]# yum -y install net-snmp net-snmp-utils php-snmp net-snmp-libs
(7)編輯配置文件
[root@cacti-server ~]# vim /etc/snmp/snmpd.conf
41 com2sec notConfigUser 127.0.0.1 public
62 access notConfigGroup "" any noauth exact all none none
85 view all included .1 80
[root@cacti-server ~]# systemctl restart snmpd.service
[root@cacti-server ~]# systemctl enable snmpd.service
(8)授權目錄權限
[root@cacti-server ~]# useradd -r -M cacti
[root@cacti-server ~]# chown -R cacti /var/www/html/cacti/rra/
[root@cacti-server ~]# chown -R cacti /var/www/html/cacti/log/
(9)配置一個抓圖的計劃任務
[root@cacti-server ~]# crontab -e
*/5 * * * * /usr/bin/php /var/www/html/cacti/poller.php >> /tmp/cacti_rrdtool.log
(10)瀏覽器訪問cacti管理頁面進行安裝
(11)測試
[root@cacti-server ~]# /usr/bin/php /var/www/html/cacti/poller.php
OK u:0.00 s:0.01 r:0.80
OK u:0.00 s:0.02 r:1.21
OK u:0.00 s:0.02 r:1.39
OK u:0.00 s:0.02 r:1.50
OK u:0.00 s:0.02 r:1.87
10/21/2016 04:02:32 PM - SYSTEM STATS: Time:1.4211 Method:cmd.php Processes:1 Threads:N/A Hosts:2 HostsPerProcess:2 DataSources:5 RRDsProcessed:5
3.安裝Spine
注:由於cacti默認使用cmd.php來輪詢數據,速度會很慢,特別是在監控節點比較多的情況下,cmd.php就更顯不足了,因此我們採用Spine來輪詢數據。cacti-spine是一個由C語言開發的,用於替代cmd.php的快速獲取數據的引擎。
(1)編譯安裝spine
[root@cacti-server ~]# cd /usr/local/src/
[root@cacti-server src]#wget http://www.cacti.net/downloads/spine/cacti-spine-0.8.8f.tar.gz
[root@cacti-server src]# tar zxvf cacti-spine-0.8.8f.tar.gz
[root@cacti-server cacti-spine-0.8.8f]# ./configure
[root@cacti-server cacti-spine-0.8.8f]# make
[root@cacti-server cacti-spine-0.8.8f]# make install
(2)拷貝snmp的配置文件
[root@cacti-server ~]# cp /usr/local/spine/etc/spine.conf.dist /etc/spine.conf
注:spine默認配置文件需要放在/etc纔會生效,否則測試時會報如下錯誤:
SPINE: Poller[0] FATAL: Unable to read configuration file! (Spine init)
(3)編輯配置文件
[root@cacti-server ~]# vim /etc/spine.conf
DB_Host localhost
DB_Database cacti
DB_User cacti
DB_Pass redhat
DB_Port 3306
(4)測試
[root@cacti-server ~]# /usr/local/spine/bin/spine
SPINE: Using spine config file [/etc/spine.conf]
SPINE: Version 0.8.8f starting
SPINE: Time: 0.1278 s, Threads: 5, Hosts: 2
(5)修改web的設置
進入Cacti頁面設置spine路徑
Console -> Configuration -> Settings -> Paths -> Alternate Poller Path -> Spine Poller File Path->/usr/local/spine/bin/spine
(6)修改Cacti使用的Poller Type
Console -> Configuration -> Settings ->Poller->Poller Type->spine
(7)查看日誌
[root@cacti-server ~]# cat /var/www/html/cacti/log/cacti.log
10/22/2016 12:45:50 AM - SYSTEM STATS: Time:0.1146 Method:spine Processes:1 Threads:1 Hosts:2 HostsPerProcess:2 DataSources:0 RRDsProcessed:0
4.添加被監控主機
(1)安裝snmp服務
[root@cacti-client ~]# yum -y install net-snmp net-snmp-devel net-snmp-utils
(2)編輯配置文件
[root@cacti-client ~]# vim /etc/snmp/snmpd.conf
41 com2sec notConfigUser 192.168.23.156 public
62 access notConfigGroup "" any noauth exact all none none
85 view all included .1 80
[root@cacti-client ~]# systemctl restart snmpd
[root@cacti-client ~]# systemctl enabled snmpd
(3)配置防火牆
[root@cacti-client ~]# firewall-cmd --permanent --add-port=161/udp
success
[root@cacti-client ~]# firewall-cmd --reload
success
5.監控apache
客戶端的配置
(1)編輯apache的配置文件,加入server-status模塊的設置
[root@cacti-client ~]# vim /etc/httpd/conf/httpd.conf
ExtendedStatus On
<Location /server-status>
SetHandler server-status
Order deny,allow
Deny from all
Allow from all
</Location>
[root@cacti-client ~]# systemctl restart httpd
[root@cacti-client ~]# systemctl enable httpd
(2)查看apache加載的模塊
[root@cacti-client ~]# apachectl -t -D DUMP_MODULES|grep status
status_module (shared)
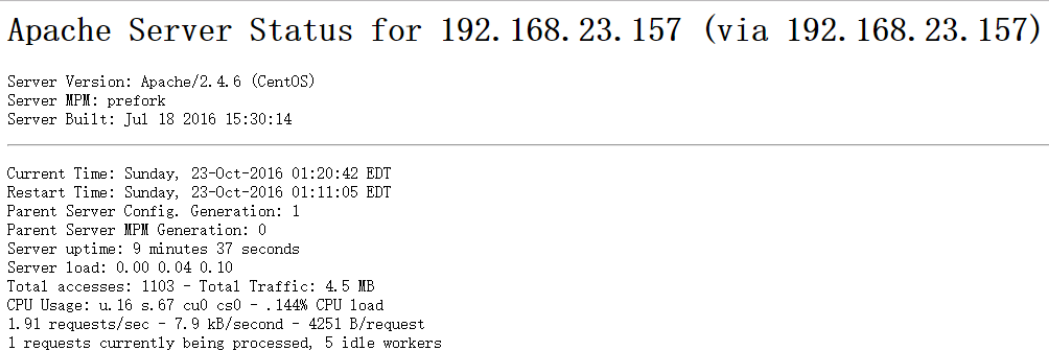
(3)訪問http://192.168.23.157/server-status查看模塊的詳細信息
[root@cacti-client ~]# firewall-cmd --permanent --add-service=http
success
[root@cacti-client ~]# firewall-cmd --reload
success
服務端的配置
(1)安裝監控apache的php頁面
[root@cacti-server ~]# cd /usr/local/src/
[root@cacti-serversrc]#wget http://forums.cacti.net/download/file.php?id=18576&sid=8d429b69af5be45179d928e1303f2077
[root@cacti-server src]# unzip ApacheStats_0.8.2.zip
[root@cacti-server src]# cd ApacheStats_0.8.2/
[root@cacti-serverApacheStats_0.8.2]#cp ss_apache_stats.php /var/www/html/cacti/scripts/
(2)導入模板
在Cacti Web界面導入cacti_host_template_webserver_-_apache.xml模板:
點擊Import/Export->Import Templates,上傳模板即可
(3)添加服務器並創建圖表
登錄Cacti Web界面,添加被監控apache服務器設備,並創建相應圖表:
Devices->Add->WebServer–Apache模板->Create New Graphs,添加所需圖表即可。等待一段時間就會出圖
6.監控mariadb
(1)創建用於監控主機連接mariadb進行監控的用戶
[root@cacti-client ~]# mysql -uroot -predhat
MariaDB [(none)]> grant process,super,replication client on *.*to 'mysqltest'@'192.168.23.156' identified by 'redhat';
MariaDB [(none)]> flush privileges;
[root@cacti-client ~]# systemctl restart mariadb
(2)配置防火牆
[root@cacti-client ~]# firewall-cmd --permanent --add-port=3306/tcp
success
[root@cacti-client ~]# firewall-cmd --reload
success
(3)安裝監控mariadb的php頁面文件
[root@cacti-server ~]# cd /usr/local/src/
[root@cacti-serversrc]#wget https://www.percona.com/downloads/percona-monitoring-plugins/1.1.6/percona-monitoring-plugins-1.1.6.tar.gz
[root@cacti-server src]# tar zxvf percona-monitoring-plugins-1.1.6
[root@cacti-server src]# cd percona-monitoring-plugins-1.1.6/cacti/scripts/
[root@cacti-serverscripts]#cpss_get_mysql_stats.php /var/www/html/cacti/scripts/
(4)編輯頁面文件
[root@cacti-server scripts]# vim /var/www/html/cacti/scripts/ss_get_mysql_stats.php
$mysql_user = 'mysqltest'; #用於監控主機連接mariadb的用戶
$mysql_pass = 'redhat'; #用戶密碼
(5)導入模板
在Cacti Web界面導入cacti_host_template_percona_mysql_server_ht_0.8.6i-sver1.1.6.xml模板:
點擊Import/Export->Import Templates,上傳模板即可
(6)添加服務器並創建圖表
登錄Cacti Web界面,添加被監控mariabdb服務器設備,並創建相應圖表:
Devices->Add->dbServer–Mysql模板->Create New Graphs,添加所需圖表即可。等待一段時間就會出圖
7.郵件報警
(1)下載插件
[root@cacti-server ~]# cd /usr/local/src/
[root@cacti-server src]# tar zxvf settings-v0.71-1.tgz
[root@cacti-server src]# mv settings /var/www/html/cacti/plugins/
[root@cacti-server src]# tar zxvf thold-v0.5.0.tgz
[root@cacti-server src]# mv thold /var/www/html/cacti/plugins/
(2)訪問cacti管理頁面安裝插件
(3)測試
(4)告警被觸發,查看郵件
[root@cacti-server ~]# cat /var/spool/mail/root
..................................
..................................
Subject: ALERT: test - Used Space - / [hdd_used] [hdd_used] went above threshold of 25 with 36.8871
From: Cacti <[email protected]>
Date: Mon, 24 Oct 2016 14:00:03 +0800
..................................
An alert has been issued that requires your attention.
..................................
Host: test (192.168.23.157)
URL: http://192.168.23.156/cacti//graph.php?local_graph_id=103&rra_id=1
Message: ALERT: test - Used Space - / [hdd_used] [hdd_used] went above threshold of 25 with 36.8871
..................................
Content-Type: image/jpg
Content-Disposition: inline; filename="103.jpg"
...................................
...................................


