實驗環境:
服務器系統:Redhat 6.2 ip地址:192.168.10.1
客戶機系統:Win7 64位 旗艦版 ip地址:192.168.10.2
系統環境:已搭建LAMP平臺
1、搭建nginx服務並實現訪問狀態統計
[root@localhost ~]#yum -y install pcre-devel zlib-devel #首先需要安裝這兩個工具
[root@localhost ~]#useradd -M -s /sbin/nologin nginx #在系統中新建一個用戶nginx不建立家目錄,禁止登陸系統,作爲nginx服務的專用賬號
[root@localhost ~]# mount.cifs //192.168.10.2/LAMP /opt #從客戶機上將共享的文件夾LAMP掛載到/opt目錄下,nginx安裝壓縮包在這個文件夾中
[root@localhost ~]#tar xzvf /opt/nginx-1.5.10.tar.gz #解壓nginx到/root目錄(解壓到哪裏看個人需求)
[root@localhost ~]#cd nginx-1.5.10/
[root@localhost nginx-1.5.10]# ./configure \ #到nginx解壓的源碼目錄進行./configure配置
--prefix=/usr/local/nginx \ #指定安裝路徑
--user=nginx \ #指定服務的使用者
--group=nginx \ #指定服務的使用組
--with-http_stub_status_module #啓用狀態統計模塊
[root@localhost nginx-1.5.10]#make
[root@localhost nginx-1.5.10]#make install
[root@localhost nginx-1.5.10]#ln -s /usr/local/nginx/sbin/nginx /usr/local/sbin/ #爲程序創建軟連接,以便使用nginx就可以直接調用nginx,不要輸絕對路徑來執行了
nginx -t #進行配置檢查
nginx #啓動服務
killall -1 nginx #重啓服務
killall -3 nginx #停止服務
-------------------------------------------------------------------------------------
一般我們在linux系統中基本上都習慣於用service命令來控制服務的啓動與停止等,這裏提供一個其他網站看到的別人寫的控制腳本,把以下內容添加到vim /etc/init.d/nginx裏面保存即可實現
#!/bin/bash
#
# nginx This shell script takes care of starting and stopping
# standalone nginx.
# config: /usr/local/nginx/conf/nginx.conf
# Source function library.
. /etc/rc.d/init.d/functions
RETVAL=0
prog="nginx"
start() {
#start nginx
[ -x /usr/local/nginx/sbin/nginx ] || exit 4
[ -z /usr/local/nginx/conf/nginx.conf ] && exit 6
echo -n $"Starting $prog: "
daemon /usr/local/nginx/sbin/nginx 2>/dev/null
RETVAL=$?
echo
return $RETVAL
}
stop () {
#stop nginx
echo -n $"Shutting down $prog: "
daemon /usr/local/nginx/sbin/nginx -s stop 2>/dev/null
RETVAL=$?
echo
return $RETVAL
}
reload () {
#reload nginx
echo -n $"Reload the config of $prog: "
daemon /usr/local/nginx/sbin/nginx -s reload 2>/dev/null
RETVAL=$?
echo
return $RETVAL
}
# See how we were called.
case "$1" in
start)
start
;;
stop)
stop
;;
restart)
stop
start
RETVAL=$?
;;
reload)
reload
;;
status)
status $prog
RETVAL=$?
;;
*)
echo $"Usage: $0 {start|stop|restart|reload|status}"
exit 2
esac
exit $RETVAL
------------------------------------------------------------------------------
cd /usr/local/nginx/conf
mv nginx.conf nginx.conf.back #將原來的配置文件做個備份以防配置出錯可以導回
grep -v "#" nginx.conf.back | grep -v "^$" > nginx.conf #過濾掉配置文件中的帶有#號的行和空行(可根據個人習慣)
[root@ling conf]# vi nginx.conf #打開配置文件插入紅色字的四行內容,注意{}需成對
server {
listen 80;
server_name localhost;
charset utf-8;
location / {
root html;
index index.html index.htm;
}
location ~ /status { #訪問位置爲ip地址/status
stub_status on; #打開狀態統計功能
access_log off; #關閉此位置的日誌記錄
}
error_page 500 502 503 504 /50x.html;
location = /50x.html {
root html;
}
}
}
在客戶機上驗證,在瀏覽器中輸入192.168.10.1,看到以下畫面的話nginx已經搭建成功
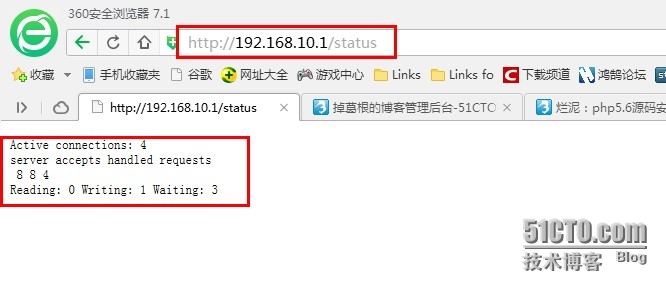
驗證狀態統計功能,在瀏覽器中輸入192.168.10.1/status,將看到如下頁面
2、配置基於域名的虛擬主機
在web服務器當中運用比較廣泛的功能還有虛擬主機,nginx當中也是可以配置的,在配置文件中插入以下這兩個server塊即可。
[root@localhost ~]#vi nginx.conf
server {
server_name www.benet.com; #輸入域名
location / {
root /var/www/benet; #指定這個網站的網頁根目錄
index index.html index.php; #指定默認打開的網頁
}
}
server {
server_name www.accp.com;
location / {
root /var/www/accp;
index index.html index.php;
}
}
[root@localhost ~]# mkdir /var/www/benet #創建網站根目錄
[root@localhost ~]# mkdir /var/www/accp
[root@localhost ~]# echo "this is benet" > /var/www/benet/index.html #製作一個html的網頁,內容爲this is benet
[root@localhost ~]# echo "this is accp" > /var/www/accp/index.html
[root@localhost ~]# service nginx restart #重啓服務
關閉 nginx: [確定]
正在啓動 nginx: [確定]
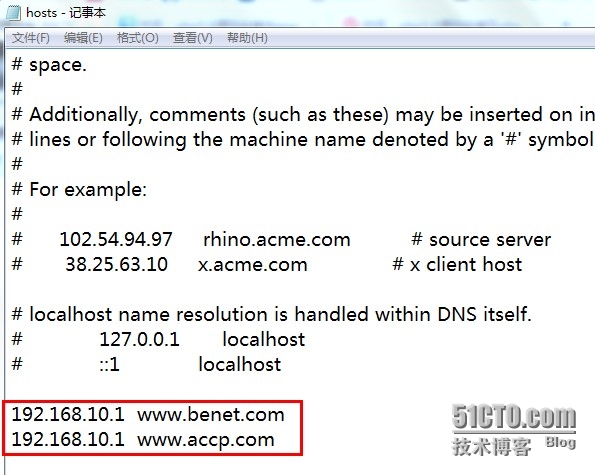
在驗證之前我們配置了兩個域名就必須要解析這兩個域名,需要搭建DNS,這裏爲了方便,我們可以在客戶機上修改hosts文件,將域名和ip地址對應的寫進去保存
注意:用記事本打開hosts文件並修改,如果無法修改可以將hosts拖到桌面修改,之後再拖回原來的文件夾即可。
在客戶機上驗證,分別打開www.benet.com和www.accp.com可以看到以下網頁
3、配置nginx支持php網頁
因爲之前已經搭建過LAMP平臺,只需要重新配置php即可,如果之前沒有安裝過php,需要安裝以下gd庫和gd庫關聯程序
[root@localhost ~]# yum -y install \
libjpeg-devel \
libpng-devel \
freetype-devel \
zlib-devel \
gettext-devel \
libXpm-devel \
libxml2-devel \
fontconfig-devel \
openssl-devel \
bzip2-devel
這裏我們用源碼編譯php-5.4.5,找到php源碼解壓的那個目錄進行./configure配置
[root@localhost ~]# umount /opt #之前我們把php解壓到/opt目錄下了,後來/opt又被用來掛載所以要先卸載才能看到之前的內容
[root@localhost php-5.4.5]#./configure \ #進行功能配置
--prefix=/usr/local/php5 \
--with-gd \
--with-mysql=/usr/local/mysql \
--with-config-file-path=/etc \
--with-zlib-dir \
--with-libxml-dir \
--with-freetype-dir \
--with-jpeg-dir \
--with-png-dir \
--with-iconv \
--with-openssl \
--with-gettext \
--enable-mbstring \
--enable-gd-native-ttf \
--enable-gd-jis-conv \
--enable-static \
--enable-inline-optimization \
--enable-sockets \
--enable-soap \
--enable-ftp \
--disable-ipv6 \
--enable-fpm #這個模塊就是實現讓nginx支持php的
[root@localhost php-5.4.5]#make && make install
注意:因爲之前裝過php,所以make很可能會報錯,可以使用make clean再重新make
[root@localhost php-5.4.5]#cp php.ini-development /etc/php.ini #第一次裝php的話需要這一步,這裏我們不需要
[root@localhost php-5.4.5]#ln -s /usr/local/php5/bin/* /usr/local/bin/ #建立連接直接調用命令
[root@localhost php-5.4.5]#ln -s /usr/local/php5/sbin/* /usr/local/sbin/
tar xzvf ZendGuardLoader-php-5.3-linux-glibc23-i386.tar.gz #爲了提高php解析效率,安裝對應加速器
cd ZendGuardLoader-php-5.3-linux-glibc23-i386/php-5.3.x
cp ZendGuardLoader.so /usr/local/php5/lib/php
[root@localhost ~]#vim /etc/php.ini #在ini配置文件末尾加入以下三行內容使php能識別加速器
[Zend Guard Loader]
zend_extension=/usr/local/php5/lib/php/ZendGuardLoader.so
zend_loader.enable=1
[root@localhost ~]#cd /usr/local/php5/etc/
[root@localhost etc]#cp php-fpm.conf.default php-fpm.conf
[root@localhost etc]#vim php-fpm.conf #配置php-fpm,讓nginx開啓php支持,找到以下幾行做相應修改
pid = run/php-fpm.pid
user = nginx
group = nginx
pm.max_children=50
pm.start_servers = 20
pm.min_spare_servers = 5
pm.max_spare_servers = 35
[root@localhost etc]#/usr/local/sbin/php-fpm #執行這個文件
netstat -tnapl | grep 9000 #fpm進程默認端口是9000,查看是否開啓
--------以下是讓nginx支持PHP功能--------
[root@localhost ~]#vim /usr/local/nginx/conf/nginx.conf
location ~ \.php$ { #配置文件中加入一個location塊
root /var/www/benet;
fastcgi_pass 127.0.0.1:9000;
fastcgi_index index.php;
include fastcgi.conf;
}
[root@localhost ~]#vim /var/www/benet/index.php #在網頁根目錄下新建一個php網頁作爲測試,輸入以下三行內容
<?php
phpinfo();
?>
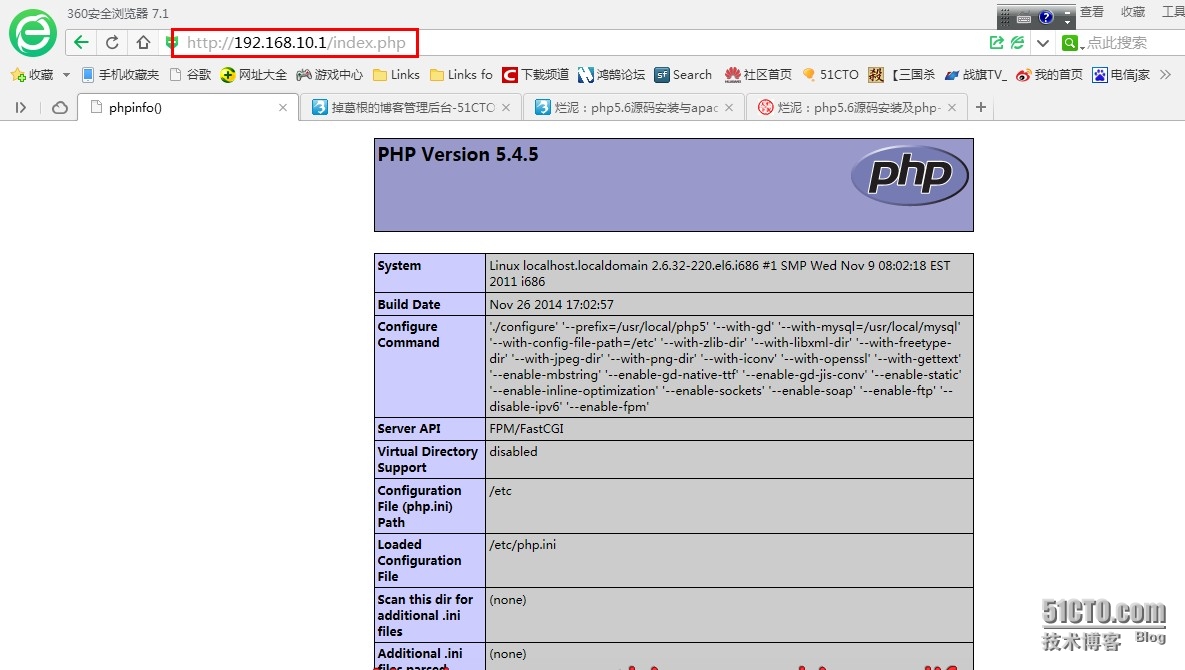
在客戶機上的瀏覽器中輸入http://192.168.5.2/index.php,出現以下頁面則實驗成功!


