安裝環境說明
- 兩臺服務器,系統centos7
- 服務器1 IP 192.168.2.191
- 服務器2 IP 192.168.2.192
- 軟件版本,keepalived-1.3.5.tar.gz
- keepalive安裝包百度雲鏈接 密碼:hmd7
- 服務器1 VIP 192.168.2.95
- 服務器2 VIP 192.168.2.96
- 本次配置,服務器1和服務器2互爲主備
編譯安裝
# tar zxvf keepalived-1.3.5.tar.gz     #解壓
# cd keepalived-1.3.5/
# ./configure
# make && make install      #編譯安裝
配置文件
- 機器1配置
在/etc/keepalived/ 目錄下創建keepalived.conf
# vim /etc/keepalived/keepalived.conf #添加以下內容 ! Configuration File for keepalived
global_defs {
notification_email {
root@localhost
}
notification_email_from [email protected]
smtp_server mail.example.com
smtp_connect_timeout 30
router_id LVS_DEVEL
}
vrrp_script chk_nginx {
script "/etc/keepalived/check_nginx.sh"
interval 2
weight -5
fall 3
rise 2
}
vrrp_instance VI_1 {
state MASTER
interface eth0 #網卡接口名稱
virtual_router_id 51
priority 101
advert_int 1
authentication {
auth_type PASS
auth_pass 1111
}
virtual_ipaddress {
192.168.2.95 #虛擬地址1
}
track_script {
chk_nginx
}
}
vrrp_instance VI_2 {
state BACKUP
interface eth0 #網卡接口名
virtual_router_id 52
priority 100
advert_int 1
authentication {
auth_type PASS
auth_pass 1111
}
virtual_ipaddress {
192.168.2.96 #虛擬地址2
}
track_script {
chk_nginx
}
}
- 服務器2配置
在/etc/keepalived/ 目錄下創建keepalived.conf
vim /etc/keepalived/keepalived.conf #添加以下內容Configuration File for keepalived
global_defs {
notification_email {
root@localhost
}
notification_email_from [email protected]
smtp_server mail.example.com
smtp_connect_timeout 30
router_id LVS_DEVEL
}
vrrp_script chk_nginx {
script "/etc/keepalived/check_nginx.sh"
interval 2
weight -5
fall 3
rise 2
}
vrrp_instance VI_1 {
state BACKUP
interface eth0 #網卡名稱
virtual_router_id 51
priority 100
advert_int 1
authentication {
auth_type PASS
auth_pass 1111
}
virtual_ipaddress {
192.168.2.95 #虛擬地址1
}
track_script {
chk_nginx
}
}
vrrp_instance VI_2 {
state MASTER
interface eth0 #網卡名稱
virtual_router_id 52
priority 101
advert_int 1
authentication {
auth_type PASS
auth_pass 1111
}
virtual_ipaddress {
192.168.2.96 #虛擬地址2
}
track_script {
chk_nginx
}
}- nginx檢查腳本
# vim /etc/keepalived/check_nginx.sh#!/bin/bash
counter=$(ps -C nginx --no-heading|wc -l)
if [ "${counter}" = "0" ]; then
/usr/local/nginx/sbin/nginx
sleep 2
counter=$(ps -C nginx --no-heading|wc -l)
if [ "${counter}" = "0" ]; then
service keepalived stop
fi
fi# chmod +x check_nginx.sh系統服務配置
# vim /lib/systemd/system/keepalived.service[Unit]
Description=LVS and VRRP High Availability Monitor
After=syslog.target network.target
[Service]
Type=simple
PIDFile=/usr/local/var/run/keepalived.pid
KillMode=process
EnvironmentFile=-/usr/local/etc/sysconfig/keepalived
ExecStart=/usr/local/sbin/keepalived --dont-fork -D
ExecReload=/bin/kill -HUP $MAINPID
[Install]
WantedBy=multi-user.target
啓動命令
# systemctl enable keepalived.service  # 設置開機自啓動
# systemctl start keepalived.service
# systemctl stop keepalived.service
注意事項
防火牆啓用狀態下執行
# firewall-cmd --direct --permanent --add-rule ipv4 filter INPUT 0 \
  --in-interface enp0s8 --destination 224.0.0.18 --protocol vrrp -j ACCEPT

# firewall-cmd --direct --permanent --add-rule ipv4 filter OUTPUT 0 \
  --out-interface enp0s8 --destination 224.0.0.18 --protocol vrrp -j ACCEPT

# firewall-cmd --reload
修改成單播通信
服務器網絡環境中,路由交換層禁用了ARP的廣播限制,造成了keepalived主備協議無法通過廣播的方式進行通信,造成主備兩臺服務器都強制佔用HAVIP地址,出現同時兩臺服務器都有VIP地址的情況出現。必須通過配置來指定IP的兩臺服務器間進行通
需要修改配置文件
    priority 100
    unicast_src_ip  192.168.2.192    #本機實際IP
    unicast_peer {
             192.168.2.191         #對端實際IP
    }
另一臺服務器配置相似,只是互換IP地址
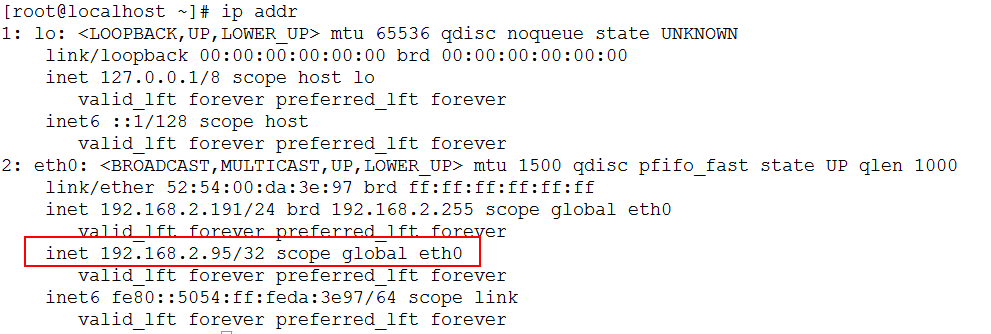
驗證
服務啓動後,可查看VIP是否綁定
# ip addr顯示結果