


提取輪廓在OpenCV裏有一個函數 cvFindContours :
int cvFindContours( CvArr* image, CvMemStorage* storage, CvSeq** first_contour,int header_size=sizeof(CvContour),int mode=CV_RETR_LIST,int method=CV_CHAIN_APPROX_SIMPLE, CvPoint offset=cvPoint(0,0) );
這個函數用起來很方便,但是隨着你使用的深入,你會發現有一些迷惑在這裏。比如當你提取輪廓時只需要最外圍的一個輪廓,但是你會發現當輪廓畫出來時是好幾個;當你需要找一個最大輪廓時卻發現找出來的卻根本就不是你想要的那個。帶着這樣問題我們再來仔細看看cvFindContours這個函數。
下邊的是一位仁兄寫的測試程序和測試圖片,說明提取輪廓的兩種方法及繪製輪廓中最大等級分析的問題,非常感謝他的分享,原文戳這裏:
[cpp] view plaincopy
/************************************************************************/
/* 提取輪廓兩種方法對比及繪製輪廓'最大等級'分析 */
/************************************************************************/
#include "stdafx.h"
#include "cv.h"
#include "highgui.h"
int main()
{
IplImage* img = cvLoadImage("lena.jpg", CV_LOAD_IMAGE_GRAYSCALE);
IplImage* img_temp = cvCreateImage(cvGetSize(img), 8, 1);
cvThreshold(img, img, 128, 255, CV_THRESH_BINARY);
CvMemStorage* mem_storage = cvCreateMemStorage(0);
CvSeq *first_contour = NULL, *c = NULL;
//////////////////////////////////////////////////////////////////////////
// 1、
cvNamedWindow("contour1");
cvCopyImage(img, img_temp);
double t = (double)cvGetTickCount();
cvFindContours(img_temp, mem_storage, &first_contour);
cvZero(img_temp);
cvDrawContours(
img_temp,
first_contour,
cvScalar(100),
cvScalar(100),
1
);
t = (double)cvGetTickCount() - t;
cvShowImage("contour1", img_temp);
printf("run1 = %gms\n", t/(cvGetTickFrequency()*1000.));
cvClearMemStorage(mem_storage);
//////////////////////////////////////////////////////////////////////////
// 2、
cvNamedWindow("contour2");
cvCopyImage(img, img_temp);
t = (double)cvGetTickCount();
CvContourScanner scanner = cvStartFindContours(img_temp, mem_storage);
while (cvFindNextContour(scanner));
first_contour = cvEndFindContours(&scanner);
cvZero(img_temp);
cvDrawContours(
img_temp,
first_contour,
cvScalar(100),
cvScalar(100),
1
);
t = (double)cvGetTickCount() - t;
cvShowImage("contour2", img_temp);
printf("run2 = %gms\n", t/(cvGetTickFrequency()*1000.));
cvClearMemStorage(mem_storage);
cvReleaseImage(&img);
cvReleaseImage(&img_temp);
cvWaitKey();
/************************************************************************/
/* 經測試 run1 = 16.1431ms run2 = 15.8677ms (參考)
不過可以肯定這兩中算法時間複雜度是相同的 */
/************************************************************************/
//////////////////////////////////////////////////////////////////////////
// 上述兩種方法完成了對輪廓的提取,如想繪製輪廓都得配合cvDrawContours來使用
// 而cvDrawContours 函數第5個參數爲 max_level 經查ICVL含義如下:
//
// 繪製輪廓的最大等級。如果等級爲0,繪製單獨的輪廓。如果爲1,繪製輪廓及在其後的相同的級別下輪廓。
// 如果值爲2,所有的輪廓。如果等級爲2,繪製所有同級輪廓及所有低一級輪廓,諸此種種。如果值爲負數,
// 函數不繪製同級輪廓,但會升序繪製直到級別爲abs(max_level)-1的子輪廓。
//
// 相信好多讀者初次都無法理解等級的含義,而且測試時候輸入>=1 的整數效果幾乎一樣
// 只有提取輪廓時候的提取模式設爲 CV_RETR_CCOMP CV_RETR_TREE 時這個參數纔有意義
//
// 經查FindContours 函數裏面這樣介紹提取模式(mode)的這兩個參數:
// CV_RETR_CCOMP - 提取所有輪廓,並且將其組織爲兩層的 hierarchy: 頂層爲連通域的外圍邊界,次層爲洞的內層邊界。
// CV_RETR_TREE - 提取所有輪廓,並且重構嵌套輪廓的全部 hierarchy
//
// 下面用第一種方法進行測試
cvNamedWindow("contour_test");
cvNamedWindow("contour_raw");
img = cvLoadImage("contour.jpg", CV_LOAD_IMAGE_GRAYSCALE);
cvShowImage("contour_raw", img);
cvThreshold(img, img, 128, 255, CV_THRESH_BINARY);
img_temp = cvCloneImage(img);
cvFindContours(
img_temp,
mem_storage,
&first_contour,
sizeof(CvContour),
CV_RETR_CCOMP //#1 需更改區域
);
cvZero(img_temp);
cvDrawContours(
img_temp,
first_contour,
cvScalar(100),
cvScalar(100),
1 //#2 需更改區域
);
cvShowImage("contour_test", img_temp);
/************************************************************************/
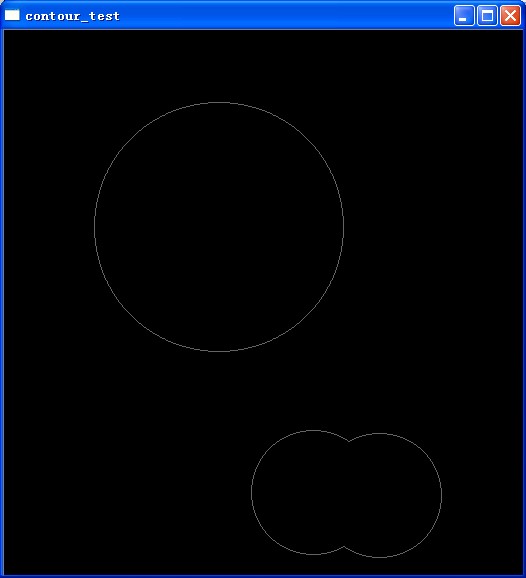
/* (1, 2) = (CV_RETR_CCOMP, 1) 如圖1
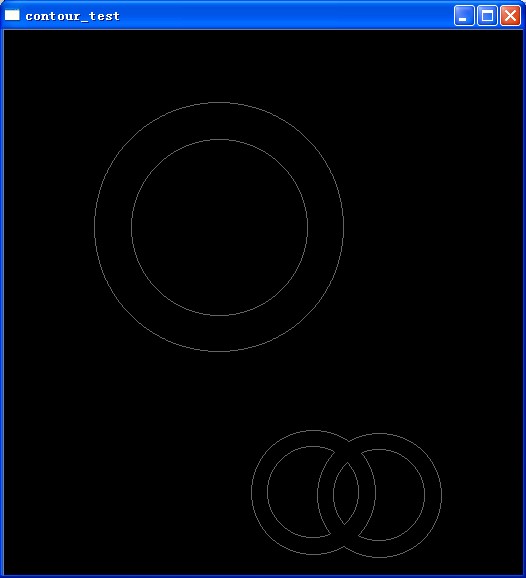
(1, 2) = (CV_RETR_CCOMP, 2) 如圖2
(1, 2) = (CV_RETR_TREE, 1) 如圖3
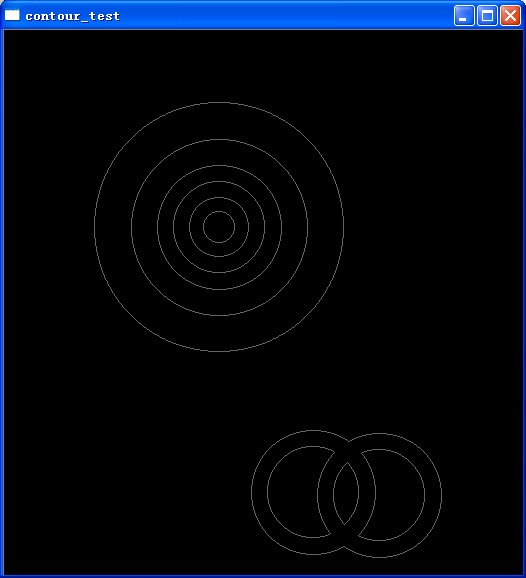
(1, 2) = (CV_RETR_TREE, 2) 如圖4
(1, 2) = (CV_RETR_TREE, 6) 如圖5
經分析CV_RETR_CCOMP 只把圖像分爲兩個層次,頂層和次層,一等級輪廓只匹配與其最接近
的內側輪廓即2等級
CV_RETR_TREE 則從輪廓外到內按等級1 - n 全部分配
CV_RETR_LIST 全部輪廓均爲1級 */
/************************************************************************/
cvWaitKey();
cvReleaseImage(&img);
cvReleaseImage(&img_temp);
cvReleaseMemStorage(&mem_storage);
cvDestroyAllWindows();
return 0;
}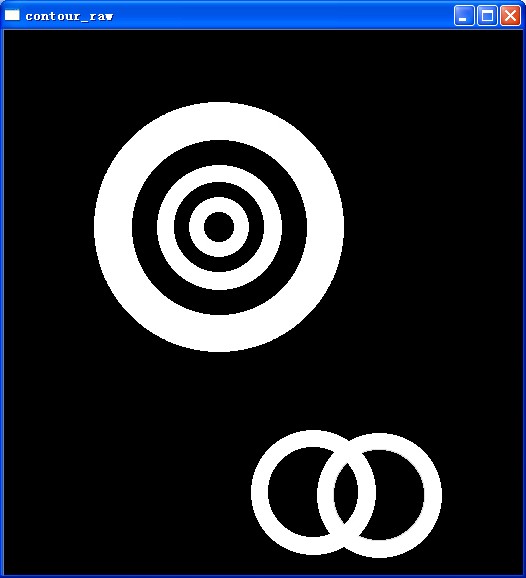
原圖

圖一

圖二
圖三
圖四
圖五
這是OpenCV的經典一個例子:
[cpp] view plaincopy
#include "cv.h"
#include "cxcore.h"
#include "highgui.h"
#include <math.h>
#endif

#pragma   comment(lib,"cv.lib")
#pragma   comment(lib,"highgui.lib")
#pragma   comment(lib,"cxcore.lib")

#define w 500
int levels = 3;
CvSeq* contours = 0;

void on_trackbar(int pos)
{
    IplImage* cnt_img = cvCreateImage( cvSize(w,w), 8, 3 );
    CvSeq* _contours = contours;
    int _levels = levels - 3;
    if( _levels <= 0 ) // get to the nearest face to make it look more funny
        _contours = _contours->h_next->h_next->h_next->h_next->h_next->h_next->h_next->v_next->h_next->h_next;
//_contours = _contours->v_next;
    cvZero( cnt_img );
    cvDrawContours( cnt_img, _contours, CV_RGB(255,0,0), CV_RGB(0,255,0), _levels);//, 3, CV_AA, cvPoint(0,0) );
    /*_levels:
3,所有外輪廓及包含的內輪廓及裏面的內輪廓
2:所有外輪廓及包含的內輪廓
1:所有外輪廓
0,第一個外輪廓
-1:第一個外輪廓及包含的內輪廓
-2:第一個外輪廓及包含的內輪廓及裏面的內輪廓


   _contours->h_next:同級的下一個輪廓
_contours->v_next父級下的下層區域;
*/
cvShowImage( "contours", cnt_img );
    cvReleaseImage( &cnt_img );
}

int main( int argc, char** argv )
{
    int i, j;
    CvMemStorage* storage = cvCreateMemStorage(0);
    IplImage* img = cvCreateImage( cvSize(w,w), 8, 1 );

    cvZero( img );

    for( i=0; i < 6; i++ )
    {
        int dx = (i%2)*250 - 30;//0%2=0;
        int dy = (i/2)*150;
        CvScalar white = cvRealScalar(255);
        CvScalar black = cvRealScalar(0);

        if( i == 0 )
        {
            for( j = 0; j <= 10; j++ )
            {
                double angle = (j+5)*CV_PI/21;
                cvLine(img, cvPoint(cvRound(dx+100+j*10-80*cos(angle)),
                    cvRound(dy+100-90*sin(angle))),
                    cvPoint(cvRound(dx+100+j*10-30*cos(angle)),
                    cvRound(dy+100-30*sin(angle))), white, 1, 8, 0);
            }
        }

        cvEllipse( img, cvPoint(dx+150, dy+100), cvSize(100,70), 0, 0, 360, white, -1, 8, 0 );
        cvEllipse( img, cvPoint(dx+115, dy+70), cvSize(30,20), 0, 0, 360, black, -1, 8, 0 );
        cvEllipse( img, cvPoint(dx+185, dy+70), cvSize(30,20), 0, 0, 360, black, -1, 8, 0 );
        cvEllipse( img, cvPoint(dx+115, dy+70), cvSize(15,15), 0, 0, 360, white, -1, 8, 0 );
        cvEllipse( img, cvPoint(dx+185, dy+70), cvSize(15,15), 0, 0, 360, white, -1, 8, 0 );
        cvEllipse( img, cvPoint(dx+115, dy+70), cvSize(5,5), 0, 0, 360, black, -1, 8, 0 );
        cvEllipse( img, cvPoint(dx+185, dy+70), cvSize(5,5), 0, 0, 360, black, -1, 8, 0 );
        cvEllipse( img, cvPoint(dx+150, dy+100), cvSize(10,5), 0, 0, 360, black, -1, 8, 0 );
        cvEllipse( img, cvPoint(dx+150, dy+150), cvSize(40,10), 0, 0, 360, black, -1, 8, 0 );
        cvEllipse( img, cvPoint(dx+27, dy+100), cvSize(20,35), 0, 0, 360, white, -1, 8, 0 );
        cvEllipse( img, cvPoint(dx+273, dy+100), cvSize(20,35), 0, 0, 360, white, -1, 8, 0 );
    }

    cvNamedWindow( "image", 1 );
    cvShowImage( "image", img );

    cvFindContours( img, storage, &contours, sizeof(CvContour),
                    2, CV_CHAIN_APPROX_SIMPLE, cvPoint(0,0) );

    // comment this out if you do not want approximation
    contours = cvApproxPoly( contours, sizeof(CvContour), storage, CV_POLY_APPROX_DP, 3, 1 );
 //cvApproxPoly:                                                 逼近方法     精度 逼近曲線是否封閉


    cvNamedWindow( "contours", 1 );
    cvCreateTrackbar( "levels+3", "contours", &levels, 7, on_trackbar );

    on_trackbar(0);
    cvWaitKey(0);
    cvReleaseMemStorage( &storage );
    cvReleaseImage( &img );

    return 0;
}主要還是理解下int mode=CV_RETR_LIST,int method=CV_CHAIN_APPROX_SIMPLE,CvPoint offset=cvPoint(0,0));
當mode 爲CV_RETR_CCOMP 只把圖像分爲兩個層次,頂層和次層,一等級輪廓只匹配與其最接近 ;
cvDrawContours 函數第5個參數爲 max_level=0時,笑臉圖像會顯示第一個找到的輪廓,左邊的白色耳朵一隻;
max_level=1時,所有白色區域的輪廓都會被顯示出來,因爲他們都屬於等級1;
max_level=2時;每個白色區域裏面的黑色區域會被顯示出來,可能一個白色區域下面有多個黑色區域,但他們都是同級的;
這裏你要注意的的是每個白色區域下的黑色區域,如臉下面有4個黑色區域,白色眼珠下有一個黑色區域,這個黑色區域與臉下的那三個區域時同級的,也就是說他不屬於臉的內區域,他是白色眼珠的內區域;
當mode爲 CV_RETR_LIST 全部輪廓均爲1級