搭建環境:一臺主機 192.168.56.12
安裝nginx,mysql,php
關閉防火牆,selinux
1.編譯安裝nginx
//創建系統用戶
[root@hyj ~]# useradd -r -M -s /sbin/nologin nginx
//安裝依賴環境
[root@hyj ~]# yum -y install pcre-devel openssl openssl-devel gd-devel
[root@hyj ~]# yum -y groups mark install 'Development Tools'
//創建日誌存放目錄,並更改屬主屬主
[root@hyj ~]# mkdir -p /var/log/nginx
[root@hyj ~]# chown -R nginx.nginx /var/log/nginx
//下載nginx,可在官網先下來
[root@hyj ~]# cd /usr/src/
[root@hyj src]# ls
debug kernels
[root@hyj src]# ls
debug kernels nginx-1.14.0.tar.gz
//編譯安裝
[root@hyj src]# cd nginx-1.14.0
[root@hyj nginx-1.14.0]# ./configure \
--prefix=/usr/local/nginx \
--user=nginx \
--group=nginx \
--with-debug \
--with-http_ssl_module \
--with-http_realip_module \
--with-http_image_filter_module \
--with-http_gunzip_module \
--with-http_gzip_static_module \
--with-http_stub_status_module \
--http-log-path=/var/log/nginx/access.log \
--error-log-path=/var/log/nginx/error.log
出現 checking for OS
- Linux 3.10.0-693.el7.x86_64 x86_64
checking for C compiler ... not found
./configure: error: C compiler cc is not found
則需要安裝依賴包gcc
[root@hyj nginx-1.14.0]# yum install gcc -y
[root@hyj nginx-1.14.0]# make && make install
//配置環境變量並使其生效
[root@hyj ~]# echo 'export PATH=/usr/local/nginx/sbin:$PATH' > /etc/profile.d/nginx.sh
[root@hyj ~]# . /etc/profile.d/nginx.sh
//服務控制方式,使用nginx命令
-t //檢查配置文件語法
-v //輸出nginx的版本
-c //指定配置文件的路徑
-s //發送服務控制信號,可選值有{stop,quit,reopen,reload}
//啓動nginx
[root@hyj ~]# nginx
[root@hyj ~]# ss -antl
State Recv-Q Send-Q Local Address:Port Peer Address:Port
LISTEN 0 128 :80 :
LISTEN 0 128 :22 :
LISTEN 0 100 127.0.0.1:25 :
LISTEN 0 128 :::22 :::
LISTEN 0 100 ::1:25 :::
2.安裝mysql二進制包
//安裝依賴包
[root@hyj ~]# yum -y install ncurses-devel openssl-devel openssl cmake mariadb-devel
//創建用戶和組
[root@hyj ~]# groupadd -r -g 306 mysql
[root@hyj ~]# useradd -M -s /sbin/nologin -g 306 -u 306 mysql
//下載軟件包
[root@hyj ~]# cd /usr/src/
[root@hyj src]# wget https://downloads.mysql.com/archives/get/file/mysql5.7.22linuxglibc2.12x86_64.tar.gz
// 解壓至/usr/local
[root@hyj src]# tar xf mysql-5.7.22-linux-glibc2.12-x86_64.tar.gz -C /usr/local/
[root@hyj src]# cd /usr/local/
[root@hyj local]# ls
bin games lib libexec nginx share
etc include lib64 mysql-5.7.22-linux-glibc2.12-x86_64 sbin src
[root@hyj local]# ln -sv mysql-5.7.22-linux-glibc2.12-x86_64/ mysql
‘mysql’ -> ‘mysql-5.7.22-linux-glibc2.12-x86_64/’
//更改/usr/local/mysql的屬主屬組
[root@hyj local]# chown -R mysql.mysql /usr/local/mysql
[root@hyj local]# ll -d /usr/local/mysql
lrwxrwxrwx. 1 mysql mysql 36 Aug 25 22:00 /usr/local/mysql -> mysql-5.7.22-linux-glibc2.12-x86_64/
//添加環境變量
[root@hyj ~]# ls /usr/local/mysql
bin COPYING docs include lib man README share support-files
[root@hyj ~]# echo 'export PATH=/usr/local/mysql/bin:$PATH' > /etc/profile.d/mysql.sh
[root@hyj ~]# . /etc/profile.d/mysql.sh
[root@hyj ~]# echo $PATH
/usr/local/mysql/bin:/usr/local/nginx/sbin:/usr/local/sbin:/usr/local/bin:/usr/sbin:/usr/bin:/root/bin
//建立數據存放目錄,並更改屬主屬組
[root@hyj ~]# mkdir /opt/data
[root@hyj ~]# chown -R mysql.mysql /opt/data/
[root@hyj ~]# ll /opt/
total 0
drwxr-xr-x. 2 mysql mysql 6 Aug 25 22:02 data
//初始化數據庫
[root@hyj ~]# /usr/local/mysql/bin/mysqld --initialize --user=mysql --datadir=/opt/data/
//初始化後會在屏幕輸出內容最後一行產生一個隨機密碼,需要記下來登錄數據庫用
[root@hyj ~]# echo 'fWqjgTJxt7*R' > /etc/pass.txt
//配置mysql
[root@hyj ~]# ln -sv /usr/local/mysql/include/ /usr/local/include/mysql
‘/usr/local/include/mysql’ -> ‘/usr/local/mysql/include/’
[root@hyj ~]# echo '/usr/local/mysql/lib' > /etc/ld.so.conf.d/mysql.conf
[root@hyj ~]# ldconfig -v
//生成配置文件
[root@hyj ~]# cat > /etc/my.cnf <<EOF
[mysqld]
basedir = /usr/local/mysql
datadir = /opt/data
socket = /tmp/mysql.sock
port = 3306
pid-file = /opt/data/mysql.pid
user = mysql
skip-name-resolve
EOF
//配置服務啓動腳本
[root@hyj ~]# cp -a /usr/local/mysql/support-files/mysql.server /etc/init.d/mysqld
[root@hyj ~]# sed -ri 's#^(basedir=).#\1/usr/local/mysql#g' /etc/init.d/mysqld
[root@hyj ~]# sed -ri 's#^(datadir=).#\1/opt/data#g' /etc/init.d/mysqld
//啓動mysql
[root@hyj ~]# service mysqld start
Starting MySQL.Logging to '/opt/data/hyj.com.err'.
. SUCCESS!
//登錄數據庫修改密碼
[root@hyj ~]# cat /etc/pass.txt
fWqjgTJxt7R
[root@hyj ~]# mysql -uroot -pfWqjgTJxt7R
mysql: [Warning] Using a password on the command line interface can be insecure.
Welcome to the MySQL monitor. Commands end with ; or \g.
Your MySQL connection id is 2
Server version: 5.7.22
...
...
mysql> set password=password('ran1027.');
Query OK, 0 rows affected, 1 warning (0.01 sec)
mysql> quit
Bye
3.安裝php
//配置yum源
[root@hyj ~]# cd /etc/yum.repos.d/
[root@hyj yum.repos.d]# wget http://mirrors.163.com/.help/CentOS7-Base-163.repo
[root@hyj yum.repos.d]# sed -i 's/\$releasever/7/g' /etc/yum.repos.d/CentOS7-Base-163.repo
[root@hyj yum.repos.d]# sed -i 's/^enabled=.*/enabled=1/g' /etc/yum.repos.d/CentOS7-Base-163.repo
//安裝擴展源
[root@hyj yum.repos.d]# yum -y install epel-release
//安裝依賴包
[root@hyj ~]# yum -y install libxml2 libxml2-devel openssl openssl-devel bzip2 bzip2-devel libcurl libcurl-devel libjpeg libjpeg-devel libpng libpng-devel freetype freetype-devel gmp gmp-devel libmcrypt libmcrypt-devel readline readline-devel libxslt libxslt-devel mhash mhash-devel
//下載php
[root@hyj ~]# cd /usr/src/
[root@hyj src]# wget http://cn.php.net/distributions/php-7.2.8.tar.xz
//編譯安裝php
[root@hyj src]# tar xf php-7.2.8.tar.xz
[root@hyj src]# cd php-7.2.8
[root@hyj php-7.2.8]# ./configure --prefix=/usr/local/php7 \
--with-curl \
--with-freetype-dir \
--with-gd \
--with-gettext \
--with-iconv-dir \
--with-kerberos \
--with-libdir=lib64 \
--with-libxml-dir=/usr \
--with-mysqli=/usr/local/mysql/bin/mysql_config \
--with-openssl \
--with-pcre-regex \
--with-pdo-mysql \
--with-pdo-sqlite \
--with-pear \
--with-jpeg-dir \
--with-png-dir \
--with-xmlrpc \
--with-xsl \
--with-zlib \
--with-config-file-path=/etc \
--with-config-file-scan-dir=/etc/php.d \
--with-bz2 \
--enable-fpm \
--enable-bcmath \
--enable-libxml \
--enable-inline-optimization \
--enable-mbregex \
--enable-mbstring \
--enable-opcache \
--enable-pcntl \
--enable-shmop \
--enable-soap \
--enable-sockets \
--enable-sysvsem \
--enable-xml \
--enable-zip
[root@hyj ~]# make && make install
//安裝後配置
[root@hyj ~]# echo 'export PATH=/usr/local/php7/bin:$PATH' > /etc/profile.d/php7.sh
[root@hyj ~]# source /etc/profile.d/php7.sh
[root@hyj ~]# which php
/usr/local/php7/bin/php
[root@hyj ~]# php -v
PHP 7.2.8 (cli) (built: Aug 25 2018 22:34:56) ( NTS )
Copyright (c) 1997-2018 The PHP Group
Zend Engine v3.2.0, Copyright (c) 1998-2018 Zend Technologies
//配置php-fpm
[root@hyj php-7.2.8]# cp php.ini-production /etc/php.ini
[root@hyj php-7.2.8]# cp sapi/fpm/init.d.php-fpm /etc/init.d/php-fpm
[root@hyj php-7.2.8]# chmod +x /etc/rc.d/init.d/php-fpm
[root@hyj php-7.2.8]# cp /usr/local/php7/etc/php-fpm.conf.default /usr/local/php7/etc/php-fpm.conf
[root@hyj php-7.2.8]# cp /usr/local/php7/etc/php-fpm.d/www.conf.default /usr/local/php7/etc/php-fpm.d/www.conf
//編輯php-fpm的配置文件(/usr/local/php7/etc/php-fpm.conf)
//配置相關選項爲自己所需要的值
[root@hyj ~]# vim /usr/local/php7/etc/php-fpm.conf
...
...
pm.max_children = 50 //最多同時提供50個進程提供50個併發服務
pm.start_servers = 5 //啓動時啓動5個進程
pm.min_spare_servers = 2 //最小空閒進程數
pm.max_spare_servers = 8 //最大空閒進程數
//啓動php-fpm
//默認情況下,fpm監聽在127.0.0.1的9000端口
[root@hyj ~]# service php-fpm start
Starting php-fpm done
[root@hyj ~]# ss -antl
State Recv-Q Send-Q Local Address:Port Peer Address:Port
LISTEN 0 128 :80 :
LISTEN 0 128 :22 :
LISTEN 0 100 127.0.0.1:25 :
LISTEN 0 128 127.0.0.1:9000 :
LISTEN 0 128 :::22 :::
LISTEN 0 100 ::1:25 :::
LISTEN 0 80 :::3306 :::*
4.配置nginx
FastCGI的相關配置參數
LNMP:php需要啓用fpm模型
配置如下:
[root@hyj ~]# vim /usr/local/nginx/conf/nginx.conf
  location / {
        root html;
        index index.html index.htm;
    }
//添加以下內容,php腳本請求全部轉發到FastCGI處理,使用默認配置
location ~ .php$ {
fastcgi_pass 127.0.0.1:9000;
fastcgi_index index.php;
fastcgi_param SCRIPT_FILENAME $document_root$fastcgi_script_name;
include fastcgi_params;
}
//配置完後重新加載nginx
[root@hyj ~]# nginx -s reload
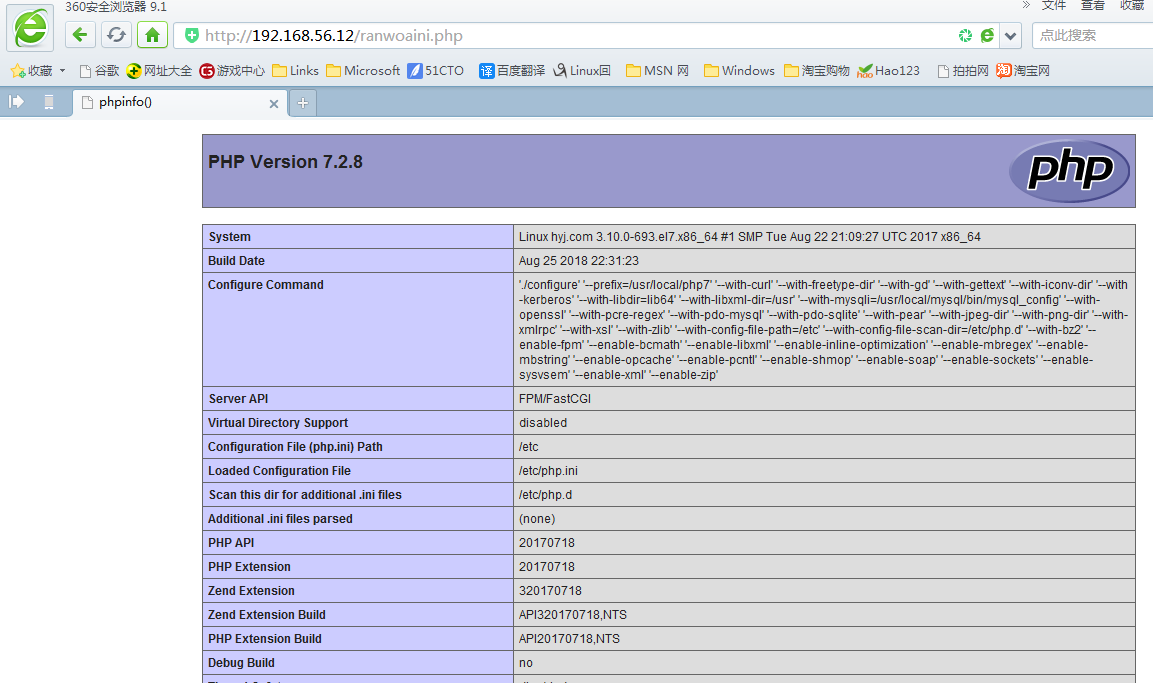
//在nginx下的html目錄下創建測試文件
[root@hyj ~]# cd /usr/local/nginx/html/
[root@hyj html]# cat > ranwoaini.php <<EOF
<?php
phpinfo();
?>
EOF
在瀏覽器上輸入192.168.56.12/ranwoaini.php訪問,出現以下界面則說明服務搭建成功