集羣技術主要分爲三大類:
高可用性(High Available Cluster),例:Linux-HA
負載均衡(Load balancing Cluster),例:LVS、MOSIX
高性能計算(High Performance Computing),例:Beowulf
我們這裏使用 RHEL5.2,LVS,Linux-HA,Ldirectord,構造一個高可用的負載均
衡集羣系統。如圖:
Load Balancer 是整個集羣系統的前端,負責把客戶請求轉發到 Real
Server 上。
Backup 是備份 Load Balancer,當 Load Balancer 不可用時接替它,成爲
實際的 Load Balancer。
Load Balancer 通過 Ldirectord 監測各 Real Server 的健康狀況。在 Real
Server 不可用時把它從羣中剔除,恢復時重新加入。
Server Array(服務器羣)
Server Array 是一組運行實際應用服務的機器,比如 WEB, Mail, FTP, DNS,
Media 等等。
在實際應用中,Load Balancer 和 Backup 也可以兼任 Real Server 的角色。
各服務器 IP 分配:
實驗環境:rhel6.5 iptables&selinux disabled 時間同步
Virtual IP: 192.168.2.111
Load Balancer: 192.168.2.36
Backup: 192.168.2.46
Real Server 1: 192.168.2.38
Real Server 2: 192.168.2.39(四臺主機都做自己的解析)
HeartBeat
HeartBeat 是 Linux-HA 的高可用性集羣軟件,它的主要作用是:
安裝在 Load Balancer 和 Backup 上,運行於 active/standby 模式。
當 Load Balancer 失效時,Backup 自動激活,成爲實際的 Load Balancer。
切換到 active 模式時,按順序啓動 Virtual IP、IPVS 和 Ldirectord。
切換到 standby 模式時,按順序關閉 Ldirectord、IPVS 和 Virtual IP。
軟件包安裝與配置
安裝完成後進入到/etc/ha.d目錄下 在desktop37上同樣安裝這三個包
[root@desktop36 ha.d]# ls
harc ldirectord.cf README.config shellfuncs
rc.d resource.d
查看那個README.config文件
[root@desktop36 ha.d]# less README.config
 |
你會看到heartbeat的配置文件在 /usr/share/doc/heartbeat-3.0.4/
進到這個目錄下
[root@desktop36 heartbeat-3.0.4]# ls
apphbd.cf AUTHORS COPYING ha.cf README
authkeys ChangeLog COPYING.LGPL haresources
把這三個標註爲紅色的文件cp到/etc/ha.d/下
[root@desktop36 heartbeat-3.0.4]# cp authkeys haresources ha.cf /etc/ha.d/
主配置文件(/etc/ha.d/ha.cf):
debugfile /var/log/ha-debug
調試日誌文件文件,取默認值
logfile /var/log/ha-log
系統運行日誌文件,取默認值
logfacility local0
日誌等級,取默認值
keepalive 2
心跳頻率,自己設定。1:表示 1 秒;200ms:表示 200 毫秒
deadtime 30
節點死亡時間閥值,就是從節點在過了 30 後還沒有收到心跳就認爲主節點死亡,自己設定
warntime 10
發出警告時間,自己設定
initdead 120
守護進程首次啓動後應該等待 120 秒後再啓動主服務器上的資源
udpport 694
心跳信息傳遞的 udp 端口,使用端口 694 進行 bcast 和 ucast 通信,取默認值
#baud 19200
串口波特率,與 serial 一起使用。
#serial /dev/ttyS0
採用串口來傳遞心跳信息。
bcast eth10
採用 udp 廣播播來通知心跳
#ucast eth1 10.0.0.3
採用網卡 eth1 的 udp 單播來通知心跳,eth1 的 IP
#mcast eth0 225.0.0.1 694 1 0
採用 udp 多播播來通知心跳
auto_failback on
當主節點恢復後,是否自動切回
#stonith baytech /etc/ha.d/conf/stonith.baytech
stonith 用來保證共享存儲環境中的數據完整性
watchdog /dev/watchdog
watchdog 能讓系統在出現故障 1 分鐘後重啓該機器,這個功能可以幫助服務器在確實停止心
跳後能夠重新恢復心跳。 如果使用該特性,修改系統中/etc/modprobe.conf, 添加如下行
options softdog nowayout=0
這樣在系統啓動的時候,在內核中裝入"softdog"內核模塊,用來生成實際的設備文件
/dev/watchdog
node desktop36.example.com
主節點名稱,與 uname –n 保持一致。排在第一的默認爲主節點,所以不要搞措順序
node desktop46.example.com
副節點名稱,與 uname –n 保持一致
ping 192.168.0.254
respawn hacluster /usr/lib64/heartbeat/ipfail
apiauth ipfail gid=haclient uid=hacluster
默認 heartbeat 並不檢測除本身之外的其他任何服務,也不檢測網絡狀況。
所以當網絡中斷時,並不會進行 Load Balancer 和 Backup 之間的切換。
可以通過 ipfail 插件,設置'ping nodes'來解決這一問題,但不能使用一個集羣節點作爲
ping 的節點。
資源文件(/etc/ha.d/haresources):
desktop36.example.com Ipaddr::192.168.2.111/24/eth0:0 ldirectord httpd
這個文件中定義了實現集羣所需的各個軟件的啓動腳本,這些腳本必須放在/etc/init.d 或者
/etc/ha.d/resource.d 目錄裏 IPaddr 的作用是啓動 Virutal IP,它是 HeartBeart 自帶的一個
腳本;ldirectord 的作用是啓動 ldirectord 監控程序,它會使 ldirectord.cf 中定義的 lvs 生效,
並監聽其健康狀;httpd 是 apache 服務的啓動腳本。
認證文件(/etc/ha.d/authkeys),文件的權限必須是 600:
auth 3
1 crc
#2 sha1 HI!
#3 md5 Hello!
配置 ip_forward
vi /etc/sysctl.conf
net.ipv4.ip_forward = 1
sysctl -p
以上是 desktop36.example.com 主心跳上的配置,進入 desktop46.example.com 備份心跳
重複以上安裝配置,切記/etc/ha.d/目錄下的 authkeys、haresources、 ha.cf
三個文件必須和 desktop36.example.com 上的相同.
分別在主備心跳上啓動 heartbeat 服務:
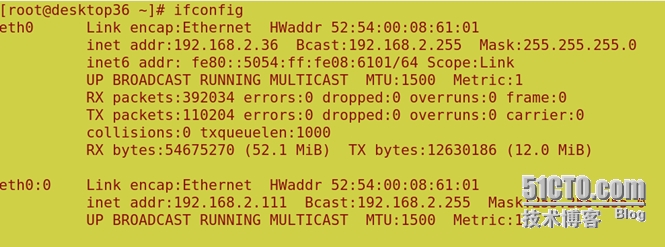
分別查看日誌,是否有報錯,服務正常的話 desktop36 上多了個 eth0:0 接口,若沒有出現,
請等待一會,再使用 ifconfig 查看,若還是沒有 eth0:0 接口出現,檢查配置文件是否正確!
若停止 desktop36 上的 heartbeat 服務,則 desktop46 會接管,併產生一個 eth0:0 接口!
IPVS
IPVS 是 LVS 集羣系統的核心軟件,它的主要作用是:
安裝在 Load Balancer 上,把發往 Virtual IP 的請求轉發到 Real Server 上。
IPVS 的負載均衡機制有三種,這裏使用 IP Tunneling 機制:
Virtual Server via NAT
Virtual Server via IP Tunneling
Virtual Server via Direct Routing
IPVS 的負載調度算法有十種:
輪叫(Round Robin)
加權輪叫(Weighted Round Robin)
少鏈接(Least Connections)
加權最少鏈接(Weighted Least Connections)
基於局部性的最少鏈接(Locality-Based Least Connections)
帶複製的基於局部性最少鏈接(Locality-Based Least Connections with
Replication)
目標地址散列(Destination Hashing )
源地址散列(Source Hashing)
最短期望延遲(Shortest Expected Delay)
無須隊列等待(Never Queue)
接下來在兩臺主備心跳上安裝ipvsadm ; yum install ipvsadm -y
ipvsadm -A -t 192.168.2.111:80 -s rr 採用輪叫算法
ipvsadm -a -t 192.168.2.111:80 -r 192.168.2.38:80 -g
ipvsadm -a -t 192.168.2.111:80 -r 192.168.2.39:80 -g (把發往 Virtual IP 的請求轉發到 Real Server 上。)
用ipvsadm -l 查看連接狀況
配置 arp 機制:
在兩臺realserver上安裝arptables_jf
[root@desktop38 ~]# yum install arptables_jf -y
[root@desktop39 ~]# yum install arptables_jf -y
[root@desktop38 ~]# ifconfig eth0:0 192.168.2.111 netmask 255.255.255.255
[root@desktop39 ~]# ifconfig eth0:0 192.168.2.111 netmask 255.255.255.255(添加虛擬IP)
[root@desktop38 ~]arptables -A IN -d 192.168.2.111 -j DROP
[root@desktop38 ~]arptables -A OUT -s 192.168.2.111 -j mangle --mangle-ip-s 192.168.2.38
[root@desktop39 ~]arptables -A IN -d 192.168.2.111 -j DROP
[root@desktop39 ~]arptables -A OUT -s 192.168.2.111 -j mangle --mangle-ip-s 192.168.2.39
/etc/init.d/arptables_jf save
/etc/init.d/arptables_jf start
這表示從虛擬IP進來的都DROP掉,從realIP出去的都是以虛擬IP的身份。
ldirectord
它的作用是:
監測 Real Server,當 Real Server 失效時,把它從 Load Balancer 列表中
刪除,恢復時重新添加。
在兩臺主備心跳上安裝ldirectord
yum localinstall ldirectord-3.9.2-1.2.x86_64.rpm
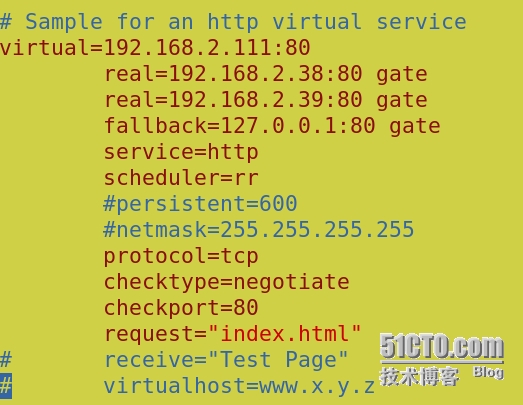
配置(/etc/ha.d/ldirectord.cf):
然後兩臺主備心跳都啓動ldirectord
#/etc/init.d/ldirectord start
這時可能會出現一個問題 只要安裝 yum install perl-IO-Socket-INET6 -y就OK了。
最後在兩臺realserver上安裝httpd用來測試 並且在/var/www/html/下寫入測試文件
echo `hostname` > /var/www/html/index.html 然後啓動httpd
測試:
訪問 http://192.168.2.111,看到頁面在兩個 realserver 上切換表示成功!
你也可以通過 ipvsadm -L 查看詳細連接情況! OK!


