Nginx
1、準備工作
下載安裝:nginx.org 下載1.10包
放到家目錄下 解壓
tar -zxf nginx-1.10.1.tar.gz
源碼安裝需要三步:
在nginx解壓後的目錄內進行操作(確定80端口未被佔用)
1. ./configure
./configure --prefix=/usr/local/lnmp/nginx(默認安裝位置) --with-http_ssl_module (自動編譯)--with-http_stub_status_module(測試模塊)
提示錯誤:缺少安裝包
yum install pcre-devel -y yum install -y openssl-devel
2. make (編譯)
3. make install (生成)
cd /usr/local/lnmp/nginx/sbin/ ./nginx (打開nginx)
curl -I 172.25.15.11 (可以查看到)
或者用火狐瀏覽器查看 可以查看到
2、刪除卸載 nginx
在 /usr/local/lnmp/nginx/sbin/ 下 執行 ./nginx -s stop (停止nginx)
rm -fr /usr/local/lnmp/nginx
在 解壓後的目錄內 make clean
或者乾脆點:刪除家目錄下的 解壓後的文件 重新解壓。
3、隱藏nginx版本號 關閉測試模式(會導致軟件很大)
重新解壓後 進入解壓後的目錄內
vim src/core/nginx.h (隱藏版本號)
vim auto/cc/gcc (關閉測試模式)
註釋掉 179行 然後 進行 ./configure && make && make install
鏈接nginx 到系統下 可以直接執行nginx命令
ln -s /usr/local/lnmp/nginx/sbin/nginx /usr/local/sbin/
which nginx (可以查看到nginx)
在系統下 輸入 nginx (開啓)
nginx -s stop (關閉)
nginx -s reload (重載)
nginx -t 檢查配置文件語法問題
4、動態模塊和靜態模塊
重新配置一個nginx
./configure --prefix=/tmp/nginx --with-ngx_mail_module=dynamic(添加動態模塊)
在/tmp/nginx/ 下多了一個modules (目錄內的模塊爲動態模塊)
可以在配置文件 /tmp/nginx/conf/nginx.conf 中的第一行調用動態模塊
(apache中早就支持nginx剛出)
5、給nginx進程添加用戶
ps aux 可以查看到 nginx進程的worker爲nobody
創建一個nginx用戶:useradd -s /sbin/nologin nginx
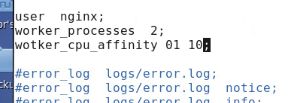
在主配置文件中修改 /usr/local/lnmp/nginx/conf/nginx.conf
Io負用方法:use epoll
併發鏈接數:worker_connections 4096 X 2 (cpu數)
用戶爲 nginx 線程數爲2 綁定任務到 cpu的兩個核
6、設置用戶的最大進程數,文件數
vim /etc/security/limits.conf
最大進程數爲100
shell炸彈::(){ :|:& }; : (無限調用函數一直到系統資源枯竭 然後會卡住,所以要限制普通用戶的最大進程數)
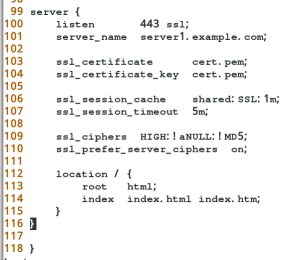
7、nginx 開啓443端口
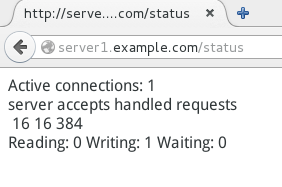
網頁測試:
修改配置文件: /usr/local/lnmp/nginx/conf/nginx.conf
nginx -t (檢測語法錯誤)
nginx -s reload (重載nginx)
在網頁測試: server1.example.com/status 刷新
修改配置文件: /usr/local/lnmp/nginx/conf/nginx.conf server{} 就是個虛擬主機
在/etc/pki/tls/certs/ 下 輸入指令make cert.pem(你想生成的ca證書)
輸入證書的相關信息。將證書移動到 /usr/local/lnmp/nginx/conf/ 下
Nginx -t nginx -s reload
訪問https://server1.example.com 可以查看到。
網頁重寫:
1.修改發佈首頁的方法
查看百度的源代碼頁 然後把代碼寫入發佈首頁 /usr/local/lnmp/nginx/html/index.html
2.網頁重定向的方法
在80端口下的虛擬主機中加入
nginx -s reload 訪問 server1.example.com 可以跳轉。


