本文轉載自大神博客:
linux下自建ssh堡壘機:http://www.361way.com/linux-diy-fort-machine/3135.html
使用google Authenticator加強ssh: http://www.361way.com/google-authenticator-ssh/2186.html
開源web終端ssh解決方案-gateone簡介:http://itnihao.blog.51cto.com/1741976/1311506
一、安裝相關包
1、安裝相關包
yum -y install wget gcc make pam-devel libpng-devel
2、安裝qrencode
wget http://fukuchi.org/works/qrencode/qrencode-3.4.1.tar.gz
tar zxf qrencode-3.4.1.tar.gz
cd qrencode-3.4.1
./configure --prefix=/usr && make && make install
該軟件爲非必須包,其主要用於在終端下生成二維碼用。
3、google authenticator PAM插件安裝
該插件有兩種安裝方式,一種是通過下載tar.gz包安裝,一種是通過git下載安裝。
tar.gz包安裝:
wget http://google-authenticator.googlecode.com/files/libpam-google-authenticator-1.0-source.tar.bz2
tar jxf libpam-google-authenticator-1.0-source.tar.bz2
cd libpam-google-authenticator-1.0
make && make install
git下載安裝:
git clone https://code.google.com/p/google-authenticator/
cd google-authenticator/libpam/
make install
二、使用google Authenticator加強ssh:
ssh本身是一個非常安全的認證連接方式。不過由於人過等方面的原因,難免會造成密碼的泄露。針對這種問題我們不妨給ssh再加一把鎖。當然,增加這層鎖的方式有很多種。例如:knockd、S/KEY、OPIE/OPTW、Two-factor authentication等(以上列舉的幾種方式中可能互相包含,有興趣的可以去維基百科上查下,進而細分下)。而今天講到的Google Authenticator就屬於Two-factor authentication的代表。
1、配置google-authenticator
安裝完成後會在/lib64/security/目錄生成pam_google_authenticator.so文件,如果是32位系統會在/lib/security/目錄生成。除此之外,系統還會多在/usr/local/bin目錄生成一個google-authenticator可執行文件,運行該命令。
[root@localhost /]# google-authenticator
Do you want authentication tokens to be time-based (y/n) y
https://www.google.com/chart?chs=200x200&chld=M|0&cht=qr&chl=otpauth://totp/[email protected]%3Fsecret%3DIO4SZL7YYHOTFNQJ
Your new secret key is: IO4SZL7YYHOTFNQJ
Your verification code is 236731
Your emergency scratch codes are:
98144901
30891929
79811882
84230327
53670228
Do you want me to update your "/root/.google_authenticator" file (y/n) y
Do you want to disallow multiple uses of the same authentication
token? This restricts you to one login about every 30s, but it increases
your chances to notice or even prevent man-in-the-middle attacks (y/n) y
By default, tokens are good for 30 seconds and in order to compensate for
possible time-skew between the client and the server, we allow an extra
token before and after the current time. If you experience problems with poor
time synchronization, you can increase the window from its default
size of 1:30min to about 4min. Do you want to do so (y/n) n
If the computer that you are logging into isn't hardened against brute-force
login attempts, you can enable rate-limiting for the authentication module.
By default, this limits attackers to no more than 3 login attempts every 30s.
Do you want to enable rate-limiting (y/n) y
注:
1.1、如果安裝了qrencode包,會在出現google的鏈接後出一個二維碼圖標。方便手持設備掃描。當然,沒裝該包,可以打開https開頭的url,打開也是一個二維碼圖片,同qrencode在終端下生成的是一樣的。
1.2、"Your emergency scratch codes are:"下面的五個碼用於在取不到或錯的驗證碼有錯時,用於應急用的。不過每個只能用一次,不能重複使用。
1.3、第四處選擇項是由於選擇是否開啓時間容錯。如果客戶端設備具有很好的同時間服務器同步功能,建議此處選擇n。如果客戶端設備(手機、ipad等)不具有很好的同ntp時間同步的功能,可以設爲y —— 即開啓時間容錯。
2、ssh調用及客戶端配置
2.1、sshd服務配置
按以上方式配置完成以後,是沒有程序去調用的。想要ssh調用,還需要在pam.d認證上進行配置。打開 /etc/pam.d/sshd 文件在第一行添加
auth required pam_google_authenticator.so
再打開 /etc/ssh/sshd_config 文件
ChallengeResponseAuthentication no
把上面配置改成
ChallengeResponseAuthentication yes
service ssh restart重啓ssh服務生效。
2.2、客戶端配置
獲取30秒一次的動態碼的客戶端是瀏覽器(僅支持chrome、firefox)、Android設備、蘋果IOS設備、Blackberry、WP手持設備。各自程序的下載地址爲:
chrome google-authenticator插件
firefox google-authenticator插件
手機應用下載地址 (該手機鏈接提示支持symbian系統,不過經本人手機測試,發現應用安裝完以後賬戶add沒用反應)
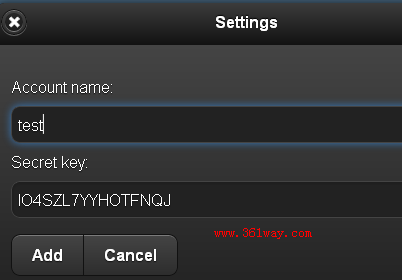
帳戶名可以隨意添寫,安全key即爲剛剛運行google-authenticator命令後生成的,add增加完成後。就會每過30秒新生成一個驗證碼。此時可以通過另外一臺主機連接的方式如下:
[root@localhost ~]# ssh [email protected]
Verification code:
Password:
Last login: Fri Jan 4 16:27:57 2013 from 192.168.10.11
[root@localhost ~]#
注:
1、如果命使用SecureCRT客戶端登錄時,需要在 連接——屬性——連接——ssh2——"鑑權/authenicaion" 中將 "鍵盤交互/keyboard Interactive" 調到第一位。不然連接會出錯。
2、以上安全配置對於ssh密鑰認證方式進行的登錄無效——即在pam配置中增加上面的配置後,通過密鑰認證時不會要求輸入驗證碼 。
三、 linux下自建ssh堡壘機
1、原理及原則
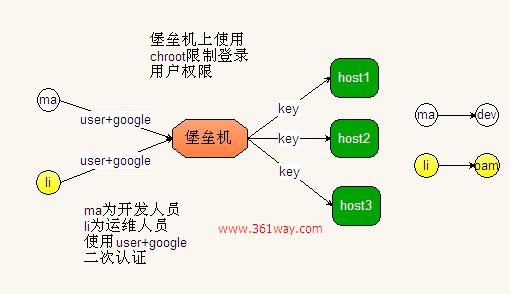
原理如上圖所示,原則如下:
1、所有主機的連接都通過/etc/hosts.deny和/etc/hosts.allow控制只允許兩臺堡壘機連接(冗餘考慮,避免一旦壞了所有主機都無法連接,這裏圖上只畫了一個)。
2、所有主機關閉密碼認證方式,只允許key認證。但切換用戶可以使用su - 用戶名 的方式進行切換。
3、角色控制,雖然連接到堡壘機上的各用戶名密碼不同,但後端所有的服務器按角色進行區分,如運維人員到後端服務器統一成oam用戶、開發人員統一成dev用戶。
4、堡壘機使用用戶名+google authenticator+密碼的方式認證。登錄用戶在堡壘機上的權限是受chroot限制的。
2、ssh服務配置
在/etc/pam.d/sshd中首行添加
auth required pam_google_authenticator.so
在/etc/ssh/sshd_config中修改:
ChallengeResponseAuthentication 將no改爲yes
UsePAM 將no改爲yes
3、chroot配置
修改/etc/ssh/sshd_config:
ChrootDirectory /var/chroot
創建模擬系統環境:
mkdir /var/chroot/
cd /var/chroot/
mkdir {bin,dev,lib,lib64,etc,home}
創建塊設備,並賦予所有用戶可執行權限,null,zero,tty這三個模擬設備需要所有用戶可寫:
mknod dev/null c 1 3
mknod dev/zero c 1 5
mknod dev/random c 1 8
mknod dev/urandom c 1 9
mknod dev/tty c 5 0
chmod -R 755 /var/chroot/
chmod 0666 dev/{null,zero,tty}
注:這裏塊設備是在/var/chroot/dev目錄下創建的,上面的dev前面是沒加/的。mknod的用法也可以參看百度百科上的介紹。
複製lib庫文件到chroot環境下:
#!/bin/bash
ldd /bin/bash /bin/ls /bin/cp /bin/mkdir /bin/mv /bin/rm /bin/rmdir|awk '{print $1}'|grep "/lib64" >> liblist
ldd /bin/bash /bin/ls /bin/cp /bin/mkdir /bin/mv /bin/rm /bin/rmdir|awk '{print $3}'|grep "/lib64" >> liblist
for libfile in `sort liblist|uniq`
do
cp -p $libfile /var/chroot/lib64/
done
特別注意的是還需要增加libnss庫文件的支持,不然ssh登錄時會報“You don't exist, go away!”的錯誤,操作命令如下:
cp /lib64/libnss_* lib64/
以上操作都是64位系統下進行的,如果是32系統,直接使用lib目錄下的庫文件。
最後就是鏈接sh到bash,操作如下:
cd /var/chroot/bin
ln -s bash sh
4、創建用戶及密鑰文件
創建用戶及passwd、group文件
useradd yang
passwd yang --abc123
grep ^yang /etc/passwd > /var/chroot/etc/passwd
grep ^yang /etc/group > /var/chroot/etc/group
創建用戶chroot家目錄
cd /var/chroot
mkdir home/yang
chown -R yang:yang home/yang
chmod 700 -R home/*
創建密鑰文件
$ ssh-keygen -t rsa
Generating public/private rsa key pair.
Enter file in which to save the key (/home/yang/.ssh/id_rsa):/var/chroot/home/yang/.ssh/id_rsa
最後將生成的id_rsa.pub文件的內容傳到後端受保護機相對應用戶的.ssh/authorized_keys文件中,當然批量機器的話建議使用puppet、saltstack這類的自動化工具實現。
5、google認證
切換到相應的用戶,例如,我這裏是su - yang,執行google-authenticator命令,然後就是一路的按y,這裏不再列出,可以參看之前寫的加強ssh安全的文章。
注:若要讓某賬戶不使用chroot環境,可以直接su到系統root賬戶,則須修改/etc/ssh/sshd_config配置,在文件末尾添加:
Match User 用戶名
ChrootDirectory /
6、後端服務器配置
後端主機權限配置主要有以下幾個地方可以操作
6.1、只開啓KEY認證,關掉密碼認證
RSAAuthentication yes
PasswordAuthentication no
6.2、設置hosts.allow和hosts.deny,指定允許遠程連接的主機IP(堡壘機IP)
如:
#cat /etc/hosts.allow
sshd:192.168.10.
#cat /etc/hosts.deny
ALL:ALL
記住hosts.allow的規則優先級高於hosts.deny就行了
6.3、設置只允許ssh連接的用戶(這個方法有好幾種),本步略
6.4、利用chattr給幾個特定文件權限限定死,連root用戶都只讀而無法更改,本步略
6.5、將用戶操作命令記入日誌(這個對bash有效,對個別csh等無效)
創建/etc/profile.d/sshlog.sh文件,內容如下:
PS1="`whoami`@`hostname`:"'[$PWD]'
history
USER_IP=`who -u am i 2>/dev/null| awk '{print $NF}'|sed -e 's/[()]//g'`
if [ "$USER_IP" = "" ]
then
USER_IP=`hostname`
fi
if [ ! -d /var/log/history ]
then
mkdir /var/log/history
chmod 777 /var/log/history
fi
if [ ! -d /var/log/history/${LOGNAME} ]
then
mkdir /var/log/history/${LOGNAME}
chmod 700 /var/log/history/${LOGNAME}
fi
export HISTSIZE=4096
DT=`date +"%Y%m%d_%H%M%S"`
export HISTFILE="/var/log/history/${LOGNAME}/${USER_IP}_history.$DT"
chmod 600 /var/log/history/${LOGNAME}/*history* 2>/dev/null
在/var/log/history目錄下,會在用戶登錄並退出後,創建與用戶名相同的目錄,並且記錄每次的登錄IP和時間,格式如:192.168.10.50_history.20130514_100547。
6.6、利用/etc/sudoers命令給個別組用戶一些特定權限(圖個便利)
例如:
oam ALL=(ALL) NOPASSWD: /sbin/reboot, /sbin/ifconfig
//oam爲可以以root執行命令的用戶,reboot、ifconfig爲可以執行的命令,需要完整路徑,多個命令用逗號加空格隔開


