


在沒有iDP的情況下,要想將程序放到iPhone上調試,並最終發佈IPA用於分享,需要以下幾個步驟:
1.自己爲自己頒發一個證書用於爲生成的程序簽名
2.修改工程配置以及Xcode的配置文件和二進制文件以阻止其驗證和簽名
3.通過自定義生成步驟,用僞造的證書爲應用程序簽名
4.使用一點小trick來生成IPA文件
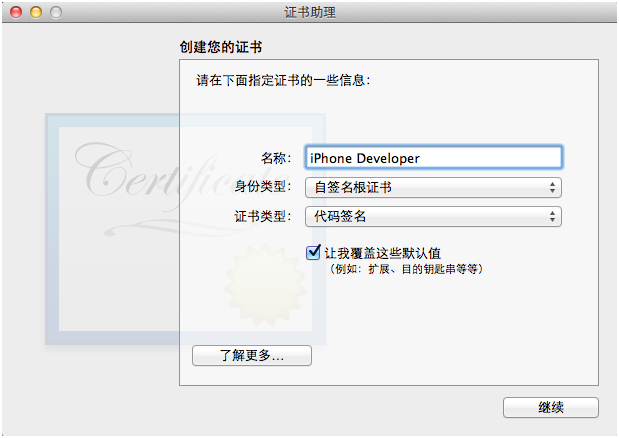
1.創建證書
創建證書的過程比較簡單,打開實用工具-鑰匙串訪問。然後在菜單欄裏點擊鑰匙串訪問-證書助理-創建證書來打開向導。第一個步驟比較重要,必須 要把名稱命名爲iPhone Developer,將類型設定爲代碼簽名,將"讓我覆蓋這些默認值"選中。之後的步驟無需更改,一路點擊“確定”和“繼續”來完成這個嚮導就可以。
2.修改Xcode的配置文件和二進制文件
下面的步驟稍微有點繁瑣,您應該瞭解UNIX命令行的基本操作,並瞭解一種命令行文本編輯器,本文使用的是vim。儘管這裏會給出完整的代碼,但是關於修改和保存代碼的基本操作,不再贅述。下面的操作請先將Xcode按Command+Q完全關閉。
(1)修改配置文件
進入目錄並備份原文件(4.1、4.2、4.3在這裏主要的差別是SDK的目錄名不同)
(Xcode4.1請執行)cd /Developer/Platforms/iPhoneOS.platform/Developer/SDKs/iPhoneOS4.3.sdk/
(Xcode4.2請執行)cd /Developer/Platforms/iPhoneOS.platform/Developer/SDKs/iPhoneOS5.0.sdk/
(Xcode4.3請執行)cd /Applications/Xcode.app/Contents/Developer/Platforms/iPhoneOS.platform/Developer/SDKs/iPhoneOS5.0.sdk
(Xcode4.3.2請執行)cd /Applications/Xcode.app/Contents/Developer/Platforms/iPhoneOS.platform/Developer/SDKs/iPhoneOS5.1.sdk
(Xcode4.5請執行)cd /Applications/Xcode.app/Contents/Developer/Platforms/iPhoneOS.platform/Developer/SDKs/iPhoneOS6.0.sdk
sudo cp SDKSettings.plist SDKSettings.plist.orig
進行編輯(Xcode 4.5之前)
sudo vim SDKSettings.plist
將以下兩段中的YES改爲NO
<key>CODE_SIGNING_REQUIRED</key>
<string>YES</string>
和
<key>ENTITLEMENTS_REQUIRED</key>
<string>YES</string>
Xcode 4.5的plist格式不再爲XML,而是改爲了Apple自己的二進制格式,我們使用Xcode本身來編輯這個plist文件,命令是
sudo /Applications/Xcode.app/Contents/MacOS/Xcode ./SDKSettings.plist
會啓動Xcode的圖形界面,我們展開DefaultProperties分支,將下面的CODE_SIGNING_REQUIRED和ENTITLEMENTS_REQUIRED兩個屬性改爲NO
下面修改另外一個文件
進入目錄並備份原文件
(Xcode4.1/4.2請執行)cd /Developer/Platforms/iPhoneOS.platform/
(Xcode4.3/4.4/4.5請執行)cd /Applications/Xcode.app/Contents/Developer/Platforms/iPhoneOS.platform
備份
sudo cp Info.plist Info.plist.orig
進行編輯
sudo vim Info.plist
將全部的XCiPhoneOSCodeSignContext 修改成 XCCodeSignContext,網上的大部分文章說有2處,但我找到了3處,可能是Xcode 4.1要多一處?(Xcode 4.2/4.3/4.3.2也有三處)總之都改掉了。提示:在在vim中輸入/要搜索的內容來搜索,按n鍵是搜索下一處。
(Xcode 4.5)編輯命令如下
sudo /Applications/Xcode.app/Contents/MacOS/Xcode /Applications/Xcode.app/Contents/Developer/Platforms/iPhoneOS.platform/Info.plist
Xcode 4.5也有三處,分別在DefaultProperties分支下、RuntimeRequirements分支下和OverrideProperties分支下。
注:我在測試時使 用命行的方式打開xcode會報錯,所以先把這兩個plist文件複製到/libs目錄下,使用命令行修改了權根,使其可以修改,如
sudo cp ./Info.plist /libs/Info.plist
sudo chmod a+w /libs/Info.plist
sudo chmod 777 /libs/Info.plist
sudo chmod a+w /libs
sudo chmod 777 /libs
試試
然後用xcode打開/libs/Info.plist進行編輯,修改好保存再sudo cp /libs/Info.plist ./Info.plist
SDKSettings.plist也一樣
(2)二進制補丁
#在桌面上建立script這個腳本
cd ~/Desktop
vim script
#(Xcode 4.1執行)在編輯器中輸入如下內容
#!/bin/bash
cd /Developer/Platforms/iPhoneOS.platform/Developer/Library/Xcode/Plug-ins/iPhoneOS\ Build\ System\ Support.xcplugin/Contents/MacOS/
dd if=iPhoneOS\ Build\ System\ Support of=working bs=500 count=255
printf "xc3x26x00x00" >> working
/bin/mv -n iPhoneOS\ Build\ System\ Support iPhoneOS\ Build\ System\ Support.original
/bin/mv working iPhoneOS\ Build\ System\ Support
chmod a+x iPhoneOS\ Build\ System\ Support
#(Xcode 4.2或4.5.2執行)在編輯器中輸入如下內容
#!/bin/bash
cd /Applications/Xcode.app/Contents/Developer/Platforms/iPhoneOS.platform/Developer/Library/Xcode/PrivatePlugIns/iPhoneOS\ Build\ System\ Support.xcplugin/Contents/MacOS/
dd if=iPhoneOS\ Build\ System\ Support of=working bs=500 count=255
printf "xc3x26x00x00" >> working
/bin/mv -n iPhoneOS\ Build\ System\ Support iPhoneOS\ Build\ System\ Support.original
/bin/mv working iPhoneOS\ Build\ System\ Support
chmod a+x iPhoneOS\ Build\ System\ Support
保存並退出。(4.1和4.2在這裏的區別也是目錄名不同,就是代碼中綠色的部分。4.1是Plug-ins而4.2是PrivatePlugIns)
授予這個腳本執行權限並執行它
chmod 777 script
./script
正常的話應該輸出(具體的數字可能有差別)
231+1 records in
231+1 records out
115904 bytes transferred in 0.001738 secs (66694555 bytes/sec)
#(Xcode 4.3注意)在Xcode 4.3版本中,我沒有找到iPhoneOS Build System Support.xcplugin這個插件,因此我跳過了這個步驟,並且最終也成功的進行了聯機調試。因此我個人認爲Xcode 4.3沒有必要執行“二進制補丁”這一步驟。請各位朋友測試~!
#(Xcode 4.3.2/4.4/4.5注意)在Xcode 4.3.2版本中,我們可以找到iPhoneOS Build System Support.xcplugin,但我沒有修改它,仍然可以進行聯機調試。這個修改步驟是從Xcode 3.X中繼承過來的,我們有理由猜測,在Xcode 4.x版本中,已經不需要修改這個文件了。(2012年5月28日更新)
至此,對SDK中配置文件和二進制文件的修改就完成了
3.準備自定義的生成後腳本
連接互聯網後執行
#(Xcode 4.1/4.2執行)
mkdir /Developer/iphoneentitlements401
cd /Developer/iphoneentitlements401
curl -O http://www.alexwhittemore.com/iphone/gen_entitlements.txt
mv gen_entitlements.txt gen_entitlements.py
chmod 777 gen_entitlements.py
#(Xcode 4.3/4.4/4.5/4.5.2執行)
mkdir /Applications/Xcode.app/Contents/Developer/iphoneentitlements
cd /Applications/Xcode.app/Contents/Developer/iphoneentitlements
curl -O http://www.alexwhittemore.com/iphone/gen_entitlements.txt
mv gen_entitlements.txt gen_entitlements.py
chmod 777 gen_entitlements.py
如果您已經聯網,則請直接轉到步驟4,如果您沒有聯網,那麼請在相應目錄手動創建gen_entitlements.py並授予其執行權限,這個文件的內容爲
#!/usr/bin/env python
import sys
import struct
if len(sys.argv) != 3:
print "Usage: %s appname dest_file.xcent" % sys.argv[0]
sys.exit(-1)
APPNAME = sys.argv[1]
DEST = sys.argv[2]
if not DEST.endswith('.xml') and not DEST.endswith('.xcent'):
print "Dest must be .xml (for ldid) or .xcent (for codesign)"
sys.exit(-1)
entitlements = """
<?xml version="1.0" encoding="UTF-8"?>
<!DOCTYPE plist PUBLIC "-//Apple//DTD PLIST 1.0//EN" "http://www.apple.com/DTDs/PropertyList-1.0.dtd">
<plist version="1.0">
<dict>
<key>application-identifier</key>
<string>%s</string>
<key>get-task-allow</key>
<true/>
</dict>
</plist>
""" % APPNAME
f = open(DEST,'w')
if DEST.endswith('.xcent'):
f.write("\xfa\xde\x71\x71")
f.write(struct.pack('>L', len(entitlements) + 8))
f.write(entitlements)
f.close()
4.修改工程設置
特別注意:本階段之前的修改配置文件、準備腳本等,只需要做一次。但本階段的操作,對每個需要真機調試的工程都要做一遍。
這個步驟的主要作用是支持真機調試,如果不做這個步驟,仍然可以通過步驟5來生成ipa在真機上運行,但是無法使用Xcode內置的調試器對在真機上運行的程序進行單步跟蹤。如果您的程序在點擊Run真機調試時秒退,請檢查此步驟是否正確完成。
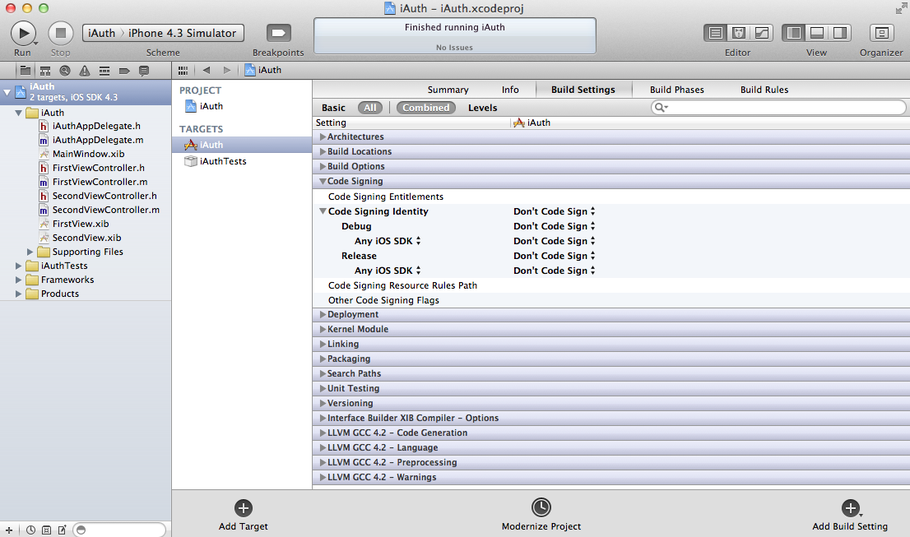
(1)禁用Xcode自動的簽名操作
將工程配置中所有的Code Signing選項全部設爲Don't Code Sign,如圖。可能需要先點擊“All”讓這個選項顯示出來
(2)添加自定義的生成後腳本
在Build Phases中添加一個Phase,右下角的Add Build Phase,然後單擊Add Run Script,輸入以下腳本
(對於Xcode 4.1/4.2)
export CODESIGN_ALLOCATE=/Developer/Platforms/iPhoneOS.platform/Developer/usr/bin/codesign_allocate
if [ "${PLATFORM_NAME}" == "iphoneos" ] || [ "${PLATFORM_NAME}" == "ipados" ]; then
/Developer/iphoneentitlements401/gen_entitlements.py "my.company.${PROJECT_NAME}" "${BUILT_PRODUCTS_DIR}/${WRAPPER_NAME}/${PROJECT_NAME}.xcent";
codesign -f -s "iPhone Developer" --entitlements "${BUILT_PRODUCTS_DIR}/${WRAPPER_NAME}/${PROJECT_NAME}.xcent" "${BUILT_PRODUCTS_DIR}/${WRAPPER_NAME}/"
fi
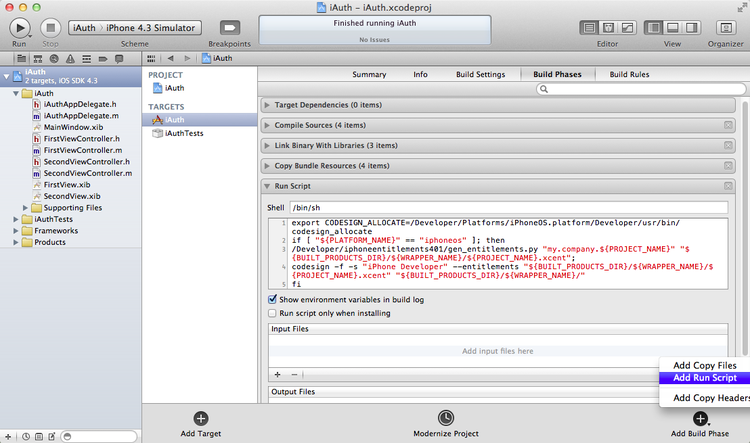
(對於Xcode 4.3/4.4/4.5/4.5.2)
export CODESIGN_ALLOCATE=/Applications/Xcode.app/Contents/Developer/Platforms/iPhoneOS.platform/Developer/usr/bin/codesign_allocate
if [ "${PLATFORM_NAME}" == "iphoneos" ] || [ "${PLATFORM_NAME}" == "ipados" ]; then
/Applications/Xcode.app/Contents/Developer/iphoneentitlements/gen_entitlements.py "my.company.${PROJECT_NAME}" "${BUILT_PRODUCTS_DIR}/${WRAPPER_NAME}/${PROJECT_NAME}.xcent";
codesign -f -s "iPhone Developer" --entitlements "${BUILT_PRODUCTS_DIR}/${WRAPPER_NAME}/${PROJECT_NAME}.xcent" "${BUILT_PRODUCTS_DIR}/${WRAPPER_NAME}/"
fi
至此配置全部完成,下面就可以插上iPhone,重新選擇生成目標來測試一下在線調試了!如果是第一次使用該設備調試,請先在Organizer中將設備切換爲開發模式,具體操作請見常見問題5。