轉自:http://hi.baidu.com/feixu_geer/item/694aaee2d24272226cabb8c9
我們將研究如何創建一個作爲Windows服務的應用程序。內容包含什麼是Windows服務,如何創建、安裝和調試它們。會用到System.ServiceProcess.ServiceBase命名空間的類。
什麼是Windows服務?
Windows服務應用程序是一種需要長期運行的應用程序,它對於服務器環境特別適合。它沒有用戶界面,並且也不會產生任何可視輸出。任何用戶消息都會被寫進Windows事件日誌。計算機啓動時,服務會自動開始運行。它們不要用戶一定登錄才運行,它們能在包括這個系統內的任何用戶環境下運行。通過服務控制管理器,Windows服務是可控的,可以終止、暫停及當需要時啓動。
Windows 服務,以前的NT服務,都是被作爲Windows NT操作系統的一部分引進來的。它們在Windows 9x及Windows Me下沒有。你需要使用NT級別的操作系統來運行Windows服務,諸如:Windows NT、Windows 2000 Professional或Windows 2000 Server。舉例而言,以Windows服務形式的產品有:Microsoft Exchange、SQL Server,還有別的如設置計算機時鐘的Windows Time服務。
創建一個Windows服務
我們即將創建的這個服務除了演示什麼也不做。服務被啓動時會把一個條目信息登記到一個數據庫當中來指明這個服務已經啓動了。在服務運行期間,它會在指定的時間間隔內定期創建一個數據庫項目記錄。服務停止時會創建最後一條數據庫記錄。這個服務會自動向Windows應用程序日誌當中登記下它成功啓動或停止時的記錄。
Visual Studio .NET能夠使創建一個Windows服務變成相當簡單的一件事情。啓動我們的演示服務程序的說明概述如下。
注意是要建立C#的工程纔可以
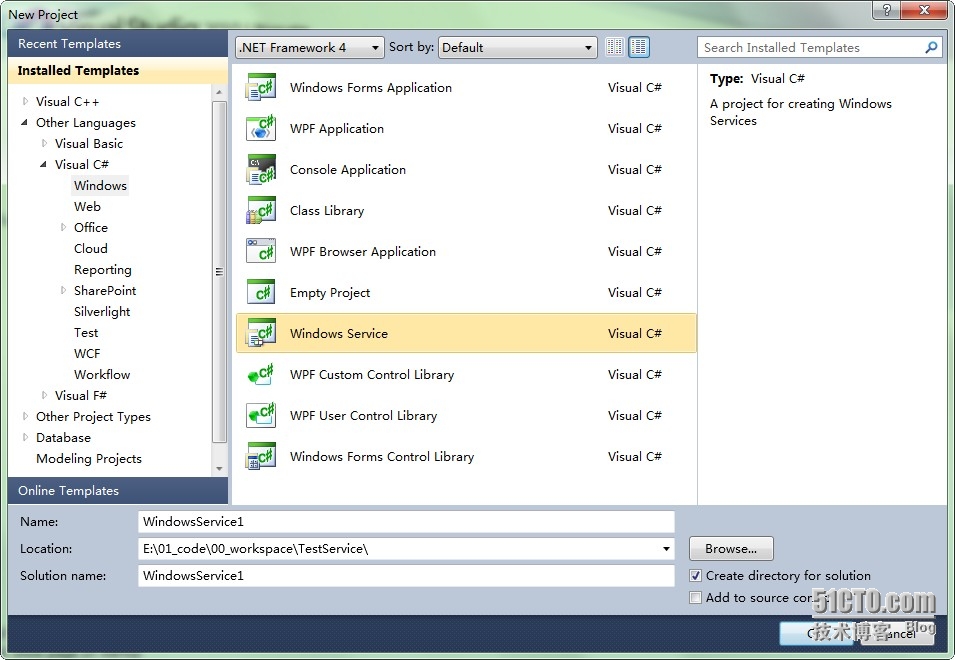
1. 新建一個項目
2. 從一個可用的項目模板列表當中選擇Windows服務
3. 設計器會以設計模式打開
4. 從工具箱的組件表當中拖動一個Timer對象到這個設計表面上 (注意: 要確保是從組件列表而不是從Windows窗體列表當中使用Timer)
5. 設置Timer屬性,Enabled屬性爲False,Interval屬性30000毫秒
6. 切換到代碼視圖頁(按F7或在視圖菜單當中選擇代碼),然後爲這個服務填加功能
Windows服務的構成
在你類後面所包含的代碼裏,你會注意到你所創建的Windows服務擴充了System.ServiceProcess.Service類。所有以.NET方式建立的Windows服務必須擴充這個類。它會要求你的服務重載下面的方法,Visual Studio默認時包括了這些方法。
? Dispose – 清除任何受控和不受控資源(managed and unmanaged resources)
? OnStart – 控制服務啓動
? OnStop – 控制服務停止
數據庫表腳本樣例
在這個例子中使用的數據庫表是使用下面的T-SQL腳本創建的。我選擇SQL Server數據庫。你可以很容易修改這個例子讓它在Access或任何你所選擇的別的數據庫下運行。
CREATE TABLE [dbo].[MyServiceLog] (
[in_LogId] [int] IDENTITY (1, 1) NOT NULL,
[vc_Status] [nvarchar] (40)
COLLATE SQL_Latin1_General_CP1_CI_AS NOT NULL,
[dt_Created] [datetime] NOT NULL
) ON [PRIMARY]
Windows服務樣例
下面就是我命名爲MyService的Windows服務的所有源代碼。大多數源代碼是由Visual Studio自動生成的。
using System;
using System.Collections;
using System.ComponentModel;
using System.Data;
using System.Data.SqlClient;
using System.Diagnostics;
using System.ServiceProcess;
namespace CodeGuru.MyWindowsService
{
public class MyService : System.ServiceProcess.ServiceBase
{
private System.Timers.Timer timer1;
/// <remarks>
/// Required designer variable.
/// </remarks>
private System.ComponentModel.Container components = null;
public MyService()
{
// This call is required by the Windows.Forms
// Component Designer.
InitializeComponent();
}
// The main entry point for the process
static void Main()
{
System.ServiceProcess.ServiceBase[] ServicesToRun;
ServicesToRun = new System.ServiceProcess.ServiceBase[]
{ new MyService() };
System.ServiceProcess.ServiceBase.Run(ServicesToRun);
}
/// <summary>
/// Required method for Designer support - do not modify
/// the contents of this method with the code editor.
/// </summary>
private void InitializeComponent()
{
this.timer1 = new System.Timers.Timer();
((System.ComponentModel.ISupportInitialize)
(this.timer1)).BeginInit();
//
// timer1
//
this.timer1.Interval = 30000;
this.timer1.Elapsed +=
new System.Timers.ElapsedEventHandler(this.timer1_Elapsed);
//
// MyService
//
this.ServiceName = "My Sample Service";
((System.ComponentModel.ISupportInitialize)
(this.timer1)).EndInit();
}
/// <summary>
/// Clean up any resources being used.
/// </summary>
protected override void Dispose( bool disposing )
{
if( disposing )
{
if (components != null)
{
components.Dispose();
}
}
base.Dispose( disposing );
}
/// <summary>
/// Set things in motion so your service can do its work.
/// </summary>
protected override void OnStart(string[] args)
{
this.timer1.Enabled = true;
this.LogMessage("Service Started");
}
/// <summary>
/// Stop this service.
/// </summary>
protected override void OnStop()
{
this.timer1.Enabled = false;
this.LogMessage("Service Stopped");
}
/*
* Respond to the Elapsed event of the timer control
*/
private void timer1_Elapsed(object sender,
System.Timers.ElapsedEventArgs e)
{
this.LogMessage("Service Running");
}
/*
* Log specified message to database
*/
private void LogMessage(string Message)
{
SqlConnection connection = null;
SqlCommand command = null;
try
{
connection = new SqlConnection(
"Server=localhost;Database=SampleDatabase;Integrated
Security=false;User Id=sa;Password=;");
command = new SqlCommand(
"INSERT INTO MyServiceLog (vc_Status, dt_Created)
VALUES ('" + Message + "',getdate())", connection);
connection.Open();
int numrows = command.ExecuteNonQuery();
}
catch( Exception ex )
{
System.Diagnostics.Debug.WriteLine(ex.Message);
}
finally
{
command.Dispose();
connection.Dispose();
}
}
}
}
P.S.
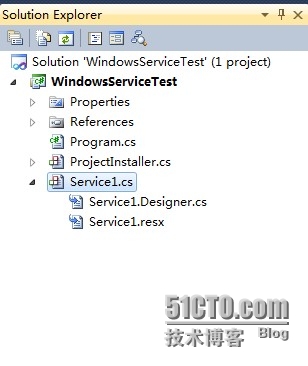
裏面的Service1.cs文件是我們要處理的文件,Service1.designer.cs裏面是由VS自動生成的頁面的設計代碼,你拖動一個控件到頁面上的時候,就會產生相應的代碼在designer.cs裏面。
.resx 文件,屬於資源文件 ,由 XML 組成,可以加入任何資源,包括二進制。同樣不能被嵌入到 Assembly 中。在 System.Resources 名字空間中有專用讀寫的類。VS. NET 創建這種文件然後將其轉成 .resources 文件並根據設置將其嵌入到 Assembly 中。
換句話說
.designer.cs 存放窗體的一些控件頁面等肉眼看見的一些東西和相關的配置信息之類的一些東西
.resx是該窗體使用的一些資源信息,例如使用了哪些資源,存放位置等等
.cs則是你編寫的代碼了,
前兩個都是環境自動生成的,通過你對窗體的拖、拉、點、按環境自動給你完成,不需你操心怎麼寫,所以最好自己也不要隨意改動(在你未看懂之前)。
一般都不需要怎麼去專門修改這兩個文件,你通過對窗體的修改,環境會自動給你完成多相應2個文件的修改,不需要人爲操心,只有你操作窗體和代碼就好了
安裝Windows服務
Windows服務不同於普通Windows應用程序。不可能簡簡單單地通過運行一個EXE就啓動Windows服務了。安裝一個Windows服務應該通過使用.NET Framework提供的InstallUtil.exe來完成,或者通過諸如一個Microsoft Installer (MSI)這樣的文件部署項目完成。
添加服務安裝程序
創建一個Windows服務,僅用InstallUtil程序去安裝這個服務是不夠的。你必須還要把一個服務安裝程序添加到你的Windows服務當中,這樣便於InstallUtil或是任何別的安裝程序知道應用你服務的是怎樣的配置設置。
1. 將這個服務程序切換到設計視圖
2. 右擊設計視圖選擇“添加安裝程序”
3. 切換到剛被添加的ProjectInstaller的設計視圖
4. 設置serviceInstaller1組件的屬性:
1) ServiceName = My Sample Service
2) StartType = Automatic
5. 設置serviceProcessInstaller1組件的屬性
1) Account = LocalSystem
6. 生成解決方案
在完成上面的幾個步驟之後,會自動由Visual Studio產生下面的源代碼,它包含於ProjectInstaller.cs這個源文件內。
using System;
using System.Collections;
using System.ComponentModel;
using System.Configuration.Install;
namespace CodeGuru.MyWindowsService
{
/// <summary>
/// Summary description for ProjectInstaller.
/// </summary>
[RunInstaller(true)]
public class ProjectInstaller :
System.Configuration.Install.Installer
{
private System.ServiceProcess.ServiceProcessInstaller
serviceProcessInstaller1;
private System.ServiceProcess.ServiceInstaller serviceInstaller1;
/// <summary>
/// Required designer variable.
/// </summary>
private System.ComponentModel.Container components = null;
public ProjectInstaller()
{
// This call is required by the Designer.
InitializeComponent();
// TODO: Add any initialization after the InitComponent call
}
#region Component Designer generated code
/// <summary>
/// Required method for Designer support - do not modify
/// the contents of this method with the code editor.
/// </summary>
private void InitializeComponent()
{
this.serviceProcessInstaller1 = new
System.ServiceProcess.ServiceProcessInstaller();
this.serviceInstaller1 = new
System.ServiceProcess.ServiceInstaller();
//
// serviceProcessInstaller1
//
this.serviceProcessInstaller1.Account =
System.ServiceProcess.ServiceAccount.LocalSystem;
this.serviceProcessInstaller1.Password = null;
this.serviceProcessInstaller1.Username = null;
//
// serviceInstaller1
//
this.serviceInstaller1.ServiceName = "My Sample Service";
this.serviceInstaller1.StartType =
System.ServiceProcess.ServiceStartMode.Automatic;
//
// ProjectInstaller
//
this.Installers.AddRange(new
System.Configuration.Install.Installer[]
{this.serviceProcessInstaller1, this.serviceInstaller1});
}
#endregion
}
}
用InstallUtil安裝Windows服務
現在這個服務已經生成,你需要把它安裝好才能使用。下面操作會指導你安裝你的新服務。
1. 打開Visual Studio .NET命令提示
2. 改變路徑到你項目所在的bin\Debug文件夾位置(如果你以Release模式編譯則在bin\Release文件夾)
3. 執行命令“InstallUtil.exe MyWindowsService.exe”註冊這個服務,使它建立一個合適的註冊項。
4. 右擊桌面上“我的電腦”,選擇“管理”就可以打計算機管理控制檯
5. 在“服務和應用程序”裏面的“服務”部分裏,你可以發現你的Windows服務已經包含在服務列表當中了
6. 右擊你的服務選擇啓動就可以啓動你的服務了
在每次需要修改Windows服務時,這就會要求你卸載和重新安裝這個服務。不過要注意在卸載這個服務前,最好確保服務管理控制檯已經關閉,這會是一個很好的習慣。如果沒有這樣操作的話,你可能在卸載和重安裝Windows服務時會遇到麻煩。僅卸載服務的話,可以執行相的InstallUtil命令用於註銷服務,不過要在後面加一個/u命令開關。
在工程生成之後可以手動的建立一個bat文件進行服務的安裝和卸載。
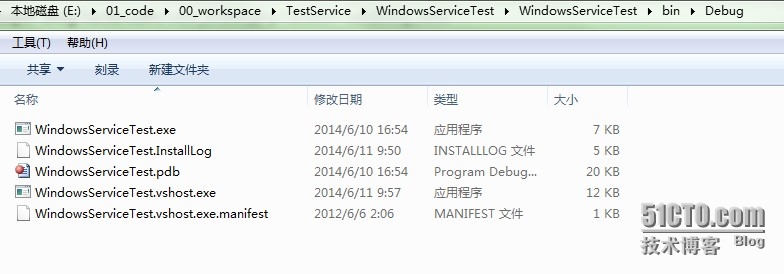
在bin/Debug文件夾路徑下找到對應編譯生成的.exe文件,我這裏是WindowsServiceTest.exe
自己建立一個install.bat文件和一個uninstall.bat文件。路徑無所謂
在install.bat中寫入如下代碼
@echo off
C: //進入C盤根目錄
cd C:\Windows\Microsoft.NET\Framework\v4.0.30319 //進入framework的工具目錄下,以便可以使用InstallUtil.exe工具,可在v4.0.30319找到
InstallUtil E:\01_code\00_workspace\TestService\WindowsServiceTest\WindowsServiceTest\bin\Debug\WindowsServiceTest.exe //安裝服務
net start "My test service" //啓動服務,程序中設定的服務名就是這個
pause
在uninstall.bat中寫入如下代碼
@echo off
C:
cd C:\Windows\Microsoft.NET\Framework\v4.0.30319
net stop "My test service"
InstallUtil E:\01_code\00_workspace\TestService\WindowsServiceTest\WindowsServiceTest\bin\Debug\WindowsServiceTest.exe /u
pause
還有另一種安裝方法,請參看:http://blog.csdn.net/march1111/article/details/1151648
調試Windows服務
從另外的角度度看,調試Windows服務絕不同於一個普通的應用程序。調試Windows服務要求的步驟更多。服務不能象你對普通應用程序做的那樣,只要簡單地在開發環境下執行就可以調試了。服務必須首先被安裝和啓動,這一點在前面部分我們已經做到了。爲了便於跟蹤調試代碼,一旦服務被啓動,你就要用Visual Studio把運行的進程附加進來(attach)。記住,對你的Windows服務做的任何修改都要對這個服務進行卸載和重安裝。
附加正在運行的Windows服務
爲了調試程序,有些附加Windows服務的操作說明。這些操作假定你已經安裝了這個Windows服務並且它正在運行。
1. 用Visual Studio裝載這個項目
2. 點擊“調試”菜單
3. 點擊“進程”菜單
4. 確保 顯示系統進程 被選
5. 在 可用進程 列表中,把進程定位於你的可執行文件名稱上點擊選中它。用戶應該是system的。
6. 點擊 附加 按鈕
7. 點擊 確定
8. 點擊 關閉
9. 在timer1_Elapsed方法裏設置一個斷點,然後等它執行
總結 現在你應該對Windows服務是什麼,以及如何創建、安裝和調試它們有一個粗略的認識了。Windows服務的額處的功能你可以自行研究。這些功能包括暫停(OnPause)和恢復(OnContinue)的能力。暫停和恢復的能力在默認情況下沒有被啓用,要通過Windows服務屬性來設置。


