


Zabbix 概述
- Zabbix 是一個基於 WEB 界面的提供分佈式系統監視以及網絡監視功能的企業級的開源解決方案。
- Zabbix 能監視各種網絡參數,保證服務器的安全運營;並提供靈活的通知機制以及讓管理員快速定位和解決存在個問題。
- Zabbix 它由 2 部分構成,Zabbix server 與可選組件 Zabbix agent。
- Zabbix server 可以通過 SNMP,zabbix agent ,ping,端口監視等方法提供對遠程服務器或網絡狀態的監視數據收集等功能,它可以運行在 Linux,Solaris,HP-UX,AIX,Free BSD,OS X等平臺上。
搭建Zabbix 監控環境
要想搭建一個 Zabbix 的工作環境,需要從服務器入手,與服務器通信,管理員需要使用一個Zabbix前端界面,與 Zabbix 服務器和數據庫進行通信。三個關鍵(界面、服務器和數據庫)可以安裝在同一臺服務器上,但是如果你有一個更大更復雜的環境,將它們安裝在不同的主機上也是一個選項。Zabbix 服務器能夠直接監控到同一網絡中的設備,如果其他網絡的設備也需要被監控,那還需要一臺 Zabbix 代理服務器。
Zabbix 特點:
1. 安裝與配置簡單,學習成本低;
2. 支持多語言(包括中文);
3. 免費開源(這個很重要);
4. 自動發現服務器與網絡設備;
5. 分佈式監視以及 WEB 集中管理功能;
6. 可以無視 agent 監視;
7. 用戶安全認證和柔軟的授權方式;
8. 通過 WEB 界面設置和查看監視結果;
9. email 等通知功能。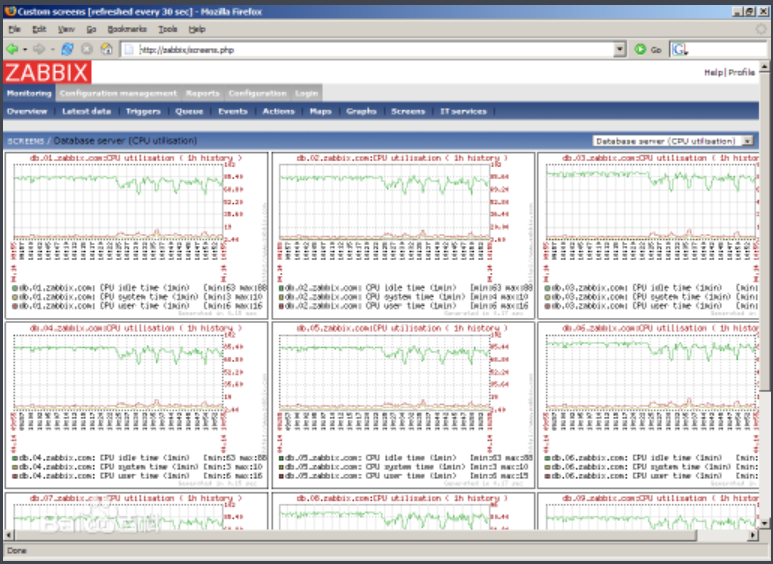
部署 Zabbix 環境準備
此次部署都屬於 yum 安裝,一臺服務器,一臺被監控機。
1·安裝 nginx1.14
2·安裝 mysql5.7
3·安裝 PHP7.2
4·Zabbix 4.0
因 Zabbix 通過 c/s 模式採集數據,通過 B/S 模式在 web 端展示和配置。所以需要搭建 LAMP 或 LNMP 架構。此文章是採取 LNMP 結構。
| 主機 | 操作系統 | IP地址 | 主要軟件 |
|---|---|---|---|
| Zabbix 服務器 | CentOS 7.4 | 192.168.154.132 | nginx1.14、mysql5.7、PHP7.2、Zabbix 4.0 |
| Linux 客戶機 | CentOS 7.4 | 192.168.154.133 | zabbix-agent |
部署步驟
(1)關閉防火牆:
[root@localhost ~]# systemctl stop firewalld.service
[root@localhost ~]# setenforce 0
(2)搭建 LNMP 之 安裝 nginx 。
配置 nginx 官方源,安裝、啓動 nginx
[root@localhost ~]# wget http://nginx.org/packages/centos/7/noarch/RPMS/nginx-release-centos-7-0.el7.ngx.noarch.rpm
[root@localhost ~]# rpm -ivh nginx-release-centos-7-0.el7.ngx.noarch.rpm
[root@localhost ~]# yum install nginx -y
[root@localhost ~]# systemctl start nginx
[root@localhost ~]# systemctl enable nginx
[root@localhost ~]# netstat -ntap | grep 80
(3)搭建 LNMP 之 安裝 mysql。
[root@localhost ~]# yum install mariadb-server mariadb -y
[root@localhost ~]# systemctl start mariadb.service
[root@localhost ~]# systemctl enable mariadb.service
(4)由於是 yum 安裝 mysql ,所以需要簡單的配置
[root@localhost ~]# mysql_secure_installation
Enter current password for root (enter for none):
OK, successfully used password, moving on...

Setting the root password ensures that nobody can log into the MariaDB
root user without the proper authorisation.

Set root password? [Y/n] y        //是否給 root 用戶設置登陸密碼
New password:                         //第一次輸入密碼
Re-enter new password:          //確認密碼
Password updated successfully!
Reloading privilege tables..
 ... Success!

By default, a MariaDB installation has an anonymous user, allowing anyone
to log into MariaDB without having to have a user account created for
them.  This is intended only for testing, and to make the installation
go a bit smoother.  You should remove them before moving into a
production environment.

Remove anonymous users? [Y/n] n             // 是否移除匿名用戶a
 ... skipping.

Normally, root should only be allowed to connect from 'localhost'.  This
ensures that someone cannot guess at the root password from the network.

Disallow root login remotely? [Y/n] n            // 遠程禁止 root 登陸嗎
 ... skipping.

By default, MariaDB comes with a database named 'test' that anyone can
access.  This is also intended only for testing, and should be removed
before moving into a production environment.

Remove test database and access to it? [Y/n] n      //刪除測試數據庫並訪問它?
 ... skipping.

Reloading the privilege tables will ensure that all changes made so far
will take effect immediately.

Reload privilege tables now? [Y/n] y                      //現在重新加載特權表嗎?
 ... Success!
(5)搭建 LNMP 之 安裝 安裝PHP 7.2
[root@localhost ~]# rpm -Uvh https://dl.fedoraproject.org/pub/epel/epel-release-latest-7.noarch.rpm
[root@localhost ~]# rpm -Uvh https://mirror.webtatic.com/yum/el7/webtatic-release.rpm
[root@localhost ~]# yum install php72w php72w-devel php72w-fpm php72w-gd php72w-mbstring php72w-mysql -y
(6)配置 Nginx ,讓它支持 PHP。
1)root@localhost ~]# vim /etc/php-fpm.d/www.conf
; Start a new pool named 'www'.
[www]

; Unix user/group of processes
; Note: The user is mandatory. If the group is not set, the default user's group
;       will be used.
; RPM: apache Choosed to be able to access some dir as httpd
user = nginx            //將Apache改爲nginx
; RPM: Keep a group allowed to write in log dir.
group = nginx          //將Apache改爲nginx
2)[root@localhost ~]# vim /etc/php.ini
359行 expose_php = Off    #隱藏PHP版本
368行 max_execution_time = 300    #執行時間
378行 max_input_time = 300    #接收數據等待時間
389行 memory_limit = 128M    #每個腳本佔用內存
656行 post_max_size = 16M    #POST數據大小
799行 upload_max_filesize = 2M    #下載文件大小
800行 always_populate_raw_post_data = -1    #可以用$HTTP_RAW_POST_DATA接收post raw data
877行 date.timezone = Asia/Shanghai    #修改時區爲 亞洲/上海
(7)配置 Nginx ,讓 PHP 處理動態請求。
[root@localhost ~]# vim /etc/nginx/conf.d/default.conf
10行        index  index.php index.html index.htm;        //加上支持頁面格式 index.php
30行     location ~ \.php$ {                           //以下需要去掉註釋
31行         root           /usr/share/nginx/html;
32行         fastcgi_pass   127.0.0.1:9000;
33行         fastcgi_index  index.php;
34行         fastcgi_param  SCRIPT_FILENAME  $document_root$fastcgi_script_name;  // 把fastcgi_param中的/scripts改爲$document_root
35行         include        fastcgi_params;
36行     }
(8)編寫 PHP 測試頁面,準備測試 PHP 是否搭建成功!
[root@localhost ~]# vim /usr/share/nginx/html/info.php
<?php
  phpinfo();
?>

[root@localhost ~]# systemctl start php-fpm.service
[root@localhost ~]# systemctl enable php-fpm.service
[root@localhost ~]# systemctl restart nginx
[root@localhost ~]# netstat -ntap | grep 9000
(9)測試 ,訪問 web 界面,是否搭建PHP成功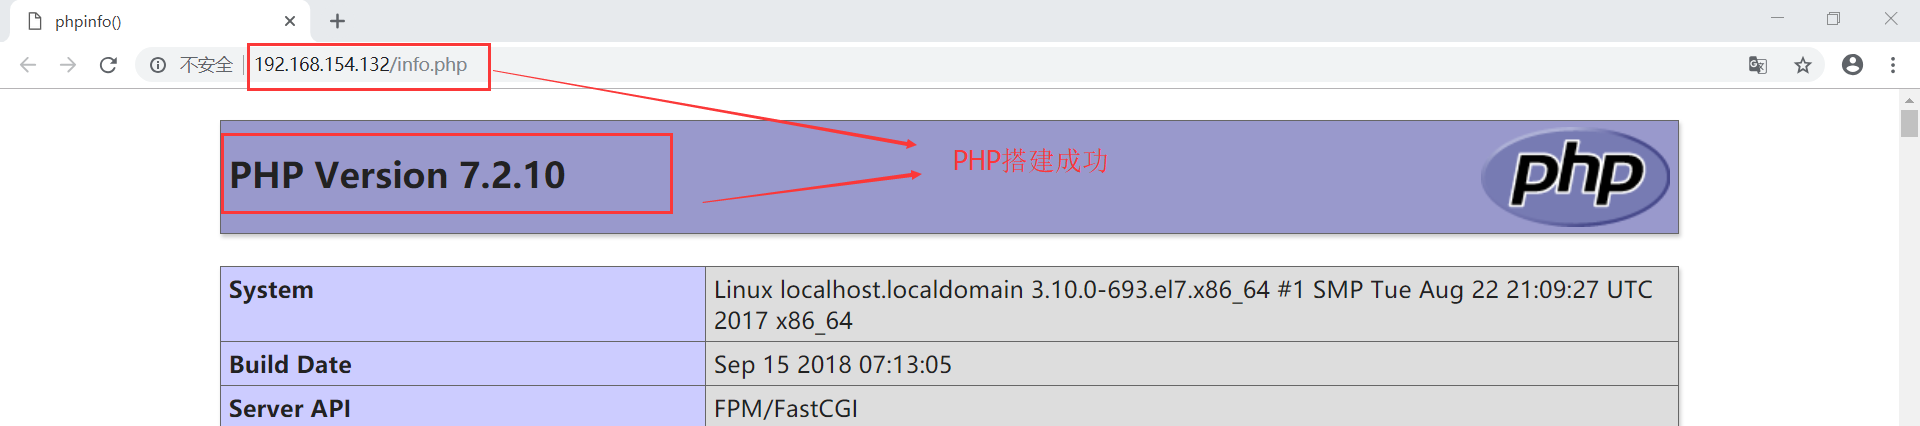
(10)編寫 MySQL 測試頁面。
[root@localhost ~]# vim /usr/share/nginx/html/info.php
<?php
 $link=mysqli_connect('127.0.0.1','root','123123');
 if ($link) echo "true";      //成功返回  true
 else echo "false";          //失敗返回  false
?>
(11)測試,訪問 web 界面 ,測試 MySQL 鏈接是否成功。
(12)創建數據庫 zabbix ,並授權。
[root@localhost ~]# mysql -u root -p123123
MariaDB [(none)]> create database zabbix character set utf8 collate utf8_bin;
MariaDB [(none)]> grant all privileges on *.* to 'zabbix'@'%' identified by '123123';
MariaDB [(none)]> flush privileges;
(13)刪除空用戶,否則 zabbix 用戶不能登陸 數據庫
MariaDB [(none)]> select user,host from mysql.user;
+--------+-----------------------+
| user   | host                  |
+--------+-----------------------+
| zabbix | %                     |
| root   | 127.0.0.1             |
| root   | ::1                   |
|        |   localhost             |
| root   | localhost             |
|        | localhost.localdomain |
| root   | localhost.localdomain |
+--------+-----------------------+
把空的用戶 名稱 都刪除,這樣就能使用  zabbix 用戶 登陸mysql

MariaDB [(none)]> drop user ''@'localhost';
MariaDB [(none)]> drop user ''@localhost.localdomain;
(14)編寫代碼,測試 zabbix 是否能連接php。
[root@localhost ~]# vim /usr/share/nginx/html/info.php
<?php
 $link=mysqli_connect('127.0.0.1','zabbix','123123');
 if ($link) echo "true";
 else echo "false";
?>
(15)到此 LNMP 搭建完畢,現在開始部署 Zabbix 服務器。
[root@localhost ~]# rpm -i https://repo.zabbix.com/zabbix/4.0/rhel/7/x86_64/zabbix-release-4.0-1.el7.noarch.rpm
[root@localhost ~]# yum install zabbix-server-mysql zabbix-web-mysql zabbix-agent -y
(16)將zabbix腳本文件導入到zabbix數據庫中.
[root@localhost ~]# zcat /usr/share/doc/zabbix-server-mysql*/create.sql.gz | mysql -uzabbix -p zabbix    //導入到zabbix數據庫中
[root@localhost ~]# mysql -uzabbix -p123123
MariaDB [(none)]> use zabbix;
MariaDB [zabbix]> show tables;     //查看是否導入成功
(17)修改 zabbix 配置文件
[root@localhost ~]# vim /etc/zabbix/zabbix_server.conf
91行:DBHost=localhost    #去掉註釋
125行:DBPassword=123123    #修改密碼

> 對比完整的配置文件:
[root@localhost ~]# grep -n '^'[a-Z] /etc/zabbix/zabbix_server.conf
38:LogFile=/var/log/zabbix/zabbix_server.log
49:LogFileSize=0
72:PidFile=/var/run/zabbix/zabbix_server.pid
82:SocketDir=/var/run/zabbix
91:DBHost=localhost
101:DBName=zabbix
117:DBUser=zabbix
125:DBPassword=123123
357:SNMPTrapperFile=/var/log/snmptrap/snmptrap.log
475:Timeout=4
518:AlertScriptsPath=/usr/lib/zabbix/alertscripts
529:ExternalScripts=/usr/lib/zabbix/externalscripts
565:LogSlowQueries=3000
(18)把 zabbix 的文件都移動到 nginx 的主頁下。
[root@localhost ~]# cp -r /usr/share/zabbix/ /usr/share/nginx/html
[root@localhost ~]# chown -R zabbix.zabbix /etc/zabbix/
[root@localhost ~]# chown -R zabbix.zabbix /usr/share/nginx/
[root@localhost ~]# chown -R zabbix.zabbix /usr/lib/zabbix/
[root@localhost ~]# chmod -R 755 /etc/zabbix/web/
[root@localhost ~]# chmod -R 777 /var/lib/php/session/
(19)啓動 zabbix 服務,因爲這裏是連自己都監控了,所以順便開啓了被監控服務。
[root@localhost ~]# systemctl start zabbix-server.service
[root@localhost ~]# systemctl enable zabbix-server.service
[root@localhost ~]# systemctl start zabbix-agent.service
[root@localhost ~]# systemctl enable zabbix-agent.service

[root@localhost ~]# netstat -ntap | grep 10051  //監控端默認端口號
(20)重啓服務。
[root@localhost ~]# systemctl restart php-fpm.service
[root@localhost ~]# systemctl restart nginx
[root@localhost ~]# systemctl restart zabbix-server.service
(21)開始 web 界面安裝,訪問。
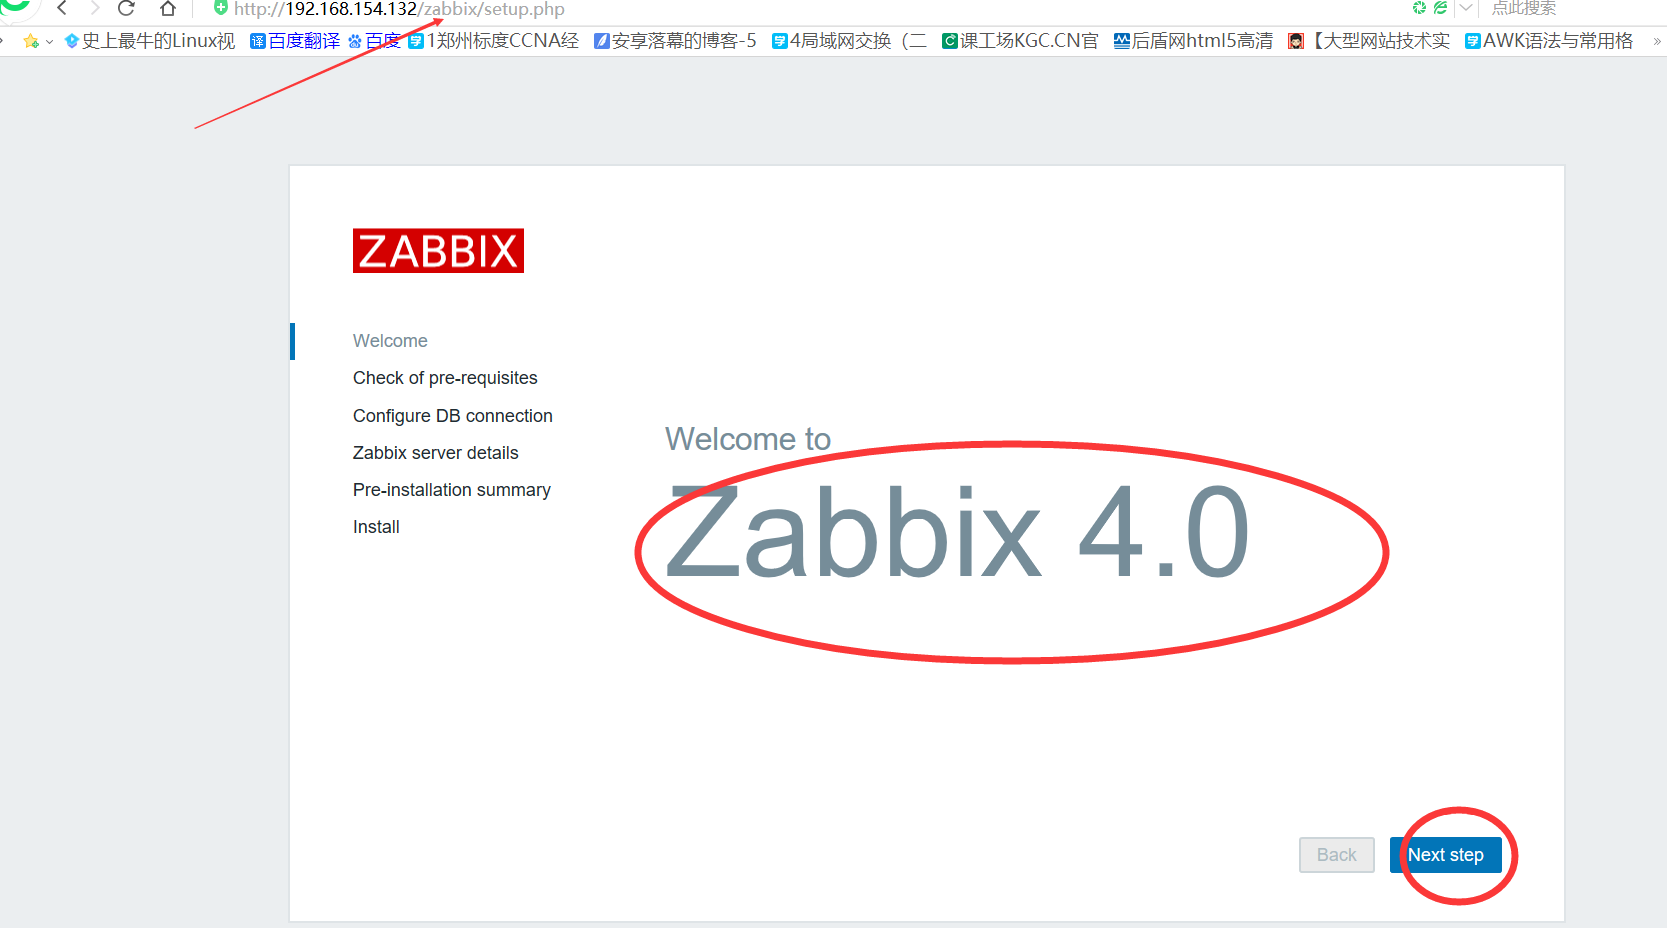
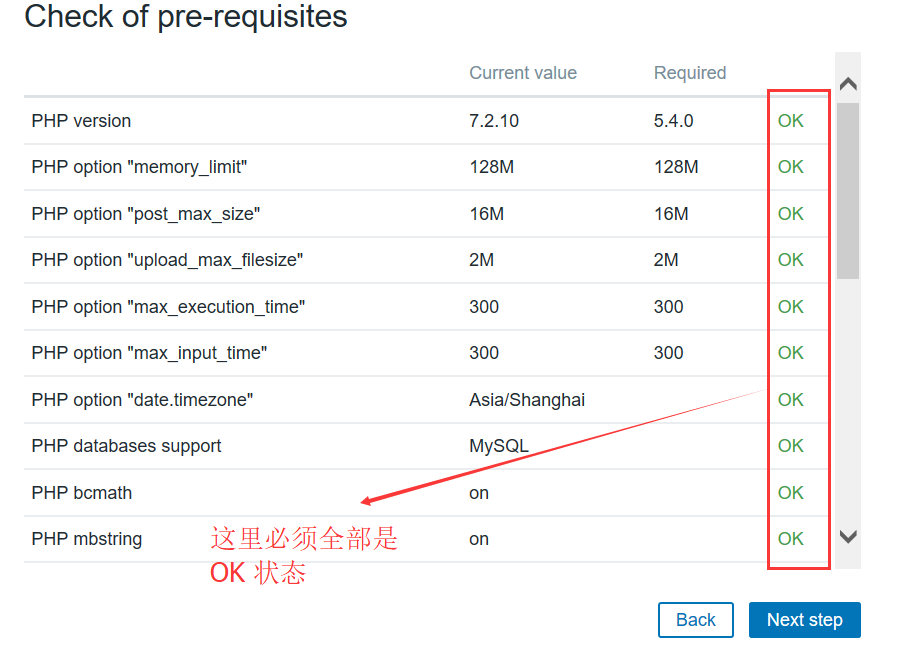
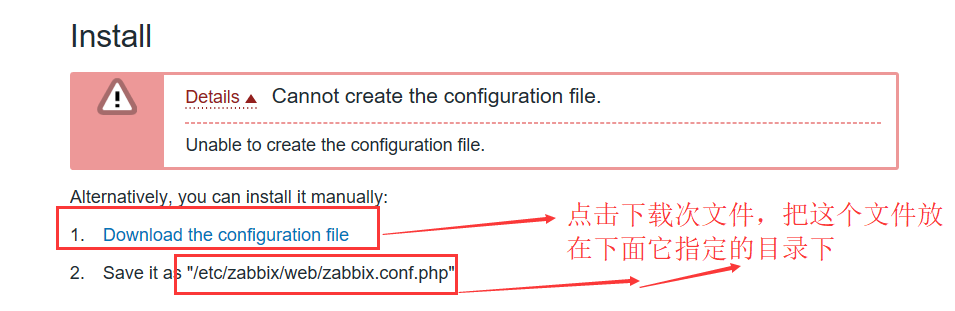

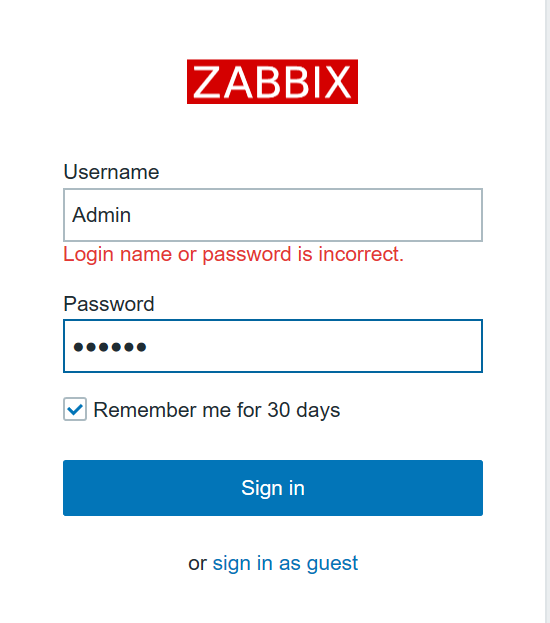
說明:用戶名是 Admin 密碼是:zabbix
(22)到此監控服務器完成,現在需要配置被監控端
[root@localhost ~]# systemctl stop firewalld.service
[root@localhost ~]# setenforce 0
[root@localhost ~]# rpm -i https://repo.zabbix.com/zabbix/4.0/rhel/7/x86_64/zabbix-release-4.0-1.el7.noarch.rpm
[root@localhost ~]# yum install zabbix-agent -y
[root@localhost ~]# vim /etc/zabbix/zabbix_agentd.conf
13:PidFile=/var/run/zabbix/zabbix_agentd.pid
32:LogFile=/var/log/zabbix/zabbix_agentd.log
43:LogFileSize=0
98:Server=192.168.199.129 //指定監控端
139:ServerActive=192.168.199.129 //指定監控端
150:Hostname=test
268:Include=/etc/zabbix/zabbix_agentd.d/*.conf(23)啓動服務。
[root@localhost ~]# systemctl start zabbix-agent.service
[root@localhost ~]# systemctl enable zabbix-agent.service
[root@localhost ~]# netstat -ntap | grep 10050
(24)被監控端搭建完畢,現在需要把它添加到監控範圍內。這個是在 web 界面配置。
總結:到此所有配置完成,下篇文章將會詳解 怎麼監控,如何郵件報警!