


Ansible 命令應用基礎
- 之前的一篇文章講到了Ansible 的安裝和作用,有興趣的可以看看Ansible 介紹與安裝。學習 ansible 就是重新學習一次命令和語法。
- Ansible 可以使用命令行進行自動化管理,基本語法如下:
ansible <host-patterm> [-m module_name] [-a args]
<host-patterm>:對哪些主機生效
 [-m module_name]:要使用的模塊
 [-a args] :模塊特有參數
- Ansible 的命令行 管理工具都是由一系列模塊、參數所支持的,可以在命令後面加上 -h 或 --help 獲取幫助。如果使用ansible-doc 工具可以通過 ansible-doc -h 或者 ansible-doc --help查看其他幫助信息。
- ansible-doc 是用來查看模塊幫助信息的工具,最主要的選項-l用來列出可使用的模塊,-s 用來列出某個模塊的描述信息和使用列子。如列出 yum 模塊的描述信息和操作動作:
[root@localhost ~]# ansible-doc -s yum      //列出 yum 模塊的幫助信息
- name: Manages packages with the `yum' package manager
  yum:
      allow_downgrade:       # Specify if the named package and version is allowed to downgrade a maybe
                               already installed higher version of that
                               package. Note that setting
                               allow_downgrade=True can make this module
                               behave in a non-idempotent way. The task
                               could end up with a set of packages that
                               does not match the complete list of
                               specified packages to install (because
                               dependencies between the downgraded package
                               and others can cause changes to the
                               packages which were in the earlier
                               transaction).
Ansible 常用模塊講解
Ansible 自帶了很多模塊,能夠下發執行 Ansible 的各種管理任務,默認使用 command 模塊,即 -m 選項省略時也可以運行此模塊,主要用於在被管理的主機上運行命令:
command 模塊
[root@localhost ~]# ansible all -a 'tail -n 3 /etc/passwd'   //查看所有主機passwd最後3行
192.168.154.132 | CHANGED | rc=0 >>     //這是第一臺被控主機
test01:x:1001:1001::/home/test01:/bin/bash
apache:x:48:48:Apache:/usr/share/httpd:/sbin/nologin
jerry:x:1002:1002::/home/jerry:/bin/bash

192.168.154.133 | CHANGED | rc=0 >>         //這是第二臺被控主機
yihong:x:1000:1000:yihong:/home/yihong:/bin/bash
test01:x:1001:1001::/home/test01:/bin/bash
test02:x:306:306::/home/test02:/bin/bash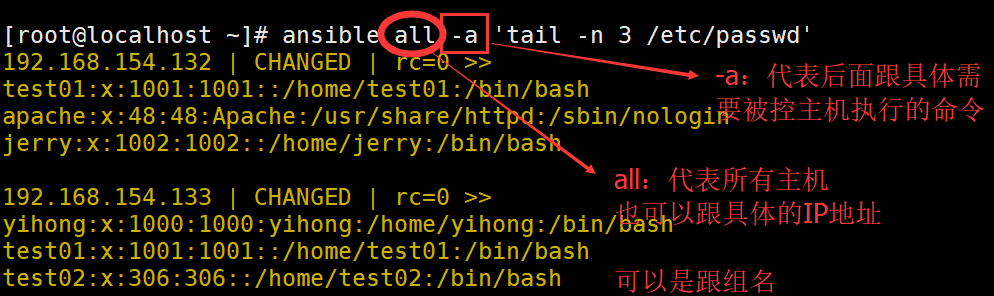
cron 模塊
Ansible 中的 cron 模塊用於定義任務計劃。其中有兩種狀態(state):present 表示添加 (省略不寫默認使用),absent 表示移除。
1·添加計劃任務
[root@localhost ~]# ansible mysql -m cron -a 'minute="*/1" job="/usr/bin/echo hello word" name="test job"'        //添加計劃任務,每分鐘執行一次 hello word
192.168.154.133 | CHANGED => {
    "changed": true,
    "envs": [],
    "jobs": [
        "test job"
    ]
}
[root@localhost ~]# ansible mysql -a 'crontab -l'     //查看計劃任務
192.168.154.133 | CHANGED | rc=0 >>
#Ansible: test job
*/1 * * * * /usr/bin/echo hello word
2·移除計劃任務
[root@localhost ~]# ansible mysql -m cron -a 'name="test job" state=absent'
192.168.154.133 | CHANGED => {
    "changed": true,
    "envs": [],
    "jobs": []
}
[root@localhost ~]# ansible mysql -a 'crontab -l'
192.168.154.133 | CHANGED | rc=0 >>
User 模塊
Ansible 中的 user 模塊用於創建新用戶和更改、刪除已存在的用戶。其中 name 選項用來指明創建的用戶名稱。
1·創建普通用戶
[root@localhost ~]# ansible mysql -m user -a 'name="test01"'  //這裏需要注意雙影號
192.168.154.133 | SUCCESS => {

[root@localhost ~]# ansible mysql -a 'tail -n 3 /etc/passwd'  //查看passwd 文件
192.168.154.133 | CHANGED | rc=0 >>
yihong:x:1000:1000:yihong:/home/yihong:/bin/bash
test01:x:1001:1001::/home/test01:/bin/bash    //新創建的用戶test01
2·創建系統用戶
[root@localhost ~]# ansible mysql -m user -a 'name="tom" system=yes shell=/sbin/nologin'
192.168.154.133 | CHANGED => {    //創建系統用戶,執行shell登陸環境
    "changed": true,
3·刪除用戶
[root@localhost ~]# ansible mysql -m user -a 'name="test01" state=absent'
192.168.154.133 | CHANGED => {     //刪除成功
group 模塊
Ansible 中的 group 模塊用於對用戶組進行管理
創建MySQL組,將tom用戶添加到MySQL組中。
[root@localhost ~]# ansible webserver -m group -a 'name=mysql gid=306 system=yes'
192.168.154.132 | CHANGED => {
    "changed": true,
    "gid": 306,
[root@localhost ~]# ansible webserver -m user -a 'name=tom uid=307 system=yes group=mysql'
192.168.154.132 | CHANGED => {copy 模塊
Ansible 中的copy 模塊用於實現文件複製和批量下發文件。其中 src 來定義本地源文件路徑,使用dest定義被管理主機文件路徑,使用content 則是通過指定信息內容來生成目標文件。
1·列如以下命令是:將本地文件 /etc/fstab 複製到被管理主機上的 /tmp/fstab.ansible,並且將所有者設置爲 root ,權限設置爲 640
[root@localhost ~]# ansible mysql -m copy -a 'src=/etc/fstab dest=/tmp/fstab.ansible owner=root mode=640'
192.168.154.133 | CHANGED => {
    "changed": true,
    "checksum": "d855a342669b42e1b6632f814cbb9f327d472b28"

[root@localhost ~]# ansible mysql -a 'ls -l /tmp/fstab.ansible'
192.168.154.133 | CHANGED | rc=0 >>
-rw-r-----. 1 root root 617 10月 22 10:42 /tmp/fstab.ansible
2·將 “Hell Word” 寫入 /tmp/fstab.ansible 文件中。
[root@localhost ~]# ansible mysql -m copy -a 'content="Hell Word" dest=/tmp/fstab.ansible'
192.168.154.133 | CHANGED => {
    "changed": true

[root@localhost ~]# ansible mysql -a 'cat /tmp/fstab.ansible'
192.168.154.133 | CHANGED | rc=0 >>
Hell Word
file 模塊
在Ansible 中使用 file 模塊來設置文件屬性。其中使用path 指定文件路徑,使用src定義源文件路徑,使用 name 或 dest 來替換創建文件的符號鏈接。
1·列如,設置 /tmp/fstab.ansible 的所屬主爲 mysql ,屬組爲 mysql ,權限爲 644. 這裏需要注意,你的系統需要有這個mysql 這個用戶纔可以,沒有就自己創建一個。
[root@localhost ~]# ansible mysql -m file -a 'owner=mysql group=mysql mode=644 path=/tmp/fstab.ansible'
192.168.154.133 | CHANGED => {
    "changed": true,

[root@localhost ~]# ansible mysql -a 'ls -l /tmp/fstab.ansible'
192.168.154.133 | CHANGED | rc=0 >>
-rw-r--r--. 1 mysql mysql 9 10月 22 10:47 /tmp/fstab.ansible
ping 模塊
ping 模塊的使用很簡單,它的作用就是拿來檢測指定主機的連通性。
[root@localhost ~]# ansible all -m ping
192.168.154.132 | SUCCESS => {
    "changed": false,
    "ping": "pong"
}
192.168.154.133 | SUCCESS => {
    "changed": false,
    "ping": "pong"
}
service 模塊
在 Ansible 中使用 service 模塊來控制管理服務的運行狀態。其中 enabled 表示是否開機自啓,取值爲 true 或者 false;使用 name 定義服務名稱;使用 state 指定服務狀態,取值分別是:started、stoped、restarted。
1·查看 httpd 服務狀態。
[root@localhost ~]# ansible all -a 'service httpd status'
 [WARNING]: Consider using the service module rather than running service.  If you need to use command
because service is insufficient you can add warn=False to this command task or set command_warnings=False
in ansible.cfg to get rid of this message.
說明:這裏有個警告,大概意思是如果你只是查詢狀態,這個模塊沒問題,但是service主要用作他用。
2·啓動 httpd 並設置爲開機自啓動
[root@localhost ~]# ansible webserver -m service -a 'enabled=true name=httpd state=started'
192.168.154.132 | SUCCESS => {
    "changed": false,
    "enabled": true
shell 模塊
Ansible 中 shell 模塊可以在被管理主機上運行命令,並支持像管道符號等功能的複雜命令。
列如:創建用戶後使用無交互模式給用戶設置密碼
[root@localhost ~]# ansible mysql -m user -a 'name="nginx" system=yes shell=/sbin/nologin'                     //創建 nginx 用戶
192.168.154.133 | CHANGED => {
    "changed": true

[root@localhost ~]# ansible mysql -m shell -a 'echo abc123 | passwd --stdin nginx'
192.168.154.133 | CHANGED | rc=0 >>
更改用戶 nginx 的密碼 。
passwd:所有的身份驗證令牌已經成功更新。
script 模塊
Ansible 中的script 模塊可以將本地腳本複製到被管理主機上進行運行。需要注意的是,使用相對路徑來指定腳本。
列如:編輯一個本地腳本 test.sh ,複製到被管理主機上進行運行。
[root@localhost ~]# vim test.sh
#!/bin/bash
echo "this is test job" > /tmp/script.ansible

[root@localhost ~]# chmod +x test.sh

[root@localhost ~]# ansible mysql -m script -a 'test.sh'
192.168.154.133 | CHANGED => {
    "changed": true,
    "rc": 0,
    "stderr": "Shared connection to 192.168.154.133 closed.\r\n"
[root@localhost ~]# ansible mysql -a 'cat /tmp/script.ansible'
192.168.154.133 | CHANGED | rc=0 >>
this is test jobyum 模塊
Ansible 中的 yum 模塊負責在被管理主機上安裝與卸載軟件包,但是需要提前在每個節點配置自己的yum 倉庫。其中 name 指定要安裝的軟件包,還需要帶上軟件包的版本號,否則安裝最新的軟件包:使用 stare 指定安裝軟件包的狀態,present、latest用來表示安裝,ansent 表示卸載。
1·安裝軟件 zsh
[root@localhost ~]# ansible mysql -m yum -a 'name=zsh'
192.168.154.133 | CHANGED => {
    "ansible_facts": {
        "pkg_mgr": "yum"
    },
    "changed": true,
[root@localhost ~]# ansible mysql -a 'rpm -q zsh'
[WARNING]: Consider using the yum, dnf or zypper module rather than running rpm. If you need to use
command because yum, dnf or zypper is insufficient you can add warn=False to this command task or set
command_warnings=False in ansible.cfg to get rid of this message.
192.168.154.133 | CHANGED | rc=0 >>
zsh-5.0.2-28.el7.x86_642·卸載 zsh 軟件包
[root@localhost ~]# ansible mysql -m yum -a 'name=zsh state=absent'
192.168.154.133 | CHANGED => {
    "ansible_facts": {
        "pkg_mgr": "yum"
    },
    "changed": true
setup 模塊
在Ansible 中使用 setup 模塊,可以收集、查看被管理主機的設備信息。每個被管理的主機在接收並運行管理命令之前,都會將自己的相關信息發送給控制主機!
[root@localhost ~]# ansible mysql -m setup   //這裏信息量較大,以下的省略
192.168.154.133 | SUCCESS => {
    "ansible_facts": {
        "ansible_all_ipv4_addresses": [
            "192.168.122.1",
            "192.168.154.133"
總結
- Ansible 的模塊非常多。當不知道模塊怎麼用時可以用 【ansible-doc -s 模塊名字】來查看模塊的用法。
- 【ansible-doc -l】 可以看看有哪些模塊可以使用!