背景知識介紹:
1、什麼是Xmanager?
Xmanager,可以將PC變成XWindow工作站,它是一個簡單的易用的高性能的運行在windows平臺上的Xserver,而linux平臺下的gnome和kde就是Xclient,linux下的Xserver爲xong。XDMCP協議是由DM程序所提供的。X11提供的displaymanager爲XDM,而著名的KDE與GNOME也都有自己的displaymanager管理程序,分別是KDM與GDM,可以通過三者中的任何一個displaymanager配置文件來啓動XDMCP這個協議程序。在操作XDMCP之前必須要先安裝圖形接口纔可以。
2、linux下的XWindowSystem
linux使用的圖形接口就是所謂的XWindowSystem,它是能夠跨平臺的,目前在linux上面開發的圖形接口軟件幾乎都是使用這個架構來處理的。XWindowSystem在運行的過程中,又因控制的數據不同而分爲Xserver和Xclient兩種程序,雖然說是Xserver/client,但是它的作用卻與網絡主機的server/client架構截然不同。
Xserver:這組程序主要負責的是屏幕畫面的繪製與顯示。Xserver可以接收來自Xclient的數據,將這些數據繪製呈現爲屏幕上的圖像。此外,我們移動鼠標、單機數據、由鍵盤輸入數據等,也會通過Xserver來傳達到Xclient端,而由Xclient來加以運算出應繪製的數據。
Xclient:這組程序主要負責的是數據的運算。Xclient在接收到Xserver傳來的數據後(如鼠標的移動、單擊等操作)會經由本身的運算而得到鼠標應該要如何移動、單擊的結果應該要出現什麼樣的數據、鍵盤輸出的結果應該要如何呈現等。然後將這些結果告知給Xserver。讓它自行繪製到屏幕上。
3、什麼是WM?
WindowManager(WM)是一組控制所有Xclient的管理程序,並同時提供例如任務欄、背景桌面、虛擬桌面、窗口大小、窗口移動與重迭顯示等任務。WindowManager主要由一些大型的桌面工具開發而來,常見的有gnome和kde。
4、什麼是DM?
DisplayManager(DM)是用於提供用戶登錄畫面,以讓用戶可以通過圖形接口登錄。在用戶登錄後,可通過displaymanager的功能去呼叫其他的windowmanager,讓用戶在圖形接口的登錄過程變得簡單。由於DM也是啓動一個等待輸入帳號密碼的圖形數據,因此DM會主動去喚醒一個Xserver,然後在上面加載等待輸入的畫面。
5、關於XDMCP協議
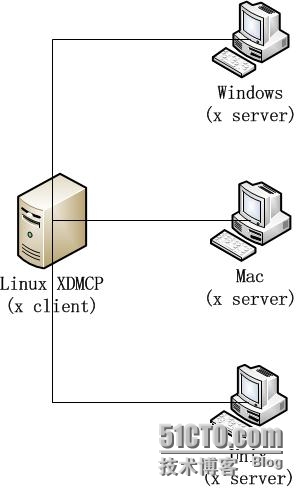
XDMCP(xdisplaymanagercontrolprotocol)啓動後會在服務器的UDP177開始監聽,然後當客戶端的Xserver連接到服務器的port177之後,我們的XDMCP就會在客戶端的Xserver中放上用戶輸入帳號、密碼的圖形接口程序。那麼你就能通過這個XDMCP去加載服務器所提供的類似windowmanager相關的Xclient,即能夠取得圖形接口的遠程連接服務器了。
架構圖如下:
操作流程:
6、CentOS配置XDMCP實現windows遠程桌面linux
6.1查看是否安裝桌面環境
[root@localhost ~]# yum grouplist
Loaded plugins: fastestmirror, refresh-packagekit, security
Setting up Group Process
Loading mirror speeds from cached hostfile
* base: mirrors.btte.net
* extras: mirrors.btte.net
* updates: mirrors.btte.net
Installed Groups:
Base   //必須的
Desktop  //必須的
Desktop Debugging and Performance Tools
Desktop Platform  //必須的
X Window System    //必須的
……省略……
6.2通過進程查看判斷當前是否開啓DM
[root@localhost ~]# pstree|grep dm
|-gdm-binary---gdm-simple-slav-+-Xorg
|                              |-gdm-session-wor
|                                              |-gdm-simple-gree
[root@localhost ~]#
6.3配置文件的設置
[root@localhost ~]# cat /etc/gdm/custom.conf
# GDM configuration storage
[daemon]
[security]
AllowRemoteRoot=yes  //允許root登錄
DisallowTCP=false  //允許客戶端使用TCP的方式連接到XDMCP
[xdmcp]
Enable=true  //啓動XDMCP
[greeter]
[chooser]
[debug]
[root@localhost ~]#
6.4重啓服務
[root@localhost ~]# init 3
[root@localhost ~]# init 5
[root@localhost ~]# runlevel
3 5
[root@localhost ~]# netstat -antulp|grep dm
udp        0      0 0.0.0.0:177                 0.0.0.0:*                               4487/gdm-binary
[root@localhost ~]#
6.5防火牆設置
[root@localhost ~]# netstat -antulp|grep dm
udp        0      0 0.0.0.0:177                 0.0.0.0:*                               4487/gdm-binary
[root@localhost ~]# grep 177 /etc/sysconfig/iptables
-A INPUT -p udp --dport 177 -j ACCEPT
[root@localhost ~]# /etc/init.d/iptables restart
iptables: Flushing firewall rules:                         [  OK  ]
iptables: Setting chains to policy ACCEPT: filter          [  OK  ]
iptables: Unloading modules:                               [  OK  ]
iptables: Applying firewall rules:                         [  OK  ]
[root@localhost ~]#
6.6關閉windows端的防火牆
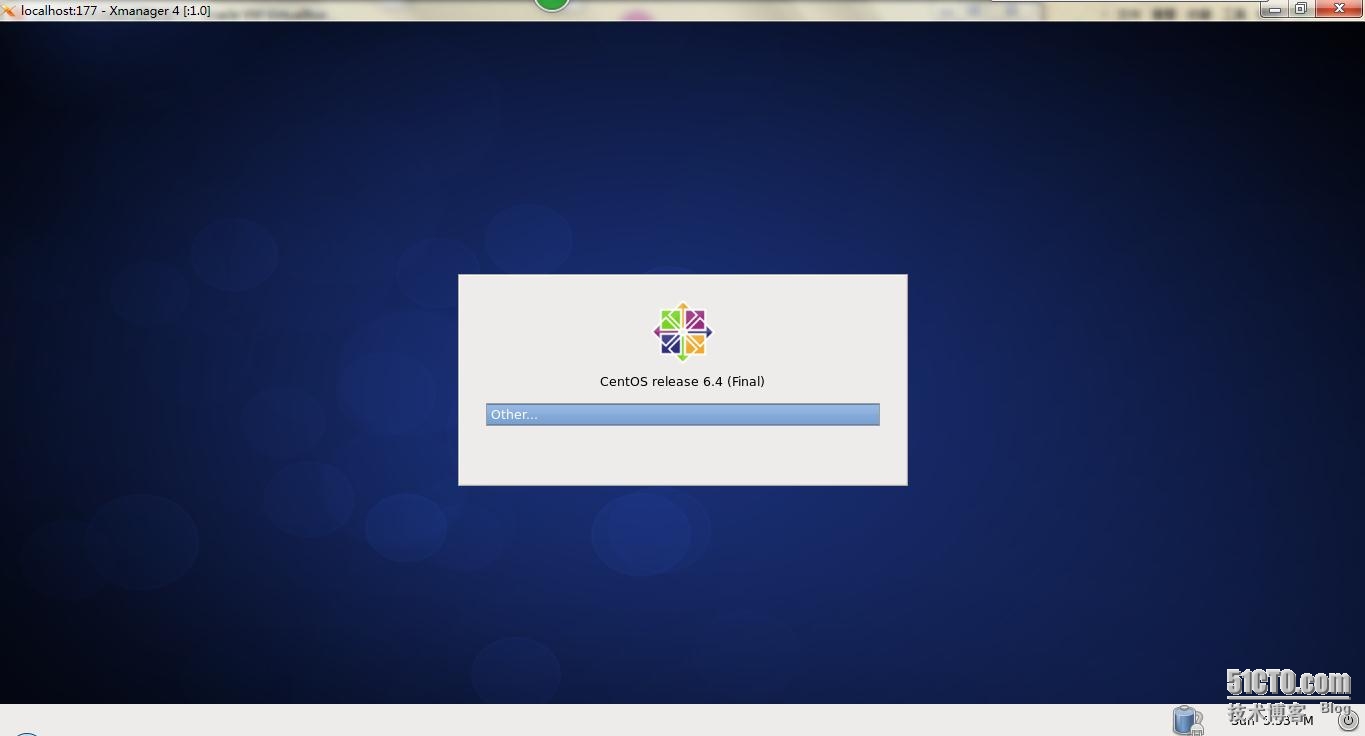
6.7測試登錄界面
7、SUSElinux配置XDMCP實現windows遠程桌面linux
7.1SUSElinux的版本查看
linux-08wz:~ # lsb_release -a
LSB Version:    core-2.0-noarch:core-3.2-noarch:core-4.0-noarch:core-2.0-x86_64:core-3.2-x86_64:core-4.0-x86_64:desktop-4.0-amd64:desktop-4.0-noarch:graphics-2.0-amd64:graphics-2.0-noarch:graphics-3.2-amd64:graphics-3.2-noarch:graphics-4.0-amd64:graphics-4.0-noarch
Distributor ID: SUSE LINUX
Description:    SUSE Linux Enterprise Server 11 (x86_64)
Release:        11
Codename:       n/a
linux-08wz:~ #
7.2查看當前使用的是哪種DM
linux-08wz:~ # pstree|grep dm
|-gdm---gdm-simple-slav-+-X
|                       |-gdm-session-wor
|                                       |-gdm-simple-gree
linux-08wz:~ #
說明是gdm
7.3修改配置文件
一共需要修改四個地方:
a、
linux-08wz:~ # egrep -v '^$|^#' /etc/sysconfig/displaymanager
DISPLAYMANAGER="gdm"
DISPLAYMANAGER_REMOTE_ACCESS="yes"  //默認是no,改爲yes
DISPLAYMANAGER_ROOT_LOGIN_REMOTE="yes" //默認是no,改爲yes
DISPLAYMANAGER_STARTS_XSERVER="yes"
DISPLAYMANAGER_XSERVER_TCP_PORT_6000_OPEN="no"
DISPLAYMANAGER_AUTOLOGIN=""
DISPLAYMANAGER_PASSWORD_LESS_LOGIN="no"
DISPLAYMANAGER_AD_INTEGRATION="no"
DISPLAYMANAGER_SHUTDOWN="root"
DISPLAYMANAGER_RANDR_MODE_VGA=""
DISPLAYMANAGER_RANDR_MODE_auto="1024x768_60 64.11 1024 1080 1184 1344 768 769 772 795 -HSync +Vsync"
DISPLAYMANAGER_XSERVER="Xorg"
linux-08wz:~ #
b、
linux-08wz:~ # egrep -v '^$|^#'  /etc/X11/xdm/Xaccess
*                                       #any host can get a login window   //查看這一行,默認不需要修改,如果是被註釋的,去掉註釋,啓用這一行
*               CHOOSER BROADCAST       #any indirect host can get a chooser
linux-08wz:~ #
c、
linux-08wz:~ # grep 'requestPort' /etc/X11/xdm/xdm-config
!DisplayManager.requestPort:    0  //默認是啓用的,註釋掉,注意用“!”註釋
linux-08wz:~ #
d、
linux-08wz:~ # cat /etc/gdm/custom.conf
# GDM configuration storage
[xdmcp]
# SuSEconfig: displaymanager:DISPLAYMANAGER_REMOTE_ACCESS
Enable=true
[chooser]
[security]
# SuSEconfig: displaymanager:~DISPLAYMANAGER_XSERVER_TCP_PORT_6000_OPEN
DisallowTCP=false
# SuSEconfig: displaymanager:DISPLAYMANAGER_ROOT_LOGIN_REMOTE
AllowRemoteRoot=yes
[debug]
linux-08wz:~ #
這個文件和CentOS的一樣
7.4重啓服務
linux-08wz:~ # init 3
linux-08wz:~ # init 5
linux-08wz:~ # netstat -antulp|grep 177
udp        0      0 0.0.0.0:177             0.0.0.0:*                           10263/gdm
linux-08wz:~ #
7.5防火牆的設置
方法一:
linux-08wz:~ # init 3
linux-08wz:~ # init 5
linux-08wz:~ # netstat -antulp|grep 177
udp        0      0 0.0.0.0:177             0.0.0.0:*                           10263/gdm
linux-08wz:~ #
注意:這種方法是在默認情況下
linux-08wz:~ # /etc/init.d/SuSEfirewall2_init start
Starting Firewall Initialization (phase 1 of 2)                                                                                                             done
linux-08wz:~ # /etc/init.d/SuSEfirewall2_setup  start
Starting Firewall Initialization (phase 2 of 2)                                                                                                             done
linux-08wz:~ # chkconfig --list|grep fire
SuSEfirewall2_init        0:off  1:off  2:off  3:on   4:off  5:on   6:off
SuSEfirewall2_setup       0:off  1:off  2:off  3:on  4:off  5:off  6:off
linux-08wz:~ #
方法二:
linux-08wz:~ # chkconfig SuSEfirewall2_setup off  //讓開機不啓動
linux-08wz:~ # iptables -A INPUT -p tcp --dport 22 -j ACCEPT
linux-08wz:~ # iptables -A INPUT -p udp --dport 177 -j ACCEPT
linux-08wz:~ # iptables -A INPUT -p icmp  -j ACCEPT
linux-08wz:~ # iptables-save > /etc/iptables.sh  //將規則保存
linux-08wz:~ # cat /etc/iptables.sh
# Generated by iptables-save v1.4.6 on Sun Oct  6 16:23:06 2013
*raw
:PREROUTING ACCEPT [492:37226]
:OUTPUT ACCEPT [370:41138]
-A PREROUTING -i lo -j NOTRACK
-A OUTPUT -o lo -j NOTRACK
COMMIT
# Completed on Sun Oct  6 16:23:06 2013
# Generated by iptables-save v1.4.6 on Sun Oct  6 16:23:06 2013
*filter
:INPUT DROP [0:0]
:FORWARD DROP [0:0]
:OUTPUT ACCEPT [67:7123]
:reject_func - [0:0]
-A INPUT -i lo -j ACCEPT
-A INPUT -m state --state ESTABLISHED -j ACCEPT
-A INPUT -p icmp -m state --state RELATED -j ACCEPT
-A INPUT -p tcp -m tcp --dport 22 -j ACCEPT
-A INPUT -p udp -m udp --dport 177 -j ACCEPT
-A INPUT -p icmp -j ACCEPT
-A OUTPUT -o lo -j ACCEPT
COMMIT
# Completed on Sun Oct  6 16:23:06 2013
linux-08wz:~ # cat /etc/init.d/after.local //默認不存在,需要自己創建,開機會加載
#!/bin/bash
/usr/sbin/iptables-restore /etc/iptables.sh
linux-08wz:~ #
7.6關閉windows端的防火牆
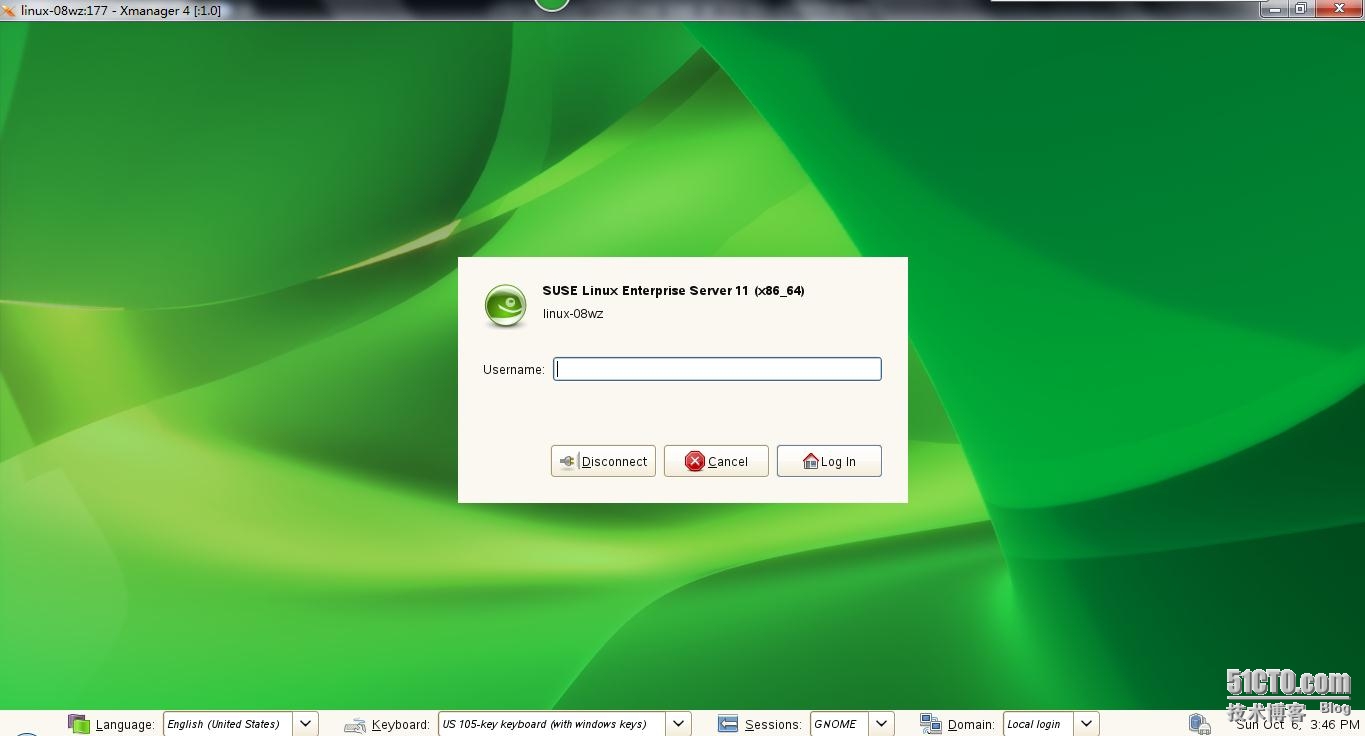
7.7測試登錄


