Lnmp
网络环境
系统版本 : CentOS release 6.6 (Final)
内核版本 : 2.6.32-504.el6.x86_64
Ip地址 :172.16.6.61/24
Nginx 版本 :nginx/1.6.2
Mysql版本5.5.43-MariaDB-log
php版本 :PHP5.4.40
xcache版本 : xcache-3.2.0.
安装配置步骤
安装配置nginx
1 . 安装开发包组
编译安装nginx之前需要安装开发包组"DevelopmentTools"和"Server Platform Development",还需要专门安装pcre-devel包
# yum groupinstall"Development tools" "Server Platform Development""Desktop Platform Development" "Debug Tools" -y
# yum install pcre-devel -y
2 . 安装编译nginx
添加运行nginx worker 进程的用户 和用户组
# groupadd -r nginx
# useradd -g nginx -r nginx
解压,编译,安装,nginx
# tar xvf nginx-1.6.2.tar.gz
# cd nginx-1.6.2
# ./configure--prefix=/usr/local/nginx-1.6.2 --user=nginx --group=nginx --pid-path=/var/run/nginx/nginx.pid--lock-path=/var/lock/nginx.lock --with-http_ssl_module--with-http_stub_status_module --with-http_gzip_static_module--with-http_flv_module --with-http_mp4_module--http-client-body-temp-path=/var/tmp/nginx/client --http-proxy-temp-path=/var/tmp/nginx/proxy--http-fastcgi-temp-path=/var/tmp/nginx/fastcgi--http-uwsgi-temp-path=/var/tmp/nginx/uwsgi
# make && makeinstall
编译安装时候的选项
--prefix=PATH setinstallation prefix #安装nignx的目录
--user=USER setnon-privileged user for worker processes #以什么用户的身份运行nignx
--group=GROUP setnon-privileged group for worker processes #以什么组的身份运行nignx
--pid-path=PATH set nginx.pidpathname #nginx pid路径
--lock-path=PATH setnginx.lock pathname #lock(锁)路径
--with-http_ssl_module enablengx_http_ssl_module #支持SSL功能
--with-http_flv_module enablengx_http_flv_module #支持flv的流媒体
....
切换至安装nginx的安装位置
# cd /usr/local/
建立nginx 符号链接,便于以后升级访问维护
# ln -s nginx-1.6.2 nginx
创建编译安装时需要的路径
# mkdir -pv /var/tmp/nginx/{client,proxy,fastcgi,uwsgi}
启动nginx#nginx 默认会监听在tcp/80
# /usr/local/nginx/sbin/nginx
# ss -lnt| grep :80
nginx的配置文件:
nginx的配置文件可分为
(1) main配置段:全局配置段
(2)event{}: 定义event模型工作特性
(3) http {} : 定义http协议相关的配置
配置段指令:要以分号结尾,语法格式: directive value1 [value2...]
#############main 配置段################################################################
# 指定运行worker进程的用户和组;#在编译中指定了运行的nginx的用户和组;编译完成以后默认会被注释掉.
user nginx nginx;
# worker进程的个数;通常应该略少于CPU物理核心数;可设置为auto
worker_processes auto;
# 指定错误日志存放的路径,错误日志记录级别可选项为:[ debug | info | notice | warn | error | crit ]
#error_log logs/error.log;
#error_log logs/error.log notice;
#error_log logs/error.log info;
error_log logs/error.log crit;
# 指定 pid 存放的路径
pid /usr/local/nginx/nginx.pid;
# 指定文件描述符数量
worker_rlimit_nofile 51200;
#############events 配置段################################################################
events
{
# 使用的网络I/O模型,Linux系统推荐采用epoll模型,FreeBSD系统推荐采用kqueue模型
use epoll;
# 允许的连接数
worker_connections 51200;
}
#############http 配置段################################################################
http
{
include mime.types;
default_type application/octet-stream;
# 设置使用的字符集,如果一个网站有多种字符集,请不要随便设置,应让程序员在HTML代码中通过Meta标签设置
#charset gb2312;
server_names_hash_bucket_size 128;
client_header_buffer_size 32k;
large_client_header_buffers 4 32k;
# 设置客户端能够上传的文件大小
client_max_body_size 8m;
sendfile on;
tcp_nopush on;
keepalive_timeout 60;
tcp_nodelay on;
fastcgi_connect_timeout 300;
fastcgi_send_timeout 300;
fastcgi_read_timeout 300;
fastcgi_buffer_size 64k;
fastcgi_buffers 4 64k;
fastcgi_busy_buffers_size 128k;
fastcgi_temp_file_write_size 128k;
# 开启gzip压缩
gzip on;
gzip_min_length 1k;
gzip_buffers 4 16k;
gzip_http_version 1.1;
gzip_comp_level 2;
gzip_types text/plain application/x-javascripttext/css application/xml;
gzip_vary on;
#limit_zone crawler $binary_remote_addr 10m;
# 第一个虚拟主机
server
{
# 监听的端口
listen 80;
# 主机名称
server_name www.a.com;
# 访问日志文件存放路径
access_log logs/a.com.access.log combined;
location /
{
# 默认首页文件,顺序从左到右,如果找不到index.html文件,则查找index.htm文件作为首页文件
index index.html index.htm;
# HTML网页文件存放的目录
root /vhosts/a.com;
}
}
# 第二个虚拟主机
server
{
# 监听的IP和端口
listen 80;
# 主机名称
server_name bbb.otherdomain.com;
#访问日志文件存放路径
access_log logs/bbb.otherdomain.com.access.logcombined;
location /
{
# 默认首页文件,顺序从左到右,如果找不到index.html文件,则查找index.htm文件作为首页文件
index index.html index.htm;
# HTML网页文件存放的目录
root /data0/htdocs/bbb.otherdomain.com;
}
}
# 第三个虚拟主机
server
{
# 监听的IP和端口
listen 80;
# 主机名称
server_name www.domain.com domain.com *.domain.com;
# 访问日志文件存放路径
access_log logs/bbb.domain.com.access.log combined;
location /
{
# 默认首页文件,顺序从左到右,如果找不到index.html文件,则查找index.htm文件作为首页文件
index index.html index.htm;
# HTML网页文件存放的目录
root /data0/htdocs/domain.com;
}
}
}
创建测试页面
[root@node1 conf]# echo a.com> /vhosts/a.com/index.html
[root@node1 conf]# echo b.com> /vhosts/b.com/index.html
[root@node1 conf]# echo c.com> /vhosts/c.com/index.html
启动nginx
# /usr/local/nginx/sbin/nginx
访问测试页面
[root@node1 conf]# for i inwww.a.com www.b.com www.c.com ;do curl $i ;done
a.com
b.com
c.com
安装mariadb
安装mariadb-5.5.43
#添加运行mysql的用户和用户组
groupadd -g 306 mysql
useradd -r -u 306 -g 306 -s/sbin/nologin mysql
id mysql
#uid=306(mysql)gid=306(mysql) groups=306(mysql)
安装mariadb
tar xvfmariadb-5.5.43-linux-x86_64.tar.gz -C /usr/local/
cd /usr/local/
#创建符号链接
ln -smariadb-5.5.43-linux-x86_64 mysql
ls -lh mysql
#lrwxrwxrwx 1 root root 27May 3 19:54 mysql ->mariadb-5.5.43-linux-x86_64
cd mysql/
cp support-files/mysql.server/etc/init.d/mysqld
chmod u+X /etc/init.d/mysqld
#创建数据目录
mkdir /data/mydata -p
#授权mysql 为mysql数据目录的的属主
chown -R root.mysql/usr/local/mariadb-5.5.43-linux-x86_64/
chown mysql.root /data/mydata
#初始化mysql
/usr/local/mysql/scripts/mysql_install_db--user=mysql --datadir=/data/mydata/
修改my.cnf 添加数据目录的位置
\cp support-files/my-huge.cnf/etc/my.cnf
[root@localhost mysql]# vim/etc/my.cnf
[mysqld]
datadir = /data/mydata
启动mysql
/etc/init.d/mysqld start
安装php
PHP rpm包的依赖关系
yum install bzip2-devel -y
yum install -ylibmcrypt-devel
安装php
tar xvf php-5.4.40.tar.bz2
cd php-5.4.40
./configure --prefix=/usr/local/php \
--with-mysql=/usr/local/mysql\
--with-openssl \
--with-mysqli=/usr/local/mysql/bin/mysql_config\
--enable-mbstring \
--with-freetype-dir \
--with-jpeg-dir \
--with-png-dir \
--with-zlib \
--with-libxml-dir=/usr \
--enable-xml \
--enable-sockets \
--enable-fpm \
--with-mcrypt \
--with-config-file-path=/etc\
--with-config-file-scan-dir=/etc/php.d\
--with-bz2
make && make install
为php提供配置文件 #cp 解压的源代码树下的php.ini-production
cp php.ini-production/etc/php.ini
为php-fpm提供配置文件
cd /usr/local/php/etc/
cp -a php-fpm.conf.defaultphp-fpm.conf
#为php-fpm提供服务控制脚本,并将其添加至服务列表 #php解压源代码树目录下
cd /root/php-5.4.40
cpsapi/fpm/init.d.php-fpm /etc/rc.d/init.d/php-fpm
chmod +x/etc/rc.d/init.d/php-fpm
chkconfig --add php-fpm
chkconfig php-fpm on
启动php-fpm
/etc/init.d/php-fpm start
验正php进程是否启动成功
# ps aux | grep php-fpm #用于查看php进程
# netstat -tnlp | grepphp-fpm #用于查看php是否监听在响应的套接字上
配置nginx支持php解析
vim /usr/local/nginx/conf/nginx.conf
#############main 配置段################################################################
# 指定运行worker进程的用户和组;#在编译中指定了运行的nginx的用户和组;编译完成以后默认会被注释掉.
user nginx nginx;
# worker进程的个数;通常应该略少于CPU物理核心数;可设置为auto
worker_processes auto;
# 指定错误日志存放的路径,错误日志记录级别可选项为:[ debug | info | notice | warn | error | crit ]
#error_log logs/error.log;
#error_log logs/error.log notice;
#error_log logs/error.log info;
error_log logs/error.log crit;
# 指定 pid 存放的路径
pid /usr/local/nginx/nginx.pid;
# 指定文件描述符数量
worker_rlimit_nofile 51200;
#############events 配置段################################################################
events
{
# 使用的网络I/O模型,Linux系统推荐采用epoll模型,FreeBSD系统推荐采用kqueue模型
use epoll;
# 允许的连接数
worker_connections 51200;
}
#############http 配置段################################################################
http
{
include mime.types;
default_typeapplication/octet-stream;
server_names_hash_bucket_size128;
client_header_buffer_size32k;
large_client_header_buffers 432k;
client_max_body_size 8m;
client_header_timeout 10;
client_body_timeout 10;
reset_timedout_connection on;
send_timeout 10;
sendfile on;
tcp_nopush on;
keepalive_timeout 10;
tcp_nodelay on;
fastcgi_connect_timeout 300;
fastcgi_send_timeout 300;
fastcgi_read_timeout 300;
fastcgi_buffer_size 64k;
fastcgi_buffers 4 64k;
fastcgi_busy_buffers_size128k;
fastcgi_temp_file_write_size256k;
limit_conn_zone$binary_remote_addr zone=addr:5m;
limit_conn addr 100;
gzip on;
gzip_min_length 1k;
gzip_buffers 4 16k;
gzip_http_version 1.0;
gzip_comp_level 2;
gzip_types text/plainapplication/x-javascripttext/css application/xml;
gzip_vary on;
gzip_proxied expired no-cacheno-store private auth;
gzip_disable "MSIE[1-6]\.";
open_file_cache max=102400inactive=30s;
open_file_cache_valid 90s;
open_file_cache_min_uses 2;
open_file_cache_errors on;
server_tokens off;
log_format access'$remote_addr - $remote_user [$time_local] "$request" '
'$status $body_bytes_sent "$http_referer" '
'"$http_user_agent" $http_x_forwarded_for';
log_not_found off;
fastcgi_intercept_errors on;
include/usr/local/nginx/conf.d/*.conf;
}
# mkdir /usr/local/nginx/conf.d
# vim /usr/local/nginx/conf.d/vhost.conf
# 第一个虚拟主机
server
{
# 监听的端口
listen 80;
# 主机名称
server_name www.a.com;
# 访问日志文件存放路径
access_log logs/a.com.access.log combined;
location /
{
# 默认首页文件,顺序从左到右,如果找不到index.html文件,则查找index.htm文件作为首页文件
index index.html index.htm;
# HTML网页文件存放的目录
root /vhosts/a.com;
}
location ~ \.php$ {
root /vhosts/a.com;
fastcgi_pass 127.0.0.1:9000;
fastcgi_index index.php;
#fastcgi_param SCRIPT_FILENAME /scripts$fastcgi_script_name;
fastcgi_param SCRIPT_FILENAME$document_root$fastcgi_script_name;
include fastcgi_params;
}
}
# 第二个虚拟主机
server
{
# 监听的IP和端口
listen 80;
# 主机名称
server_name www.b.com;
# 访问日志文件存放路径
access_log logs/b.com.access.log combined;
location /
{
# 默认首页文件,顺序从左到右,如果找不到index.html文件,则查找index.htm文件作为首页文件
index index.html index.htm;
# HTML网页文件存放的目录
root /vhosts/b.com;
}
location ~ \.php$ {
root /vhosts/b.com;
fastcgi_pass 127.0.0.1:9000;
fastcgi_index index.php;
#fastcgi_param SCRIPT_FILENAME /scripts$fastcgi_script_name;
fastcgi_param SCRIPT_FILENAME$document_root$fastcgi_script_name;
include fastcgi_params;
}
}
# 第三个虚拟主机
server
{
# 监听的IP和端口
listen 80;
# 主机名称
server_name www.c.com;
# 访问日志文件存放路径
access_log logs/c.com.access.log combined;
location /
{
# 默认首页文件,顺序从左到右,如果找不到index.html文件,则查找index.htm文件作为首页文件
index index.html index.htm;
# HTML网页文件存放的目录
root /vhosts/c.com;
}
location ~ \.php$ {
root /vhosts/c.com;
fastcgi_pass 127.0.0.1:9000;
fastcgi_index index.php;
#fastcgi_param SCRIPT_FILENAME /scripts$fastcgi_script_name;
fastcgi_param SCRIPT_FILENAME$document_root$fastcgi_script_name;
include fastcgi_params;
}
}
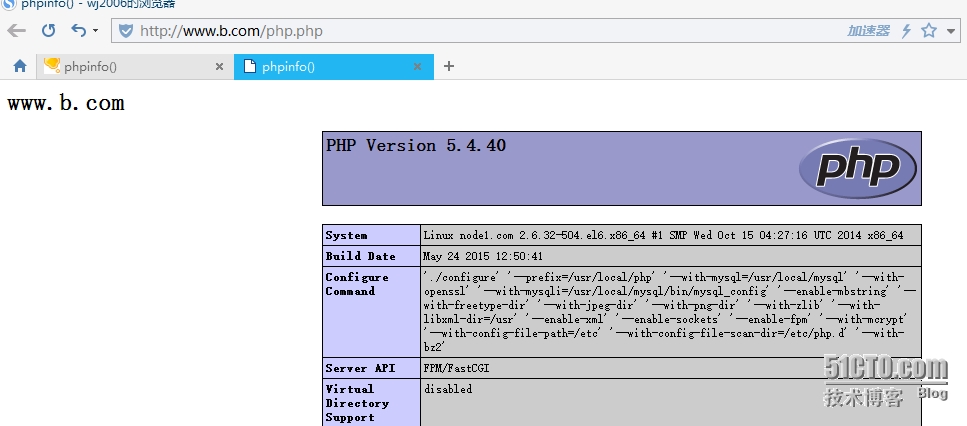
访问;
安装xcache
# tar xvfxcache-3.2.0.tar.bz2
# cd xcache-3.2.0
# /usr/local/php/bin/phpize
# ./configure --enable-xcache--with-php-config=/usr/local/php/bin/php-config
# make && makeinstall
# cp xcache.ini /etc/php.d/
配置xcache.ini
# vim /etc/php.d/xcache.ini
....
;; non-Windows example:
extension = /usr/local/php/lib/php/extensions/no-debug-non-zts-20100525/xcache.so
....
重启启动php-fpm
# /etc/init.d/php-fpm stop
# /etc/init.d/php-fpm start
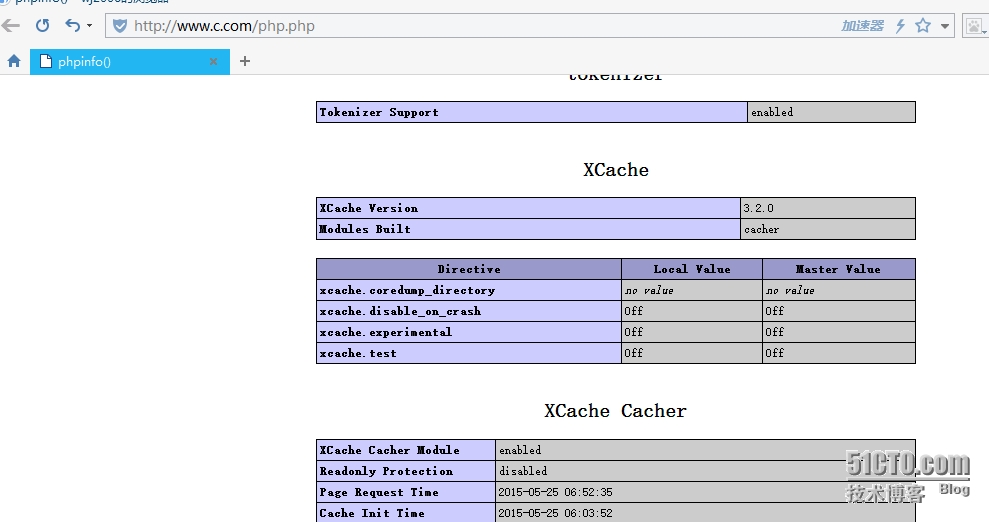
访问测试页面


