


處理大量的連接的讀寫,Apache所採用的select網絡I/O模型非常低效。


|
yum -y install gcc openssl-devel zlib-devel pcre-devel
yum groupinstall "Developement Tools" "Development Libraries" -yt
|
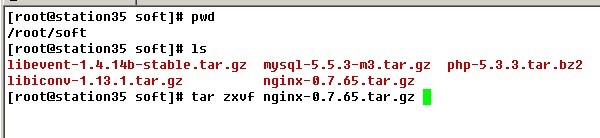
執行上面最後一條語句解壓
|
tar zxvf nginx-0.7.65.tar.gz cd nginx-0.7.65 useradd -s /sbin/nologin -M nginx # 添加一個不能登錄的且沒有家目錄 名爲nginx的用戶 ./configure \ #開始編譯 所帶的參數很容易理解筆者不多解釋 編譯完成後沒有報錯就可以安裝了。 make && make install 編譯安裝完成後爲了讓nginx開機啓動,筆者提供個systemV風格的腳本 vim /etc/init.d/nginxd |
把以下內容粘貼進去
| #!/bin/sh # # nginx - this script starts and stops the nginx daemon # # chkconfig: - 85 15 # description: Nginx is an HTTP(S) server, HTTP(S) reverse \ # proxy and IMAP/POP3 proxy server # processname: nginx # config: /etc/nginx/nginx.conf # config: /etc/sysconfig/nginx # pidfile: /var/run/nginx.pid # Source function library. . /etc/rc.d/init.d/functions # Source networking configuration. . /etc/sysconfig/network # Check that networking is up. [ "$NETWORKING" = "no" ] && exit 0 nginx="/usr/sbin/nginx" prog=$(basename $nginx) NGINX_CONF_FILE="/etc/nginx/nginx.conf" [ -f /etc/sysconfig/nginx ] && . /etc/sysconfig/nginx lockfile=/var/lock/subsys/nginx make_dirs() { # make required directories user=`nginx -V 2>&1 | grep "configure arguments:" | sed 's/[^*]*--user=\([^ ]*\).*/\1/g' -` options=`$nginx -V 2>&1 | grep 'configure arguments:'` for opt in $options; do if [ `echo $opt | grep '.*-temp-path'` ]; then value=`echo $opt | cut -d "=" -f 2` if [ ! -d "$value" ]; then # echo "creating" $value mkdir -p $value && chown -R $user $value fi fi done } start() { [ -x $nginx ] || exit 5 [ -f $NGINX_CONF_FILE ] || exit 6 make_dirs echo -n $"Starting $prog: " daemon $nginx -c $NGINX_CONF_FILE retval=$? echo [ $retval -eq 0 ] && touch $lockfile return $retval } stop() { echo -n $"Stopping $prog: " killproc $prog -QUIT retval=$? echo [ $retval -eq 0 ] && rm -f $lockfile return $retval } restart() { configtest || return $? stop sleep 1 start } reload() { configtest || return $? echo -n $"Reloading $prog: " killproc $nginx -HUP RETVAL=$? echo } force_reload() { restart } configtest() { $nginx -t -c $NGINX_CONF_FILE } rh_status() { status $prog } rh_status_q() { rh_status >/dev/null 2>&1 } case "$1" in start) rh_status_q && exit 0 $1 ;; stop) rh_status_q || exit 0 $1 ;; restart|configtest) $1 ;; reload) rh_status_q || exit 7 $1 ;; force-reload) force_reload ;; status) rh_status ;; condrestart|try-restart) rh_status_q || exit 0 ;; *) echo $"Usage: $0 {start|stop|status|restart|condrestart|try-restart|reload|force-reload|configtest}" exit 2 esac |
保存退出 並給/etc/init.d/nginxd 賦予執行權限
chmod +x /etc/init.d/nginxd
chkconfig --add nginxd ##讓入開機啓動選項中
chkconfig nginxd on #讓其開機自動啓動
service nginxd start #立即啓動nginx 服務

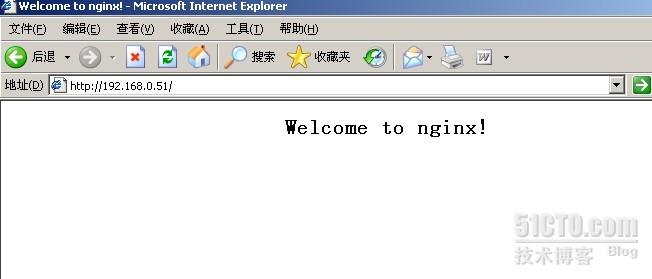
出現OK字樣 並且通過web瀏覽器 訪問該主機出現以下畫面 表示nginx 編譯完成併成功啓動
下面是編譯安裝MYSQL
Mysql
先解壓縮mysql-5.5.3-m3.tar.gz 需進入該源碼包所在目錄 筆者目錄爲/root/soft tar zxvf mysql-5.5.3-m3.tar.gz #解壓縮到當前目錄 cd mysql-5.5.3-m3/ /usr/sbin/groupadd mysql #添加mysql用戶 開始編譯、安裝 (具體參數不多介紹,都是些基本功能的啓用,有興趣者可以查看mysql的官方文檔) 編譯安裝時間可能有些長,需要耐心等待。。 chmod +w /usr/local/webserver/mysql #給mysql目錄寫的權限 cd / mkdir /mysql/{data,binlog,relaylog} -p #創建mysql數據庫、日誌存放目錄 以mysql用戶帳號的身份建立數據表
/usr/sbin/useradd -g mysql mysql #添加mysql組
./configure --prefix=/usr/local/webserver/mysql/ --enable-assembler --with-extra-charsets=complex --enable-thread-safe-client --with-big-tables --with-readline --with-ssl --with-embedded-server --enable-local-infile --with-plugins=partition,innobase,myisammrg
make && make install
chown -R mysql:mysql /usr/local/webserver/mysql #改變mysql目錄的屬組和屬主爲mysql
chown -R mysql:mysql /mysql #改變/mysql的屬組和屬主爲mysql
手動創建Mysql的配置文件
|
vim /mysql/my.cnf [client]
character-set-server = utf8 port = 3306 socket = /tmp/mysql.sock [mysqld] character-set-server = utf8 replicate-ignore-db = mysql replicate-ignore-db = test replicate-ignore-db = information_schema user = mysql port = 3306 socket = /tmp/mysql.sock basedir = /usr/local/webserver/mysql datadir = /mysql/data log-error = /mysql/mysql_error.log pid-file = /mysql/mysql.pid open_files_limit = 10240 back_log = 600 max_connections = 5000 max_connect_errors = 6000 table_cache = 614 external-locking = FALSE max_allowed_packet = 32M sort_buffer_size = 1M join_buffer_size = 1M thread_cache_size = 300 #thread_concurrency = 8 query_cache_size = 512M query_cache_limit = 2M query_cache_min_res_unit = 2k default-storage-engine = MyISAM thread_stack = 192K transaction_isolation = READ-COMMITTED tmp_table_size = 246M max_heap_table_size = 246M long_query_time = 3 log-slave-updates log-bin = /data0/mysql/3306/binlog/binlog binlog_cache_size = 4M binlog_format = MIXED max_binlog_cache_size = 8M max_binlog_size = 1G relay-log-index = /mysql/relaylog/relaylog relay-log-info-file = /mysql/relaylog/relaylog relay-log = /mysql/relaylog/relaylog expire_logs_days = 30 key_buffer_size = 256M read_buffer_size = 1M read_rnd_buffer_size = 16M bulk_insert_buffer_size = 64M myisam_sort_buffer_size = 128M myisam_max_sort_file_size = 10G myisam_repair_threads = 1 myisam_recover interactive_timeout = 120 wait_timeout = 120 skip-name-resolve #master-connect-retry = 10 slave-skip-errors = 1032,1062,126,1114,1146,1048,1396 #master-host = 192.168.1.1 #master-user = username
#master-password = password #master-port = 3306 server-id = 1 innodb_additional_mem_pool_size = 16M innodb_buffer_pool_size = 512M innodb_data_file_path = ibdata1:256M:autoextend innodb_file_io_threads = 4 innodb_thread_concurrency = 8 innodb_flush_log_at_trx_commit = 2 innodb_log_buffer_size = 16M innodb_log_file_size = 128M innodb_log_files_in_group = 3 innodb_max_dirty_pages_pct = 90 innodb_lock_wait_timeout = 120 innodb_file_per_table = 0 #log-slow-queries = /mysql/slow.log #long_query_time = 10 [mysqldump] quick max_allowed_packet = 32M |
創建管理MySQL數據庫的shell腳本
|
vim /mysql/mysqld ###注意 下面的3,4行賬號密碼可以自行創建,第2行的默認端口3306一般不要改 #!/bin/sh -p${mysql_password} -S /tmp/mysql.sock shutdown
|
賦給shell腳本可執行權限
chmod +x /mysql/mysqld #該腳本可以用/mysql/mysqld start |restart |stop 來執行
|
啓動Mysql: /mysql/mysqld start 通過命令行登錄管理MySQL服務器(提示輸入密碼時直接回車): /usr/local/webserver/mysql/bin/mysql -u root -p -S /tmp/mysql.sock 輸入以下SQL語句,創建一個具有root權限的用戶(admin)和密碼(123456): GRANT ALL PRIVILEGES ON *.* TO 'admin'@'localhost' IDENTIFIED BY '123456';
GRANT ALL PRIVILEGES ON *.* TO 'admin'@'127.0.0.1' IDENTIFIED BY '123456';
|
至此Mysql已全部配置完成
PHP
首先 需要解壓編譯安裝
|
cd /root/soft 解壓編譯安裝libevent-1.4.14b-stable tar zxvf libevent-1.4.14b-stable.tar.gz cd libevent-1.4.14b-stable ./configure && make && make install --------------------------------------------------------------------------------------------------------- cd /root/soft tar zxvf libconv-1.13.1.tar.gz cd libiconv-1.13.1
|
|
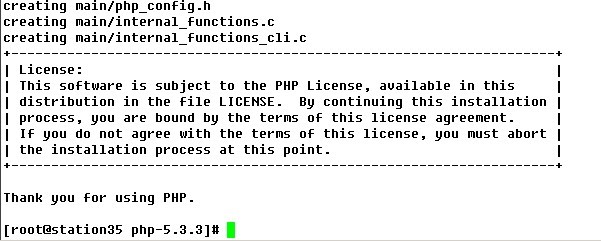
cd /root/soft tar jxvf php-5.3.3.tar.bz2 cd php-5.3.3 ./configure --prefix=/usr/local/php --with-mysql=/usr/local/webserver/mysql --with-mysqli=/usr/local/webserver/mysql/bin/mysql_config --with-openssl --enable-fpm --with-libevent-dir=/usr/local --enable-mbstring --with-freetype-dir --with-jpeg-dir --with-png-dir --with-zlib --with-libxml-dir=/usr --enable-xml --with-iconv-dir=/usr/local #需要說明兩點 1.--with-mysql和--with-mysqli的路徑是你mysql的具體所在的目錄 2.--enable-fpm 啓動fpm .其他都是些基本選項 ,簡單易懂 出現以下畫面表示編譯成功
下面就是安裝了 make ZEND_EXTRA_LIBS='-liconv' #因爲-liconv的目錄不是在/usr/local下所以安裝時需要手動指定 說明: 如果在make 時,mysql的路徑沒有錯誤,但一直error,嘗試使用低版本的mysql在進行此步驟,因爲可能存在版本差異的路徑bug。。 cp /root/soft/php-5.3.3/php.ini-production /usr/local/php/etc/php.ini
|
全部安裝工作準備已經完成,剩下進行一些配置.
|
首先修改下面來配置修改 /usr/local/php/etc/php-fpm.conf 該配置文件只用修改以下四點 ; Note: Used when pm is set to either 'static' or 'dynamic' ; The number of child processes created on startup. ; The desired minimum number of idle server processes. ; The desired maximum number of idle server processes. 只需要把藍色部分前面的註釋去掉,修改完成,試着啓動 /usr/local/php/sbin/php-fpm & 啓動後用netstat -tnlp 查看 如果有如圖所示端口 測表示正常啓動 如需要開機自動啓動 則可以添加到/etc/rc.d/rc.local中 vim /etc/rc.d/rc.local 在空白行添加 /usr/local/php/sbin/php-fpm &
|

|
配置fastcgi_params 文件 cd /etc/nginx/ vim fastcgi_params 將裏面內容替換爲 fastcgi_param GATEWAY_INTERFACE CGI/1.1; 保存退出 |
|
下面就是最後修改nginx.conf配置文件 vim /etc/nginx/nginx.conf 首先將 #user nobody; 之後找到 location ~ \.php$ { 把前面註釋全部去掉 root 後面的路徑是你網頁文件所放置的路徑,筆者放在/www下 該目錄如果不存在的話還需要手動創建。 找到 location / { 修改爲如上所示 主要是添加index 後面的index.php 修改完成後保存退出,重新啓動nginx服務 service nginxd restart 之後編輯/www/index.php 在其中添加 <?php 保存退出 之後用web瀏覽器訪問 如果出現如下畫面 表示服務成功,並能連接到php
|

|
下面是測試msql 的連接 把剛纔/www/index.php中的內容修改成 <?php 然後刷新web頁面,如果出現OK!字樣 測表示正常連接 |
如果都沒有問題,那麼恭喜你,你已經全源碼成功實現LEMP架構。