


實驗拓撲如下:

二、服務器ip配置信息
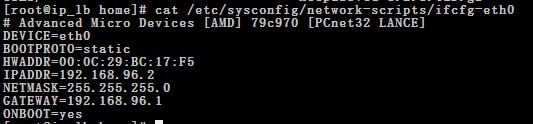
1. ip_lb 主機(master) :
2.ip_lb_2 主機 (backup)

3.web1 主機

4.web2 主

三、在master和backup分別查看是否有ipvsadm軟件
1. 檢查ipvsadm是否安裝
rpm -qa ipvsadm*
rpm -vih ipvsadm*
yum install -y ipvsadm*
yum 配置文件
[maweibing]
named=maweibing
baseurl=file:///mnt/
enabled=1
gpgcheck=1
gpgkey=file:///etc/pki/rpm-gpg/RPM-GPG-KEY-redhat-release
2. 檢查模版是否加入內核
四、分別在web1和web2上面安裝apache服務.
# 安裝apache服務不說明了. 開放的端口是:80
1. keepalived-1.2.1.tar.gz # 解壓這個文件並且安裝 (tar -zxvf keepalived-1.2.1.tar.gz)
2. ./configure --prefix=/home/keepalived/ --with-kernel-dir=/usr/src/kernels/2.6.18-164.el5-i686
3.make
4.make install
5.配置文件的路徑
cp /home/keepalived/etc/rc.d/init.d/keepalived /etc/init.d/
cp /home/keepalived/etc/sysconfig/keepalived /etc/sysconfig/
cp /home/keepalived/etc/keepalived/keepalived.conf /etc/keepalived/
cp /home/keepalived/sbin/keepalived /sbin/
6.配置keepalived.conf文件.( ip_lb 主機<master> )
vim /etc/keepalived/keepalived.conf
#global define
global_defs {
router_id LVS_T1
}


vrrp_sync_group bl_group {
group {
  bl_one
}
}

vrrp_instance bl_one {
    state MASTER
    interface eth0
    lvs_sync_daemon_interface eth0
    virtual_router_id 38
    priority 150
    advert_int 3
    authentication {
        auth_type PASS
        auth_pass 1111
    }
    virtual_ipaddress {
      192.168.96.100
    }
}


virtual_server 192.168.96.100 8099 {
    delay_loop 3
    lb_algo rr
    lb_kind DR
    persistence_timeout 1
    protocol TCP


    real_server 192.168.96.33 8099 {
        weight 1
        TCP_CHECK {
            connect_timeout 10
            nb_get_retry 3
            delay_before_retry 3
            connect_port 8099
        }

    }

    real_server 192.168.96.4 8099 {
        weight 1
        TCP_CHECK {
            connect_timeout 10
            nb_get_retry 3
            delay_before_retry 3
            connect_port 8099
        }
    }
}
7、配置keepalived.conf文件.(ip_lb_2 主機 <backup> )
vim /etc/keepalived/keepalived.conf
#global define
global_defs {
router_id LVS_T2
}


vrrp_sync_group bl_group {
group {
  bl_one
}
}

vrrp_instance bl_one {
    state BACKUP
    interface eth0
    lvs_sync_daemon_interface eth0
    virtual_router_id 38
    priority 120
    advert_int 3
    authentication {
        auth_type PASS
        auth_pass 1111
    }
    virtual_ipaddress {
      192.168.96.100
    }
}


virtual_server 192.168.96.100 8099 {
    delay_loop 3
    lb_algo rr
    lb_kind DR
    persistence_timeout 1
    protocol TCP


    real_server 192.168.96.33 8099 {
        weight 1
        TCP_CHECK {
            connect_timeout 10
            nb_get_retry 3
            delay_before_retry 3
            connect_port 8099
        }

    }

    real_server 192.168.96.4 8099 {
        weight 1
        TCP_CHECK {
            connect_timeout 10
            nb_get_retry 3
            delay_before_retry 3
            connect_port 8099
        }
    }
}
8. 分別在主備上啓動keepalived
[root@ip_lb home]# /etc/init.d/keepalived start
Starting keepalived: [ OK ]
[root@ip_lb home]# tail -f /var/log/message
# PS:這裏說的LVS.並不是用ipvsadm軟件配置.而是直接用keepalived的virtual_server配置項控制的.
# 安裝ipvsadm只是可以看到負載狀況.其實只需要keepalived也可以實現負載均衡集羣.
六、在web1和web2主機上配置LVS-DR的相關配置.
1. vim /etc/init.d/lvsDR_node (web1主機)
#! /bin/sh
# descript : start real server DR
VIP=192.168.96.100
. /etc/rc.d/init.d/functions
case "$1" in
       start)
             echo "start LVS of RealServer DR"
             /sbin/ifconfig lo:0 $VIP broadcast $VIP netmask 255.255.255.255 up
             echo "1" > /proc/sys/net/ipv4/conf/all/arp_ignore
             echo "2" > /proc/sys/net/ipv4/conf/all/arp_announce
               ;;
       stop)
             /sbin/ifconfig lo:0 down
             echo "close LVS of RealServer DR"
             echo "0" > /proc/sys/net/ipv4/conf/all/arp_ignore
             echo "0" > /proc/sys/net/ipv4/conf/all/arp_announce
              ;;
         *)
              echo "Usage : $0 {start|stop}"
              exit 1
esac
2. 把這個文件複製到web2主機上.
3. 在web1和web2上分別啓動這個腳本:
/etc/init.d/lvsDR_node start
七、web1和web2主機上開啓httpd服務.
/etc/init.d/httpd start
# ================= TEST =======================================
八、測試是否可以負載均衡.
編寫測試腳本:
#! /bin/sh
for((i=1;i<=100;i++));do
curl http://192.168.96.100:8099 >> /tmp/q;
done
結果:

九、測試斷開一個web服務或加入一個web服務
現在關閉 web2主機(192.168.96.4) 的web 服務..
查看日誌可以看到:

現在再把 web2主機(192.168.96.4)的web 服務加入進來:
查看日誌可以看到:

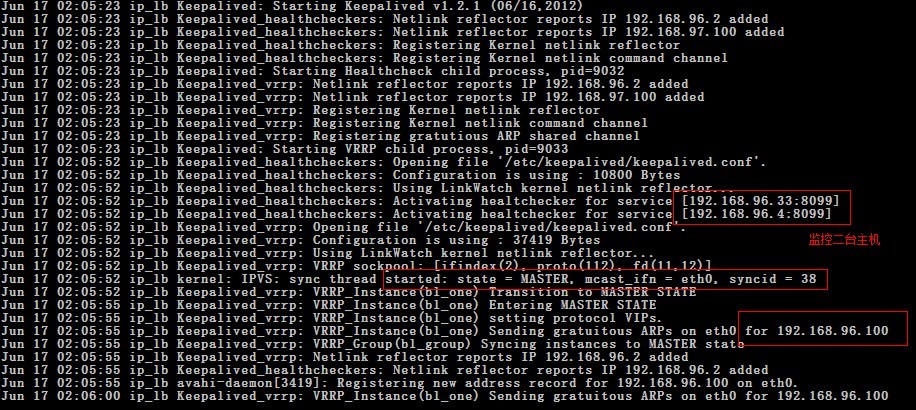
十、 測試HA
現在模擬主(master)的keepalived主機死掉.
備機的日誌文件:

可以看到備機的keepalived已經開始工作....