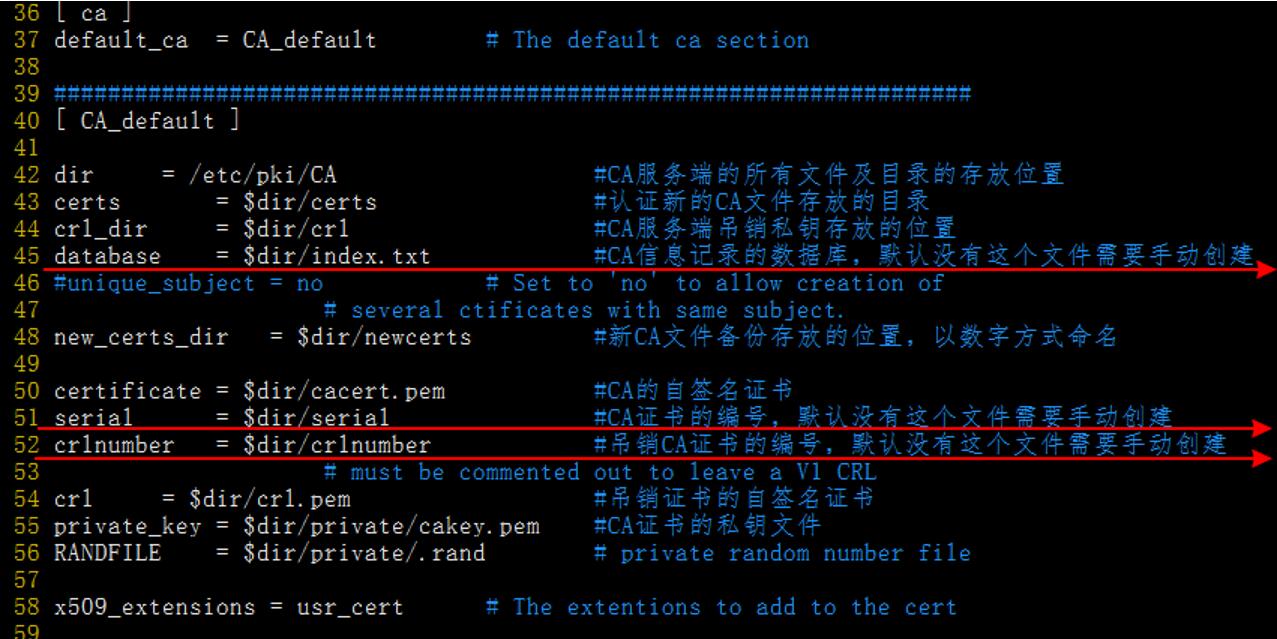
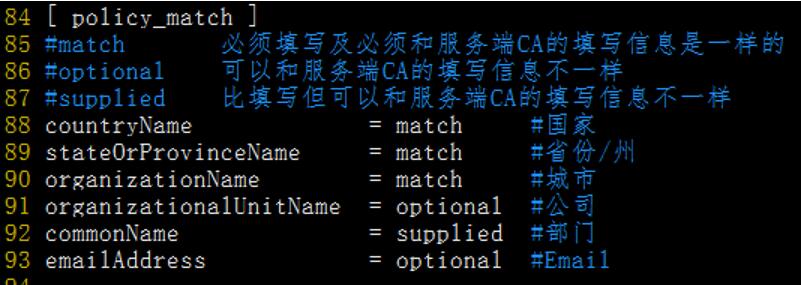
CA認證的配置文件是/etc/pki/tls/opensl.cnf
服務器的操作
1.進入/etc/pki/CA下
創建 index.txt,serial,crlnumber這三個文件
併爲爲創建記錄證書文件和吊銷證書文件給予編號
[root@centos6 ~]# cd /etc/pki/CA
[root@centos6 CA]# touch index.txt
[root@centos6 CA]# touch serial
[root@centos6 CA]# touch crlnumber
[root@centos6 CA]# echo 01 > serial
[root@centos6 CA]# echo 01 > crlnumber
2.建立私鑰文件
[root@centos6 CA]# (umask 077 ; openssl genrsa -out /etc/pki/CA/private/cakey.pem 4096 )
Generating RSA private key, 4096 bit long modulus
..................................................++
.....................................................................................................................................................................................++
e is 65537 (0x10001)
#()代表建立一個子shell,umask 077 改變子shell的權限
#openssl genrsa -out 輸入一個密鑰文件 長度爲4096
[root@centos6 CA]# tree                               #查看CA目錄下的文件
.
├── cacert.pem
├── certs
├── crl
├── crlnumber
├── index.txt
├── newcerts
├── private
│   └── cakey.pem
└── serial
4 directories, 5 files
3.給自己頒發CA認證
[root@centos6 CA]# openssl req -new -x509 -key /etc/pki/CA/private/cakey.pem  -out /etc/pki/CA/cacert.pem -days 36500
You are about to be asked to enter information that will be incorporated
into your certificate request.
What you are about to enter is what is called a Distinguished Name or a DN.
There are quite a few fields but you can leave some blank
For some fields there will be a default value,
If you enter '.', the field will be left blank.
-----
Country Name (2 letter code) [XX]:CN                                                                       # 國家
State or Province Name (full name) []:beijing                                                          # 省/州
Locality Name (eg, city) [Default City]:beijing                                                          # 城市
Organization Name (eg, company) [Default Company Ltd]:bta                             # 公司
Organizational Unit Name (eg, section) []:yunwei                                                   # 部門
Common Name (eg, your name or your server's hostname) []:bta.com             # 所需要認證的名稱
Email Address []:[email protected]                                                                                  # Email
客戶端
客戶端需要在/etc/pki/tls/下操作
1.進入 /etc/pki/tls建立私鑰文件
[root@go ~]$cd /etc/pki/tls/
[root@go tls]$(umask 077; openssl genrsa -out /etc/pki/tls/private/TianRandai.key 2048)
Generating RSA private key, 2048 bit long modulus
....+++
..+++
e is 65537 (0x10001
[root@go tls]$tree private/    #查看TianRandai.key是否創建成功
private/
└── TianRandai.key
0 directories, 1 file
2.導出證書
root@go tls]$openssl req -new -key private/TianRandai.key -out TianRandai.csr
You are about to be asked to enter information that will be incorporated
into your certificate request.
What you are about to enter is what is called a Distinguished Name or a DN.
There are quite a few fields but you can leave some blank
For some fields there will be a default value,
If you enter '.', the field will be left blank.
-----
Country Name (2 letter code) [XX]:CN
State or Province Name (full name) []:beijing
Locality Name (eg, city) [Default City]:beijing
Organization Name (eg, company) [Default Company Ltd]:bta
Organizational Unit Name (eg, section) []:yunwei
Common Name (eg, your name or your server's hostname) []:www.bta.com
Email Address []:[email protected]
Please enter the following 'extra' attributes
to be sent with your certificate request
A challenge password []:
An optional company name []:
#這裏的內容需要和服務端match的地方填寫相同的信息
3.將證書複製到服務端
[root@go tls]$scp TianRandai.csr 172.18.17.21:/etc/pki/CA
[email protected]'s password:
TianRandai.csr                                                                                                                                            100% 1041     1.0KB/s   00:00
服務端
1.查看一下客戶端文件
[root@centos6 CA]# tree
.
├── cacert.pem
├── certs
├── crl
├── crlnumber
├── index.txt
├── newcerts
├── private
│   └── cakey.pem
├── serial
└── TianRandai.csr
#客戶端文件已經拷貝過來了
4 directories, 6 files
2.認證客戶端文件生成CA證書
[root@centos6 CA]# openssl ca -in TianRandai.csr -out TianRandai.crt -days 365
#-days 給予證書的期限,默認以天爲單位
Using configuration from /etc/pki/tls/openssl.cnf
Check that the request matches the signature
Signature ok
Certificate Details:
        Serial Number: 1 (0x1)
        Validity
            Not Before: Feb 21 01:57:04 2017 GMT
            Not After : Feb 21 01:57:04 2018 GMT
        Subject:
            countryName       = CN
            stateOrProvinceName   = beijing
            organizationName     = bta
            organizationalUnitName  = yunwei
            commonName        = www.bta.com
            emailAddress              = [email protected]
        X509v3 extensions:
            X509v3 Basic Constraints:
                CA:FALSE
            Netscape Comment:
                OpenSSL Generated Certificate
            X509v3 Subject Key Identifier:
                2C:2E:03:82:0A:2C:95:11:7E:0F:71:DC:41:B8:B6:F8:F3:32:3B:1F
            X509v3 Authority Key Identifier:
                keyid:98:9B:95:79:0B:0A:25:93:17:06:D1:02:92:1A:EF:A0:6F:6B:95:D8
Certificate is to be certified until Feb 21 01:57:04 2018 GMT (365 days)
Sign the certificate? [y/n]:y
1 out of 1 certificate requests certified, commit? [y/n]y
Write out database with 1 new entries
Data Base Updated
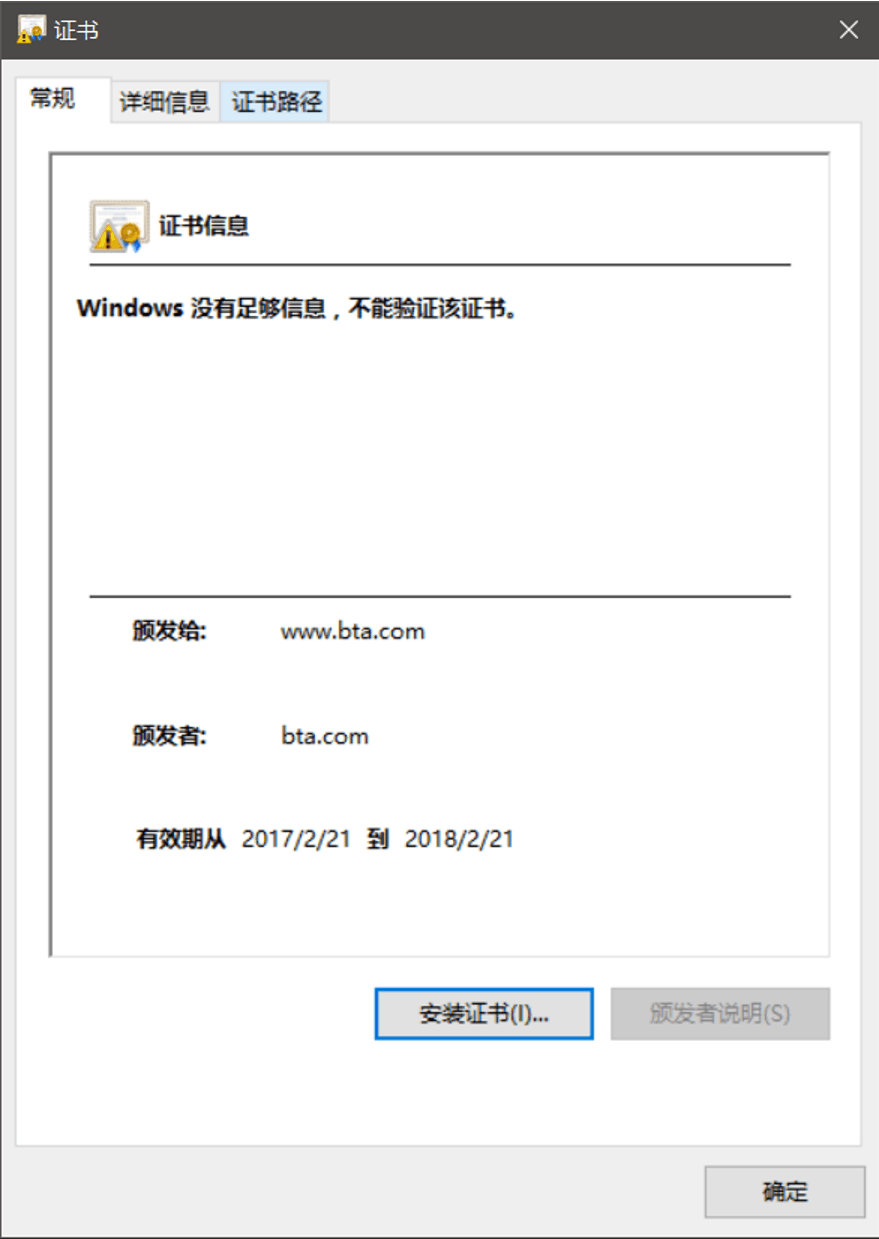
3.拷貝到windows上來開一看,木有問題


