


PXE Server就是DHCP+TFTP服務,如果想使用Server上的文件,可以加入FTP或Samba等服務。我用經常用的是PXE啓動WinPE環境,在Linux 中再加入Samba服務。WinPE中用 net use 把共享映射到WinPE下。就可以使用Server上的文件了。
下面Linux PXE是我在VirtualBox上RHEL6系統上配置的。
1.配置Linux DHCP Server
以下是dhcpd.conf配置文件:這裏只是簡單給出必須的配置項。
ddns-update-style interim;
ignore client-updates;
allow booting;
allow bootp;
class "pxeclients" {
match if substring(option vendor-class-identifier, 0, 9) = "PXEClient";
next-server 192.168.56.254;
filename "pxeboot.0";
}
subnet 192.168.56.0 netmask 255.255.255.0 {
option routers 192.168.56.1;
range dynamic-bootp 192.168.56.10 192.168.56.250;
default-lease-time 600;
max-lease-time 7200;
}
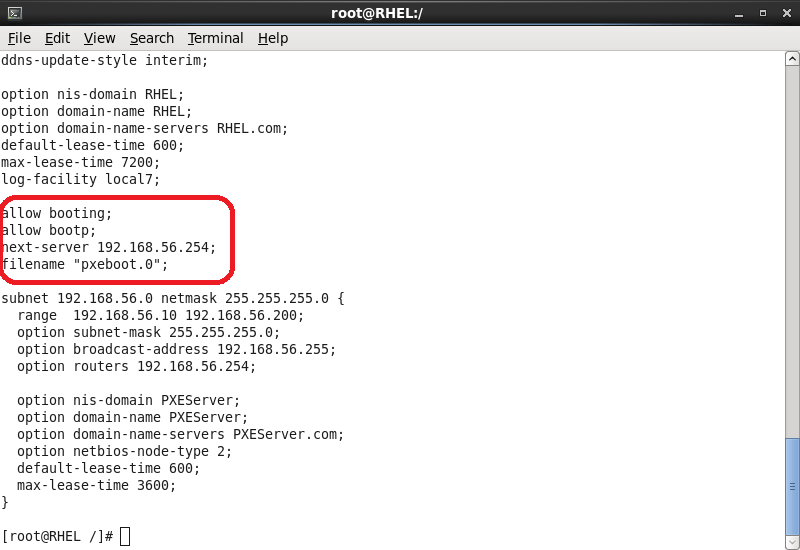
下圖是我的DHCP配置文件內容:紅色方框中的參數是必須的,一個都不能少。
2.配置Linux下的tftp Server
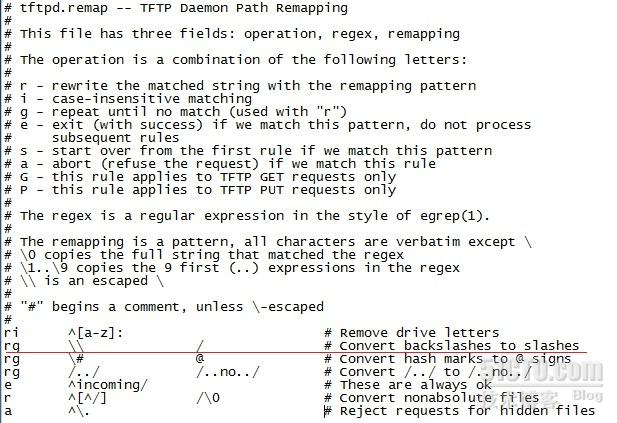
(1)創建remap文件,/tftpboot/tftpd.remap。該文件內容如下:
必須加入這一行:rg \\ /
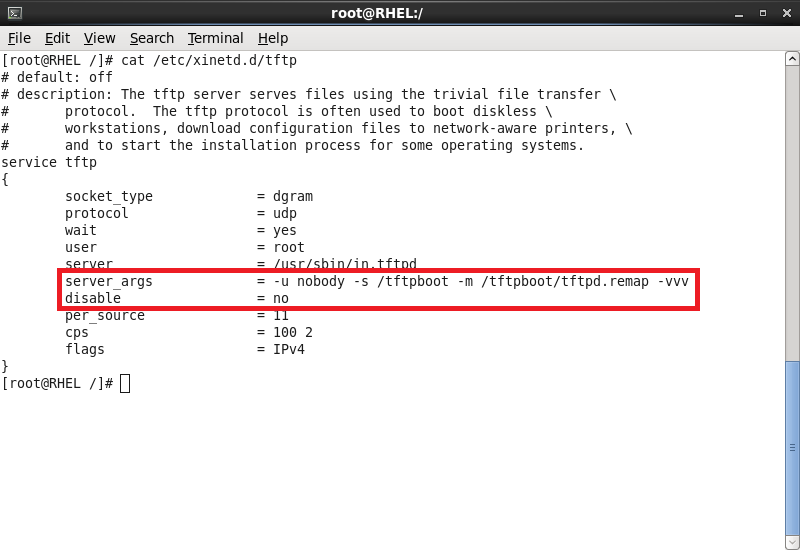
(2)編輯/etc/xinitd.d/tftp文件。
service tftp
{
socket_type = dgram
protocol = udp
wait = yes
user = root
server = /usr/sbin/in.tftpd
server_args = -u nobody -s /tftpboot -m /tftpboot/tftpd.remap -vvv
disable = no
per_source = 11
cps = 100 2
flags = IPv4
}
下圖是我的xinitd方式啓動TFTP的配置內容:
3.啓動各服務
#service dhcpd restart
#service xinetd restart
4.創建BCD啓動文件(摘自微軟官方)
在此步驟中,將使用 BCDEdit 工具創建 BCD 存儲。BCDEdit 工具只能在 Windows7 計算機或 Windows PE 環境中運行。BCDEdit 工具位於 \Windows\System32 目錄中。
1.在 Windows® 7 計算機或 Windows PE 環境中,使用 BCDEdit 工具創建一個 BCD 存儲。例如,
Bcdedit -createstore c:\BCD
Bcdedit -store c:\BCD -create {ramdiskoptions} /d "Ramdisk options"
Bcdedit -store c:\BCD -set {ramdiskoptions} ramdisksdidevice boot
Bcdedit -store c:\BCD -set {ramdiskoptions} ramdisksdipath \boot\boot.sdi
3.(可選)創建內核調試程序設置。例如,
Bcdedit -store c:\BCD -create {dbgsettings} /d "Debugger settings"
Bcdedit -store c:\BCD -set {dbgsettings} debugtype serial
Bcdedit -store c:\BCD -set {dbgsettings} baudrate 115200
Bcdedit -store c:\BCD -set {dbgsettings} debugport 1
4.爲 Windows PE 映射創建 OSLoader 設置。例如,
Bcdedit -store c:\BCD -create /d "MyWinPE Boot Image" /application osloader 如果 s 命令成功,則計算機將返回 GUID 值。下列示例將此值指代爲 guid1。
Bcdedit -store c:\BCD -set {guid1} systemroot \Windows
Bcdedit -store c:\BCD -set {guid1} detecthal Yes
Bcdedit -store c:\BCD -set {guid1} winpe Yes
Bcdedit -store c:\BCD -set {guid1} osdevice ramdisk=[boot]\Boot\boot.wim,{ramdiskoptions}
Bcdedit -store c:\BCD -set {guid1} device ramdisk=[boot]\Boot\boot.wim,{ramdiskoptions}
5.創建 BOOTMGR 設置。例如,
Bcdedit -store c:\BCD -create {bootmgr} /d "Windows BootManager" /inherit {dbgsettings}
Bcdedit -store c:\BCD -set {bootmgr} timeout 30
Bcdedit -store c:\BCD -displayorder {guid1} {guid2}
其中,guid1、guid2 等等是每個 .wim 文件條目對應的 GUIDS。
我所使用的BCDEDIT命令如下:我把創建出來的BCD文件保存在D:\BCD這個目錄下。
bcdedit /createstore d:\BCD\BCD
bcdedit /store D:\BCD\BCD /create {ramdiskoptions} /d "Ramdisk options"
bcdedit /store D:\BCD\BCD /set {ramdiskoptions} ramdisksdidevice boot
bcdedit /store D:\BCD\BCD /set {ramdiskoptions} ramdisksdipath \Boot\boot.sdi
bcdedit /store D:\BCD\BCD /create /d "WinPE 3.0 32bit" /application osloader 得到ID
set id={ac1ab259-21dd-11e0-aee8-b8ac6fc4f993} 例如是這個ID
bcdedit /store D:\BCD\BCD /set %id% systemroot \windows
bcdedit /store D:\BCD\BCD /set %id% detecthal Yes
bcdedit /store D:\BCD\BCD /set %id% winpe Yes
bcdedit /store D:\BCD\BCD /set %id% osdevice ramdisk=[boot]\Boot\boot32.wim,{ramdiskoptions}
bcdedit /store D:\BCD\BCD /set %id% device ramdisk=[boot]\Boot\boot32.wim,{ramdiskoptions}
bcdedit /store D:\BCD\BCD /set %id% detecthal Yes
bcdedit /store D:\BCD\BCD /set %id% winpe Yes
bcdedit /store D:\BCD\BCD /set %id% osdevice ramdisk=[boot]\Boot\boot32.wim,{ramdiskoptions}
bcdedit /store D:\BCD\BCD /set %id% device ramdisk=[boot]\Boot\boot32.wim,{ramdiskoptions}
bcdedit /store D:\BCD\BCD /create {bootmgr} /d "Windows Boot Manager"
bcdedit /store D:\BCD\BCD /set {bootmgr} nointegritychecks yes
bcdedit /store D:\BCD\BCD /set {bootmgr} timeout 0
bcdedit /store D:\BCD\BCD /default %id%
bcdedit /store D:\BCD\BCD /displayorder %id%
bcdedit /store D:\BCD\BCD /set {bootmgr} nointegritychecks yes
bcdedit /store D:\BCD\BCD /set {bootmgr} timeout 0
bcdedit /store D:\BCD\BCD /default %id%
bcdedit /store D:\BCD\BCD /displayorder %id%
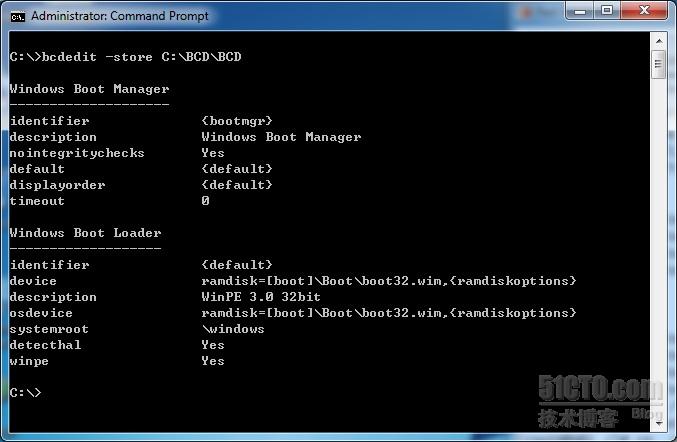
下圖是我的BCD文件中的內容:
還可以做成多啓動,例如WinPE 32BIT和WinPE 64BIT。只需要用BCDEDIT命令修改BCD文件即可。網有很多說要修改bootmgr.exe文件的二進制內容,又說要去掉其中的MD5驗證功能等,都是錯誤的,根本不用那麼麻煩。我們只需要修改BCD文件就可以了。而Windows中提供了一個非常強大的命令來修改它,就是BCDEDIT這個命令。
5.把WINPE3.0文件放到Linux TFTP Server /tftpboot 目錄下。
創建Boot目錄
#Mkdir /tftpboot/Boot
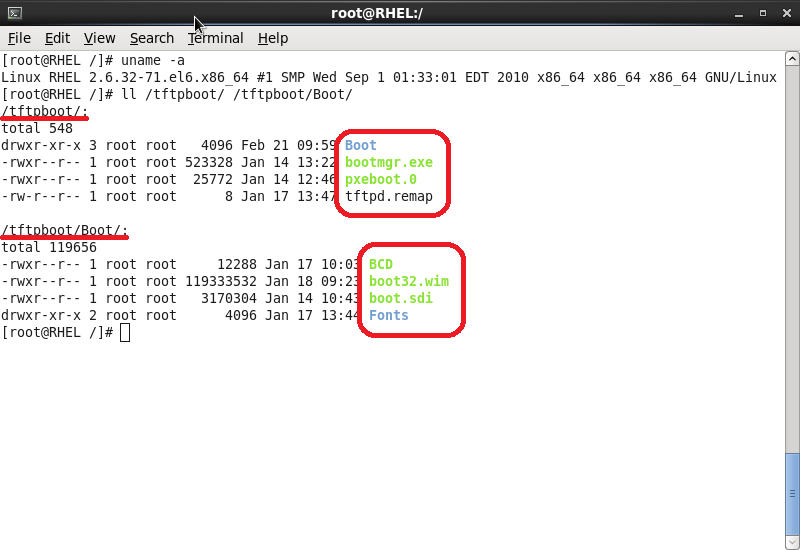
把BCD、boot.sdi、boot.wim、front目錄放到 /tftpboot/Boot/ 目錄
把pxeboot.0、bootmgr.exe、tftpd.remap放到 /tftpboot/ 目錄
其中tftpd.remap這個文件非常重要,這是把windows下的“\”映射成Linux下的“/”,否則在加載BCD文件的時候就會出錯,出現找不到BCD文件的提示。
下圖是我的/tftpboot/目錄下的內容:
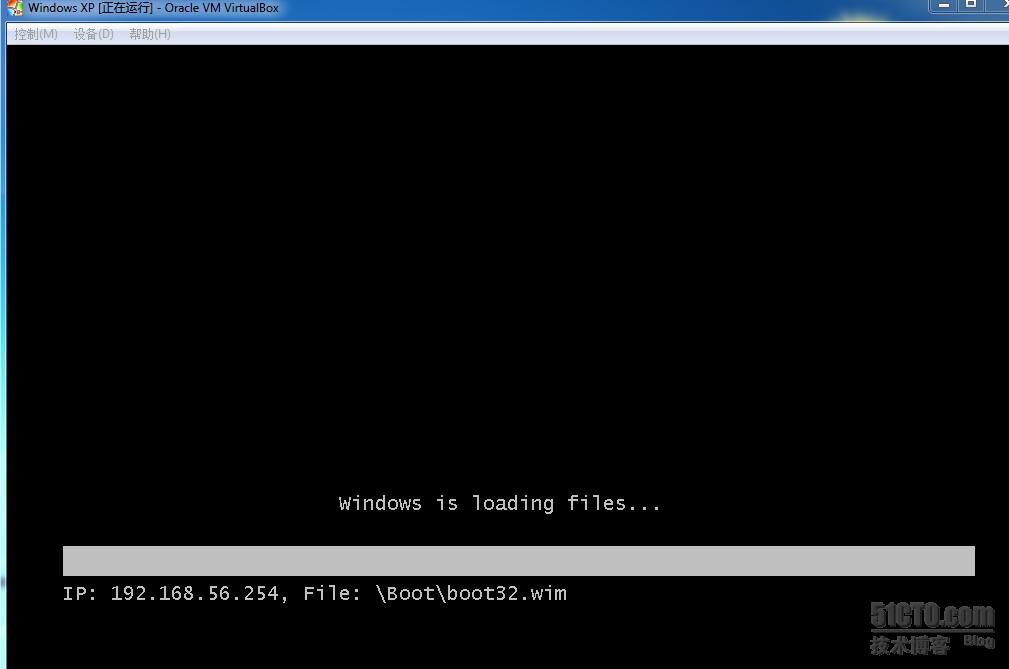
從網絡啓動,啓動畫面如下:
至於WinPE3.0如何製作,這種簡單的問題就不用說了,用AIK或OPK就可以製作一個乾淨的WinPE了。bootmgr.exe/boot.sdi/boot.wim/pxeboot.0可以從AIK或OPK中獲得。其中pxeboot.0就是pxebootn12.com的改名。
以後有時間我會把這部份完善。