hadoop生態系統
HBase簡介
–HBase–HadoopDatabase,是一個高可靠性、高性能、面向列、可伸縮、實時讀寫的分佈式數據庫
–利用HadoopHDFS作爲其文件存儲系統,利用HadoopMapReduce來處理HBase中的海量數據,利用Zookeeper作爲其分佈式協同服務
(1)安裝的前提條件
此安裝是在阿里雲服務器上安裝的,且java環境已經配好,hadoop和zookeeper都已經安裝好併成功啓動
(2)下載hbase-1.1.3-bin.tar.gz,上傳並解壓
進入conf目錄下
1.在hbase-env.sh中配置JAVA_HOME
2.配置hbase-site.xml如下
<property>
<name>hbase.rootdir</name>
<value>file:///opt/hbase</value> //hbase根目錄
</property>
<property>
<name>hbase.zookeeper.property.dataDir</name>
<value>/opt/zookeeper</value> //zookeeper根目錄,要啓動
</property>
(3)啓動hbase
進入bin/目錄
[root@tongbin]# ./start-hbase.sh ./stop-hbase.sh
startingmaster, logging to /home/tong/hbase-1.1.3/bin/../logs/hbase-tong-master-tong.out
[root@tongbin]# jps
2442SecondaryNameNode
2148NameNode
2284-- process information unavailable
9112Jps
1074Application
7868QuorumPeerMain
2241DataNode
8848 HMaster
可以看到啓動成功了
(4)測試hbase的shell
[root@tong bin]# ./hbase shell
SLF4J: Classpath contains multiple SLF4J bindings.
SLF4J: Foundbinding in[jar:file:/home/tong/hbase-1.1.3/lib/slf4j-log4j12-1.7.5.jar!/org/slf4j/impl/StaticLoggerBinder.class]
SLF4J: Foundbinding in [jar:file:/home/tong/hadoop-2.5.1/share/hadoop/common/lib/slf4j-log4j12-1.7.5.jar!/org/slf4j/impl/StaticLoggerBinder.class]
SLF4J: Seehttp://www.slf4j.org/codes.html#multiple_bindings for an explanation.
SLF4J: Actualbinding is of type [org.slf4j.impl.Log4jLoggerFactory]
HBase Shell; enter'help<RETURN>' for list of supported commands.
Type"exit<RETURN>" to leave the HBase Shell
Version 1.1.3,r72bc50f5fafeb105b2139e42bbee3d61ca724989, Sat Jan 16 18:29:00 PST 2016
hbase(main):001:0>
hbase(main):002:0>list
hbase(main):002:0>status
1 servers, 0dead, 2.0000 average load
hbase(main):003:0>version
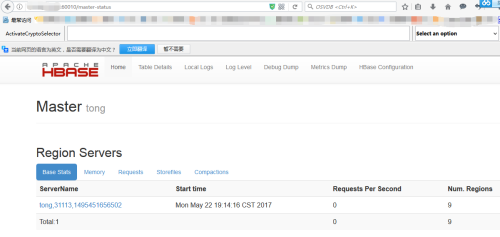
擴展:讓瀏覽器訪問hbase
#vim hbase-site.xml 添加以下內容
<property>
<name>hbase.master.info.port</name>
<value>60010</value> //端口,任選
</property>
<property>
<name>hbase.master.info.bindAddress</name>
<value>ip</value>
</property>
# vim/etc/sysconfig/iptables //讓60010通過
# serviceiptables restart //重啓網卡
就可以在瀏覽器中訪問了,瀏覽器訪問http://ip:60010/
至此,hbase的單機安裝就結束了


