


Nagios是一款功能強大的網絡監視工具,它可以有效的監控windows、linux、unix主機狀態以及路由器交換機的網絡設置,打印機工作狀態等,並將狀態出現異常的服務及時以郵件、msn短信等形式第一時間通告管理員。由於它是一款遵循GPLv2的開源網絡監控軟件,以其出色的性能低廉的使用成本,深受廣大用戶的好評。
nagios的主要監控功能有:
1)監控網絡服務(HTTP、POP3、SMTP、PING、MySQL等)
2)監控主機資源(磁盤空間利用率、內存利用率、CPU負載等)
3)簡潔的插件設計接口,使得用戶可以輕鬆開發所需的檢測腳本(運維則可直接找到相關腳本並使用)
4)並行服務模式
5)輕鬆描述網絡結構,並且能夠區辨“宕機”和“主機不可達”
6)通過郵件或用戶自定義的方式將主機或服務的工作狀態變化情況通知給管理員6)當服務或主機問題產生與解決時將告警發送給聯繫人(通過EMail、短信、用戶定義方式) 可以通過飛信,等方式實現時,既可傳遞給管理員,可高效的保證服務器的維護
7)自動日誌滾動
8)支持以冗餘方式進行主機監控
9)可以通過web方式直觀的查看當前網絡狀態、通知和問題歷史、日誌文件等等,此組件爲可選 Nagios相關的配置文件: nagios.cfg爲其主配置文件其中可以定義nagios的一些基本工作狀態可監控機的配置文件; command.cfg其爲nagios的監控命令配置文件,在其中可定義nagios在監控過程中針對某項服務所使用到得命令; contact.cfg其爲nagios報警途徑配置文件,它用來定義一旦監控到某臺主機狀態異常或某服務狀態爲離線通知運維人員的方法; timeperiods.cfg用於定義nagios向運維人員發送報警的週期時間頻率等; resource.cfg用於定義nagios監控服務所使用到腳本所在路徑; templates.cfg中定義的是nagios監控各項主機或服務屬性狀態所需的模板。
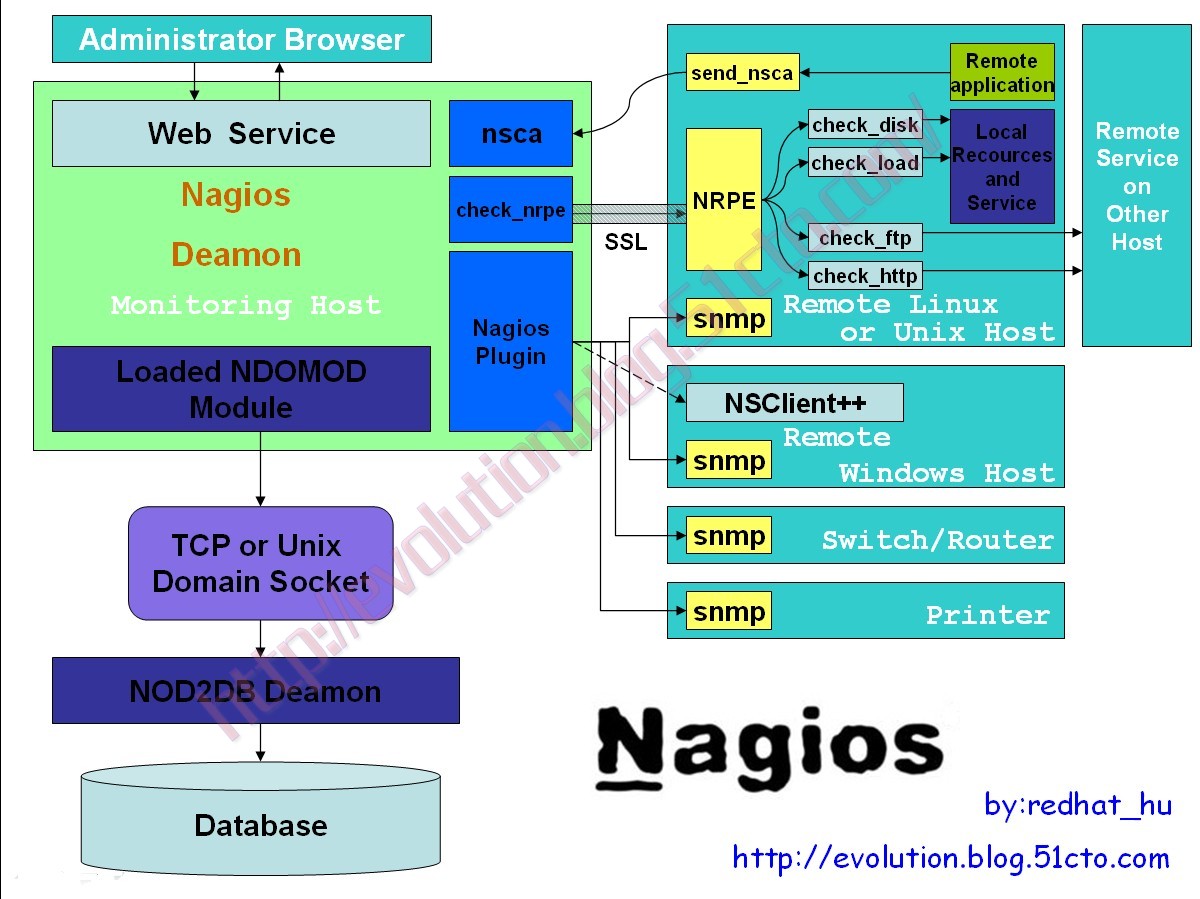
工作原理不在贅述,直接上圖:
下文將包括這些內容:安裝配置最新版nagios V3.3.1、添加定義被監控Windows主機和Linux主機、具體服務的監控、出現異常情況報警手段定義以及配置過程中筆者所遇到並解決的一些問題。
廢話不多說,直接開始配置內容
1.到nagios官網下載到最新版的nagios-3.3.1.tar、nagios-plugins-1.4.15.tar、nrpe-2.12.tar以及windows的客戶端nsclient_201.zip
2.安裝nagios部署過程中需要依賴到得其他軟件和庫文件
- yum groupinstall -y 'Development Libraries' 'Development Tools" 'Legacy Software Development' 'X Software Development'
- yum -y install httpd gcc glibc glibc-common *gd* php php-mysql mysql mysql-server mysql-devel openssl-devel
- # 安裝Nagios必須的基本組件的運行依賴於httpd、mysql、gd以及編譯用到的gcc
Nagios 監控端程序的安裝及配置
1.添加nagios用戶和組
- groupadd nagcmd
- #添加與nagios運行相關服務的組
- useradd -m nagios
- #添加nagios用戶
- usermod -a -G nagcmd nagios
- #將nagios用戶追加附加組
- usermod -a -G nagcmd apache
- #將apache用戶追加nagcmd組使之工作時具有足夠的權限
2.編譯安裝nagios 3.3.1
- tar xvf nagios-3.3.1.tar.gz
- cd nagios
- # ./configure --with-command-group=nagcmd --enable-event-broker
- #默認安裝路徑在/usr/local/nagios/
- make all && make install && make install-init && make install-config && make install-commandmode && make install-webconf
- #安裝主程序、添加初始化程序、生成配置文件、生成web配置文件
make install-webconf的作用:在/etc/httpd/conf.d/nagios.conf生成web相關配置文件,用於定義nagios使用的CGI選項,web的身份認證等
- htpasswd -c /usr/local/nagios/etc/htpasswd.users nagiosadmin
- New password:
- Re-type new password:
- Adding password for user nagios
- #爲nagios的web頁面創建賬號密碼,對訪問進行身份認證
- service httpd restart
- chkconfig httpd on
- #啓動httpd,並設置開機啓動
PS:此處用戶名儘量使用默認nagiosadmin,否則就需要修改cgi.cfg文件中所有關於認證選項的用戶
3.編譯安裝nagios-plugins
nagios的所有監控工作都是由nagios-plugins插件完成的,因此,在啓動nagios之前還需要爲其安裝nagios-plugins。
Ps:作者在安裝nagios-cn-3.2.3.tar過程中,在此處編譯完成發現mysql關聯庫文件本跳過。經分析原因是由於在編譯nagios時修改了nagios的默認安裝路徑(非/usr/local/nagios)。 解決辦法:
- tar xvf nagios-plugins-1.4.15.tar.gz
- cd nagios-plugins-1.4.15
- ./configure --with-nagios-user=nagios --with-nagios-group=nagios --with-mysql
- #添加mysql依賴
- make && make install
- #編譯並安裝
- cp /usr/lib/mysql/mysql_config /usr/lib/pkgconfig/
- #將mysql的配置文件放在這個目錄下使之能夠在編譯過程中讀到相關配置選項
- 再進行編譯安裝nagios-plugins
4.測試配置文件語法並嘗試啓動nagios
- chkconfig --add nagios
- chkconfig nagios on
- #添加nagios到開機啓動項
- vim /etc/profile
- PATH=$PATH:/usr/local/nagios/bin
- #向profile加入這一行,指明nagios命令的path
- . /etc/profile
- nagios -v /usr/local/nagios/etc/nagios.cfg
- #檢查配置文件的語法
- service nagios start
- #如語法監測爲報錯則嘗試開啓服務
注意:此時需要關閉SELINUX或針對nagios對SELIUNX進行配置
- 方法一、直接關閉selinux
- getenforce
- #查看selinux的運行狀態
- setenforce 0
- #如果是enforce(開啓)狀態,則關閉
- Ps:如果您想在今後的使用中完全關閉selinux,可以通過編輯/etc/sysconfig/selinux文件,將其中的selinux後面的值“force”修改爲“disable”即可。
- 方法二、修改相關文件的type
- chcon -R -t httpd_sys_content_t /usr/local/nagios/sbin
- chcon -R -t httpd_sys_content_t /usr/local/nagios/share
- #進行這些操作就可以在selinux開啓的狀態下正常訪問nagios
5.打開瀏覽器檢測nagios的工作情況
http://192.168.0.71/nagios
注意:如果htpasswd生成的密碼沒有使用的默認的nagiosadmin則會導致無法正常顯示監控信息,將cgi.cfg中use_authentication=1改成0雖能顯示主機信息但在手動刷新服務狀態時報錯
解決方法:將cgi.cfg中認證用戶改成htpasswd生成的用戶;或按照cgi.cfg認證功能用戶從新生成htpasswd。
配置監控Windows主機
1.修改nagios主配置文件
- vim /usr/local/nagios/etc/nagios.cfg
- cfg_file=/usr/local/nagios/etc/objects/windows.cfg
- #將這一行註釋去掉
2.修改用來定義windows的配置文件
- vim /usr/local/nagios/etc/objects/windows.cfg
- define host{
- use windows-server ; Inherit default values from a template
- host_name winserver ; The name we're giving to this host
- alias My Windows Server ; A longer name associated with the host
- address 192.168.0.72 ; windowsIP
- }
- #修改IP,此ip爲windows主機IP
配置監控Linux主機
1.編譯安裝nrpe
- tar xvf nrpe-2.12.tar
- cd nrpe-2.12
- ./configure --enable-ssl --with-ssl-lib=/lib/
- make all && make install-plugin
2.在nagios中定義nrpe
- vi /usr/local/nagios/etc/objects/commands.cfg
- #check nrpe
- define command{
- command_name check_nrpe
- command_line $USER1$/check_nrpe -H $HOSTADDRESS$ -c $ARG1$
- }
- #在末行添加這些內容
3.創建定義linux的配置文件
- vim /usr/local/nagios/etc/objects/mylinux.cfg
- define host{
- use linux-server
- host_name mylinux
- alias mylinux
- address 192.168.0.72#客戶端IP即被監控的IP
- }
- define service{
- use generic-service
- host_name mylinux
- service_description check-load
- check_command check_nrpe!check_load
- }
- define service{
- use generic-service
- host_name mylinux
- service_description check-users
- check_command check_nrpe!check_users
- }
- define service{
- use generic-service
- host_name mylinux
- service_description otal_procs
- check_command check_nrpe!check_total_procs
- }
chown -R nagios:nagios mylinux.cfg
#修改配置文件的屬主屬組
4.修改配置文件
- vim /usr/local/nagios/etc/nagios.cfg
- cfg_file=/usr/local/nagios/etc/objects/mylinux.cfg
- #在主配置文件指明linux主機的配置文件路徑
Windows 監控端配置
安裝NSClient,進入安裝目錄修改配置文件NSC.ini,將[module]下所有庫文件的註釋刪去。運行nsclient。
Linux 監控端配置
1.添加nagios用戶
- useradd nagios
2.編譯安裝nagios-plugin
- tar zxf nagios-plugins-1.4.15.tar.gz
- cd nagios-plugins-1.4.15
- ./configure --with-nagios-user=nagios --with-nagios-group=nagios
- make && make install
3.編譯安裝nrpe
- yum install openssl-devel
- #先安裝openssl解決依賴
- tar -zxvf nrpe-2.12.tar.gz
- cd nrpe-2.12.tar.gz
- ./configure --enable-ssl --with-ssl-lib=/usr/lib/
- make all && make install-plugin && make install-daemon && make install-daemon-config
- #編譯安裝
4.配置並啓用nrpe
- vim /usr/local/nagios/etc/nrpe.cfg
- allowed_hosts=192.168.0.71
- #監控端的IP
- /usr/local/nagios/bin/nrpe -c /usr/local/nagios/etc/nrpe.cfg –d
- #開啓進程
監控端重啓nagios服務
- service nagiso restart
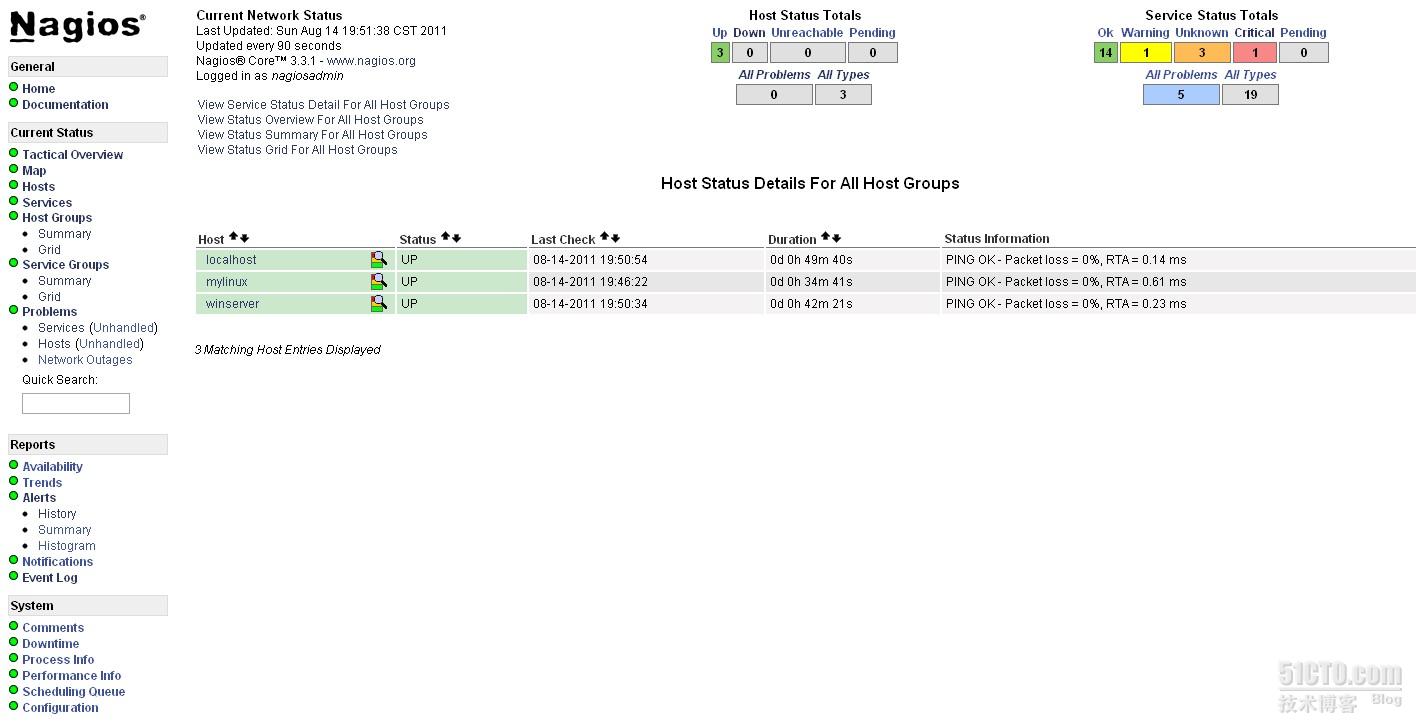
瀏覽器刷新頁面,即出現windows和linux被監控主機
監控服務的添加
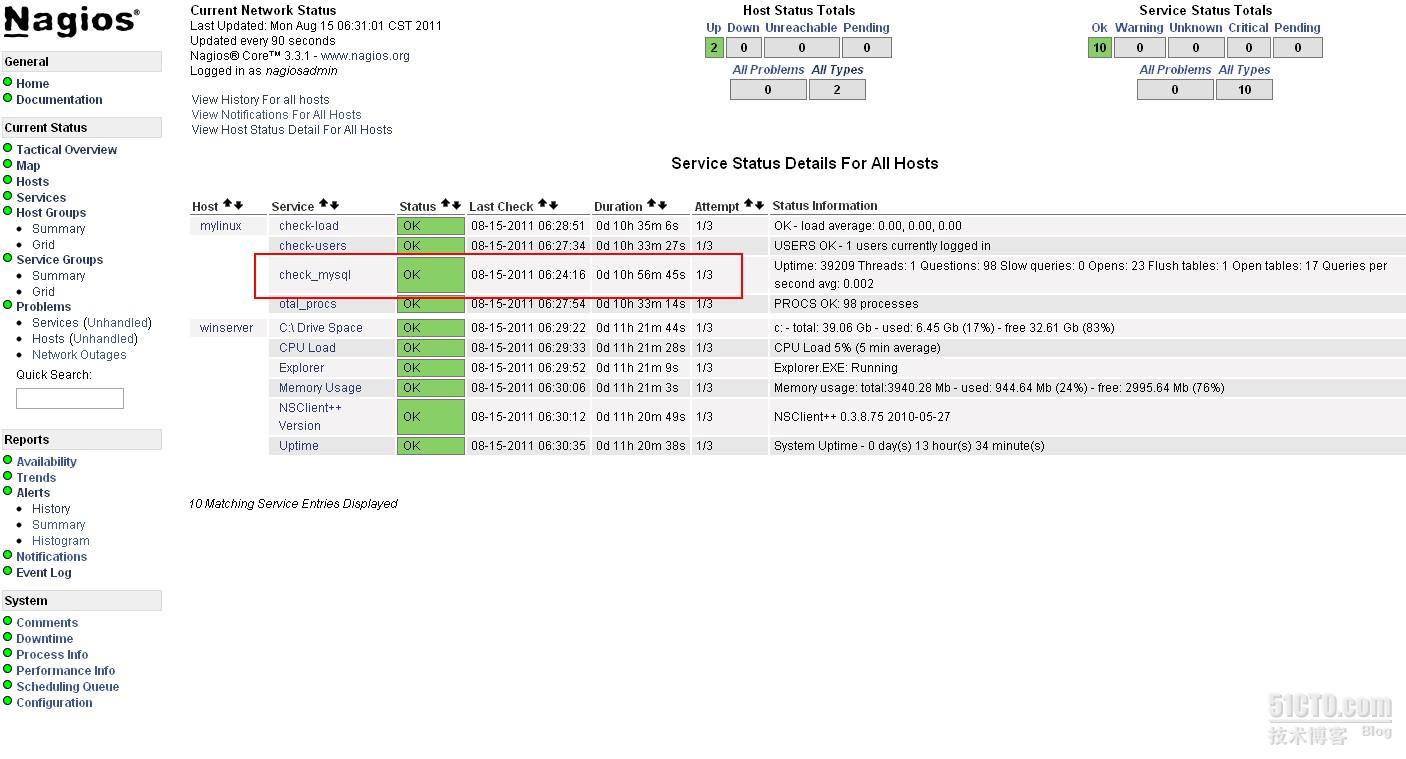
下面就添加被監控主機mysql服務爲例進行說明
1.被監控機(192.168.0.72)安裝mysql並創建監控用戶
- yum install mysql mysql-server
- #簡單起見yum安裝mysql
- service mysqld start
- #啓動mysql
- mysqladmin -uroot -p password '123456'
- #給root用戶創建mysql密碼
- mysql -uroot -p
- #進入mysql
- mysql> create database nagios;
- #創建數據庫
- mysql> grant select on nagios.* to nagios@'%' identified by 'redhat';
- #給nagios用戶賦予查詢權限
- mysql> flush privileges;
- #刷新特權表
2.監控機(192.168.0.71)修改相關配置文件
- vim /usr/local/nagios/etc/objects/command.cfg
- #check mysql
- define command{
- command_name check_mysql
- command_line $USER1$/check_mysql -H 192.168.0.72 -u nagios -d nagios -p redhat
- }
- #在命令配置文件中添加這些字段
- vim /usr/local/nagios/etc/objects/mylinux.cfg
- define service{
- use generic-service
- host_name mylinux
- service_description check_mysql
- check_command check_mysql
- }
- #在linux主機配置文件中定義服務
重啓服務
- service nagios restart
刷新瀏覽器頁面
異常報警
這裏選用飛信作爲異常報警手段,異常事件出發直接以短信形式通知運維人員
1.飛信的安裝
- unzip fetion.zip
- cd ../fetion
- mv fetion /usr/bin/
- #將飛信腳本放在/usr/lib
- chmod +x /usr/bin/fetion
- #添加執行權限
- mv ./* /usr/lib
- #將剩餘所有庫文件移動到/usr/lib
Ps:飛信程序已上傳至本文附件中
2.修改nagios相關配置文件
- vim /usr/local/nagios/etc/templates.cfg
- define contact{
- name generic-contact
- service_notification_period 24x7
- host_notification_period 24x7
- service_notification_options w,u,c,r,f,s
- host_notification_options d,u,r,f,s
- service_notification_commands notify-service-by-fetion
- host_notification_commands notify-host-by-fetion
- register 0
- }
- #修改成上面字段
- vim /usr/local/nagios/etc/commands.cfg
- commands.cfg
- define command{
- command_name notify-service-by-fetion
- command_line /usr/bin/fetion --mobile 您的手機號 --pwd 您的飛信密碼 --to 您的手機號 --msg-tpye=0 --msg-utf8 $HOSTNAME
- }
- #添加這些字段
重啓服務使配置文件生效
關於nagios的配置流程以及應用添加就先寫到這裏,以上內容在您實現過程中出現的任何問題,歡迎在此交流; 並請各位高手前輩大神達人予以批評指正,謝謝!