


1、標記行
這裏講的標記行指的是單擊此行,可以實現在此行右邊出現一個勾,如下圖所示:

爲了實現標記功能,在ViewController.m中@end之前添加代碼:
#pragma mark -
#pragma mark Table Delegate Methods
- (void)tableView:(UITableView *)tableView didSelectRowAtIndexPath:(NSIndexPath *)indexPath {
    UITableViewCell *oneCell = [tableView cellForRowAtIndexPath: indexPath];
    if (oneCell.accessoryType == UITableViewCellAccessoryNone) {
        oneCell.accessoryType = UITableViewCellAccessoryCheckmark;
    } else
        oneCell.accessoryType = UITableViewCellAccessoryNone;
    [tableView deselectRowAtIndexPath:indexPath animated:YES];
}
該代碼實現:單擊某行時,若此行未被標記,則標記此行;若此行已經被標記,則取消標記。
運行效果如上圖。
上面的代碼實際上就是修改某行的accessoryType屬性,這個屬性可以設爲四個常量:
UITableViewCellAccessoryCheckmark
UITableViewCellAccessoryDetailDisclosureButton
UITableViewCellAccessoryDisclosureIndicator
UITableViewCellAccessoryNone
效果依次如下圖所示:


UITableViewCellAccessoryCheckmark UITableViewCellAccessoryDetailDisclosureButton
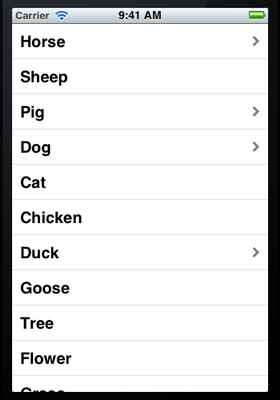

UITableViewCellAccessoryDisclosureIndicator UITableViewCellAccessoryNone
注意,上面第二張圖片中的藍色圓圈不僅僅是一個圖標,還是一個控件,點擊它可以觸發事件,在上一篇博客《iOS開發16:使用Navigation Controller切換視圖》使用過。
2、移動行
想要實現移動或者刪除行這樣的操作,需要啓動表格的編輯模式。使用的是setEditing:animated:方法。
2.1 打開ViewController.xib,將其中的表格控件映射成Outlet到ViewController.h,名稱爲myTableView。
2.2 打開ViewController.m,在viewDidLoad方法最後添加代碼:
//啓動表格的編輯模式
[self.myTableView setEditing:YES animated:YES];
2.3 在@end之前添加代碼:
//打開編輯模式後,默認情況下每行左邊會出現紅的刪除按鈕,這個方法就是關閉這些按鈕的
- (UITableViewCellEditingStyle)tableView:(UITableView *)tableView
           editingStyleForRowAtIndexPath:(NSIndexPath *)indexPath {
    return UITableViewCellEditingStyleNone;
}

//這個方法用來告訴表格 這一行是否可以移動
- (BOOL)tableView:(UITableView *)tableView canMoveRowAtIndexPath:(NSIndexPath *)indexPath {
    return YES;
}

//這個方法就是執行移動操作的
- (void)tableView:(UITableView *)tableView moveRowAtIndexPath:(NSIndexPath *)
        sourceIndexPath toIndexPath:(NSIndexPath *)destinationIndexPath {
    NSUInteger fromRow = [sourceIndexPath row];
    NSUInteger toRow = [destinationIndexPath row];

    id object = [list objectAtIndex:fromRow];
    [list removeObjectAtIndex:fromRow];
    [list insertObject:object atIndex:toRow];
}
editingStyleForRowAtIndexPath這個方法中用到了常量UITableViewCellEditingStyleNone,它表示不可編輯,這裏的編輯指的是刪除和插入。表示表格行的編輯模式的常量有:
UITableViewCellEditingStyleDelete
UITableViewCellEditingStyleInsert
UITableViewCellEditingStyleNone
顧名思義,第一個表示刪除,第二個表示插入,第三個表示不可編輯。
若將editingStyleForRowAtIndexPath方法中的UITableViewCellEditingStyleNone依次換成上面三個值,則它們運行的效果依次如下圖所示:

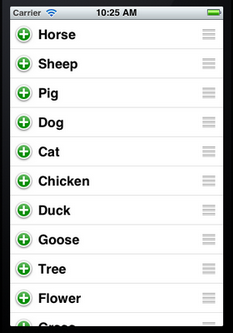
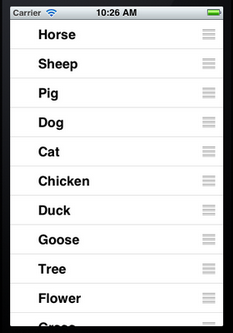
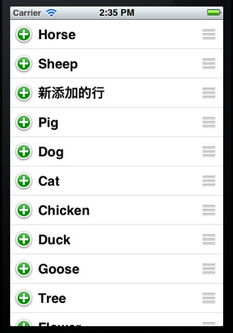
2.4 運行,從下圖可以看到實現了行的移動:

但是也會發現,現在無法對每行進行標記了。這說明,在編輯模式下,無法選擇行,從而didSelectRowAtIndexPath這個方法不會執行。
3、刪除行
從第2步過來,實現刪除某行,其實比較簡單了。
3.1將editingStyleForRowAtIndexPath方法中的UITableViewCellEditingStyleNone修改成UITableViewCellEditingStyleDelete。
3.2 在@end之前添加代碼:
//這個方法根據參數editingStyle是UITableViewCellEditingStyleDelete
//還是UITableViewCellEditingStyleDelete執行刪除或者插入
- (void)tableView:(UITableView *)tableView commitEditingStyle:
    (UITableViewCellEditingStyle)editingStyle forRowAtIndexPath:(NSIndexPath *)indexPath {
    NSUInteger row = [indexPath row];
    if (editingStyle == UITableViewCellEditingStyleDelete) {
        [self.list removeObjectAtIndex:row];
        [tableView deleteRowsAtIndexPaths:[NSArray arrayWithObject:indexPath]
                         withRowAnimation:UITableViewRowAnimationAutomatic];
    }
}
在這個方法中又出現了一個常量:UITableViewRowAnimationAutomatic,它表示刪除時的效果,類似的常量還有:
UITableViewRowAnimationAutomatic
UITableViewRowAnimationTop
UITableViewRowAnimationBottom
UITableViewRowAnimationLeft
UITableViewRowAnimationRight
UITableViewRowAnimationMiddle
UITableViewRowAnimationFade
UITableViewRowAnimationNone
它們的效果就不一一介紹了,可以在實際使用時試試。
3.3 運行,看看效果:
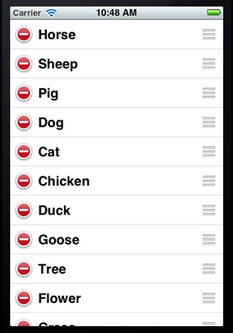


剛運行時顯示如左邊的圖片,點擊某一行左邊的圓圈圖標,會顯示如中間圖片所示。然後點擊Delegate按鈕,那一行就會被刪除掉,如右邊的那張圖片所示,它顯示的是刪除時的效果。
4、插入行
這個與刪除行類似。
4.1 首先將editingStyleForRowAtIndexPath方法中的UITableViewCellEditingStyleDelete修改成UITableViewCellEditingStyleInsert。
4.2在3.2添加的方法中添加代碼:
else {
    //我們實現的是在所選行的位置插入一行,因此直接使用了參數indexPath
    NSArray *insertIndexPaths = [NSArray arrayWithObjects:indexPath,nil];
    //同樣,將數據加到list中,用的row
    [self.list insertObject:@"新添加的行" atIndex:row];
    [tableView insertRowsAtIndexPaths:insertIndexPaths withRowAnimation:UITableViewRowAnimationRight];
}
上面的代碼中也可以不用insertRowsAtIndexPaths方法,而直接使用[tableView reloadData];語句,但是這樣就沒有添加的效果了。
4.3 好了,運行一下:


剛運行時如上面左圖所示,單擊了某個加號後,新的一行就從右邊飛進來了,因爲在insertRowsAtIndexPaths中用了參數UITableViewRowAnimationRight。