Heartbeat是著名HA項目,Heartbeat在3.0之後分拆爲Heartbeat和Pacemaker 兩個各自獨立項目。Pacemaker在後續發展中使用Corosync作爲消息層,和Corosync緊密結合,同時也保留Heartbeat作爲可選的消息層。所以新版Pacemaker 1.1.x 和heartbeat3.x 結合方面有些問題,安裝複雜,特此記錄下安裝過程中的問題及解決辦法,以供參考。
安裝環境:
Redhat Enterprise linux 6.4 (64Bit)
安裝路徑:/usr/local/heartbeat
配置文件路徑:/etc/heartbeat/
軟件介紹:
Cluster Glue 1.0.9 (中間層,粘合heartbeat和pacemaker,提供LRM和STONITH等工具及類庫)
Resource Agents 3.9.2(提供各類資源腳本以供調用)
Heartbeat 3.0.5 (消息層,負責消息傳遞)
注:Heartbeat 2.1.4之後原先的項目被拆分成Cluster Glue,Resource Agents,Heartbeat 3個子項目
下載:http://www.linux-ha.org/wiki/Downloads
Pacemaker 1.1.11(即Cluster Resource Manager,簡稱CRM,用來管理整個HA的控制中心,屬於管理層,客戶端通過pacemaker來配置管理監控整個集羣)
注:從Pacemaker 1.1.8開始,crmsh發展成一個獨立項目,Pacemaker中不再提供。我們安裝好Pacemaker後,是沒有crm這個命令行模式的資源管理器的,需另行下載安裝。(https://savannah.nongnu.org/projects/crmsh/)
Redhat發行版提供了另一個命令行管理器pcs作爲crmsh替代, pcs還提供圖形界面但需另外安裝。
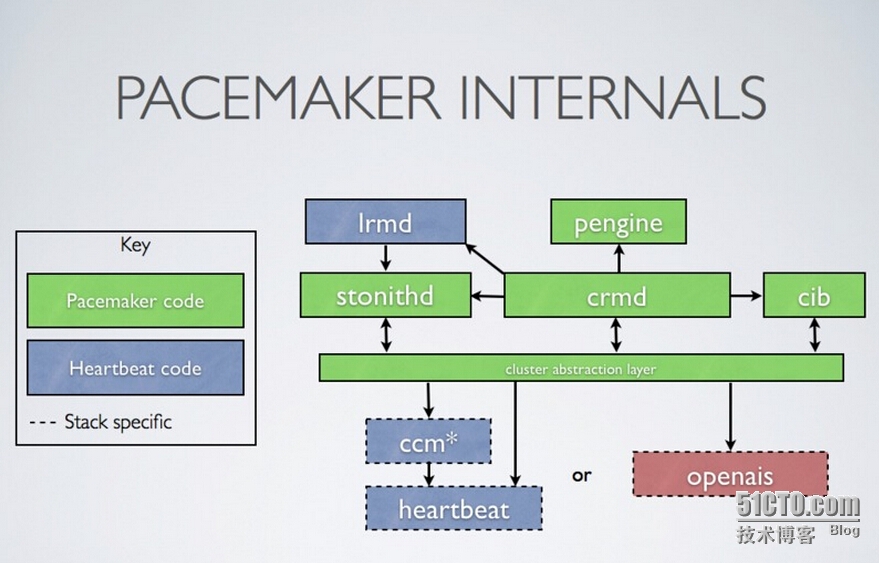
Pacemaker內部結構
準備工作:
1.yum install或rpm -ivh安裝以下依賴軟件包,以免安裝過程中出錯
yum -y install autoconf automake libtool glib2-devel libxml2-devel bzip2-devel e2fsprogs-devel libxslt-devel libtool-ltdl-devel libuuid-devel docbook-style-xsl docbook-dtds
2.添加用戶和組
新建用戶hacluster屬於新建組haclient,用於配置respawn,軟件安裝中均指定uid=hacluster,gid=haclient
# groupadd haclient
# useradd -g haclient hacluster -M -s /sbin/nologin
按順序安裝軟件:
1.安裝Cluster Glue
# tar jxvf glue-1.0.9.tar.bz2
# cd Reusable-Cluster-Components-glue--glue-1.0.9/
# ./autogen.sh
# ./configure --prefix=/usr/local/heartbeat --with-daemon-user=hacluster --with-daemon-group=haclient --sysconfdir=/etc/heartbeat libdir=/usr/local/heartbeat/lib64 LIBS='/lib64/libuuid.so.1'
# make && make install
注:在./configure的時候指定一下LIBS='/lib64/libuuid.so.1',同理Resource Agents,Heartbeat,Pacemaker
在./configure的時候都指定一下,不然繼續報錯。
./.libs/libplumb.so: undefined reference to `uuid_parse’
 ./.libs/libplumb.so: undefined reference to `uuid_generate’
 ./.libs/libplumb.so: undefined reference to `uuid_copy’
 ./.libs/libplumb.so: undefined reference to `uuid_is_null’
 ./.libs/libplumb.so: undefined reference to `uuid_unparse’
 ./.libs/libplumb.so: undefined reference to `uuid_clear’
 ./.libs/libplumb.so: undefined reference to `uuid_compare’
...........................................................
configure: error: You do not have the libuuid development package installed
2.安裝Resource Agents
# cd ClusterLabs-resource-agents-b735277/
# ./autogen.sh
# ./configure --prefix=/usr/local/heartbeat --sysconfdir=/etc/heartbeat libdir=/usr/local/heartbeat/lib64 CFLAGS=-I/usr/local/heartbeat/include LDFLAGS=-L/usr/local/heartbeat/lib64 LIBS='/lib64/libuuid.so.1'
# make && make install
//建立一個軟連接,避免編譯時找不到所需要的包.
# ln -s /usr/local/heartbeat/lib64/* /lib64/
注: 如缺少一些依賴包,會有錯誤提示,按照提示安裝相應包即可。
安裝glue, resource agent, heartbeat時,需要到網上下載docbook-style-xsl,docbook-dtds包,
如網速慢容易出現錯誤,可單獨下載或用yum install docbook-style-xsl docbook-dtds安裝軟件包,
以提高安裝速度。
無法下載docbook時會發生類似錯誤:
error : Operation in progress
warning: failed to load external entity "http://docbook.sourceforge.net/release/xsl/current/html/formal.xsl"
compilation error: file http://docbook.sourceforge.net/release/xsl/current/html/docbook.xsl line 46 element include
xsl:include : unable to load http://docbook.sourceforge.net/release/xsl/current/html/formal.xsl
http://docbook.sourceforge.net/release/xsl/current/html/table.xsl:1: parser error : Document is empty
http://docbook.sourceforge.net/release/xsl/current/html/table.xsl:1: parser error : Start tag expected, '<' not found
compilation error: file http://docbook.sourceforge.net/release/xsl/current/html/docbook.xsl line 47 element include
xsl:include : unable to load http://docbook.sourceforge.net/release/xsl/current/html/table.xsl
3.安裝Heartbeat
# cd Heartbeat-3-0-7e3a82377fa8/
# ./bootstrap
# ./configure --prefix=/usr/local/heartbeat --with-daemon-user=hacluster --with-daemon-group=haclient --sysconfdir=/etc/heartbeat CFLAGS=-I/usr/local/heartbeat/include  LDFLAGS=-L/usr/local/heartbeat/lib64 LIBS='/lib64/libuuid.so.1'
# make && make install
make報錯:
In file included from ../include/lha_internal.h:41,
                 from strlcpy.c:1:
/usr/local/heartbeat/include/heartbeat/glue_config.h:105:1: error: "HA_HBCONF_DIR" redefined
In file included from ../include/lha_internal.h:38,
                 from strlcpy.c:1:
../include/config.h:390:1: error: this is the location of the previous definition
gmake[1]: *** [strlcpy.lo] Error 1
解決辦法:
編輯/usr/local/heartbeat/include/heartbeat/glue_config.h的最後1行(105行)
將 #define HA_HBCONF_DIR "/etc/heartbeat/ha.d/" 註釋掉 ,避免路徑重複定義錯誤。
4.Pacemaker安裝
Pacemaker默認使用Corosync,yum和rpm安裝Pacemaker均是使用Corosync,因此下載源碼包進行安裝。
注:有同學曾用apt-get在ubuntu上成功安裝Pacemaker+heartbeat,這說明RPM包在製作時綁定了Corosync,而deb包則沒有。
https://github.com/ClusterLabs/pacemaker/
# cd pacemaker-master-1.1.11/
# ./autogen.sh
# ./configure --prefix=/usr/local/heartbeat --with-daemon-user=hacluster --with-daemon-group=haclient libdir=/usr/local/heartbeat/lib64 CFLAGS=-I/usr/local/heartbeat/include LDFLAGS=-L/usr/local/heartbeat/lib64  LIBS='/lib64/libuuid.so.1'  --with-heartbeat
# make && make install
錯誤:
configure: error: Version of libqb is too old: v0.13 or greater requried
解決方法:安裝libqb-devel和libqb
rpm -ivh libqb-devel-****.rpm和libqb-****.rpm
錯誤:
No package 'dbus-1' found
解決方法:安裝dbus-devel
rpm -ivh dbus-devel-****.rpm
錯誤:
checking for native corosync... try
checking for cpg... configure: error: Package requirements (libcpg) were not met:
No package 'libcpg' found
解決方法:安裝corosynclib-devel
yum -y install corosynclib-devel 或 rpm -ivh corosynclib-devel-*.rpm
注:corosync,corosynclib,corosynclib-devel相互間存在依賴關係,3個軟件包的版本必須相同
make出現錯誤:
gmake[2]: Entering directory `/tools/pacemaker-master/lib/common'
  CC     ipc.lo
  CC     utils.lo
cc1: warnings being treated as errors
utils.c: In function ‘crm_generate_uuid’:
utils.c:2515: error: implicit declaration of function ‘uuid_generate’
utils.c:2515: error: nested extern declaration of ‘uuid_generate’
utils.c:2516: error: implicit declaration of function ‘uuid_unparse’
utils.c:2516: error: nested extern declaration of ‘uuid_unparse’
gmake[2]: *** [utils.lo] Error 1解決方法:安裝libuuid-devel
rpm -ivh libuuid-devel-*.rpm
然後重新執行./configure,再重新make
因自定義路徑沒采用默認路徑,所以安裝完成後要鏈接一些必要庫文件,以免運行時出錯
ln -s /usr/local/heartbeat/usr/lib/ocf/* /usr/lib/ocf
ln -s /usr/local/heartbeat/libexec/pacemaker /usr/libexec
ln -s /usr/local/heartbeat/share/pacemaker /usr/share
ln -s /usr/local/heartbeat/var/lib/pacemaker /var/lib

ln -s /usr/local/heartbeat/lib64/pkgconfig/*.* /usr/lib64/pkgconfig/
ln -s /usr/local/heartbeat/lib64/python2.6/site-packages/*    /usr/lib64/python2.6/site-packages/
至此4個軟件都已安裝成功,下節介紹Heartbeat+Pacemaker+Apache+MySQL 設置和測試
FAQ
Q:爲什麼在/var/log/messages裏看到很多下面這樣的警告?
A :這種情況是因爲部署Heartbeat是直接從其它機器上拷貝過來導致的。直接拷過來會導致兩個節點上的uuid衝突,解決方法是強制某個Hearbeat重新生成uuid,先停止Heatbeat然後刪除hb_uuid這個文件(可以通過find命令查找)重啓就好了:
# rm –rf /usr/local/heartbeat/var/lib/heartbeat/hb_uuid
Q:什麼是“腦裂”問題?
A :採用keepalive等心跳軟件,需要注意“腦裂”問題: "在“雙機熱備”高可用(HA)系統中,當聯繫2個節點的“心跳線”斷開時,本來爲一整體、動作協調的HA系統,就分裂成爲2個獨立的個體。由於相互失去了聯繫,都以爲是對方出了故障,2個節點上的HA軟件像“裂腦人”一樣,“本能”地爭搶“共享資源”、爭起“應用服務”,就會發生嚴重後果:或者共享資源被瓜分、2邊“服務”都起不來了;或者2邊“服務”都起來了,但同時讀寫“共享存儲”,導致數據損壞(常見如數據庫輪詢着的聯機日誌出錯)。
Q:啓動heartbaet的時候可能會報很多庫找不到的錯誤:
A:可以先通過find命令查找,然後通過建立軟連接就可以解決了:
pacemaker使用默認路徑/usr/libexec/pacemaker時
# ln -s /usr/libexec/pacemaker/* /usr/local/heartbeat/lib64/heartbeat/
pacemaker使用自定義路徑/usr/local/heartbeat時
# ln -s /usr/local/heartbeat/libexec/pacemaker/* /usr/libexec


