


步驟一、交換機和PC機的基本配置
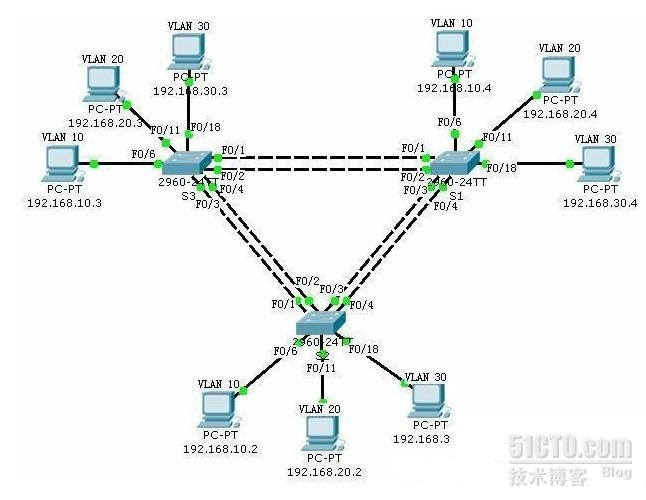
步驟二、關閉交換機的所有端口,然後啓用接入端口
S1(config)#int range f0/1 - 24
S1(config-if-range)#shutdown
S1(config-if-range)#int range g1/1 - 2
S1(config-if-range)#shutdown
S1(config-if-range)#int f0/6
S1(config-if)#switchport mode access
S1(config-if)#no shut
S1(config-if)#int f0/11
S1(config-if)#switchport mode access
S1(config-if)#no shut
S1(config-if)#int f0/18
S1(config-if)#switchport mode access
S1(config-if)#no shut
(交換機S2、S3配置參考S1)
步驟三、配置中繼鏈路和本徵VLAN
S1(config)#int range f0/1 – 4
S1(config-if-range)#switchport mode trunk
S1(config-if-range)#switchport trunk native vlan 99
S1(config-if-range)#no shut
(交換機S2、S3配置參考S1)
步驟四、配置VTP
S1(config)#vtp mode server
Device mode already VTP SERVER.
S1(config)#vtp domain cisco
Changing VTP domain name from NULL to cisco
S1(config)#vtp password cisco
Setting device VLAN database password to cisco
S2(config)#vtp mode client
Device mode already VTP CLIENT.
S2(config)#vtp domain cisco
Changing VTP domain name from NULL to cisco
S2(config)#vtp password cisco
Setting device VLAN database password to cisco
S3(config)#vtp mode client
Device mode already VTP CLIENT.
S3(config)#vtp domain cisco
Changing VTP domain name from NULL to cisco
S3(config)#vtp password cisco
Setting device VLAN database password to cisco
步驟五、在S1(VTP Server)上配置VLAN
S1(config)#vlan 10
S1(config-vlan)#name staff
S1(config-vlan)#exit
S1(config)#vlan 20
S1(config-vlan)#name students
S1(config-vlan)#exit
S1(config)#vlan 30
S1(config-vlan)#name guest
S1(config-vlan)#exit
S1(config)#vlan 99
S1(config-vlan)#name management
S1(config-vlan)#exit
(配置至此,用#sh vlan brief命令查看S2、S3交換機的vlan配置,會看到VTP Server已經將VLAN信息傳播至兩個交換機)
步驟六、爲各個VLAN分配接口
S1(config)#interface range fa0/6 - 10
S1(config-if-range)#switchport access vlan 10
S1(config-if-range)#interface range fa0/11-17
S1(config-if-range)#switchport access vlan 20
S1(config-if-range)#interface range fa0/18-24
S1(config-if-range)#switchport access vlan 30
S1(config-if-range)#exit
(交換機S2、S3配置參考S1)
步驟七、接入層交換機上配置端口安全功能
S1(config)#interface fa0/6
S1(config-if)#switchport port-security
S1(config-if)#switchport port-security maximum 1
S1(config-if)#switchport port-security mac-address sticky
S1(config-if)#interface fa0/11
S1(config-if)#switchport port-security
S1(config-if)#switchport port-security maximum 1
S1(config-if)#switchport port-security mac-address sticky
S1(config-if)#interface fa0/18
S1(config-if)#switchport port-security
S1(config-if)#switchport port-security maximum 1
S1(config-if)#switchport port-security mac-address sticky
S1(config-if)#end
(交換機S2、S3配置參考S1)
注:
interface FastEthernet0/1
switchport mode access
說明:其實端口安全的默認設置的maximum是1,如果需要限定幾個MAC,設爲幾就OK了。
步驟八、爲各交換機配置管理VLAN地址和默認網關
S1(config)#ip default-gateway 192.168.1.1
S1(config)#interface vlan99
S1(config-if)#ip address 192.168.99.11 255.255.255.0
S1(config-if)#no shutdown
S2(config)#ip default-gateway 192.168.1.1
S2(config)#interface vlan99
S2(config-if)#ip address 192.168.99.12 255.255.255.0
S2(config-if)#no shutdown
S3(config)#ip default-gateway 192.168.1.1
S3(config)#interface vlan99
S3(config-if)#ip address 192.168.99.13 255.255.255.0
S3(config-if)#no shutdown
步驟九、按下列要求配置並改良STP
S1 成爲 VLAN 10 的根橋(優先級 4096)、VLAN 20 的備用根橋(優先級 16384)
S2 成爲 VLAN 20 的根橋(優先級 4096)、VLAN 30 的備用根橋(優先級 16384)
S3 成爲 VLAN 30 的根橋(優先級 4096)、VLAN 10 的備用根橋(優先級 16384)
S1(config)#spanning-tree vlan 10 priority 4096
S1(config)#spanning-tree vlan 20 priority 16384
S2(config)#spanning-tree vlan 20 priority 4096
S2(config)#spanning-tree vlan 30 priority 16384
S3(config)#spanning-tree vlan 30 priority 4096
S3(config)#spanning-tree vlan 10 priority 16384
注
1、查看MAC地址
2、查看配置命令
3、查看CDP鄰居信息命令
1)查看CDP全局配置信息
2)查看某藉口配置信息
3)顯示有關CDP包的統計信息 Swintch#show cdp traffic
4)列出與本設備相鄰的設備
5)顯示詳細的鄰居信息
6)顯示所有入口項的細節
4、查看VLAN信息命令
5、查看某個VLAN的信息
6、查看端口的VLAN號
7、查端口的管理模式和VLAN的情況Swintch#show interfaces f0/2 switchport
8、查看歷史命令
9、查看閃存
10、查看VTP配置信息
11、查看生成樹配置
12、查看VLAN的生成樹詳細信息Swithc#show spanning-tree vlan 2 detail
13、查看FIB表
14、查看鄰居關係表
15、查看二層以太通道信息
注:如果在其它模式查看前面加上 “do”就可以了