


原創作品,未經作者授權,嚴禁轉載。
作者:網絡白領 實驗指導:鑫飄雪
作者:網絡白領 實驗指導:鑫飄雪
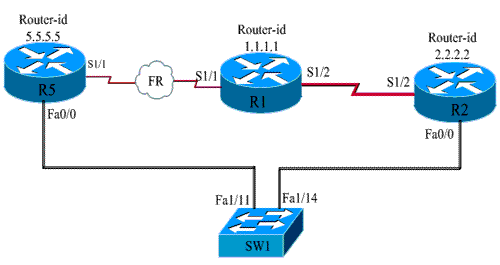
實驗拓撲圖:
實驗環境說明:
1.將路由器R5的Fa0/0端口的ip設爲:192.168.4.5/24;S1/1端口的ip設爲:192.168.3.5/24
2.將路由器R1的S1/1端口的ip設爲:192.168.3.1/24;S1/2端口的ip設爲:192.168.2.1/24
3.將路由器R2的S1/2端口的ip設爲:192.168.2.2/24;Fa0/0端口的ip設爲:192.168.1.2/24
前言:我們都知道,OSPF的網絡類型有:廣播型(也稱多路訪問)、點到點、點到多點、非廣播多路訪問(NBMA),除了非廣播型多點訪問類型以外的其它類型都會自動選擇DR和BDR,這樣纔會形成鄰居,網絡之間纔可以互相通信。而我們今天要演示的OSPF在NBMA中的實現,就是要克服這種非廣播型多路訪問中無法自動選出DR和BDR而無法發現鄰居。沒有鄰居的路由器之間是無法通信的。我們的解決思路主要有:1、手工爲相應的端口指定鄰居;2、改變相應端口的網絡類型。下面請看我們的詳細配置過程:
┌┄┄┄┄┄┄┄┄┄┄┄┄┄┄┄┄┄┄┄┄┄┄┄┄┄┄┄┐
┊作者:網絡白領 實驗指導:鑫飄雪 ┆
┆原創作品,未經作者允許,嚴禁擅自轉載傳播!! ┊
└┈┈┈┈┈┈┈┈┈┈┈┈┈┈┈┈┈┈┈┈┈┈┈┈┈┈┈┘
配置過程清單:
交換機SW1的配置:
分別將Fa1/11、Fa1/14端口設置爲全雙工模式:
SW1(config)#int fa1/11
SW1(config-if)#speed 100
SW1(config-if)#duplex full
SW1(config-if)#no shut
SW1(config-if)#exit
分別將Fa1/11、Fa1/14端口設置爲全雙工模式:
SW1(config)#int fa1/11
SW1(config-if)#speed 100
SW1(config-if)#duplex full
SW1(config-if)#no shut
SW1(config-if)#exit
SW1(config)#int fa1/14
SW1(config-if)#speed 100
SW1(config-if)#duplex full
SW1(config-if)#no shut
SW1(config-if)#exit
路由器R2的配置清單:
1、分別爲路由器R2的S1/2、Fa0/0端口設置iP:
R2(config)#int s1/2
R2(config-if)#ip add 192.168.2.2 255.255.255.0
R2(config-if)#no shut
1、分別爲路由器R2的S1/2、Fa0/0端口設置iP:
R2(config)#int s1/2
R2(config-if)#ip add 192.168.2.2 255.255.255.0
R2(config-if)#no shut
R2(config)#int fa0/0
R2(config-if)#speed 100
R2(config-if)#duplex full
R2(config-if)#ip add 192.168.1.2 255.255.255.0
R2(config-if)#no shut
R2(config-if)#exit
R2(config-if)#speed 100
R2(config-if)#duplex full
R2(config-if)#ip add 192.168.1.2 255.255.255.0
R2(config-if)#no shut
R2(config-if)#exit
2、在路由器R2上配置OSPF:
R2(config)#router ospf 100
R2(config-router)#router-id 2.2.2.2
R2(config-router)#network
R2(config-router)#network 192.168.2.2 0.0.0.0 a 0
R2(config-router)#network 192.168.1.2 0.0.0.0 a 0
R2(config-router)#exit
R2(config)#router ospf 100
R2(config-router)#router-id 2.2.2.2
R2(config-router)#network
R2(config-router)#network 192.168.2.2 0.0.0.0 a 0
R2(config-router)#network 192.168.1.2 0.0.0.0 a 0
R2(config-router)#exit
路由器R1的配置清單:
1、爲路由器R1的S1/1端口設置ip並封裝楨中繼:(//後面爲註釋說明)
R1(config)#int s1/1
R1(config-if)#ip add 192.168.3.1 255.255.255.0
R1(config-if)#encapsulation frame-relay
R1(config-if)#frame-relay map ip 192.168.3.5 105 br //使用br關鍵字模擬廣播
R1(config-if)#no frame-relay inverse-arp
R1(config-if)#no shut
R1(config-if)#ip add 192.168.3.1 255.255.255.0
R1(config-if)#encapsulation frame-relay
R1(config-if)#frame-relay map ip 192.168.3.5 105 br //使用br關鍵字模擬廣播
R1(config-if)#no frame-relay inverse-arp
R1(config-if)#no shut
2、爲路由器R1的S1/2端口設置ip:
R1(config)#int s1/2
R1(config-if)#ip add 192.168.2.1 255.255.255.0
R1(config-if)#no shut
R1(config-if)#ip add 192.168.2.1 255.255.255.0
R1(config-if)#no shut
3、在路由器R1上配置OSPF:
R1(config)#router ospf 100
R1(config-router)#router-id 1.1.1.1
R1(config-router)#network 192.168.3.1 0.0.0.0 a 0
R1(config-router)#network 192.168.2.1 0.0.0.0 a 0
R1(config-router)#exit
R1(config-router)#router-id 1.1.1.1
R1(config-router)#network 192.168.3.1 0.0.0.0 a 0
R1(config-router)#network 192.168.2.1 0.0.0.0 a 0
R1(config-router)#exit
路由器R5的配置清單:
1、爲路由器R5的S1/1端口配置ip並封裝楨中繼:
R5(config)#int s1/1
R5(config-if)#ip add 192.168.3.5 255.255.255.0
R5(config-if)#encapsulation frame-relay
R5(config-if)#frame-relay map ip 192.168.3.1 501 br //使用br關鍵字模擬廣播
R5(config-if)#no frame-relay inverse-arp
R5(config-if)#no shut
R5(config-if)#exit
R5(config)#int s1/1
R5(config-if)#ip add 192.168.3.5 255.255.255.0
R5(config-if)#encapsulation frame-relay
R5(config-if)#frame-relay map ip 192.168.3.1 501 br //使用br關鍵字模擬廣播
R5(config-if)#no frame-relay inverse-arp
R5(config-if)#no shut
R5(config-if)#exit
2、爲路由器R5的Fa0/0端口配置ip並設爲全雙工模式:
R5(config)#int fa0/0
R5(config-if)#speed 100
R5(config-if)#duplex full
R5(config-if)#ip add 192.168.4.5 255.255.255.0
R5(config-if)#no shut
R5(config-if)#exit
R5(config-if)#speed 100
R5(config-if)#duplex full
R5(config-if)#ip add 192.168.4.5 255.255.255.0
R5(config-if)#no shut
R5(config-if)#exit
3、在路由器R5上配置OSPF:
R5(config)#router ospf 100
R5(config-router)#router-id 5.5.5.5
R5(config-router)#network 192.168.4.5 0.0.0.0 a 0
R5(config-router)#network 192.168.3.5 0.0.0.0 a 0
R5(config-router)#exit
R5(config-router)#router-id 5.5.5.5
R5(config-router)#network 192.168.4.5 0.0.0.0 a 0
R5(config-router)#network 192.168.3.5 0.0.0.0 a 0
R5(config-router)#exit
以上爲正常的配置過程,如果我們來通過#show ip ospf nei命令來看看R1、R5的鄰居表,你會發現它們的鄰居表中根本沒有對方,也就是說,它們之間根本沒有發現鄰居,這時整個網絡的通信就會到這裏出現故障而無法通信。在前面我們已經說過,非廣播型多路訪問是不會自動選出DR和BDR的,需要我們手工來指定。這時我們就有了兩種思路:1、改變R1 、R5之間的網絡類型,將它們改變爲點對多點(point-to-mu,這裏演示的是點對點的拓撲,現實中就是點對多點的拓撲了);2、手工爲它們指定鄰居。請看下面的配置,這就是關鍵所在:
A:改變網絡類型實現OSPF在楨中繼可以發現鄰居:
1、改變R1的S1/1的網絡類型爲“點對多點”:
R1(config)#int s1/1
R1(config-if)#ip ospf network point-to-mu //改變網絡類型爲點對多點
R1(config-if)#no shut
R1(config)#int s1/1
R1(config-if)#ip ospf network point-to-mu //改變網絡類型爲點對多點
R1(config-if)#no shut
2、改變R5的S1/1的網絡類型爲“點對多點”:
R5(config)#int s1/1
R5(config-if)#ip ospf network point-to-mu //改變網絡類型爲點對多點
R5(config-if)#no shut
R5(config-if)#ip ospf network point-to-mu //改變網絡類型爲點對多點
R5(config-if)#no shut
這時,我們使用#show ip ospf nei命令來查看R1的鄰居表:
R1#show ip ospf nei
R1#show ip ospf nei
Neighbor ID Pri State Dead Time Address Interface
5.5.5.5 0 FULL/ - 00:01:47 192.168.3.5 Serial1/1
2.2.2.2 0 FULL/ - 00:00:33 192.168.2.2 Serial1/2
5.5.5.5 0 FULL/ - 00:01:47 192.168.3.5 Serial1/1
2.2.2.2 0 FULL/ - 00:00:33 192.168.2.2 Serial1/2
看到了吧,路由器R1的鄰居表裏面已經有了R5和R2,這時,我們再用ping命令來驗證一下,我們用R1來pingR5:
R1#ping 192.168.4.5
Type escape sequence to abort.
Sending 5, 100-byte ICMP Echos to 192.168.4.5, timeout is 2 seconds:
!!!!!
Success rate is 100 percent (5/5), round-trip min/avg/max = 44/73/112 ms
Sending 5, 100-byte ICMP Echos to 192.168.4.5, timeout is 2 seconds:
!!!!!
Success rate is 100 percent (5/5), round-trip min/avg/max = 44/73/112 ms
成功了!同樣的道理,R5我們就不再驗證了,您看明白了嗎?
B:手工爲R1、R5指定鄰居:(//後面爲註釋)
R1(config)#router ospf 100
R1(config)#router ospf 100
R1(config)#nei 192.168.3.5 //指定R5是R1的鄰居,這裏寫對方的ip
R5(config)#router ospf 100
R5(config)#nei 192.168.3.1 //指定R1是R5的鄰居,這裏寫對方的ip
驗證的過程在此省略,不明白的地方歡迎留言提問。