


Rsync(remote sync)遠程同步工具,通過rsync可以實現對遠程服務器數據的增量備份通過,但rsync自身也有缺陷,同步數據時,rsync採用核心算法對遠程服務器的目標文件進行對比,只進行差異同步。我們可以想象一下,如果服務器的文件數量達到了百萬甚至千萬量級,那麼文件對比是非常耗時的,而且發生變化的往往是其中很少的一部分,這是非常低效的方式。inotify的出現,可以緩解rsync不足之處,取長補短。
第一部分:inotify+rsync實時數據同步
Inotify 是一種強大的、細粒度的、異步的文件系統事件監控機制,linux內核從2.6.13起,加入了inotify支持,通過inotify可以監控文件系統中添加、刪除、修改、移動等各種事件,利用這個內核接口,第三方軟件可以監控文件系統下文件的各種變化情況,而inotify-tools 正是實時監控的軟件。
註釋:下面的inotify配置時建立在rsync服務基礎上的配置過程。
1.1 查看服務器內核是否支持inotify功能
[root@root backup]# uname -r
2.6.32-431.el6.x86_64
[root@root backup]# ls -l /proc/sys/fs/inotify/
總用量 0
-rw-r--r-- 1 root root 0 12月 22 09:03 max_queued_events
-rw-r--r-- 1 root root 0 12月 22 09:03 max_user_instances
-rw-r--r-- 1 root root 0 12月 22 09:03 max_user_watches1.2.下載inotify-tools安裝包,地址:https://sourceforge.net/projects/inotify-tools/postdownload
1.3.上傳服務器進行解壓安裝。
[root@root soft]# tar -zxvf inotify-tools-3.13.tar.gz
[root@root soft]# cd inotify-tools-3.13
[root@root inotify-tools-3.13]# ./configure --prefix=/usr/local/inotify-tools-3.13
[root@root inotify-tools-3.13]# make && make install
[root@root inotify-tools-3.13]# ln -s /usr/local/inotify-tools-3.13/ /usr/local/inotify
[root@root inotify-tools-3.13]# ls -l /usr/local/inotify/
總用量 16
drwxr-xr-x. 2 root root 4096 12月 22 12:36 bin # inotify監控執行命令(二進制)
drwxr-xr-x. 3 root root 4096 12月 22 12:36 include #inotify程序所需用的頭文件
drwxr-xr-x. 2 root root 4096 12月 22 12:36 lib #動態鏈接的庫文件
drwxr-xr-x. 4 root root 4096 12月 22 12:36 share #幫助文檔
[root@root inotify-tools-3.13]# ls -l /usr/local/inotify/bin/  #兩個監控命令
總用量 80
-rwxr-xr-x. 1 root root 38598 12月 22 12:36 inotifywait
-rwxr-xr-x. 1 root root 40369 12月 22 12:36 inotifywatch
1.4.兩個監控命令可以通過--help查看詳解
[root@root inotify-tools-3.13]# /usr/local/inotify/bin/inotifywait --help
        -m|--monitor    Keep listening for events forever.  Without
                        this option, inotifywait will exit after one
                        event is received.
        -r|--recursive  Watch directories recursively.
        -q|--quiet      Print less (only print events).
        --exclude <pattern>
                        Exclude all events on files matching the
                        extended regular expression <pattern>.
       --format <fmt>  Print using a specified printf-like format
                        string; read the man page for more details.
       --timefmt <fmt> strftime-compatible format string for use with
                        %T in --format string.
       -e|--event <event1> [ -e|--event <event2> ... ]
                Listen for specific event(s).  If omitted, all events are
                listened for.
Exit status:
        0  -  An event you asked to watch for was received.
        1  -  An event you did not ask to watch for was received
              (usually delete_self or unmount), or some error occurred.
        2  -  The --timeout option was given and no events occurred
              in the specified interval of time.
Events:
        access          file or directory contents were read
        modify          file or directory contents were written
        attrib          file or directory attributes changed
        close_write     file or directory closed, after being opened in
                        writeable mode
        close_nowrite   file or directory closed, after being opened in
                        read-only mode
        close           file or directory closed, regardless of read/write mode
        open            file or directory opened
        moved_to        file or directory moved to watched directory
        moved_from      file or directory moved from watched directory
        move            file or directory moved to or from watched directory
        create          file or directory created within watched directory
        delete          file or directory deleted within watched directory
        delete_self     file or directory was deleted
        unmount         file system containing file or directory unmounted
1.5.看小型拓撲圖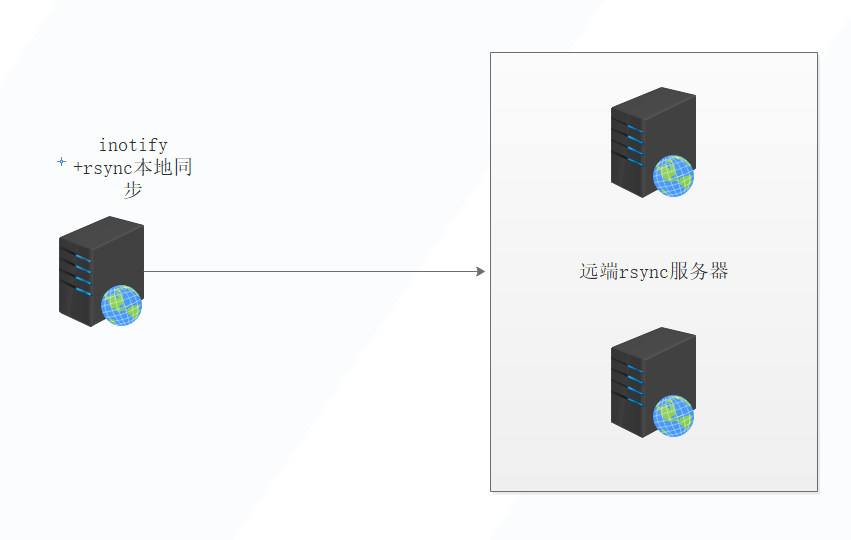
1.6. 編寫事件監控腳本
#!/bin/bash
#para
###設置變量
host01=192.168.120.120
src=/backup
dst=backup
user=rsync_backup
rsync_passfile=/etc/rsync.password
inotify_home=/usr/local/inotify/
#rsync -aruz $user@$host01::$dst --password-file=${rsync_passfile}

#judge  檢驗判斷上述變量
if [ ! -e  "$src" ] \
|| [ ! -e "${rsync_passfile}" ] \
|| [ ! -e "${inotify_home}/bin/inotifywait" ] \
|| [ ! -e "/usr/bin/rsync" ];
then
    echo "Check File and Folder"
    exit 9
fi
#用inotifywait命令檢測數據同步目錄變化,出現變化後,使用rsync進行實時同步
${inotify_home}/bin/inotifywait -mrq --timefmt '%d/%m/%y %H:%M' --format '%T %w%f' -e close_write,delete,create,attrib $src \
| while read file
do
    cd $src && rsync -aruz -R --delete ./ --timeout=100 $user@$host01::$dst --password-file=${rsync_passfile} >/dev/null 2>&1
done
exit 0
1.7 注:配置inotify時系統的默認參數值
查看系統默認參數值:
[root@rsync ~]# sysctl -a | grep max_queued_events
fs.inotify.max_queued_events = 16384
[root@rsync ~]# sysctl -a | grep max_user_instances
fs.inotify.max_user_instances = 128
[root@rsync ~]# sysctl -a | grep max_user_watches
fs.inotify.max_user_watches = 8192
修改參數:
sysctl -w fs.inotify.max_queued_events="99999999"
sysctl -w fs.inotify.max_user_watches="99999999"
sysctl -w fs.inotify.max_user_instances="65535"
[root@rsync ~]# vi /etc/sysctl.conf #添加以下代碼
fs.inotify.max_queued_events=99999999
fs.inotify.max_user_watches=99999999
fs.inotify.max_user_instances=65535
參數說明:
max_queued_events:
inotify隊列最大長度,如果值太小,會出現" Event Queue Overflow "錯誤,導致監控文件不準確
max_user_watches:
要同步的文件包含多少目錄,可以用:find /home/wwwroot/ -type d | wc -l 統計,必須保證max_user_watches值大於統計結果(這裏/home/wwwroot/爲同步文件目錄)
max_user_instances:
每個用戶創建inotify實例最大值
第二部分:sersync+rsync實時數據同步
2.1.sersync介紹
1.sersync是基於inotify開發的,類似於inotify-tools的工具
2.sersync可以記錄下被監聽目錄中發生變化的(包括增加、刪除、修改)具體某一個文件或者某一個目錄的名字,然後使用rsync同步的時候,只同步發生變化的文件或者目錄
2.2 sersync具有以下幾個優點
1.sersync是使用c++編寫,而且對linux系統文件系統產生的臨時文件和重複的文件操作進行過濾,所以在結合rsync同步的時候,節省了運行時耗和網絡資源。因此更快。
2.sersync配置起來很簡單,其中bin目錄下已經有基本上靜態編譯的2進制文件,配合bin目錄下的xml配置文件直接使用即可。
3.使用多線程進行同步,尤其在同步較大文件時,能夠保證多個服務器實時保持同步狀態。
4.有出錯處理機制,通過失敗隊列對出錯的文件重新同步,如果仍舊失敗,則按設定時長對同步失敗的文件重新同步。
5.自帶crontab功能,只需在xml配置文件中開啓,即可按要求隔一段時間整體同步一次。無需再額外配置crontab功能。
6.能夠實現socket與http插件擴展。
2.3 安裝sersync(前提條件先安裝好rsync)
2.3.1 wget 下載sersync安裝包
https://storage.googleapis.com/google-code-archive-downloads/v2/code.google.com/sersync/sersync2.5_32bit_binary_stable_final.tar.gz #32位
https://storage.googleapis.com/google-code-archive-downloads/v2/code.google.com/sersync/sersync2.5.4_64bit_binary_stable_final.tar.gz #64位
2.3.2 解壓縮到 /usr/local/sersync/ 下,編輯配置文件confxml.xml(記得先備份,在編輯)
sersync的配置文件confxml.xml詳解。自己學習修改功能,
1.可修改26行本地目錄、服務器模塊、IP;
2.認證部分【rsync密碼認證】
3.定義同步失敗後重新同步的時間和錯誤日誌
4.具體需根據生產環境需求修改
<?xml version="1.0" encoding="ISO-8859-1"?>
<head version="2.5">
    <host hostip="localhost" port="8008"></host>    #hostip與port是針對插件的保留字段,對於同步沒有任何作用,保留默認即可。
    <debug start="false"/>  #開啓debug模式,會在sersync正在運行的控制檯,打印inotify事件與rsync同步命令。
    <fileSystem xfs="false"/>   #對於xfs文件系統的用戶,需要將這個選項開啓,才能是sersync正常工作。

    <filter start="false">
        <exclude expression="(.*)\.svn"></exclude>
        <exclude expression="(.*)\.gz"></exclude>
        <exclude expression="^info/*"></exclude>
        <exclude expression="^static/*"></exclude>
    </filter>   #對於sersync監控的文件,會默認過濾系統的臨時文件(以"."開頭,以"~"結尾),除了這些文件外,可以自定義其他需要過濾的文件。

    <inotify>
        <delete start="true"/>
        <createFolder start="true"/>
        <createFile start="false"/>
        <closeWrite start="true"/>
        <moveFrom start="true"/>
        <moveTo start="true"/>
        <attrib start="false"/>
        <modify start="false"/>
    </inotify>  #inotify監控參數,對於大多數應用,可以把createFile設置爲false來提高性能,減少rsync通訊,因爲拷貝文件到監控目錄會產生create事件與close_write事件,所以如果關閉create事件,只監控文件拷貝時結束的事件close_write,同樣可以實現文件完整同步。    #注意:要將createFolder保持爲true,如果將createFloder設置爲false,則不會對產生的目錄進行監控,該目錄下的子文件與子目錄也不會被監控,所以除非特殊需要,請開啓。默認情況下對創建文件(目錄)事件與刪除文件(目錄)事件都進行監控,如果項目中不需要刪除遠程目標服務器的文件(目錄),則可以將delete參數設置爲false,則不會刪除事件監控。

    <sersync>
        <localpath watch="/backup">
            <remote ip="192.168.120.120" name="backup"/>
            <!--<remote ip="192.168.8.39" name="tongbu"/>--> #注:可添加rsync.conf中多個模塊的名字
            <!--<remote ip="192.168.8.40" name="tongbu"/>-->
        </localpath>
         #/backup目錄爲sersync主服務器本地待同步的目錄,ip爲從服務器的ip地址,name="backup",backup爲rsync.conf中模塊的名字。
        <rsync>
            <commonParams params="-artuz"/> #rsync的同步參數
            <auth start="true" users="rsync" passwordfile="/etc/rsync.password"/>#可填寫虛擬用戶rsync,本地密碼文件路徑
            <userDefinedPort start="false" port="874"/><!-- port=874 -->
            <timeout start="false" time="100"/><!-- timeout=100 -->
            <ssh start="false"/>    #如果開啓就是使用 rsync -e ssh的方式進行傳輸
        </rsync>
        <failLog path="/tmp/rsync_fail_log.sh" timeToExecute="60"/><!--default every 60mins execute once--> #失敗日誌腳本配置 #如果文件同步失敗,會重新傳送,再次失敗就會寫入rsync_fail_log.sh,然後每隔一段時間(timetoexecute進行設置)執行該腳本再次重新傳送,然後清空該腳本。
        <crontab start="false" schedule="600"><!--600mins-->    #每隔一段時間整體同步。如果文件量比較大,crontab的時間間隔要設的大一些,否則可能增加通訊開銷。如果開啓了filter文件過濾功能,那麼crontab整體同步也需要設置過濾,否則雖然實時同步的時候文件被過濾了,但crontab整體同步的時候,如果不單獨設置crontabfilter,還會將需要過濾的文件同步到遠程服務器,crontab的過濾正則與fileter過濾的不同。
            <crontabfilter start="false">   #如果同時開啓了filter與crontab,則要開啓crontab的crontabfilter。
                <exclude expression="*.php"></exclude>
                <exclude expression="info/*"></exclude>
            </crontabfilter>
        </crontab>
        <plugin start="false" name="command"/>  #設置爲true,將文件同步到遠程服務器後會條用name參數指定的插件。如果需要使用插件則需要在啓動實例的時候加上-m參數
    </sersync>

    <plugin name="command">
        <param prefix="/bin/sh" suffix="" ignoreError="true"/>  <!--prefix /opt/tongbu/mmm.sh suffix-->
        <filter start="false">
            <include expression="(.*)\.php"/>
            <include expression="(.*)\.sh"/>
        </filter>
    </plugin>   #當同步文件完成後,會調用command插件,如同步文件是test.php,則test.php文件再改動後,調用rsync同步到遠程服務器後,調用command插件,執行/bin/sh test.php suffix >/dev/null 2>&1
    #如果suffix設置了,則會放在inotify事件test.php之後,如果ignoError爲true,則會添加>/dev/null 2>&1,當然還可以設置command的filter,當filter爲true,include可以只對正則匹配到的文件調用command。
    <plugin name="socket">
        <localpath watch="/opt/tongbu">
            <deshost ip="192.168.138.20" port="8009"/>
        </localpath>
    </plugin>   #向指定ip與端口發送inotify所產生的文件路徑信息。
        <plugin name="refreshCDN">
        <localpath watch="/data0/htdocs/cms.xoyo.com/site/">
            <cdninfo domainname="ccms.chinacache.com" port="80" username="xxxx" passwd="xxxx"/>
            <sendurl base="http://pic.xoyo.com/cms"/>
            <regexurl regex="false" match="cms.xoyo.com/site([/a-zA-Z0-9]*).xoyo.com/images"/>
        </localpath>
    </plugin>
    #在同步的過程中將文件發送到目的服務器後刷新cdn接口。改模塊是根據chainaCDN的協議進行設計,當有文件產生的時候,就向cdn接口發送需要刷新的路徑位置。
    #localpath是需要監控的目錄,cdninfo標籤制定了cdn接口的域名,端口號,以及用戶名與密碼。
    #sendurl標籤是需要刷新的url的前綴。regexurl標籤中的,regex屬性爲true時,使用match屬性的正則語句匹配inotify返回的路徑信息,並將正則匹配到的部分作爲url一部分。
    舉例:
    如果產生文件事件爲:/data0/htdocs/cms.xoyo.com/site/jx3.xoyo.com/image/a/123.txt
    經過上面的match正則匹配後,最後刷新的路徑是:http://pic.xoyo.com/cms/jx3/a/123.txt
    如果regex屬性爲false,最後刷新的路徑是:http://pic.xoyo.com/cms/jx3.xoyo.com/images/a/123.txt
</head>#自定義超端口
2.3.3 配置完後,開啓sersync守護進程同步數據
啓動方法
/usr/local/sersync/bin/sersync2 -r -d -o /usr/local/sersync/conf/confxml.xml-d daemon方式啓動
-n 啓用線程數量
-o 指定配置文件
-r 遞歸同步目錄數據
整個sersync設置完畢!最後可以寫腳本並添加chkconfig或者直接加命令到rc.local完成自啓動。