


1. 背景介紹
a. 現在硬盤的容量越來越大,fdisk命令已經無法滿足分區要求,因爲,fdisk命令只支持2T以下的磁盤分區,大於2T的硬盤需要使用parted命令進行分區操作
b. 常用的有msdos和gpt分區表格式,msdos不支持2TB以上容量的磁盤,所以大於2TB的磁盤選gpt分區表格式
2. 操作步驟
2.1 fdisk命令分區及掛載方法
2.1.1 通過fdisk -l查看硬盤信息,以格式化/dev/vdb磁盤爲例

2.1.2 輸入fdisk /dev/vdb,開始創建分區操作
[root@192168088103-MySQL-Server ~]# fdisk /dev/vdb
Welcome to fdisk (util-linux 2.23.2).

Changes will remain in memory only, until you decide to write them.
Be careful before using the write command.

Device does not contain a recognized partition table
Building a new DOS disklabel with disk identifier 0x01e1bcab.

#輸入“m”,按“Enter”,打印幫助菜單,輸入“n”,按“Enter”,開始新建分區
Command (m for help): n
Partition type:
   #選擇分區類型,p爲主分區,e爲擴展分區
   p   primary (0 primary, 0 extended, 4 free)
   e   extended
#這裏我們選擇主分區
Select (default p): p
#指定主分區的編號,系統默認支持4個主分區,輸入主分區編號“1”,按“Enter”
Partition number (1-4, default 1): 1
#默認是從2048開始,直接回車,代表默認2048開始;由於EFI的興起,要給EFI 代碼留磁盤最開始的1M空間,爲EFI啓動預留的,所以從2048開始
First sector (2048-209715199, default 2048):
Using default value 2048
#默認是截至209715199,不輸入數值直接回車,代表這塊磁盤就劃分一個分區,即磁盤大小;如果想劃分多個分區,直接輸入+50G,就可以劃分出一個50G 的分區了
Last sector, +sectors or +size{K,M,G} (2048-209715199, default 209715199):
Using default value 209715199
#表示分區完成,即爲100GB的數據盤新建了1個分區
Partition 1 of type Linux and of size 100 GiB is set

#輸入p,打印出新建的分區信息
Command (m for help): p

Disk /dev/vdb: 107.4 GB, 107374182400 bytes, 209715200 sectors
Units = sectors of 1 * 512 = 512 bytes
Sector size (logical/physical): 512 bytes / 512 bytes
I/O size (minimum/optimal): 512 bytes / 512 bytes
Disk label type: dos
Disk identifier: 0x01e1bcab

   Device Boot      Start         End      Blocks   Id  System
/dev/vdb1            2048   209715199   104856576   83  Linux

#輸入w,將分區信息寫入到分區表中
Command (m for help): w
The partition table has been altered!

Calling ioctl() to re-read partition table.
Syncing disks.
#執行partprobe命令,將新的分區表變更信息同步至操作系統
[root@192168088103-MySQL-Server ~]# partprobe
2.1.3 對新建的分區進行格式化操作,設定操作系統認識的分區格式類型
#格式化分區的命令,mkfs -t ext4 /dev/vdb1 或 mkfs.ext4 /dev/vdb1
[root@192168088103-MySQL-Server ~]# mkfs -t ext4 /dev/vdb1
mke2fs 1.42.9 (28-Dec-2013)
Filesystem label=
OS type: Linux
Block size=4096 (log=2)
Fragment size=4096 (log=2)
Stride=0 blocks, Stripe width=0 blocks
6553600 inodes, 26214144 blocks
1310707 blocks (5.00%) reserved for the super user
First data block=0
Maximum filesystem blocks=2174746624
800 block groups
32768 blocks per group, 32768 fragments per group
8192 inodes per group
Superblock backups stored on blocks:
        32768, 98304, 163840, 229376, 294912, 819200, 884736, 1605632, 2654208,
        4096000, 7962624, 11239424, 20480000, 23887872

Allocating group tables: done
Writing inode tables: done
Creating journal (32768 blocks): done
Writing superblocks and filesystem accounting information: done
#格式化需要等待一段時間,請觀察系統運行狀態,不要退出
2.1.4 創建目錄,並將/dev/vdb1掛載到新創建的目錄下
#創建掛載點目錄
[root@192168088103-MySQL-Server ~]# mkdir -p /home/data1
#將/dev/vdb1分區掛載到目錄下/home/data1/
[root@192168088103-MySQL-Server ~]# mount /dev/vdb1 /home/data1/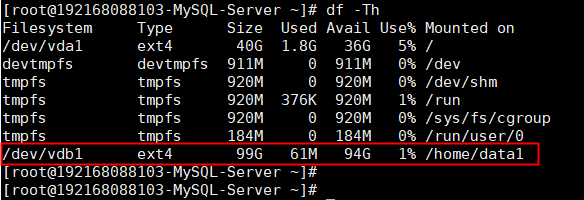
表示新建分區/dev/vdb1已掛載至/home/data1
2.2 parted命令分區及掛載方法
2.2.1 通過fdisk -l查看硬盤信息,以格式化/dev/vdc磁盤爲例

2.2.2 輸入parted /dev/vdc,開始創建分區操作
[root@192168088103-MySQL-Server ~]# parted /dev/vdc
GNU Parted 3.1
Using /dev/vdc
Welcome to GNU Parted! Type 'help' to view a list of commands.
#設定分區表格式gpt
(parted) mklabel gpt
#設定一個主分區,如果想分一個1T的分區和2T 的分區,可以使用命令 mkpart primary 0 1T和mkpart primary 1T 3T設定,刪除的話,可以使用rm ${number}
(parted) mkpart primary 0% 100%
#打印當前分區信息
(parted) print
Model: Virtio Block Device (virtblk)
Disk /dev/vdc: 3221GB
Sector size (logical/physical): 512B/512B
Partition Table: gpt
Disk Flags:

Number  Start   End     Size    File system  Name     Flags
 1      1049kB  3221GB  3221GB               primary

#parted命令分區完成後,直接quit退出即可,新建的分區信息默認保存,不需要手動操作
(parted) quit
Information: You may need to update /etc/fstab.
#執行partprobe命令,將新的分區表變更信息同步至操作系統
[root@192168088103-MySQL-Server ~]# partprobe
2.2.3 對新建的/dev/vdc1分區進行格式化操作,設定操作系統認識的分區格式類型
[root@192168088103-MySQL-Server ~]# mkfs -t ext4 /dev/vdc1
mke2fs 1.42.9 (28-Dec-2013)
Filesystem label=
OS type: Linux
Block size=4096 (log=2)
Fragment size=4096 (log=2)
Stride=0 blocks, Stripe width=0 blocks
196608000 inodes, 786431488 blocks
39321574 blocks (5.00%) reserved for the super user
First data block=0
Maximum filesystem blocks=2933915648
24000 block groups
32768 blocks per group, 32768 fragments per group
8192 inodes per group
Superblock backups stored on blocks:
        32768, 98304, 163840, 229376, 294912, 819200, 884736, 1605632, 2654208,
        4096000, 7962624, 11239424, 20480000, 23887872, 71663616, 78675968,
        102400000, 214990848, 512000000, 550731776, 644972544

Allocating group tables: done
Writing inode tables: done
Creating journal (32768 blocks): done
Writing superblocks and filesystem accounting information: done
#格式化需要等待一段時間,請觀察系統運行狀態,不要退出
2.2.4 創建目錄,並將/dev/vdc1掛載到新創建的目錄下
#創建掛載點目錄
[root@192168088103-MySQL-Server ~]# mkdir -p /home/data2
#將/dev/vdc1分區掛載到目錄下/home/data2/
[root@192168088103-MySQL-Server ~]# mount /dev/vdc1 /home/data2/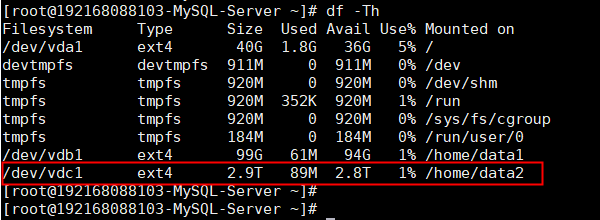
2.3 設置開機自動掛載磁盤
友情提示:
目前使用虛擬服務器的小夥伴越來越多,分區盤符有可能會變化,但唯一不變的是UUID。因此,掛載數據盤的時候,推薦使用UUID來配置自動掛載數據盤。
磁盤的UUID(universally unique identifier)是Linux系統爲存儲設備提供的唯一的標識字符串。
2.3.1 獲取磁盤的UUID配置自動掛載數據盤
#輸入blkid直接回車,獲取所有分區的UUID,輸入blkid /dev/vdb1只獲取當前分區的UUID
[root@192168088103-MySQL-Server ~]# blkid
/dev/vda1: UUID="eb697457-a097-4263-8bbf-a75aa632d27c" TYPE="ext4"
/dev/vdb1: UUID="27f82453-0372-461a-9d52-c390bfe54ecf" TYPE="ext4"
/dev/vdc1: UUID="5f12e9e9-ee55-4c9e-a921-461109f82922" TYPE="ext4" PARTLABEL="primary" PARTUUID="d76b8671-8b2d-4541-b9ee-faf2b9e77191"
2.3.2 編輯/etc/fstab文件,添加開機自動掛載磁盤
在文件/etc/fstab末尾添加如下行,並保存文件
UUID=27f82453-0372-461a-9d52-c390bfe54ecf /home/data1 ext4 defaults 0 0
UUID=5f12e9e9-ee55-4c9e-a921-461109f82922 /home/data2 ext4 defaults 0 0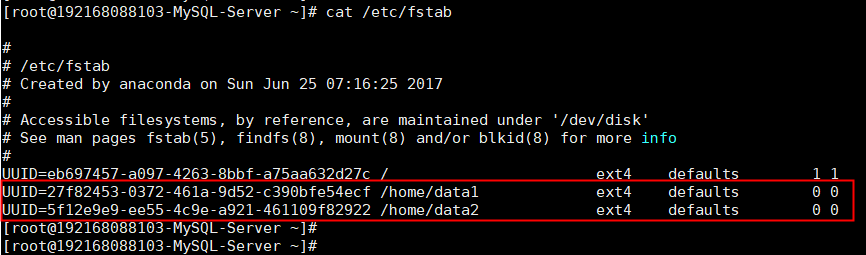
2.3.3 使用mount命令重新加載/etc/fstab文件
#重新加載/etc/fstab文件,檢查添加的掛載信息,執行mount -a命令如果有輸出,則說明添加的掛載信息有異常,可能導致系統啓動時,數據盤掛載異常,需要調整/etc/fstab文件中的掛載信息,執行命令無輸出,則正常
[root@192168088103-MySQL-Server ~]# mount -a
[root@192168088103-MySQL-Server ~]#
參考鏈接:
a. /etc/fstab文件詳解 https://www.cnblogs.com/miaoxg/p/5971036.html
b. parted命令詳解 https://www.cnblogs.com/machangwei-8/p/10353690.html