大綱
一、什麼是高可用集羣
二、什麼是高可用性
三、高可用集羣相關概念
四、Heartbeat v1版示例
一、什麼是高可用集羣
高可用集羣,英文原文爲High Availability Cluster,簡稱HA Cluster,簡單的說,集羣(cluster)就是一組計算機,它們作爲一個整體向用戶提供一組網絡資源。這些單個的計算機系統 就是集羣的節點(node)。高可用性集羣(HA cluster)是指如單系統一樣地運行並支持(計算機)持續正常運行的一個主機羣。
高可用集羣的出現是爲了使集羣的整體服務儘可能可用,從而減少由計算機硬件和軟件易錯性所帶來的損 失。如果某個節點失效,它的備援節點將在幾 秒鐘的時間內接管它的職責。因此,對於用戶而言,集羣永遠不會停機。高可用集羣軟件的主要作用就是實現故障檢查和業務切換的自動化。
只有兩個節點的高可用集羣又稱爲雙機熱備,即使用兩臺服務器互相備份。當一臺服務器出現故障時,可由另一臺服務器承擔服務任務,從而在不需要人工干預的 情況下,自動保證系統能持續對外提供服務。雙機熱備只是高可用集羣的一種,高可用集羣系統更可以支持兩個以上的節點,提供比雙機熱備更多、更高級的功能, 更能滿足用戶不斷出現的需求變化。
二、什麼是高可用性
計算機系統的可靠性用平均無故障時間(MTBF)來度量,即計算機系統平均能夠正常運行多長時間,才發生一次故障。系統的可靠性越高,平均無故障時間越長。可維護性用平均維修時間(MTTR)來度量,即系統發生故障後維修和重新恢復正常運行平均花費的時間。系統的可維護性越好,平均維修時間越短。計算機系統的可用性定義爲:MTBF/(MTBF+MTTR) * 100%。由此可見,計算機系統的可用性定義爲系統保持正常運行時間的百分比。計算公式爲
MTBF = mean time between failuresv
MTTR = mean time to repairv
A = probability system will provide service ata random time (ranging from 0 to 1)
描述可用性的一種常用的方法是使用“9”,如三個 9 表示 99.9% 可用性。但是,有時會誤解用 9 度量的含義。需要進行算術運算才能知道三個 9(99.9% 可用性)表示一年大約有 8.5 小時的服務中斷期。四個 9 (99.99%) 是更高一級的可用性,表示一年大約有 1 小時的服務中斷期。五個 9 (99.999%) 表示每年僅有大約 5 分鐘的中斷期。
三、高可用集羣相關概念
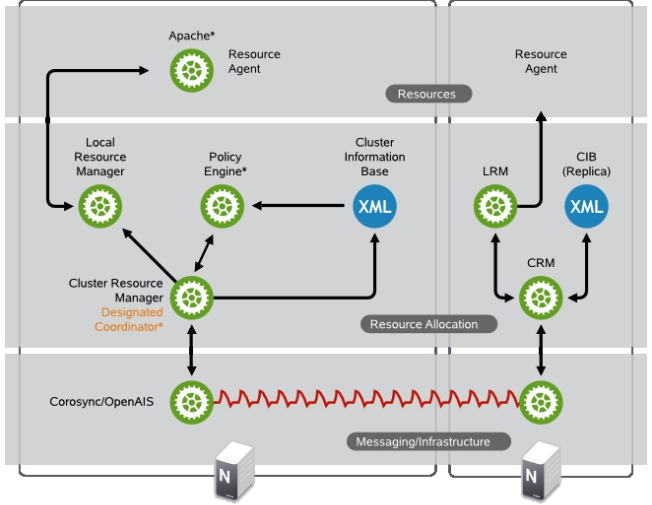
1、高可用集羣架構層次
Messaging Layer
Cluster Resource Manager
Resource Agent
(1)、Messaging Layer
各節點之間傳遞各自的心跳信息和集羣食物決策信息
(2)、Cluster Resource Manager
羣集資源管理器 (CRM)
在資源分配層中執行的每個操作都要經過羣集資源管理器。如果資源分配層的其他組件(或更高層中的組件)需要通訊,則它們通過本地 CRM 進行。在每個節點上,CRM 都會維護羣集信息庫 (CIB)。
羣集信息庫 (CIB)
羣集信息庫是整個羣集配置和當前狀態在內存中的 XML 表示。它包含所有羣集選項、節點、資源、約束及其之間的關係的定義。CIB 還將更新同步到所有羣集節點。羣集中有一個主 CIB,由指定協調器 (DC)進行維護。所有其他節點都包含 CIB 複本。
指定協調器 (DC)
羣集中的一個 CRM 會選爲 DC。DC 是羣集中唯一可以決定需要在整個羣集執行更改(例如節點屏蔽或資源移動)的實體。DC 同時也是用於保存 CIB 主副本的節點。所有其他節點都從當前 DC 獲取他們的配置和資源分配信息。DC 是在成員資格更改後從羣集的所有節點中選出的。
策略引擎 (PE)
只要指定協調程序需要進行羣集範圍的更改(對新 CIB 作出反應),策略引擎就會根據羣集的當前狀態和配置計算其下一個狀態。PE 還生成一個轉換圖,包含用於達到下一個羣集狀態的(資源)操作和依賴性的列表。PE 始終在 DC 上運行。
本地資源管理器 (LRM)
LRM 代表 CRM 調用本地資源代理。因此它可以執行啓動/停止/監視操作並將結果報告給 CRM。LRM 是其本地節點上所有資源相關信息的權威來源。
(3)、Resource Agent
最高層是資源層。資源層包括一個或多個資源代理 (RA)。資源代理是已寫入的用來啓動、停止和監視某種服務(資源)的程序(通常是外殼腳本)。資源代理僅由 LRM 調用。第三方可將他們自己的代理放在文件系統中定義的位置,這樣就爲各自的軟件提供了現成羣集集成。
2、集羣的工作模型
A/P:兩個節點,主備模型
N-M N>M,N個節點,M個服務
N-N:N個節點,N個服務
A/A:雙主模型
3、資源約束類型
location constraint:位置約束,資源更傾向於那個節點上
coloation constraint:排列約束,資源運行在同一節點的傾向性
order constraint:順序約束,資源的啓動次序及關閉次序
4、集羣的處理策略(某節點不是集羣成員,如何處理運行於當前節點的資源)
stopped:停止
ignore:忽略
freeze:不連接新的請求,凍結
suicide:將服務器kill,即自殺式行爲
5、資源類型(Resource Type)
primitive:主資源,只能運行於一個節點
group:組資源,資源容器
clone:克隆資源,同時運行於多個節點上的資源,如STONITH和dlm(分佈式鎖管理器)
master/slave:主從資源,一種特殊的克隆資源,只能運行於2個節點,並且有主從關係
6、RA類別
heartbeat legacy:傳統的heartbeat類別
LSB:LSB風格的腳本,如/etc/rc.d/init.d目錄下的腳本
OCF:Open Cluster Framework,遵循此種規範的各vendor都可以提供
STONITH:爆頭設備,Shoot The Other Node In The Head的簡寫
7、隔離級別
節點級別:STONTIH
資源級別:FC SAN Switch
8、資源粘性
資源對某節點的依賴程度,通過score定義,INF表示正無窮,-INF表示負無窮
四、Heartbeat v1版示例
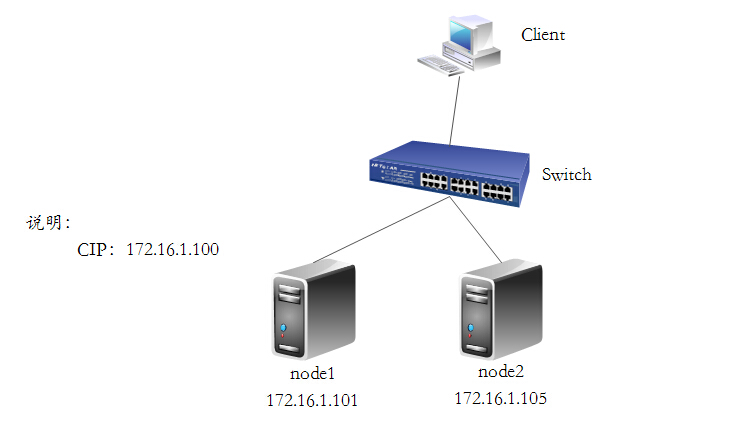
系統環境
CentOS6.5 x86_64
node1.soysauce.com node1 172.16.1.103
node2.soysauce.com node2 172.16.1.104
拓撲圖
1、準備工作
(1)、時間同步
[root@node1 ~]# ntpdate s2c.time.edu.cn
[root@node2 ~]# ntpdate s2c.time.edu.cn

可根據需要定義至crontab任務中
(2)、主機名稱要與uname -n,並通過/etc/hosts解析
node1
[root@node1 ~]# hostname node1.network.com
[root@node1 ~]# uname -n
node1.network.com
[root@node1 ~]# sed -i 's@\(HOSTNAME=\).*@\1node1.network.com@g'  /etc/sysconfig/network

node2
[root@node2 ~]# hostname node2.network.com
[root@node2 ~]# uname -n
node2.network.com
[root@node2 ~]# sed -i 's@\(HOSTNAME=\).*@\1node2.network.com@g'  /etc/sysconfig/network

node1添加hosts解析
[root@node1 ~]# vim /etc/hosts
[root@node1 ~]# cat /etc/hosts
127.0.0.1   localhost localhost.localdomain localhost4 localhost4.localdomain4
::1         localhost localhost.localdomain localhost6 localhost6.localdomain6
#	CentOS5.8
172.16.1.101	CentOS5.8
172.16.1.102	CentOS6.5
172.16.1.103	node1.network.com node1
172.16.1.104	node2.network.com node2

拷貝此hosts文件至node2
[root@node1 ~]# scp /etc/hosts root@node2:/etc/
The authenticity of host 'node2 (172.16.1.104)' can't be established.
RSA key fingerprint is 1e:87:cd:f0:95:ff:a8:ef:19:bc:c6:e7:0a:87:6b:fa.
Are you sure you want to continue connecting (yes/no)? yes
Warning: Permanently added 'node2' (RSA) to the list of known hosts.
root@node2's password:
hosts                                                                  100%  292     0.3KB/s   00:00
(3)、ssh互信通信
node1
[root@node1 ~]# ssh-keygen -t rsa -f ~/.ssh/id_rsa -P ''
Generating public/private rsa key pair.
Your identification has been saved in /root/.ssh/id_rsa.
Your public key has been saved in /root/.ssh/id_rsa.pub.
The key fingerprint is:
3d:85:a6:fe:42:9c:be:98:a5:d6:47:6c:e6:f7:f1:a3 root@node1
[root@node1 ~]# ssh-copy-id -i ~/.ssh/id_rsa.pub root@node2
The authenticity of host 'node2 (172.16.1.104)' can't be established.
RSA key fingerprint is 13:42:92:7b:ff:61:d8:f3:7c:97:5f:22:f6:71:b3:24.
Are you sure you want to continue connecting (yes/no)? yes
Warning: Permanently added 'node2,172.16.1.104' (RSA) to the list of known hosts.
root@node2's password:
hosts                                                                  100%  292     0.3KB/s   00:00
[root@node1 ~]# ssh root@node2 'ifconfig'
eth0      Link encap:Ethernet  HWaddr 00:0C:29:3A:AC:CC
          inet addr:172.16.1.104  Bcast:255.255.255.255  Mask:255.255.255.0
          inet6 addr: fe80::20c:29ff:fe3a:accc/64 Scope:Link
          UP BROADCAST RUNNING MULTICAST  MTU:1500  Metric:1
          RX packets:138231 errors:0 dropped:0 overruns:0 frame:0
          TX packets:172956 errors:0 dropped:0 overruns:0 carrier:0
          collisions:0 txqueuelen:1000
          RX bytes:15715088 (14.9 MiB)  TX bytes:21064792 (20.0 MiB)

lo        Link encap:Local Loopback
          inet addr:127.0.0.1  Mask:255.0.0.0
          inet6 addr: ::1/128 Scope:Host
          UP LOOPBACK RUNNING  MTU:16436  Metric:1
          RX packets:4810 errors:0 dropped:0 overruns:0 frame:0
          TX packets:4810 errors:0 dropped:0 overruns:0 carrier:0
          collisions:0 txqueuelen:0
          RX bytes:476915 (465.7 KiB)  TX bytes:476915 (465.7 KiB)

lo:0      Link encap:Local Loopback
          inet addr:172.16.1.110  Mask:255.255.255.255
          UP LOOPBACK RUNNING  MTU:16436  Metric:1

同理node2也需要做同樣的雙擊互信,一樣的操作,此處不再演示
2、安裝heartbeat與httpd
node1
[root@node1 ~]# yum install -y heartbeat httpd
node2
[root@node2 ~]# yum install -y heartbeat httpd
3、配置密鑰文件authkeys
[root@node1 ~]# cd /etc/ha.d/
[root@node1 ha.d]# cp /usr/share/doc/heartbeat-3.0.4/{authkeys,ha.cf,haresources} .
[root@node1 ha.d]# ls
authkeys  ha.cf  harc  haresources  rc.d  README.config  resource.d  shellfuncs
[root@node1 ha.d]# vim authkeys
[root@node1 ha.d]# tail -2 authkeys
auth 2
2 sha1  8e3a2cf5ae9eddff                # 這裏使用sha1認證,可自行定義
[root@node1 ha.d]# chmod 600 authkeys
[root@node1 ha.d]# ll authkeys
-rw------- 1 root root 690 Jan  6 14:28 authkeys        # 保證權限爲600
4、配置主配置文件ha.cf
[root@node1 ha.d]# vim ha.cf
[root@node1 ha.d]# grep "^[^#]" ha.cf             # 參數可自行根據需要調整
logfile	/var/log/heartbeat.log
keepalive 1
deadtime 10
warntime 3
udpport	694
mcast eth0 225.0.100.1 694 1 0
auto_failback on
node node1.network.com                # 注意此處的主機名一定要與uname -n結果保持一致
node node2.network.com
ping  172.16.1.1
compression	bz2
compression_threshold 2

ha.cf配置文件部分參數詳解:

	autojoin    none
		#集羣中的節點不會自動加入
	logfile /var/log/ha-log
		#指名heartbaet的日誌存放位置
	keepalive 2
		#指定心跳使用間隔時間爲2秒(即每兩秒鐘在eth1上發送一次廣播)
	deadtime 30
		#指定備用節點在30秒內沒有收到主節點的心跳信號後,則立即接管主節點的服務資源
	warntime 10
		#指定心跳延遲的時間爲十秒。當10秒鐘內備份節點不能接收到主節點的心跳信號時
		就會往日誌中寫入一個警告日誌,但此時不會切換服務
	initdead 120
		#在某些系統上,系統啓動或重啓之後需要經過一段時間網絡才能正常工作,
		該選項用於解決這種情況產生的時間間隔。取值至少爲deadtime的兩倍。

	udpport 694
		#設置廣播通信使用的端口,694爲默認使用的端口號。
	baud    19200
		#設置串行通信的波特率
	bcast   eth0
		# Linux  指明心跳使用以太網廣播方式,並且是在eth0接口上進行廣播。
	#mcast eth0 225.0.0.1 694 1 0
		#採用網卡eth0的Udp多播來組織心跳,一般在備用節點不止一臺時使用。
		Bcast、ucast和mcast分別代表廣播、單播和多播,是組織心跳的三種方式,任選其一即可。
	#ucast eth0 192.168.1.2
		#採用網卡eth0的udp單播來組織心跳,後面跟的IP地址應爲雙機對方的IP地址
	auto_failback on
		#用來定義當主節點恢復後,是否將服務自動切回,heartbeat的兩臺主機分別爲主節點和備份節點。
		主節點在正常情況下佔用資源並運行所有的服務,遇到故障時把資源交給備份節點並由備份節點運行服務。
		在該選項設爲on的情況下,一旦主節點恢復運行,則自動獲取資源並取代備份節點,
		如果該選項設置爲off,那麼當主節點恢復後,將變爲備份節點,而原來的備份節點成爲主節點
	#stonith baytech /etc/ha.d/conf/stonith.baytech
		# stonith的主要作用是使出現問題的節點從集羣環境中脫離,進而釋放集羣資源,
		避免兩個節點爭用一個資源的情形發生。保證共享數據的安全性和完整性。
	#watchdog /dev/watchdog
		#該選項是可選配置,是通過Heartbeat來監控系統的運行狀態。
		使用該特性,需要在內核中載入"softdog"內核模塊,用來生成實際的設備文件,如果系統中沒有這個內核模塊,就需要指定此模塊,重新編譯內核。
		編譯完成輸入"insmod softdog"加載該模塊。然後輸入"grep misc /proc/devices"(應爲10),
		輸入"cat /proc/misc |grep watchdog"(應爲130)。最後,生成設備文件:"mknod /dev/watchdog c 10 130" 。即可使用此功能
	node node1.magedu.com
		#主節點主機名,可以通過命令“uanme –n”查看。
	node node2.magedu.com
		#備用節點主機名
	ping 192.168.12.237
		#選擇ping的節點,ping 節點選擇的越好,HA集羣就越強壯,可以選擇固定的路由器作爲ping節點,
		但是最好不要選擇集羣中的成員作爲ping節點,ping節點僅僅用來測試網絡連接
	ping_group group1 192.168.12.120 192.168.12.237
		#類似於ping  ping一組ip地址
	apiauth pingd  gid=haclient uid=hacluster
	respawn hacluster /usr/local/ha/lib/heartbeat/pingd -m 100 -d 5s
		#該選項是可選配置,列出與heartbeat一起啓動和關閉的進程,該進程一般是和heartbeat集成的插件,這些進程遇到故障可以自動重新啓動。
		最常用的進程是pingd,此進程用於檢測和監控網卡狀態,需要配合ping語句指定的ping node來檢測網絡的連通性。其中hacluster表示啓動pingd進程的身份。

	#下面的配置是關鍵,也就是激活crm管理,開始使用v2 style格式
	crm respawn
		#注意,還可以使用crm yes的寫法,但這樣寫的話,如果後面的cib.xml配置有問題
		#會導致heartbeat直接重啓該服務器,所以,測試時建議使用respawn的寫法
	#下面是對傳輸的數據進行壓縮,是可選項
	compression     bz2
	compression_threshold 2

	注意,v2 style不支持ipfail功能,須使用pingd代替
5、編輯資源配置文件haresources
[root@node1 ha.d]# vim haresources
[root@node1 ha.d]# grep "^[^#]" haresources
node1.network.com	IPaddr2::172.16.1.110/16/eth0   httpd
6、配置httpd服務,測試沒問題之後再禁止其開機自啓動
node1
[root@node1 ha.d]# echo "<h1>node1.network.com</h1>" > /var/www/html/index.html
[root@node1 ha.d]# service httpd start
Starting httpd:                                            [  OK  ]
[root@node1 ha.d]# curl http://172.16.1.103
<h1>node1.network.com</h1>
[root@node1 ha.d]# service httpd stop
Stopping httpd:                                            [  OK  ]
[root@node1 ha.d]# chkconfig httpd off
node2
[root@node2 ha.d]# echo "<h1>node2.network.com</h1>" > /var/www/html/index.html
[root@node2 ha.d]# service httpd start
Starting httpd:                                            [  OK  ]
[root@node2 ha.d]# curl http://172.16.1.104
<h1>node2.network.com</h1>
[root@node2 ha.d]# service httpd stop
Stopping httpd:                                            [  OK  ]
[root@node2 ha.d]# chkconfig httpd off
7、將剛纔配置的三個文件同步至node2
[root@node1 ha.d]# scp authkeys ha.cf haresources root@node2:/etc/ha.d/
authkeys                                                                                        100%  690     0.7KB/s   00:00
ha.cf                                                                                           100%   10KB  10.3KB/s   00:00
haresources                                                                                     100% 6049     5.9KB/s   00:00
8、啓動heartbeat服務,測試能否正常提供服務
[root@node1 ha.d]# service heartbeat start
Starting High-Availability services: INFO:  Resource is stopped
Done.

[root@node1 ha.d]# ssh root@node2 'service heartbeat start'
Starting High-Availability services: 2016/01/06_14:47:31 INFO:  Resource is stopped
Done.

[root@node1 ha.d]# ss -tnl | grep "80"                # 80端口已然啓動
LISTEN     0      128                      :::80                      :::*
此時可以看到資源已然運行在我們定義的主節點上
此時模擬node1節點故障,看資源是否會轉移至node2節點
[root@node1 ha.d]# /usr/share/heartbeat/hb_standby
Going standby [all].
此時可以看到資源已成功從node1轉移至node2,此時再讓node1上線
[root@node1 ha.d]# /usr/share/heartbeat/hb_takeover
因爲我們在主配置文件中定義了auto_failback on,所以會實現故障轉回功能,若不想自動轉回,則設置此參數爲off即可
9、添加NFS,使兩個node共享此NFS所提供的頁面文件
(1)、首先配置NFS
[root@Director ~]# mkdir /www/web -pv
mkdir: created directory `/www'
mkdir: created directory `/www/web'
[root@Director ~]# echo "<h1>NFS Server</h1>" >> /www/web/index.html
[root@Director ~]# vim /etc/exports
[root@Director ~]# cat /etc/exports
/www/web	172.16.0.0/16(ro)
[root@Director ha.d]# service rpcbind start
Starting rpcbind:                                          [  OK  ]
[root@Director ha.d]# service nfs start
Starting NFS services:                                     [  OK  ]
Starting NFS quotas:                                       [  OK  ]
Starting NFS mountd:                                       [  OK  ]
Starting NFS daemon:                                       [  OK  ]
Starting RPC idmapd:                                       [  OK  ]
(2)、在node1節點上配置haresources文件,定義NFS資源,再同步此文件至node2
[root@node1 ha.d]# service heartbeat start
[root@node1 ha.d]# ssh node2 'service heartbeat start'
[root@node1 ha.d]# showmount -e 172.16.1.102
Export list for 172.16.1.102:
/www/web 172.16.0.0/16
[root@node1 ha.d]# vim haresources
[root@node1 ha.d]# grep "^[^#]" haresources
node1.network.com	IPaddr2::172.16.1.110/16/eth0 Filesystem::CentOS6.5:/www/web::/var/www/html::nfs  httpd
[root@node1 ha.d]# scp haresources node2:/etc/ha.d/
haresources                                               100% 6101     6.0KB/s   00:00
(3)、啓動heartbeat服務
[root@node1 ha.d]# service heartbeat start
[root@node1 ha.d]# ssh node2 'service heartbeat start'
[root@node1 ha.d]# ip addr show
1: lo: <LOOPBACK,UP,LOWER_UP> mtu 16436 qdisc noqueue state UNKNOWN
    link/loopback 00:00:00:00:00:00 brd 00:00:00:00:00:00
    inet 127.0.0.1/8 scope host lo
    inet6 ::1/128 scope host
       valid_lft forever preferred_lft forever
2: eth0: <BROADCAST,MULTICAST,UP,LOWER_UP> mtu 1500 qdisc pfifo_fast state UP qlen 1000
    link/ether 00:0c:29:5c:4e:8f brd ff:ff:ff:ff:ff:ff
    inet 172.16.1.103/24 brd 255.255.255.255 scope global eth0
    inet 172.16.1.110/16 scope global eth0
    inet6 fe80::20c:29ff:fe5c:4e8f/64 scope link
       valid_lft forever preferred_lft forever
[root@node1 ha.d]# mount
/dev/mapper/vg_centos6-lv_root on / type ext4 (rw)
proc on /proc type proc (rw)
sysfs on /sys type sysfs (rw)
devpts on /dev/pts type devpts (rw,gid=5,mode=620)
tmpfs on /dev/shm type tmpfs (rw)
/dev/sda1 on /boot type ext4 (rw)
none on /proc/sys/fs/binfmt_misc type binfmt_misc (rw)
sunrpc on /var/lib/nfs/rpc_pipefs type rpc_pipefs (rw)
nfsd on /proc/fs/nfsd type nfsd (rw)
172.16.1.102:/www/web on /var/www/html type nfs (rw,vers=4,addr=172.16.1.102,clientaddr=172.16.1.103)
[root@node1 ha.d]# ss -tnl
State      Recv-Q Send-Q                                 Local Address:Port                                   Peer Address:Port
LISTEN     0      128                                               :::111                                              :::*
LISTEN     0      128                                                *:111                                               *:*
LISTEN     0      128                                               :::80                                               :::*
LISTEN     0      128                                               :::33969                                            :::*
LISTEN     0      128                                               :::22                                               :::*
LISTEN     0      128                                                *:22                                                *:*
LISTEN     0      64                                                 *:32838                                             *:*
LISTEN     0      64                                                :::52455                                            :::*
LISTEN     0      128                                                *:38442
(4)、測試是否能訪問到NFS所共享的頁面
此時讓node1節點下線
[root@node1 ha.d]# /usr/share/heartbeat/hb_standby
Going standby [all].
可以看到,仍然可以訪問,但此時所有資源已經轉移到了node2上面
[root@node2 ha.d]# ip addr show
1: lo: <LOOPBACK,UP,LOWER_UP> mtu 16436 qdisc noqueue state UNKNOWN
    link/loopback 00:00:00:00:00:00 brd 00:00:00:00:00:00
    inet 127.0.0.1/8 scope host lo
    inet6 ::1/128 scope host
       valid_lft forever preferred_lft forever
2: eth0: <BROADCAST,MULTICAST,UP,LOWER_UP> mtu 1500 qdisc pfifo_fast state UP qlen 1000
    link/ether 00:0c:29:3a:ac:cc brd ff:ff:ff:ff:ff:ff
    inet 172.16.1.104/24 brd 255.255.255.255 scope global eth0
    inet 172.16.1.110/16 scope global eth0
    inet6 fe80::20c:29ff:fe3a:accc/64 scope link
       valid_lft forever preferred_lft forever
[root@node2 ha.d]# ss -tnl | grep "80"
LISTEN     0      128                      :::80                      :::*
[root@node2 ha.d]# mount | grep "nfs"
sunrpc on /var/lib/nfs/rpc_pipefs type rpc_pipefs (rw)
172.16.1.102:/www/web on /var/www/html type nfs (rw,vers=4,addr=172.16.1.102,clientaddr=172.16.1.104)
到此爲止一個簡單的 Heartbeat + NFS + httpd的高可用服務搭建完成


