


ubuntu各版本阿里雲鏡像下載地址
ubuntu 14.04:
http://mirrors.aliyun.com/ubuntu-releases/14.04/
ubuntu 16.04:
http://mirrors.aliyun.com/ubuntu-releases/16.04/
ubuntu 18.04:
http://mirrors.aliyun.com/ubuntu-releases/18.04/
1.配置網卡ip
1)配置網卡eth0,本地內網網卡無需指定網關和域名服務器
root@ubuntu1804:~# vim /etc/netplan/01-netcfg.yaml
network:
version: 2
renderer: networkd
ethernets:
eth0:
dhcp4: no
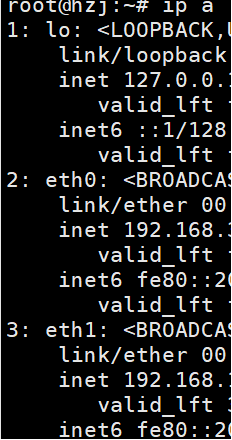
addresses: [192.168.1.30/24]2)配置網卡eth1,要保持嚴格縮進,否則會導致網卡起不來
root@ubuntu1804:~# vim /etc/netplan/02-netcfg.yaml
network:
    version: 2
    renderer: networkd
    ethernets:
        eth1:
            dhcp4: yes
            addresses: [192.168.10.107/24]
            gateway4: 192.168.10.1
            nameservers:
                addresses: [223.6.6.6]
2.修改網卡名爲eth*
1)編輯grub文件
root@ubuntu1804:~#vim /etc/default/grub
    ……
    GRUB_CMDLINE_LINUX="net.ifnames=0 biosdevname=0"
    ……
2)加載更新grub文件
root@ubuntu1804:~#update-grub3)重啓機器實現網卡名更改
root@ubuntu1804:~#reboot4)啓動機器實現網卡名的修改
若要再次修改網卡ip,修改完後需重啓網絡
root@ubuntu1804:~#netplan apply #重啓網卡命令
3.配置爲國內阿里雲倉庫源
1)配置ubuntu倉庫源
    root@ubuntu1804:~# vim /etc/apt/sources.list
    deb http://mirrors.aliyun.com/ubuntu/ bionic main restricted universe multiverse
    deb-src http://mirrors.aliyun.com/ubuntu/ bionic main restricted universe multiverse

    deb http://mirrors.aliyun.com/ubuntu/ bionic-security main restricted universe multiverse
    deb-src http://mirrors.aliyun.com/ubuntu/ bionic-security main restricted universe multiverse

    deb http://mirrors.aliyun.com/ubuntu/ bionic-updates main restricted universe multiverse
    deb-src http://mirrors.aliyun.com/ubuntu/ bionic-updates main restricted universe multiverse

    deb http://mirrors.aliyun.com/ubuntu/ bionic-proposed main restricted universe multiverse
    deb-src http://mirrors.aliyun.com/ubuntu/ bionic-proposed main restricted universe multiverse

    deb http://mirrors.aliyun.com/ubuntu/ bionic-backports main restricted universe multiverse
    deb-src http://mirrors.aliyun.com/ubuntu/ bionic-backports main restricted universe multiverse
2)更新倉庫
    root@ubuntu1804:~# apt update
    Get:1 http://mirrors.aliyun.com/ubuntu bionic InRelease [242 kB]
    Get:2 http://mirrors.aliyun.com/ubuntu bionic-security InRelease [88.7 kB]
    Get:3 http://mirrors.aliyun.com/ubuntu bionic-updates InRelease [88.7 kB]
    Get:4 http://mirrors.aliyun.com/ubuntu bionic-proposed InRelease [242 kB]
    ……
3)升級本機所有已安裝的軟件包
root@ubuntu1804:~# apt upgrade4.安裝初始化常用的軟件包
1)在ubuntu18.04中常用的初始化安裝包
root@ubuntu1804:~# apt-get install iproute2 ntpdate tcpdump telnet traceroute nfs-kernel-server nfs-common lrzsz tree openssl libssl-dev libpcre3 libpcre3-dev zlib1g-dev gcc openssh-server iotop unzip zip ipmitool -y 2)在centos7的初始化最小化安裝常用軟件包
[root@centos7 ~]# yum install vim iotop bc gcc gcc-c++ glibc glibc-devel pcre pcre-devel openssl openssl-devel zip unzip zlib-devel net-tools lrzsz tree ntpdate telnet lsof tcpdump wget libevent libevent-devel bc systemd-devel bash-completion traceroute -y5.開啓遠程連接並允許root賬戶直接登錄
1)編輯ssh遠程服務配置文件,註釋掉禁止root祕鑰登錄
root@ubuntu1804:~# vim /etc/ssh/sshd_config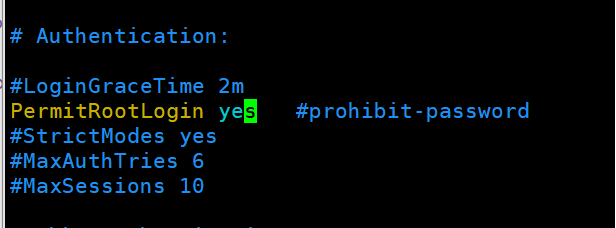
2)在重新啓動sshd服務,即可實現root遠程登錄
root@ubuntu1804:~# systemctl restart sshd