 作者 | 阿里雲智能事業羣技術專家 牛秋霖(冬島)
導讀:通過前面的一系列文章你已經知道如何基於 kubectl 來操作 Knative 的各種資源。但是如果想要在項目中集成 Knative 僅僅使用 kubectl 這種命令的方式是不夠的,還需要在代碼中基於 Knative Serving SDK 進行集成開發。本篇文章中,阿里雲智能事業羣技術專家冬島將從 Knative Serving SDK 入手,介紹如何基於 Knative SDK 進行 serverless 開發。
Golang Context
在正式開始介紹 Knative Serving SDK 之前,我們先簡單介紹一下 Golang Context 的機理。因爲在 Knative Serving 中 client、Informer 的初始化和信息傳遞完全是基於 Golang Context 實現的。
Golang 是從 1.7 版本開始引入的 Context ,Golang 的 Context 可以很好的簡化多個 goroutine 之間以及請求域間的數據傳遞、取消信號和截至時間等相關操作。Context 主要有兩個作用:
- 傳輸必要的數據;
- 進行協調控制,比如終止 goroutein、設置超時時間等。
Context 定義
Context 本身是一個接口。
type Context interface {
    Deadline() (deadline time.Time, ok bool)
    Done() <-chan struct{}
    Err() error
    Value(key interface{}) interface{}
}
這個接口中定義了四個方法,下面分別介紹:
- Deadline 方法是獲取設置的截止時間的意思,到了這個時間點,Context 會自動發起取消請求;
- Done 方法返回一個只讀的 chan,如果該方法返回的 chan 可以讀取,則意味着 parent Context 已經發起了取消請求, 此時應該做清理操作,然後退出 goroutine 並釋放資源;
- Err 方法返回取消的錯誤原因;
- Value 方法獲取該 Context 上綁定的值,是一個鍵值對。所以要通過一個 Key 纔可以獲取對應的值,這個值是線程安全的。
關於 Context 主要記住一點:可以通過 Value 傳遞數據,Value 是一個鍵值對結構。更多詳細的介紹可以參見下面這些文章:
- Concurrency Patterns in Go
- How to correctly use context.Context in Go 1.7
- Using context cancellation in Go
- Go Context
Knative Serving client 源碼淺析
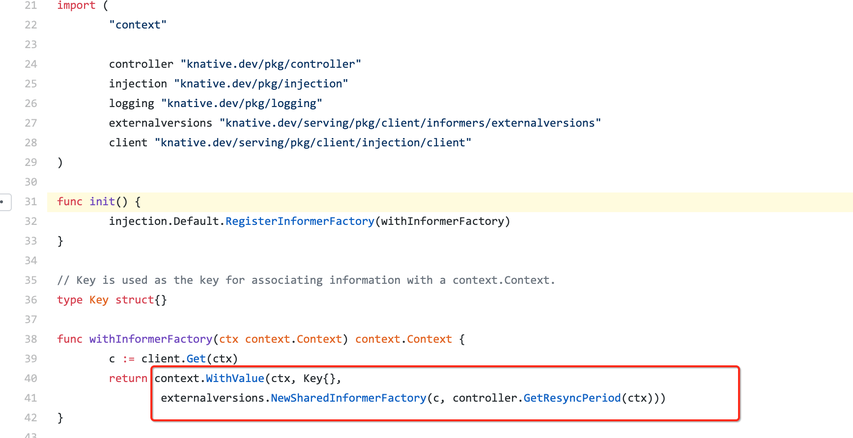
在 Context 的這些特性中,Knative Serving 中重度依賴的是 Value 功能。以 Service 的 Informer 初始化爲例進行說明,這裏可以看到源碼。
Informer “構造函數”是在 init 函數中自動註冊到 injection.Default 中的。當 Informer “構造函數”被調用之後會自動把生成的 Informer 注入到 Context 中 context.WithValue(ctx, Key{}, inf), inf.Informer()。

從上圖中可以看到:Informer 初始化的時候需要調用 factory,而 factory 本身是從 Context 中獲取的。下面我們再看看 factory 是怎麼初始化的。factory 的初始化。
上圖可以發現,factory 也是把“構造函數”註冊到 injection.Default 中,並會將生成的 SharedInformerFactory 注入到 Context 中。而且 factory 中使用的 client (鏈接 kube-apiserver 使用的對象)也是從 Context 獲取到的。
可以說 Knative Serving SDK 初始化的過程是面向 Context 編程的。關鍵對象是自動注入到 Context,在使用的時候從 Context 中取出。
順帶提一點,Knative Serving 的日誌對象也是在 Context 保存的,當需要打印日誌的時候先通過 logger := logging.FromContext(ctx) 從 Context 中拿到 logger,然後就可以使用了。這樣做的好處是可以通過管理 logger 對象,比如做 trace 功能。
如下所示是基於 logger 打印出來的日誌,可以看到對於同一個請求的處理是可以通過 traceID 進行追蹤的。下面這段日誌都是對 577f8de5-cec9-4c17-84f7-f08d39f40127 這個 trace 的處理。
{"level":"info","ts":"2019-08-28T20:24:39.871+0800","caller":"controller/service.go:67","msg":"Reconcile: default/helloworld-go","knative.dev/traceid":"be5ec711-6ca3-493c-80ed-dddfa21fd576","knative.dev/key":"default/helloworld-go"}
{"level":"info","ts":"2019-08-28T20:24:39.871+0800","caller":"controller/controller.go:339","msg":"Reconcile succeeded. Time taken: 487.347µs.","knative.dev/traceid":"90653eda-644b-4b1e-8bdb-4a1a7a7ff0d8","knative.dev/key":"eci-test/helloworld-go"}
{"level":"info","ts":"2019-08-28T20:24:39.871+0800","caller":"controller/service.go:106","msg":"service: default/helloworld-go route: default/helloworld-go ","knative.dev/traceid":"be5ec711-6ca3-493c-80ed-dddfa21fd576","knative.dev/key":"default/helloworld-go"}
{"level":"info","ts":"2019-08-28T20:24:39.872+0800","caller":"controller/service.go:67","msg":"Reconcile: eci-test/helloworld-go","knative.dev/traceid":"22f6c77d-8365-4773-bd78-e011ccb2fa3d","knative.dev/key":"eci-test/helloworld-go"}
{"level":"info","ts":"2019-08-28T20:24:39.872+0800","caller":"controller/service.go:116","msg":"service: default/helloworld-go revisions: 1 ","knative.dev/traceid":"be5ec711-6ca3-493c-80ed-dddfa21fd576","knative.dev/key":"default/helloworld-go"}
{"level":"info","ts":"2019-08-28T20:24:39.872+0800","caller":"controller/service.go:118","msg":"service: default/helloworld-go revision: default/helloworld-go-cgt65 ","knative.dev/traceid":"be5ec711-6ca3-493c-80ed-dddfa21fd576","knative.dev/key":"default/helloworld-go"}
{"level":"info","ts":"2019-08-28T20:24:39.872+0800","caller":"controller/controller.go:339","msg":"Reconcile succeeded. Time taken: 416.527µs.","knative.dev/traceid":"be5ec711-6ca3-493c-80ed-dddfa21fd576","knative.dev/key":"default/helloworld-go"}
{"level":"info","ts":"2019-08-28T20:24:39.872+0800","caller":"controller/service.go:106","msg
使用 Knative Serving SDK
介紹完 Knative Serving client 的初始化過程,下面我們看一下應該如何在代碼中用 Knative Serving SDK 進行編碼。
示例參見:https://github.com/knative-sample/serving-controller/blob/v0.1/cmd/app/app.go
這個示例中首先使用配置初始化 *zap.SugaredLogger 對象,然後基於 ctx := signals.NewContext() 生成一個 Context。signals.NewContext() 作用是監聽 SIGINT 信號,也就是處理 CTRL+c 指令。這裏用到了 Context 接口的 Done 函數機制。
構造 Informer
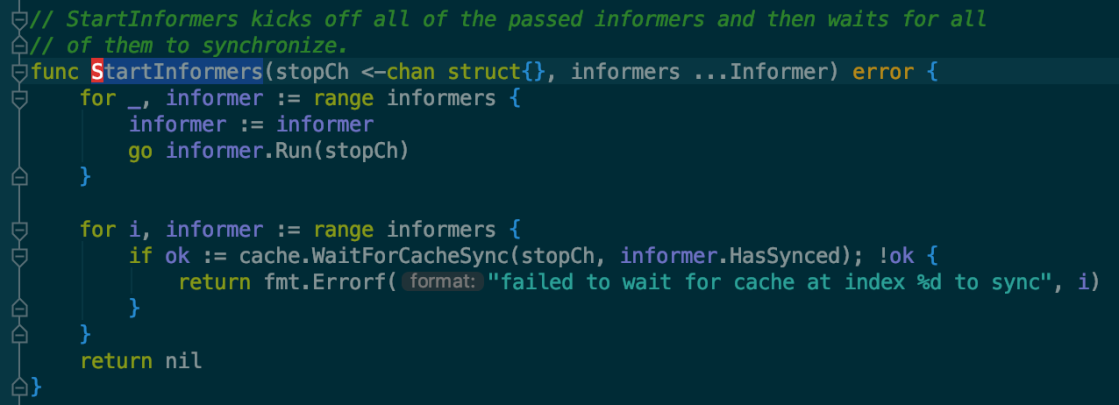
接着使用 ctx, informers := injection.Default.SetupInformers(ctx, cfg) 構造出所有的 informer,然後調用下面這段代碼執行注入,把 informer 注入到 Context 中。
// Start all of the informers and wait for them to sync.
    logger.Info("Starting informers.")
    if err := controller.StartInformers(ctx.Done(), informers...); err != nil {
        logger.Fatalw("Failed to start informers", err)
    }
從 Context 中獲取 Informer
實例代碼: https://github.com/knative-sample/serving-controller/blob/v0.1/pkg/controller/controller.go

如上所示,所有的 informer 都是從 Context 中獲取的。
最後 Controller 初始化一個 Reconciler 接口,接口的定義如下, 裏面只有一個 Reconcile 函數。這個使用方式和 sigs.k8s.io/controller-runtime 使用的邏輯是一樣的。如果你之前寫過 Operator 之類的功能,對這個操作應該不會陌生。
// Reconciler is the interface that controller implementations are expected
// to implement, so that the shared controller.Impl can drive work through it.
type Reconciler interface {
    Reconcile(ctx context.Context, key string) error
}
在 Reconcile 中調用 Knative API
代碼示例: https://github.com/knative-sample/serving-controller/blob/v0.1/pkg/controller/service.go
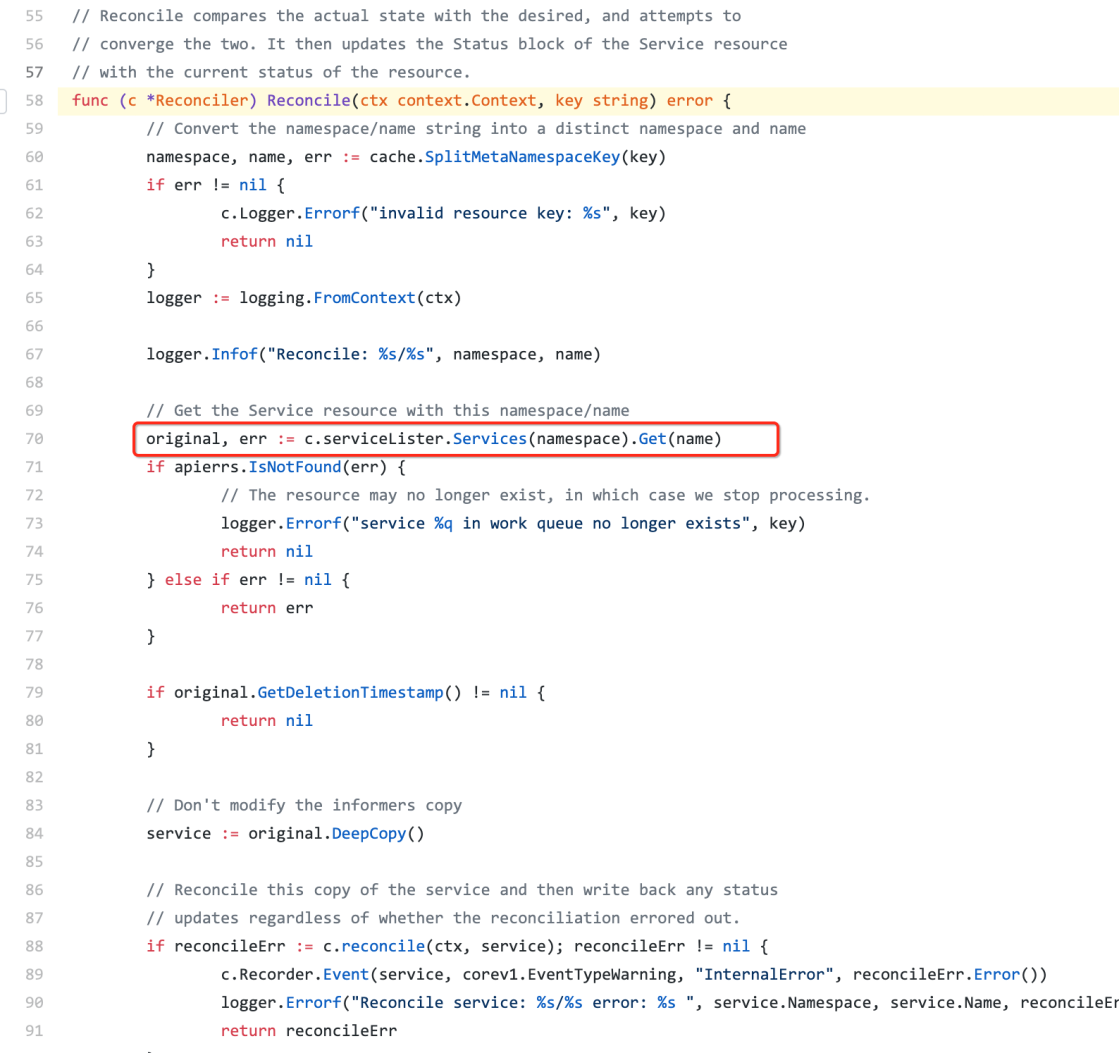
現在就可以在 Reconcile 中通過 c.serviceLister.Services(namespace).Get(name) 這種方式直接操作 Seving 資源了。
至此,我們已經把基於 Knative Seving 開發 Serverless 應用的關鍵脈梳理了一遍。更詳細的代碼示例請參見:https://github.com/knative-sample/serving-controller ,這裏面有完整可以運行的代碼。
小結
本文從 Knative Serving client 的初始化過程開始展開,介紹了 Knative informer 的設計以及使用方法。通過本文你可以瞭解到:
- Knative Serving client 的設計思路
- 如何基於 Knative Serving SDK 進行二次開發
- 通過 Knative Serving 學習到如何面向 Context 編程
- Knative Serving 集成開發示例: https://github.com/knative-sample/serving-controller
歡迎加入 Knative 交流羣

掃描下方二維碼添加小助手,拉你進羣!