


加密,gpg加密,ssh三種轉發,openssl,pam
一、僅開放本機兩個IP地址中的一個地址172.16.0.X上綁定的sshd和vsftpd服務給172.16.0.0/16網絡中除了 172.16.0.0/24網絡中的主機之外的所有主機,但允許172.16.0.200訪問,每次的用戶訪問都要記錄於日誌文件 中,注:其中X爲學號
/etc/hosts.allow:
    sshd,vsftpd: 172.16.0.0/16 EXCEPT 172.16.0.0/24 EXCEPT 172.16.0.200 :spawn echo `date` login >> /var/log/ssh.log
/etc/hosts.deny:
    sshd,vsftpd:ALL
2、編寫腳本/root/bin/checkip.sh,每5分鐘檢查一次,如果發現通過ssh登錄失敗次數超過10次,自動將此遠 程IP放入Tcp Wrapper的黑名單中予以禁止防問
[root@localhost ~]# echo '*/5 * * * * /data/checkip.awk /var/log/secure' >> /var/spool/cron/root
[root@localhost ~]# cat /data/checkip.awk
#!/bin/awk -f
/sshd.*Failed password/{ip=$(NF-3); ips[ip]++}
END{
    for (i in ips){
        if(ips[i]>10){
            cmd="echo sshd:"i">>/etc/hosts.deny"; system(cmd)
        }
    }
}
3、gpg加密解密:
交互式加密:會彈出一個框
[root@localhost ~]# gpg -c virtual_machine_reset_5.sh 交互式解密:
gpg -d virtual_machine_reset_5.sh.gpg非交互式:
[root@localhost tmp]# echo "cX0BCoWt1+qq9ZeKYCXTtxMQeiI" | gpg -c --no-tty  --batch --passphrase-fd 0 virtual_machine_reset_5.sh
[root@localhost tmp]# gpg --batch --passphrase cX0BCoWt1+qq9ZeKYCXTtxMQeiI virtual_machine_reset_5.sh.gpg
查看gpg版本:gpg -h
CentOS7的gpg是2.0.22,Ubuntu18.04的gpg是2.2.4
4、非交互式生成密鑰
[root@localhost tmp]# ssh-keygen -f ~/.ssh/id_rsa -P '' -C 'admin'5、ssh_config
1、改端口號
Port  22
2、加主機
[root@localhost tmp]# tail -5 /etc/ssh/ssh_config
Host testbox
    HostName 192.168.38.146
    User root
    Port 2222
    IdentityFile ~/.ssh/id_rsa
就可以直接連了,默認是22端口
6、ssh命令選項
    -q      靜默模式。大多數警告信息將不輸出。

    -W host:port  請求客戶端上的標準輸入和輸出通過安全隧道轉發到host:port上,該選項隱含了"-N","-T",ExitOnForwardFailure和ClearAllForwardings選項

    -T      禁止爲ssh分配僞終端。
    -N      明確表示不執行遠程命令。僅作端口轉發時比較有用。

# ProxyCommand ssh -q -W %h:%p gateway.example.com 當跳板機用
ssh當跳板機:
7、本地端口轉發:
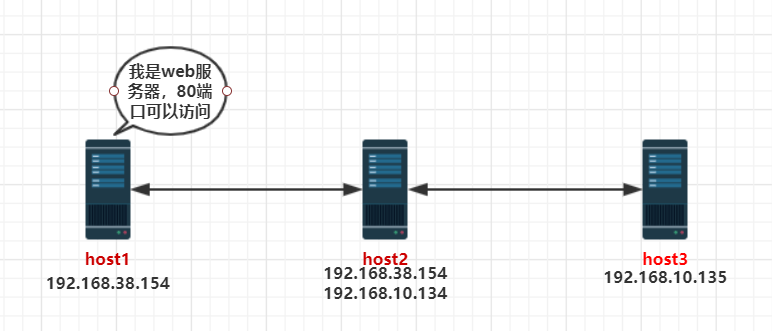
ssh -L [local_bind_addr:]local_port:remote:remote_port middle_hostroot@host3:~# ssh -L 2222:192.168.38.154:80 192.168.10.134 -fNg通過這條神奇的命令,現在就可以通過訪問192.168.10.135:2222來訪問192.168.38.154:80了
其中"-L"選項表示本地端口轉發,其工作方式爲:host3主機監聽2222端口;host3將192.168.38.154:80映射爲本地2222;當有人訪問192.168.10.135:2222時,本地ssh將此端口的數據包轉發給192.168.10.134;192.168.10.134將數據包轉發給192.168.38.154:80
再來一個:ssh -L 2222:127.0.0.1:80 127.0.0.1 -fNg
該命令執行後,就把本機2222端口的流量轉發給本機80端口了
可以發現,該命令執行後訪問的還是本地IP的某一端口,所以叫本地轉發
8、遠程端口轉發
遠程端口轉發表示的是將遠程端口的數據轉發到本地。
這個就牛逼了!將遠程端口轉發到本地,那我豈不是連接遠程的端口就可以連接到本地服務器了!
看下面,遠程端口轉發使用的是-R,注意公網服務器要開啓GatewayPorts
[root@hk-server ~]# sed -i '$a GatewayPorts yes' /etc/ssh/sshd_config && systemctl restart sshd #這個必須得開,不然端口監聽在127.0.0.1上
[root@192-168-38-140 ~]# ssh -R 2222:192.168.38.154:22 47.75.136.95 -fNg其工作方式爲:192.168.38.140請求47.75.136.95上的ssh,在47.75.136.95上建立一個套接字監聽2222端口,該端口是192.168.38.154:22的映射;當有主機連接47.75.136.95:2222時,此連接中的數據全部通過通過安全隧道轉發給192.168.38.154:22
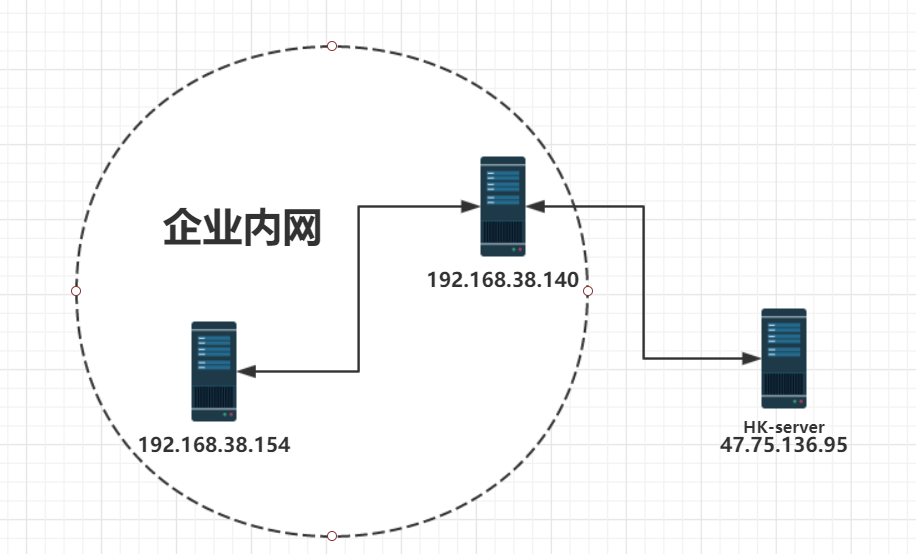
可以通過此方法,將內網搭建的博客網站映射出去,然後就可以通過公網訪問了
再來一個:ssh -R 12345:127.0.0.1:22 47.75.136.95 -fNg
[root@192-168-38-140 ~]# ssh -R 12345:127.0.0.1:22 47.75.136.95 -fNg將請求轉發給自己,該命令執行後,就可以通過47.75.136.95:12345來訪問本地的192.168.38.140了
9、動態端口轉發(SOCKS代理)
ssh -D [bind_addr:]port remote
ssh支持動態端口轉發,由ssh來判斷髮起請求的工具使用的是什麼應用層協議,然後根據判斷出的協議結果決定目標端口
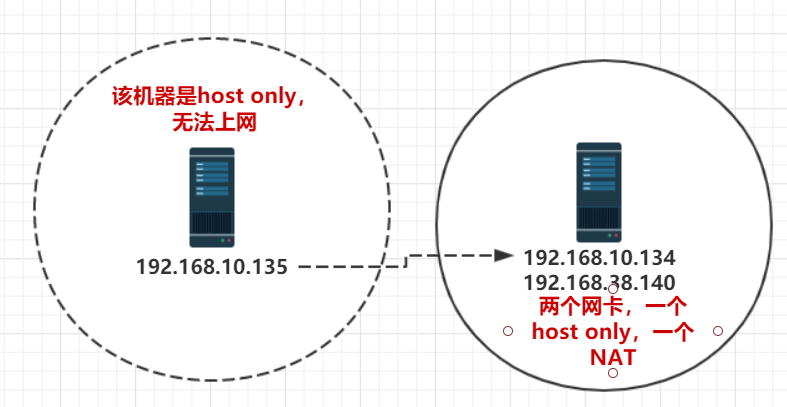
可以實現:讓內網不能上網的服務器上網:
[root@192-168-38-140 ~]# ssh -D 1080 127.0.0.1 -fNg然後192.168.10.135機器將火狐瀏覽器設置代理到socket代理:192.168.10.134 1080
about:config將network.proxy.socks_remote_dns設置爲true,開啓遠程DNS
工作方式:我是192.168.38.140,我在本地監聽1080,所有人都可以把數據轉發到我的1080端口,我再把數據通過ssh隧道動態轉發出去
10、ssh_config常改選項,優化
UseDNS no       #禁用DNS,解決連接慢
GSSAPIAuthentication no     #不開啓GSSAPI認證,解決連接慢
Port 9527       #修改默認端口號
PermitRootLogin yes     #不允許root登陸
PermitEmptyPasswords no  #禁止空密碼登陸
ssh_config的使用,將常用主機寫到ssh_config或者~/.ssh/config裏面,例如
Host testbox
    HostName 192.168.38.146
    User root
    Port 2222
    IdentityFile ~/.ssh/id_rsa
ssh-agent管理密鑰
生產環境中經常對密鑰加密,每次連接都需要輸入密碼,很麻煩,而且多個私鑰時,也不用自己去指定ssh-agent全部管理了
啓動ssh-agent
ssh-agent
添加私鑰交給ssh-agent管理
ssh-add ~/.ssh/id_rsa
列出ssh-agent管理的密鑰
ssh-add -L
注意
使用ssh-add失敗,提示Could not open a connection to your authentication agent.
執行:ssh-agent bash 再試
還有一種情況下比如,主機A需要通過主機B才能訪問主機C的情況下,我們可能需要在B上保存私鑰纔可以,但是如果使用ssh-agent的agent forwarding功能後,就可以使用主機A登陸B和C了,而不用在B上保存私鑰
11、pam模塊-google驗證器
比如google身份驗證就是通過pam模塊實現的
如何使用:epel源安裝google-authenticator
apk:https://www.lanzous.com/i5yl8ad 密碼:6666
家目錄那個隱藏文件裏面放着幾個臨時密碼,防止手機丟了,可以自行在裏面加幾個密碼,一次有效,
12、pam模塊學習
以pam_limits模塊爲例
先man看幫助
NAME
       pam_limits - PAM module to limit resources
SYNOPSIS
       pam_limits.so [conf=/path/to/limits.conf] [debug] [set_all] [utmp_early] [noaudit]
DESCRIPTION
       The pam_limits PAM module sets limits on the system resources that can be obtained in a
       user-session. Users of uid=0 are affected by this limits, too.
       By default limits are taken from the /etc/security/limits.conf config file. Then individual
       *.conf files from the /etc/security/limits.d/ directory are read. The files are parsed one
       after another in the order of "C" locale. The effect of the individual files is the same as
       if all the files were concatenated together in the order of parsing. If a config file is
       explicitly specified with a module option then the files in the above directory are not
parsed. *可以看到,不管哪個用戶,哪怕root都受到此限制的影響,且默認情況下,限制文件未/etc/security/limits.conf及/etc/security/limits.conf.d/.conf**
使用limit -a查看當前所有資源限制情況
[root@192-168-38-140 pam.d]# ulimit -a
core file size          (blocks, -c) 0
data seg size           (kbytes, -d) unlimited
scheduling priority             (-e) 0
file size               (blocks, -f) unlimited
pending signals                 (-i) 1779
max locked memory       (kbytes, -l) 64
max memory size         (kbytes, -m) unlimited
open files                      (-n) 1024
pipe size            (512 bytes, -p) 8
POSIX message queues     (bytes, -q) 819200
real-time priority              (-r) 0
stack size              (kbytes, -s) 8192
cpu time               (seconds, -t) unlimited
max user processes              (-u) 1779
virtual memory          (kbytes, -v) unlimited
file locks                      (-x) unlimited
默認文件打開數太小,不夠,生產中必須修改,ubuntu18.04現在默認都改大了,如下:
*   soft nofile 128000
*   hard nofile 256000

root soft nofile 128000
root hard nofile 256000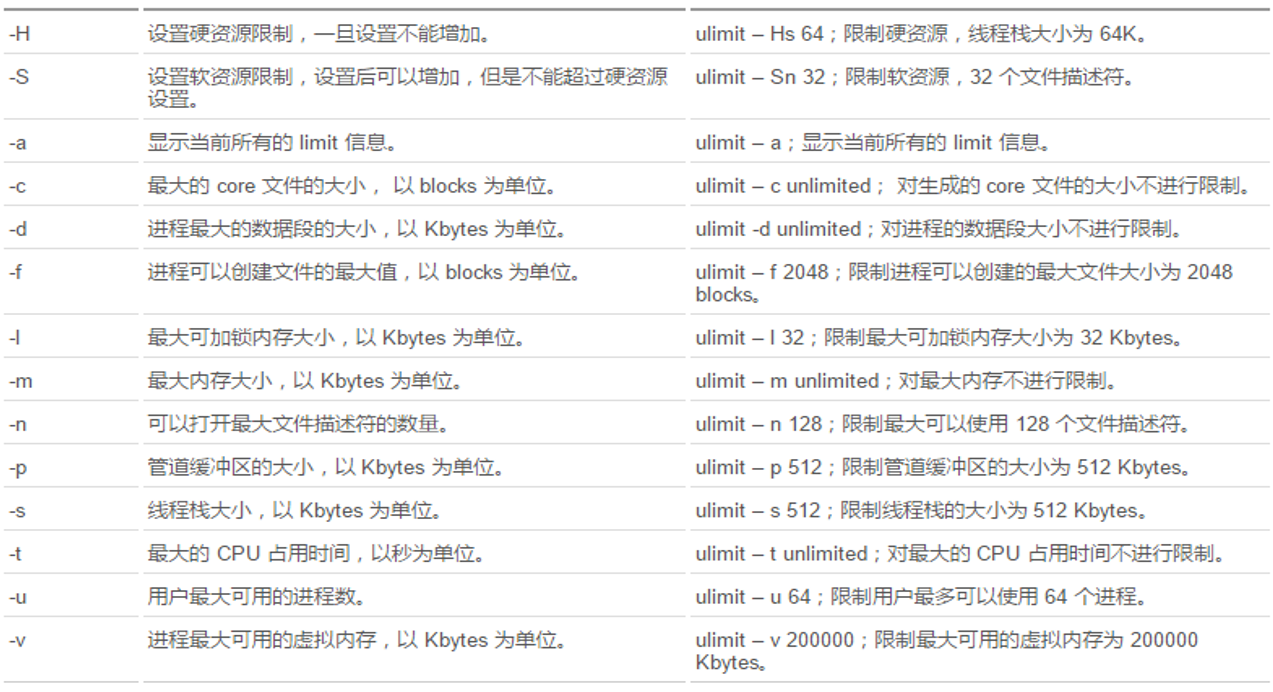
關於fork彈的避免措施其一就是顯示每個用戶的進程數,比如
*   soft    nproc   1024
*   hard    nproc   1024
ulimit -n 2000只會臨時生效,建議寫文件
13、自簽證書和CA生成
查看證書到期時間:
[root@192-168-38-140 ~]# openssl x509 -in /etc/pki/tls/cert.pem -noout -dates | sed -nr 's/notAfter=//p'
Dec 31 09:37:37 2030 GMT
[root@192-168-38-140 ~]# openssl s_client -host www.taobao.com -port 443 -showcerts </dev/null 2>/dev/null | sed -n '/BEGIN CERTIFICATE/,/END CERT/p' -n | openssl x509 -noout -text | sed -n 's/ *Not After : *//p'
Nov 13 07:36:08 2019 GMT