


一、GlusterFS相關概念:
GlusterFS 是一個開源的分佈式文件系統,同時也是Scale-Out存儲解決方案Gluster的核心,在存儲數據方面有強大的橫向擴展能力。GlusterFS主要由存儲服務器、客戶端及NFS/Samba存儲網關(可選組件)組成。GlusterFS架構中最大的設計特點是沒有元數據服務器組件,也就是說沒有主/從服務器之分,每一個節點都可以是主服務器。
.
1、Gluster相關參考文檔如下(我下面的配置是基於本地yum配置的,若需要搭建最新版本,可直接按照下面的文檔鏈接進行配置):
.
Gluster官網 :https://wiki.centos.org/SpecialInterestGroup/Storage/gluster-Quickstart
基於centos7/Redhat安裝Gluster官方文檔:https://blog.csdn.net/daydayup_gzm/article/details/52748812
.
2、 GlusterFS相關術語:
.
Brick(存儲塊):指可信主機池中由主機提供的用於物理存儲的專用分區。
Volume(邏輯卷):一個邏輯卷是一組Brick的集合。卷是數據存儲的邏輯設備。
FUSE:是一個內核模塊,允許用戶自己創建文件系統,無須修改內核代碼。
Glusterd(後臺管理進程):在存儲羣集中的每個節點上都要運行。
VFS:內核空間對用戶空間提供的訪問磁盤的接口。
3、GlusterFS的卷類型:
- 分佈式卷:相當於Windows中的跨區卷,只是擴大了磁盤空間,不具有容錯能力;
- 條帶卷:相當於Windows中的帶區卷,屬於RAID 0級別,一份文件會在多個磁盤上進行讀寫,文件越大,讀寫效率越高,但不具有容錯能力;
- 複製卷:相當於Windows中的鏡像卷,屬於RAID 1級別,具有容錯能力,讀性能高,但寫性能下降,因爲要將同一份文件同步寫入在多個Brick上。
- 分佈式條帶卷:brick server數量是條帶數(數據塊分佈的brick數量)的倍數,兼具分佈式卷和條帶卷的特點。
- 分佈式複製卷:brick server數量是鏡像數(數據副本數量)的倍數,兼具分佈式卷和複製卷的特點。
- 條帶複製卷:類似於RAID 10,同時具備條帶卷和複製卷的特點。
- 分佈式條帶複製卷:三種基本卷的複合卷,通常用於map reduce應用。
在以上幾種卷類型中,有些可能無法理解透徹,但是沒關係,在生產環境中,大多數公司考慮到磁盤的利用率,會使用RAID5,或者RAID 10,關於RAID 5卷的配置可以參考:GlusterFS Dispersed Volume(糾錯卷)總結。
4、下面介紹GlusterFS一些卷類型的特點(不包括RAID5):
1、分佈式卷(類似Windows中的跨區卷):
.
分佈式卷是GlusterFS的默認卷,在創建卷時,默認選項是創建分佈式卷。在該模式下,並沒有對文件進行分塊處理,文件直接存儲在某個server節點上。
.
分佈式卷具有如下特點:
.
1、文件分佈在不同的服務器,不具備冗餘性。
2、更容易且廉價地擴展卷的大小。
3、單點故障會造成數據丟失。
4、依賴底層的數據保護。
2、條帶卷(類似Windows中的帶區卷,也稱爲RAID 0):
.
stripe模式相當於RAID 0,在該模式下,根據偏移量將文件分成N塊(N個條帶節點),輪詢地存儲在每個Brick Server節點。節點把每個數據塊都作爲普通文件存入本地文件系統,通過擴展屬性記錄總塊數和每塊的序號。在配置時指定條帶數必須等於卷中Brick 所包含的存儲服務器數,在存儲大文件時,性能尤爲突出,但是不具備冗餘性。
.
條帶卷具有如下特點:
.
1、數據被分割成更小塊分佈到塊服務器羣中的不同條帶區。
2、分佈減少了負載且更小的文件加速了存取的速度。
3、沒有數據冗餘。
3、複製卷(類似於Windows中的鏡像卷,也稱爲RAID 1)
.
複製模式,即同一文件保存一份或多份副本,每個節點上保存相同的內容和目錄結構。複製模式因爲要保存副本,所以磁盤利用率較低,如果多個節點上的存儲空間不一致,那麼將按照木桶效應取最低節點的容量作爲該卷的總容量。複製卷具有冗餘性,即使一個節點損壞,也不影響數據的正常使用。
.
複製卷具有如下特點:
1、卷中所有的服務器均保存一個完整的副本。
2、卷的副本數量可由客戶創建的時候決定。
3、至少有兩個塊服務器或更多服務器。
4、具備冗餘性。
4、分佈式複製卷(也稱爲RAID 10):
分佈式複製卷兼顧分佈式卷和複製卷的功能,主要用於需要冗餘的情況下。
.
二、GlusterFS各種卷類型的部署及客戶端掛載使用:
.
環境如下: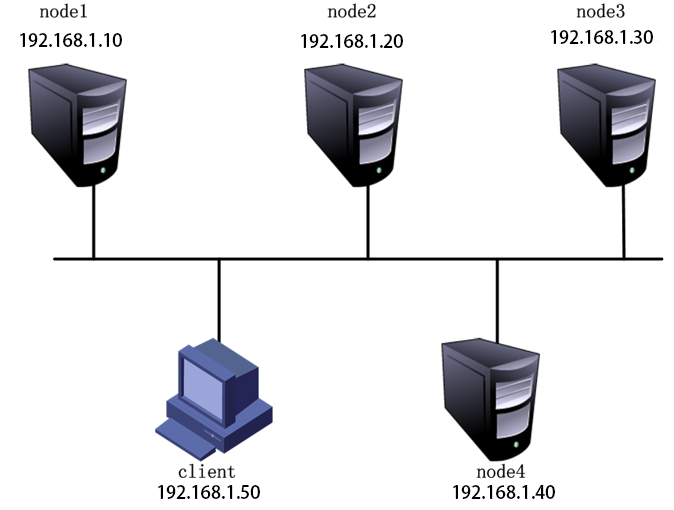
相關信息: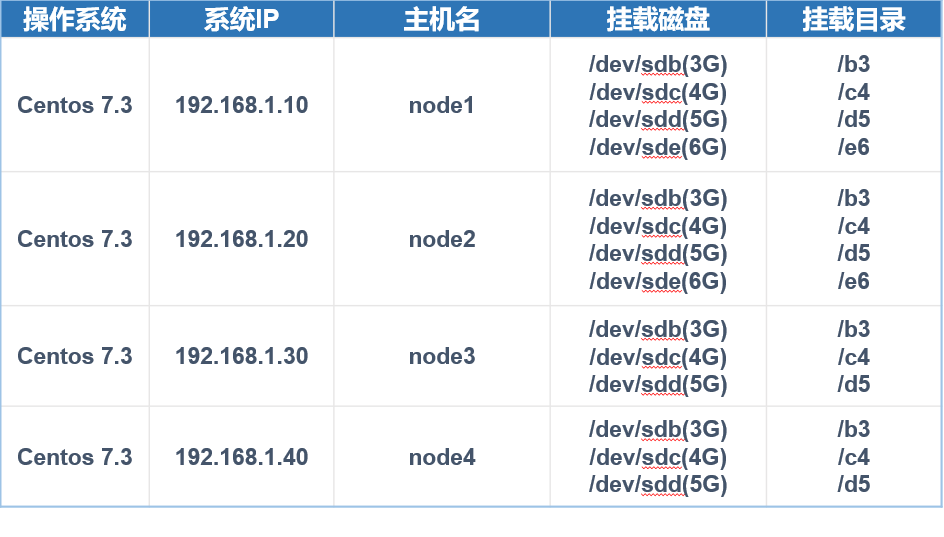
磁盤掛載信息: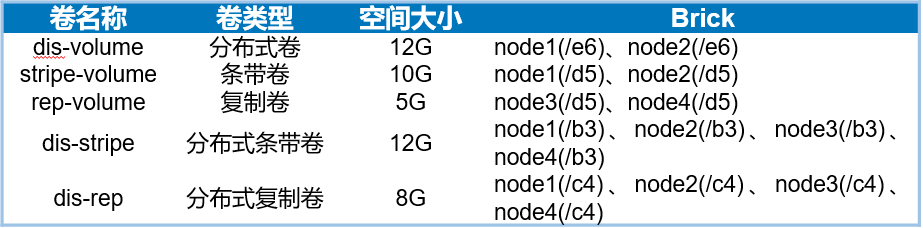
.
準備工作:
1、在所有節點上進行操作:根據上表中添加磁盤,通過fdisk命令進行分區,mkfs格式化,創建相應的掛載目錄,並將格式化的磁盤掛載到相應的目錄中,最後修改/etc/fstab配置文件,使其永久掛載。
可參考博文:https://blog.51cto.com/14154700/2350748
2、配置防火牆放行流量
3、本地yum倉庫:https://pan.baidu.com/s/1ZzURDjGsue7cPnVPdKFCvA (提取碼:309q)
開始部署:
.
node1的配置:
配置hosts文件
[root@node1 /]# vim /etc/hosts                 # 添加四個節點的解析
...............      //  省略部分內容
192.168.1.10    node1
192.168.1.20    node2
192.168.1.30    node3
192.168.1.40    node4
[root@node1 /]# mount /dev/sr0 /media/           # 掛在本地yum倉庫
mount: /dev/sr0 is write-protected, mounting read-only
[root@node1 /]# rm -rf /etc/yum.repos.d/*         #刪除原有yum配置文件(或者移走也行)
[root@node1 /]# vim /etc/yum.repos.d/a.repo           # 編寫yum配置文件
[yum]
baseurl=file:///media
gpgcheck=0

[root@node1 /]# yum -y install glusterfs glusterfs-server glusterfs-fuse glusterfs-rdma      # yum安裝 gluster,所有節點都需要做
[root@node1 /]# systemctl start glusterd                  # 啓動服務
[root@node1 /]# systemctl enable glusterd
node2的配置:
.
因爲所有節點大部分配置都是相同的,所以我們可以使用scp命令來將配置好的節點文件複製來使用
[root@node2 /]# scp [email protected]:/etc/hosts /etc/              # 將hosts解析文件複製過來
The authenticity of host '192.168.1.10 (192.168.1.10)' can't be established.
ECDSA key fingerprint is 68:df:0f:ac:c7:75:df:02:88:7d:36:6a:1a:ae:27:23.
Are you sure you want to continue connecting (yes/no)? yes
Warning: Permanently added '192.168.1.10' (ECDSA) to the list of known hosts.
[email protected]'s password:             # 輸入密碼
hosts                                                100%  234     0.2KB/s   00:00
[root@node2 /]# rm -rf /etc/yum.repos.d/*
[root@node2 /]# scp [email protected]:/etc/yum.repos.d/* /etc/yum.repos.d/
[email protected]'s password:
a.repo                                               100%   39     0.0KB/s   00:00
[root@node2 /]# mount /dev/sr0 /media                   # 掛載yum倉庫
[root@node2 /]# yum -y install glusterfs glusterfs-server glusterfs-fuse glusterfs-rdma     # 安裝軟件
[root@node2 /]# systemctl start glusterd          # 啓動服務
[root@node2 /]# systemctl enable glusterd
node3和node4照着node2配置操作就可以
.
添加節點(接下來的所有配置,在任意一臺節點上執行都可以,我這裏在node1上執行):
[root@node1 /]# gluster peer probe node1
peer probe: success. Probe on localhost not needed             # 表示當前就在node1上,已經存在,不需要再添加了
[root@node1 /]# gluster peer probe node2
peer probe: success.
[root@node1 /]# gluster peer probe node3
peer probe: success.
[root@node1 /]# gluster peer probe node4
peer probe: success.
[root@node1 /]# gluster peer status             # 添加完畢後查看羣集狀態
Number of Peers: 3

Hostname: node2
Uuid: b25b967a-0ec6-4e2e-841f-b13368ec6d73
State: Peer in Cluster (Connected)             #如果某個節點顯示Disconnected,請檢查hosts配置文件

Hostname: node3
Uuid: 3ce5c3aa-c1da-4112-825d-998e71220423
State: Peer in Cluster (Connected)

Hostname: node4
Uuid: 0c543cae-ec0c-4249-8600-605e0f552b11
State: Peer in Cluster (Connected)
創建卷:
1、創建分佈式卷:
[root@node1 /]# gluster volume create dis-volume node1:/e6 node2:/e6 force        # force:強制      ; 其中“dis-volume”爲卷名,沒有指定類型,默認創建的是分佈式卷。
volume create: dis-volume: success: please start the volume to access data
[root@node1 /]# gluster volume info dis-volume             # 查看該卷相關信息,通過修改卷名也可以查看其它卷的信息

Volume Name: dis-volume
Type: Distribute
Volume ID: 09a6443c-a544-475d-9084-28892ce0093f
Status: Started
Snapshot Count: 0
Number of Bricks: 2
Transport-type: tcp
Bricks:
Brick1: node1:/e6
Brick2: node2:/e6
Options Reconfigured:
transport.address-family: inet
nfs.disable: on
[root@node1 /]# gluster volume start dis-volume             # 啓用該卷
volume start: dis-volume: success
2、創建條帶卷:
[root@node1 /]# gluster volume create stripe-volume stripe 2 node1:/d5 node2:/d5 force
volume create: stripe-volume: success: please start the volume to access data
#創建條帶卷,指定條帶卷的個數爲2個。“stripe-volume”爲卷名
#指定類型爲stripe,數值爲2,而且後面跟了2個brick  server,所以創建的是條帶卷
[root@node1 /]# gluster volume start stripe-volume                    # 啓用該卷
volume start: stripe-volume: success
3、創建複製卷:
[root@node1 /]# gluster volume create rep-volume replica 2 node3:/d5 node4:/d5 force
volume create: rep-volume: success: please start the volume to access data
#指定類型爲“replica”,數值爲“2”,而且後面跟了兩個brick server,所以創建的是複製卷
[root@node1 /]# gluster volume start  rep-volume              # 啓用該卷
volume start: rep-volume: success
4、創建分佈式條帶卷:
[root@node1 /]# gluster volume create dis-stripe stripe 2 node1:/b3 node2:/b3 node3:/b3 node4:/b3 force
volume create: dis-stripe: success: please start the volume to access data
#指定類型爲stripe,數值爲2,而且後面跟了4個brick server,所以創建的是分佈式條帶卷
[root@node1 /]# gluster volume start dis-stripe               # 啓用
volume start: dis-stripe: success
5、創建分佈式複製卷:
[root@node1 /]# gluster volume create dis-rep replica 2 node1:/c4 node2:/c4 node3:/c4 node4:/c4 force
volume create: dis-rep: success: please start the volume to access data
#指定類型爲replica,數值爲2,而且後面跟了4個brick  server,是2的兩倍,所以創建的是分佈式複製卷
[root@node1 /]# gluster volume start dis-rep
volume start: dis-rep: success
至此需要的卷就創建完畢了。
.
部署 Gluster 客戶端:
.
1、安裝客戶端軟件
[root@client /]# rm -rf /etc/yum.repos.d/*
[root@client /]# scp [email protected]:/etc/yum.repos.d/* /etc/yum.repos.d/
[email protected]'s password:
a.repo                                               100%   39     0.0KB/s   00:00
# 掛載本地yum倉庫
[root@client /]# yum -y install glusterfs glusterfs-fuse            # yum安裝客戶端
2、創建掛載目錄:
[root@client /]# mkdir -p /test/{dis,stripe,rep,dis_and_stripe,dis_and_rep}
[root@client /]# ls /test/
dis  dis_and_rep  dis_and_stripe  rep  stripe
3、修改hosts文件:(直接scp複製也可以)
[root@client /]# scp [email protected]:/etc/hosts /etc/
The authenticity of host '192.168.1.10 (192.168.1.10)' can't be established.
ECDSA key fingerprint is 68:df:0f:ac:c7:75:df:02:88:7d:36:6a:1a:ae:27:23.
Are you sure you want to continue connecting (yes/no)? yesd
Warning: Permanently added '192.168.1.10' (ECDSA) to the list of known hosts.
[email protected]'s password:
hosts                                                100%  234     0.2KB/s   00:00
[root@client /]# cat /etc/hosts
..................              // 省略部分
192.168.1.10    node1
192.168.1.20    node2
192.168.1.30    node3
192.168.1.40    node4
4、掛載 Gluster 文件系統:
[root@client /]# mount -t glusterfs node1:dis-volume /test/dis
[root@client /]# mount -t glusterfs node1:stripe-volume /test/stripe
[root@client /]# mount -t glusterfs node1:rep-volume /test/rep/
[root@client /]# mount -t glusterfs node1:dis-stripe /test/dis_and_stripe/
[root@client /]# mount -t glusterfs node1:dis-rep /test/dis_and_rep/
[root@client /]# df -h              # 查看掛載信息,如果掛載不成功,請檢查hosts解析文件
文件系統             容量  已用  可用 已用% 掛載點
.................          // 省略部分
node1:dis-volume      12G   65M   12G    1% /test/dis
node1:stripe-volume   10G   65M   10G    1% /test/stripe
node1:rep-volume     5.0G   33M  5.0G    1% /test/rep
node1:dis-stripe      12G  130M   12G    2% /test/dis_and_stripe
node1:dis-rep        8.0G   65M  8.0G    1% /test/dis_and_rep
5、修改fstab文件,設置自動掛載:
[root@client /]# vim /etc/fstab
..................              // 省略部分
node1:stripe-volume     /test/stripe    glusterfs       defaults,_netdev 0 0
node1:rep-volume        /test/rep       glusterfs       defaults,_netdev 0 0
node1:dis-stripe        /test/dis_and_stripe    glusterfs       defaults,_netdev 0 0
node1:dis-rep           /test/dis_and_rep       glusterfs       defaults,_netdev 0 0
node1:dis-volume        /test/dis       glusterfs       defaults,_netdev 0 0
GlusterFS維護命令:
[root@node1 /]# gluster volume list             // 查看卷的列表
dis-rep
dis-stripe
dis-volume
rep-volume
stripe-volume
[root@node1 /]# gluster volume info // 查看所有卷的信息
Volume Name: dis-rep
Type: Distributed-Replicate
Volume ID: f57c0228-4a5f-4995-8fac-87f9bc034c33
Status: Started
Snapshot Count: 0
Number of Bricks: 2 x 2 = 4
Transport-type: tcp
Bricks:
Brick1: node1:/c4
Brick2: node2:/c4
Brick3: node3:/c4
Brick4: node4:/c4
Options Reconfigured:
transport.address-family: inet
nfs.disable: on
................ // 省略部分[root@node1 /]# gluster volume status // 查看卷的狀態
Status of volume: dis-rep
Gluster process TCP Port RDMA Port Online Pid
------------------------------------------------------------------------------
Brick node1:/c4 49155 0 Y 13656
Brick node2:/c4 49155 0 Y 13443
Brick node3:/c4 49154 0 Y 13480
Brick node4:/c4 49154 0 Y 13334
Self-heal Daemon on localhost N/A N/A Y 13676
Self-heal Daemon on node2 N/A N/A Y 13463
Self-heal Daemon on node4 N/A N/A Y 13354
Self-heal Daemon on node3 N/A N/A Y 13500
Task Status of Volume dis-rep
------------------------------------------------------------------------------[root@node1 ~]# gluster volume stop dis-stripe #停止一個卷
Stopping volume will make its data inaccessible. Do you want to continue? (y/n) y
volume stop: dis-stripe: success
[root@node1 ~]# gluster volume delete dis-stripe #刪除一個卷
Deleting volume will erase all information abe. Do you want to continue? (y/n) y
volume delete: dis-stripe: success
[root@node1 ~]# gluster volume set dis-rep auth.allow 192.168.1.*,10.1.1.*
#設置只允許特定網段的客戶端訪問卷dis-rep
volume set: success