


項目整體介紹
**整個項目包括以下幾個應用工程**
1、  用戶APP
2、  商家APP
3、  業務平臺管理後臺
4、  商家業務管理後臺
5、  官網

**整體項目規劃設計如下**
1、  用戶APP採用JAVA環境佈署,初始環境兩臺服務器,實現負載均衡與高可用,前端負載使用nginx 做負載
2、  商家APP採用JAVA環境佈署,初始環境兩臺服務器,實現負載均衡與高可用,前端負載使用nginx 做負載
3、  業務平臺管理後臺採用JAVA環境佈署,初始環境一臺服務器,前端使用nginx 反向代理,後續業務流量擴大,架構重新擴展
4、  商家平臺管理後臺採用JAVA環境佈署,初始環境一臺服務器,前端使用nginx 反向代理,後續業務流量擴大,架構重新擴展
5、  官方網站都是一些靜態頁面,採用nginx佈署,WEB服務另安裝FTP服務器,做爲業務管理後臺一些靜態資源的上傳
6、  數據庫使用Mysql主從複製架構,程序上實現讀寫分享,從庫開啓binlog做備份使用
7、  全網所有備份數據全部同步到專業內網備份服務器,所有業務備份數據保留30天
8、  全網所有服務器監控(基本監控與服務監控)都採用zabbix監控
服務器IP地址規劃如下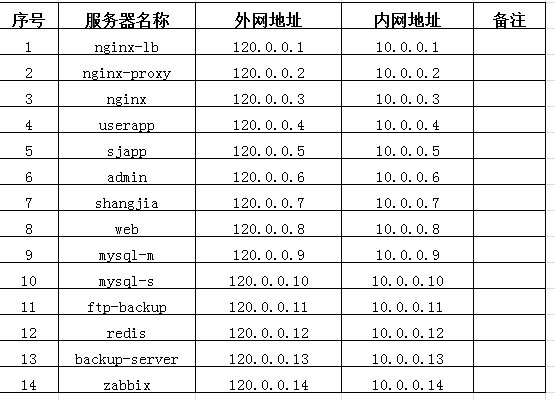
服務器環境與應用軟件版本介紹
服務器環境
[root@centos ~]# cat /etc/redhat-release CentOS release 6.8 (Final)
[root@centos ~]# uname -r2.6.32-642.el6.x86_64
應用軟件版本
Nginx 1.12.1 Mysql 5.7.17 Jdk 1.8Tomcat 8.5.9 Zabbix 3.0Yum 源使用163、阿里去、sohu國內的源都可以,自行選擇Redis 4.0.1
服務器邏輯架構圖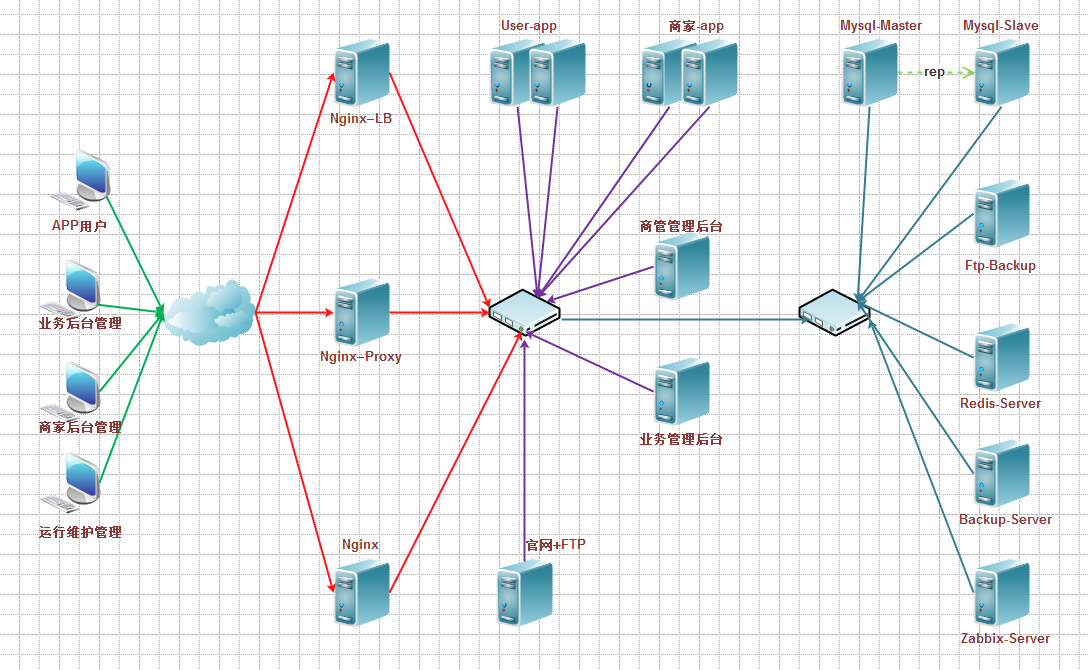
服務器基礎環境配置
因使用雲主機服務器,初始系統安裝就略過了,如果需要批量安裝的請參考前面的文章
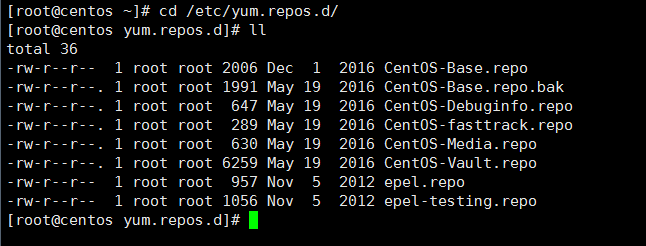
配置國內YUM源,以163爲例
[root@centos ~]# cd /etc/yum.repos.d/[root@centos yum.repos.d]# wget http://mirrors.163.com/.help/CentOS6-Base-163.repo[root@centos yum.repos.d]# mv CentOS-Base.repo CentOS-Base.repo.bak[root@centos yum.repos.d]# mv CentOS6-Base-163.repo CentOS-Base.repo
安裝需要的軟件包
[root@centos ~]# yum install lsof vim telnet dos2unix lrzsz tree –y
關閉不需要啓動的服務
[root@centos ~]#for service in `chkconfig --list|grep 3:on|awk '{print $1}'`;do chkconfig --level 3 $service off;done[root@centos ~]#for service in crond network sshd rsyslog;do chkconfig --level 3 $service on;done[root@centos ~]# chkconfig --list|grep 3:on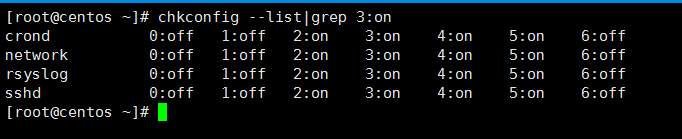
修改SSH服務的默認配置
cp /etc/ssh/sshd_config /etc/ssh/sshd_config.bak
sed -i 's%#Port 22%Port 2233%g'  /etc/ssh/sshd_config
sed -i 's%#PermitRootLogin yes%PermitRootLogin no%g'  /etc/ssh/sshd_config
sed -i 's%#PermitEmptyPasswors no%PermitEmptyPasswors no%g'  /etc/ssh/sshd_config
sed -i 's%#UseDNS yes%UseDNS no%g'  /etc/ssh/sshd_config
egrep "UseDNS|2233|RootLogin|EmptyPass"  /etc/ssh/sshd_config
/etc/init.d/sshd reload
關閉selinux
配置文件/etc/selinux/config
sed -i 's#SELINUX=enforcing#SELINUX=disabled#g' /etc/selinux/config
egrep "SELINUX=" /etc/selinux/config
關閉防火牆
如果不是對外網的服務器,直接關閉防火牆,有外網地址的可建議開啓,並允許相關的服務端口,併發高的服務器也不需要開啓防火牆,可能會影響性能
/etc/invited/pintables stop/etc/invited/pintables statuspintables: Firewall is not running.
鎖定系統關鍵文件
for file in /etc/passed /etc/shadow /etc/services /etc/initial /etc/rc.localdo
   chattr +i $filedone
配置普通操作用戶及sudo權限
具體操作請參考公衆號相關文章介紹
配置全網服務器時間同步
/usr/sbin/ntpdate time.windows.comcat>>/var/spool/cron/root<<EOF#this cron is for ntpdate */5 * * * * /usr/sbin/ntpdate time.windows.com >/dev/null 2>&1#cron config end EOF
配置全網服務器hosts文件
Cat>>/etc/hosts<<EOF
10.0.0.1      nginx-lb
10.0.0.2      nginx-proxy
10.0.0.3      nginx
10.0.0.4      userapp
10.0.0.5      sjapp
10.0.0.6      admin
10.0.0.7      shangjia
10.0.0.8      web
10.0.0.9      mysql-m
10.0.0.10     mysql-s
10.0.0.11     ftp-backup
10.0.0.12     redis
10.0.0.13     backup-server
10.0.0.14     zabbix
EOF
規範所有服務器目錄
[root@centos ~]# mkdir /download/tools/ -p[root@centos ~]# mkdir /app/logs -p[root@centos ~]# mkdir /app -p[root@centos ~]# mkdir /server/{scripts,backup} –p至此基本的服務器優化配置也就結束了,接下來就是安裝各類服務
分發hosts文件到其它服務器
分發服務器使用全網備份服務器
首先創建分發用戶
[root@centos ~]# useradd fenfa -u 999[root@centos ~]# echo "123456"|passwd --stdin fenfaChanging password for user fenfa.
passwd: all authentication tokens updated successfully.
[root@centos ~]# /bin/cp /etc/sudoers /etc/sudoers.bak[root@centos ~]# echo "fenfa ALL=(root) NOPASSWD:/usr/bin/rsync" >>/etc/sudoers[root@centos ~]# tail -1 /etc/sudoersfenfa ALL=(root) NOPASSWD:/usr/bin/rsync
切換到fenfa用戶創建密鑰
安裝配置expect服務[root@centos ~]$ yum install expect* -y
編寫腳本
[fenfa@centos ~]$ vim fenfa.exp#!/usr/bin/expectif {$argc != 2} {
send_user "usage: expect xxxx.exp file host\n"
  it
}#define varset file [lindex $argv 0]set host [lindex $argv 1]set password "123456"spawn ssh-copy-id -i $file  fenfa@$hostexpect {        "yes/no"   {send "yes\r";exp_continue}         "password" {send "$password\r"}
}
expect eof
[fenfa@centos ~]$ vim fenfa_key.sh#!/bin/sh. /etc/init.d/functionsfor ip in `cat host.list`doexpect fenfa.exp ~/.ssh/id_dsa.pub $ip >/dev/null 2>&1if [ $? -eq 0 ];then
   action "$ip" /bin/true
 else
   action "$ip" /bin/falsefidone
執行腳本結果如下
[fenfa@centos ~]$ sh fenfa_key.sh10.0.0.1                         [  OK  ]10.0.0.2                         [  OK  ]10.0.0.3                         [  OK  ]10.0.0.4                         [  OK  ]10.0.0.5                         [  OK  ]10.0.0.6                         [  OK  ]10.0.0.7                         [  OK  ]10.0.0.8                         [  OK  ]10.0.0.9                         [  OK  ]10.0.0.10                        [  OK  ]10.0.0.11                        [  OK  ]10.0.0.12                        [  OK  ]10.0.0.13                        [  OK  ]10.0.0.14                        [  OK  ]
[root@centos ~]# su - fenfa[fenfa@centos ~]$ ll /home/fenfa/.ssh/
total 4-rw------- 1 fenfa fenfa 602 Sep 21 12:14 authorized_keys
編寫分發文件腳本

只需要將文件替換成你所需要分發的文件即可
前端反向代理及管理後臺服務器的配置
前端nginx反向代理服務器配置
安裝所需的依賴包
[root@centos ~]# yum install pcre-devel zlib-devle openssl-devel gcc-c++ –y
編譯安裝nginx
cd /download/tools/
wget http://nginx.org/download/nginx-1.12.1.tar.gz
tar zxf nginx-1.12.1.tar.gz
cd nginx-1.12.1./configure --prefix=/app/nginx-1.12.1make && make install
[root@centos ~]# cd /app/[root@centos app]# ln -s nginx-1.12.1 nginx[root@centos ~]# cd /app/nginx/conf/[root@centos conf]# mkdir extra[root@centos conf]# cp nginx.conf nginx.conf.bak
在nginx.conf文件後增加下面的配置
include extra/*.conf;
[root@centos ~]# cd /app/nginx/conf/extra/[root@centos extra]# vim admin.mingongge.conf## HTTPS server configuration#server {    listen       80;
    server_name admin.mingongge.com;
    location / {
        proxy_pass http://10.0.0.6:8080;
        proxy_connect_timeout 600;
        proxy_read_timeout 600;
        proxy_send_timeout 600;
    }
}
[root@centos extra]# vim shangjia.mingongge.conf## HTTPS server configuration#server {    listen       80;
    server_name shangjia.mingongge.com;
    location / {
        proxy_pass http://10.0.0.7:8080;
        proxy_connect_timeout 600;
        proxy_read_timeout 600;
        proxy_send_timeout 600;
    }
}
業務平臺管理後臺admin.mingongge.com
JDK Tomcat環境安裝
tar zxf apache-tomcat-8.5.9.tar.gz
mv apache-tomcat-8.5.9 /usr/local/tomcat
tar zxf jdk-8u111-linux-x64.tar.gz -C /usr/local/cd /usr/local/
ln -s jdk1.8.0_111 jdk
cat >>/etc/profile <<EOFexport JAVA_HOME=/usr/local/jdk1.8.0_111export CLASSPATH=.:$JAVA_HOME/lib/dt.jar:$JAVA_HOME/lib/tools.jarexport PATH=$JAVA_HOME/bin:$PATHexport CATALINA_HOME=/usr/local/apache-tomcat-8.5.9
EOF
[root@centos local]# source /etc/profile[root@centos local]# java -versionjava version "1.8.0_111"Java(TM) SE Runtime Environment (build 1.8.0_111-b14)
Java HotSpot(TM) 64-Bit Server VM (build 25.111-b14, mixed mode)
JDK Tomcat環境配置
<Context path="" docBase="/www/admin" debug="0" reloadable="true" crossContext="true" />echo "this is the admin.mingongge.com" >/www/admin/index.html
/usr/local/tomcat/bin/startup.sh
商家管理後臺 shangjia.mingongge.com
JDK Tomcat環境安裝請參考前面的步驟
<Context path="" docBase="/www/shangjia" debug="0" reloadable="true" crossContext="true" />echo "this is the shangjia.mingongge.com" >/www/shangjia/index.html
/usr/local/tomcat/bin/startup.sh
測試反向代理
[root@centos ~]# curl http://admin.mingongge.comthis is the admin.mingongge.com
[root@centos ~]# curl http://shangjia.mingongge.comthis is the shangjia.mingongge.com

模擬用戶訪問